Comments / Questions (33)
![]() Ellinor Olsson wrote:
Ellinor Olsson wrote:
Jag stickar nu min andra tröja i den här modellen. Jag gör inte ökningen inför resåren, gjorde det på den första tröjan och det blev helt fel. Förstår heller inte varför eftersom man normalt ökar maskantalet efter resår om man stickar nerifrån.
08.02.2019 - 12:21
![]() Cecilie wrote:
Cecilie wrote:
Hei. I strl. small ser det ut som diagram a3 slutter med to farger. Skal man dele opp til erme og bol mens man strikker mønster?
25.01.2019 - 19:04
![]() Pia Thorn wrote:
Pia Thorn wrote:
Hej. Jeg vil høre om det kan passe, at man i str s skal tage ud og sætte masker på snor til ærme på samme tid, mens man strikker mønster og ikke på en pind, hvor man strikker ensfarvet? mvh Pia
13.01.2019 - 16:44DROPS Design answered:
Hei Pia. Det stemmer at du deler til ermer og bol på siste omgangen i A.3. Denne omgangen er ensfarget: hele omgangen strikkes med sitron. God fornøyelse
16.01.2019 - 14:46
![]() Chris wrote:
Chris wrote:
Klopt het dat er zoveel steken moeten GEMEERDERD worden voor de onderste rand in boordsteek?
31.12.2018 - 13:33DROPS Design answered:
Chris,
Ja, dat klopt. Het patroon heeft een A-lijn en daarom wordt er gemeerderd voor de boord.
01.01.2019 - 19:04
![]() Krysia wrote:
Krysia wrote:
Wat is de kabellengte die ik nodig heb voor de mouwen? Ik kan niet zo goed met 4naalden breien en wil dus een rondbreinaald gebruiken voor de mouwen.
14.12.2018 - 08:17DROPS Design answered:
Dag Krysia,
Hiervoor heb je de korte rondbreinaald van 40 cm nodig.
18.12.2018 - 10:26
![]() Anna wrote:
Anna wrote:
Gibt es eine Anleitung, wie man den Übergang vom Rumpf zum Ärmel arbeiten soll? Woher kommt der Faden zum Auffassen der zusätzlich angeschlagenen Maschen bzw. wie funktioniert das im 2-farbigen Muster? Ich konnte dazu leider in den Tutorials nichts finden. Eine Hilfe wäre super!
24.09.2018 - 17:44DROPS Design answered:
Liebe Anna, dieses Video zeigt wie man die Maschen der Ärmel stillegt und wie man die neuen Maschen unter den Ärmel anschlägt (timecode ca .6:54) - diese Maschen können Sie dann mit den beiden Farben wie im Diagram anschlagen. Das Video zeigt die Technik mit einem Raglanpullover, aber mit einer runden Passe wird dieser Teil genauso gestrickt. Viel Spaß beim stricken!
25.09.2018 - 09:47
![]() Anke Hambloch wrote:
Anke Hambloch wrote:
Welche andere Wolle statt Karisma kann man auch verwenden?
27.08.2018 - 19:26DROPS Design answered:
Liebe Frau Hambloch, Sie können alle Garne der Garngruppe B verwenden. Über dem Button "Kommentare" im Kopf der Anleitung finden Sie einen Link zur Garnumrechnung, wenn Sie ein anderes Garn verwenden möchten. Viel Spaß beim Stricken!
29.08.2018 - 10:21
![]() Judi Kilmer wrote:
Judi Kilmer wrote:
Does this sweater pattern mean size small is 56 inches across??\\r\\nThat seems very large
26.08.2018 - 00:37DROPS Design answered:
Hi Judy, The chest measurements in the diagram are in centimetres, so in size small,the jumper is 46 cm (18 1/2 inches) in width. Happy knitting
26.08.2018 - 07:52
![]() Tan wrote:
Tan wrote:
This is a beautiful jumper in lovely colours. Will you be releasing a cardigan pattern?
21.08.2018 - 11:50
![]() Marije wrote:
Marije wrote:
Klopt het lijf wel? Ik mis een beschrijving voor mt xl-xxl net na het verdelen van het werk in lijf en mouwen!
12.08.2018 - 12:28DROPS Design answered:
Dag Marije, In de maten xl, xxl en xxxl kun na de pas verder gaan bij de beschrijving voor alle maten in de paragraaf over het LIJF. In deze maten is het Scandinavisch patroon (dat in de kleinere maten nog op het lijf moet worden gebreid) al verwerkt in A.3.
12.08.2018 - 17:25
Lemon Pie#lemonpiesweater |
||||||||||||||||
 |
 |
|||||||||||||||
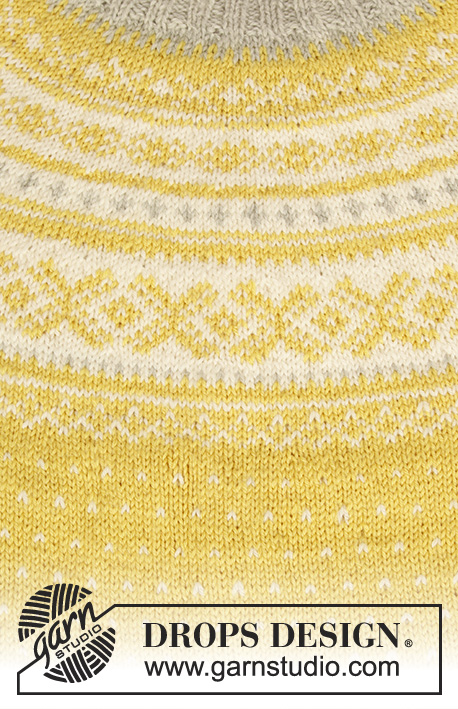
Knitted jumper in DROPS Karisma. Piece is knitted top down with round yoke and Nordic pattern. Size: S - XXXL Knitted hat in DROPS Karisma. Piece is knitted with Nordic pattern fold in rib.
DROPS 195-10 |
||||||||||||||||
|
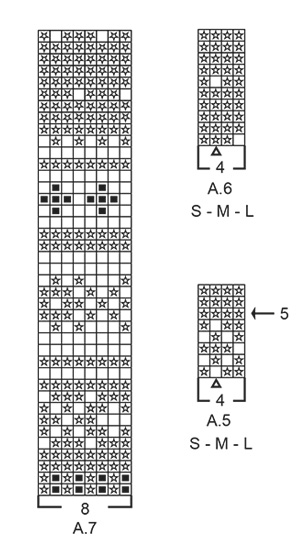
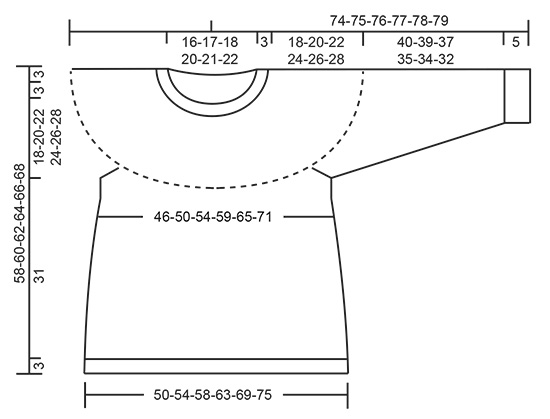
EXPLANATION FOR THE PATTERN: ---------------------------------------------------------- INCREASE/DECREASE TIP: To calculate how to increase evenly, use the total number of stitches on row (e.g. 96 stitches) and divide stitches by number of increases to be done (e.g. 32) = 3. In this example increase by making 1 yarn over after every 3rd stitch. On next round knit yarn overs twisted to avoid holes. When decreasing, knit every 2nd. and 3rd. stitch together. ELEVATION (in back of neck): Skip this paragraph if you do not want an elevation. Insert 1 marker at beginning of round = mid back. Begin from right side with light pearl grey and knit 15-16-17-18-19-20 stitches past marker, turn, tighten yarn and purl 30-32-34-36-38-40. Turn, tighten yarn and knit 45-48-51-54-57-60, turn, tighten yarn and purl 60-64-68-72-76-80. Turn, tighten yarn and knit 75-80-85-90-95-100, turn, tighten yarn and purl 90-96-102-108-114-120. Turn piece, tighten yarn and knit until mid-back. Then work YOKE as explained in pattern. KNITTING TIP: To avoid the knitting tension to tighten when working pattern, it is important not to tighten the strands on back side of piece. Use a larger needle size when working pattern if needed. It is important to keep the knitting tension vertically otherwise the yoke on jumper will be too short and the armholes too small! PATTERN: Jumper: See diagrams A.1 to A.6. Choose diagram for your size (applies to A.1, A.3, A.4, A.5 and A.6). Work the entire pattern in stocking stitch. Hat: See diagram A.7. Work the entire pattern in stocking stitch. DECREASE TIP (applies to mid under sleeves): Begin 2 stitches before stitch with marker thread, knit 2 together, knit 1 (stitch with marker thread), knit 2 twisted together (= 2 stitches decreased). ---------------------------------------------------------- START THE PIECE HERE: ---------------------------------------------------------- JUMPER - SHORT OVERVIEW OF THE PIECE: Neck edge, yoke and body are worked in the round on circular needle, top down. Work sleeves in the round on double pointed needles/a short circular needle, top down. NECK EDGE: Cast on 96-100-104-112-116-124 stitches on circular needle size 3.5 mm with light pearl grey. Knit 1 round. Then work rib in the round (= knit 2/purl 2) for 3 cm. Knit 1 round while increasing 32-34-34-34-34-36 stitches evenly - read INCREASE/DECREASE TIP = 128-134-138-146-150-160 stitches. Switch to circular needle size 4.5 mm. Knit 1 round. Now work an elevation at the back of neck so that yoke is somewhat higher on back piece. This elevation can be skipped, then the neck will be the same front and back - work ELEVATION - read explanation above, or go straight to YOKE. YOKE: Read KNITTING TIP! Work A.1 in the round. REMEMBER THE KNITTING TENSION! When A.1 has been worked, work 2-2-2-2-4-8 rounds in stocking stitch with lemon - AT THE SAME TIME on first round increase 32-34-38-46-50-56 stitches evenly – remember INCREASE/DECREASE TIP = 160-168-176-192-200-216 stitches. Then work A.2 in the round (= 20-21-22-24-25-27 repetitions of 8 stitches). AT THE SAME TIME on every round marked with arrow increase evenly as explained below. On round with arrow-1 increase 40-48-56-56-64-64 stitches evenly = 200-216-232-248-264-280 stitches (there is now room for 25-27-29-31-33-35 repetitions of 8 stitches). On round with arrow-2 increase 32-40-48-48-56-56 stitches evenly = 232-256-280-296-320-336 stitches (there is now room for 29-32-35-37-40-42 repetitions of 8 stitches). On round marked with arrow-3 increase 20-32-32-40-40-48 stitches evenly = 252-288-312-336-360-384 stitches. When A.2 has been worked, work A.3 in the round (= 21-24-26-28-30-32 repetitions of 12 stitches). Continue pattern like this. AT THE SAME TIME on round marked with arrow-4 increase 20-16-16-20-20-20 stitches evenly = 272-304-328-356-380-404 stitches. Then work until last round in A.3 remain. Then work last round as follows: Work 42-46-49-54-59-64 stitches as shown in last row in A.3 (= ½ back piece), slip the next 52-60-66-70-72-74 stitches on 1 stitch holder for sleeve, cast on 8-8-10-10-12-14 new stitches on needle (= in the side under sleeve), work 84-92-98-108-118-128 stitches as shown in last row in A.3 (= front piece), slip the next 52-60-66-70-72-74 stitches on 1 stitch holder for sleeve, cast on 8-8-10-10-12-14 new stitches on needle (= in the side under sleeve) and work the remaining 42-46-49-54-59-64 stitches as shown in A.3 (= ½ back piece). Finish body and sleeves separately. NOW MEASURE THE PIECE FROM HERE! BODY: = 184-200-216-236-260-284 stitches. SIZE S and M: Work A.4 in the round (= 46-50 repetitions of 4 stitches). When A.4 has been worked, work A.5 in the round. AT THE SAME TIME on round with arrow-5 in A.5 increase 16 stitches evenly in both sizes = 200-216 stitches. When A.5 has been worked, work as explained below ALL SIZES! SIZE L: Work A.5 in the round (= 54 repetitions of 4 stitches). AT THE SAME TIME on round with arrow-5 increase 16 stitches evenly = 232 stitches. When A.5 has been worked, work as explained below ALL SIZES! ALL SIZES: Work A.6 in the round (= 50-54-58-59-65-71 repetitions of 4 stitches). Continue pattern like this. AT THE SAME TIME on round marked with arrow-5 in A.6 increase 16 stitches evenly (only applies to size XL, XXL and XXXL and only applies first time A.6 is worked vertically in these sizes) = 200-216-232-252-276-300 stitches on needle. Continue A.6 until piece measures approx. 31 cm from division in all sizes. Knit 1 round with lemon while increasing 52-56-60-64-68-76 stitches evenly = 252-272-292-316-344-376 stitches. Switch to circular needle size 3.5 mm. Work rib in the round with lemon = knit 2/purl 2 for 3 cm. Then loosely cast off with knit over knit and purl over purl but to avoid at tight cast-off edge make 1 yarn over after every 8th stitch at the same time cast off (cast off yarn overs as stitches). Jumper measures approx. 58-60-62-64-66-68 cm from shoulder and down. SLEEVE: Slip the 52-60-66-70-72-74 stitches from stitch holder in one side of piece on double pointed needles or a short circular needle size 4.5 mm and pick in addition up 1 stitch in each of the 8-8-10-10-12-14 new stitches cast on under sleeve = 60-68-76-80-84-88 stitches on needle. Insert 1 marker thread in the middle of the 8-8-10-10-12-14 stitches under sleeve, i.e. insert marker thread in first stitch after the middle, count 29-33-37-39-41-43 stitches, insert 1 marker thread in next stitch (= middle stitch). 29-33-37-39-41-43 stitches now remain on round after last marker thread. Move marker threads upwards when working. Marker thread under sleeve is used later when decreasing and marker thread mid on top of sleeve should be used to count where to begin pattern. READ THE REST OF SLEEVE BEFORE CONTINUING! Work last row in A.3 to finish A.3 the same way as on body. SIZE S and M: Work A.4 in the round (= 15-17 repetitions of 4 stitches), but count outwards from the middle – middle stitch in A.4 (marked with triangle) should fit stitch with marker thread mid on top of sleeve. When A.4 has been worked, work A.5 in the round. After A.5 work A.6 in the round. Repeat A.6 down to rib. SIZE L: Work A.5 in the round (= 19 repetitions of 4 stitches), but count outwards from the middle – middle stitch in A.5 (marked with triangle) should fit stitch with marker thread mid on top of sleeve. After A.5 work A.6 in the round. Repeat A.6 down to rib. SIZE XL, XXL and XXXL: Work A.6 in the round (= 20-21-22 repetitions of 4 stitches), but count outwards from the middle – middle stitch in A.6 (marked with triangle) should fit stitch with marker thread mid on top of sleeve. Continue A.6 down to rib. DECREASE: AT THE SAME TIME when piece measures 2-2-2-2-3-3 cm, decrease 2 stitches mid under sleeve - read DECREASE TIP. Decrease like this every 6-4-2½-2½-2-1½ cm 7-10-13-14-15-16 times in total = 46-48-50-52-54-56 stitches. When sleeve measures approx. 40-39-37-35-34-32 cm from division (shorter measurements in the larger sizes because of longer yoke), knit 1 round with lemon while increasing 2-0-2-0-2-0 stitches evenly = 48-48-52-52-56-56 stitches. Switch to double pointed needles size 3.5 mm. Work rib in the round = knit 2/purl 2 for 5 cm. Cast off with knit over knit and purl over purl but make sure to avoid a tight cast-off edge (if the cast-off edge is tight make 1 yarn over after every 8th stitch while casting off - cast off yarn overs as regular stitches). Sleeve measures approx. 45-44-42-40-39-37 cm from division and down. Work the other sleeve the same way. ---------------------------------------------------------- HAT - SHORT OVERVIEW OF THE PIECE: Worked in the round on circular needle, bottom up. Switch to double pointed needles when needed. HAT: Cast on 132-140 stitches on circular needle size 3 mm with light pearl grey. Work rib in the round = knit 2/purl 2 for 10 cm. Switch to circular needle size 4 mm. Knit 1 round while at the same time decrease 36-36 stitches evenly - read INCREASE/DECREASE TIP = 96-104 stitches. Read KNITTING TIP and work A.7 in the round (= 12-13 repetitions of 8 stitches). REMEMBER THE KNITTING TENSION! When A.7 has been worked, continue in stocking stitch with lemon. When piece measures 24-24 cm, knit 1 round while decreasing 0-2 stitches evenly = 96-102 stitches. Now insert 6 markers in the piece as follows: Insert first marker at the beginning of round, then insert the next 5 marker 16-17 stitches apart. On next round, decrease 1 stitch after every marker by knitting the first 2 stitches together after every marker. Decrease like this on every other round 10-10 times in total and then on every round 2-3 times in total = 24-24 stitches remain. Knit 2 rounds where all stitches are knitted together 2 by 2 on both rounds = 6-6 stitches remain. Cut the yarn and pull it through the remaining stitches, tighten together and fasten. Hat measures approx. 32-33 cm in total from top and down. Fold up half the rib edge. |
||||||||||||||||
Diagram explanations |
||||||||||||||||
|
||||||||||||||||
 |
||||||||||||||||
 |
||||||||||||||||
 |
||||||||||||||||
 |
||||||||||||||||
Have you finished this pattern?Tag your pictures with #dropspattern #lemonpiesweater or submit them to the #dropsfan gallery. Do you need help with this pattern?You'll find 27 tutorial videos, a Comments/Questions area and more by visiting the pattern on garnstudio.com. © 1982-2026 DROPS Design A/S. We reserve all rights. This document, including all its sub-sections, has copyrights. Read more about what you can do with our patterns at the bottom of each pattern on our site. |
||||||||||||||||


Post a comment to pattern DROPS 195-10
We would love to hear what you have to say about this pattern!
If you want to leave a question, please make sure you select the correct category in the form below, to speed up the answering process. Required fields are marked *.