
Popular categories
Looking for a yarn?


Comments / Questions (6)
![]() Judy wrote:
Judy wrote:
For the decreases, I am assuming that they are done in the middle of the stockinette stitches between the front and back pieces. The only marker to place mentioned in the pattern instructions is at the beginning of A.1. and no mention is made of putting any others, but then it says to make the decreases on either side of both marker threads. I am confused.
18.04.2025 - 22:18DROPS Design answered:
Dear Judy, the markers seem to be missing from the instructions. The first marker should be at the beginning of the round, before the 6-5-7-7-9-10 stitches in garter stitch. The second marker is placed after the 7-6-8-8-10-11 stitches in garter stitch (right before we start repeating the pattern again). So they should be placed on each of the sides. Then you will decrease on the sides of these markers. We will correct it as soon as possible. Happy knitting!
20.04.2025 - 23:52
![]() Kathi wrote:
Kathi wrote:
Für die Schultern am Vorderteil werden neue Maschen angeschlagen. Wie werden diese in den darauffolgenden Reihen gestrickt? Kraus rechts oder glatt rechts? Hilfreich wäre auch eine Längenangabe nach allen Zunahmen, bevor man die beiden Schultern verbindet...
09.09.2019 - 16:58DROPS Design answered:
Liebe Kathi, die neuen Maschen für den Halsausschnitt werden glatt rechts gestrickt, bis genügend Maschen zugenommen sind, um 1 x A.2 mehr in der Breite zu stricken. Viel Spaß beim stricken!
10.09.2019 - 08:25
![]() Gisèle Houle wrote:
Gisèle Houle wrote:
Bonjour, Félicitation pour votre site. Si je fais des manches courtes, je me demandes si le modèle serait aussi beau? Et combien de fil/laine il faudrait en surplus? Merci
11.07.2018 - 05:22DROPS Design answered:
Bonjour Mme Houle, merci pour votre retour. Nous ne sommes toutefois pas en mesure de pouvoir ajuster chacun de nos modèles à chaque demande individuelle. Consultez d'autres modèles de ce type avec manches courtes pour vous faire une idée, votre magasin DROPS saura vous aider et vous conseiller, même par mail ou téléphone. Bon tricot!
11.07.2018 - 07:55
![]() Lise T. D'Amours wrote:
Lise T. D'Amours wrote:
So airy and feminine! I need this in my wardrobe!
09.01.2018 - 16:02
![]() Jutta wrote:
Jutta wrote:
Tolles Muster, toller Schnitt, würde ich gerne stricken.
30.12.2017 - 11:36
![]() Beti wrote:
Beti wrote:
Eine traumhaftes Modell. Ich würde es gern nacharbeiten.
22.12.2017 - 19:44
|
||||||||||||||||||||||||||||
Liliana#lilianatop |
||||||||||||||||||||||||||||
|
|
||||||||||||||||||||||||||||
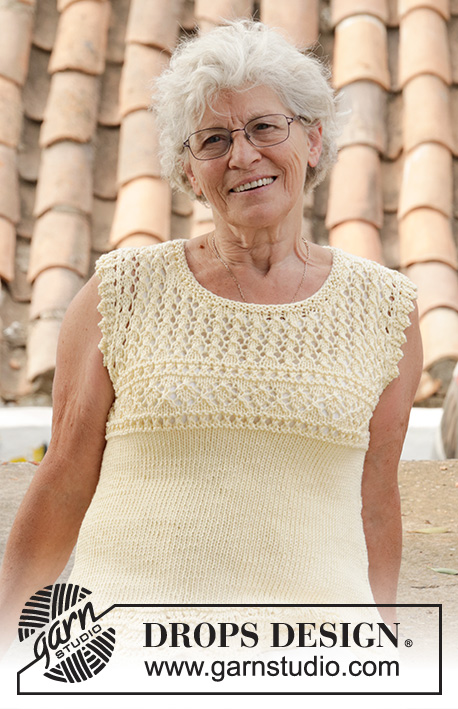
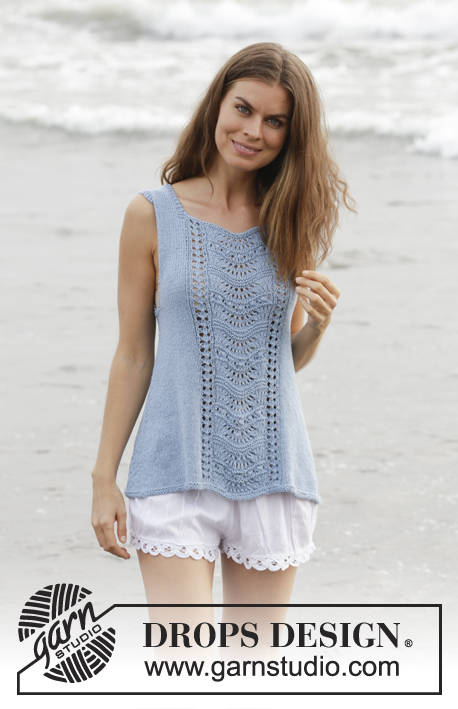
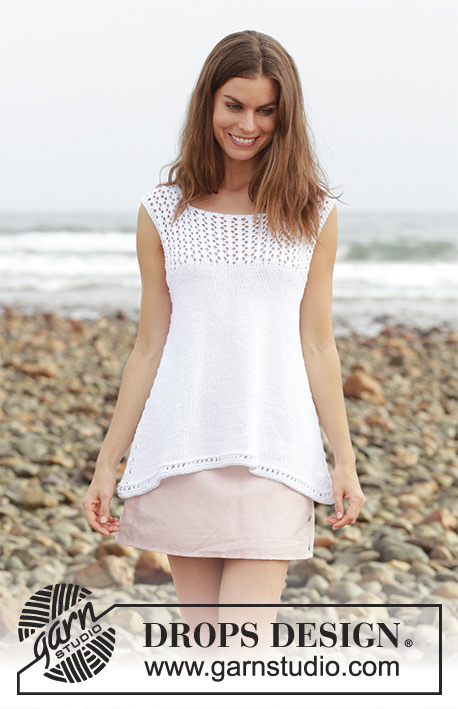
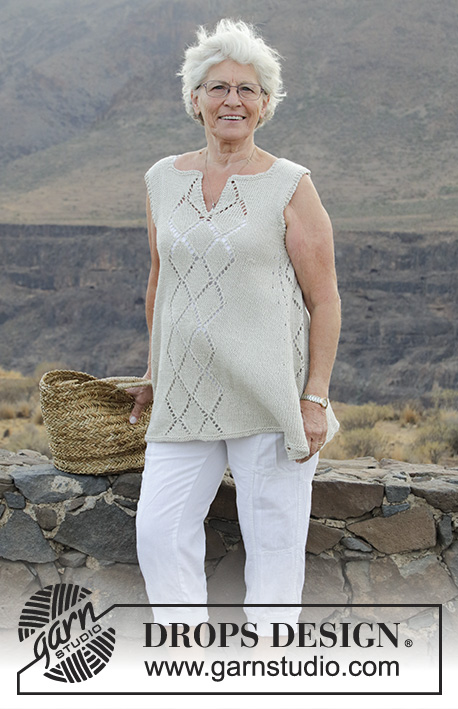
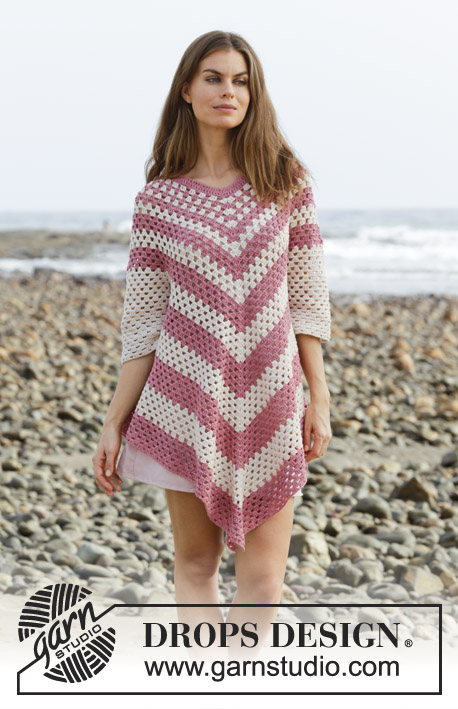
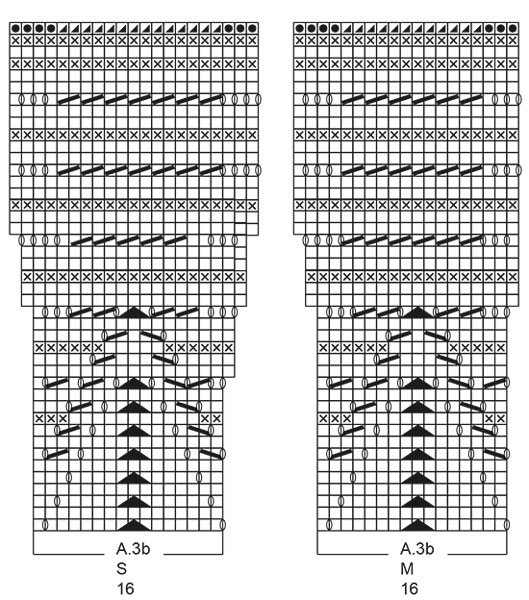
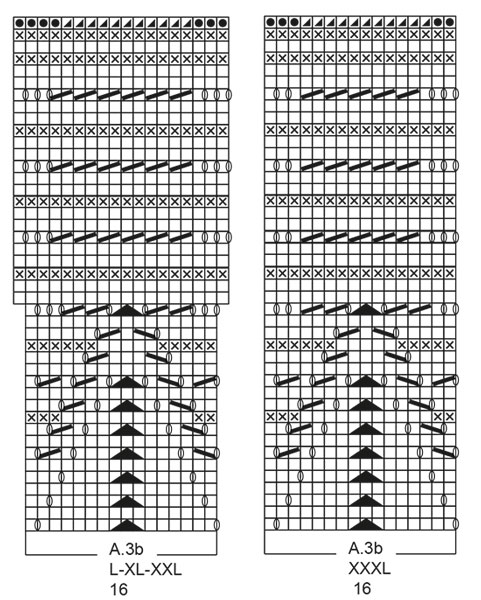
Top with lace pattern and wave pattern, knitted top down. Size: S - XXXL Piece is knitted in DROPS Muskat.
DROPS 190-41 |
||||||||||||||||||||||||||||
|
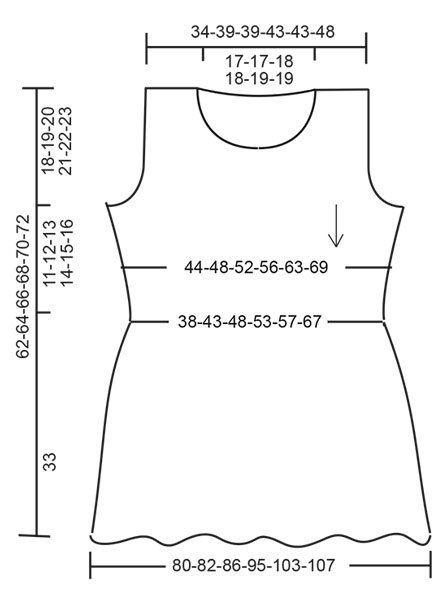
INFORMATION FOR PATTERN: GARTER STITCH (back and forth): 1 ridge = knit 2 rows. GARTER STITCH (in the round - applies to neck edge): 1 ridge = 2 rounds. Knit 1 round and purl 1 round. INCREASE TIP (applies to yoke): All increases are done from the right side. Increase by making 1 yarn over between 2 edge stitches in garter stitch. Purl yarn over twisted on next row, it should not make holes. DECREASE TIP (applies to body): Decrease 1 stitch on each side of every marker thread as follows: Work until 3 stitches remain before marker thread and knit 2 together, knit 2 (marker thread is between these stitches), slip next stitch knitwise, knit 1, pass slipped stitch over stitch worked (= 2 stitches decreased in total). Repeat at both marker threads (= 4 stitches decreased in total). PATTERN: See diagrams A.1 to A.3. Choose diagram for your size in A.3b. Diagrams show all rows in pattern seen from the right side. ---------------------------------------------------------- TOP: Work back and forth on circular needle, top down, for armhole, then continue in the round. First work each shoulder separately before slipping piece together. BACK PIECE: First work 2 shoulders, cast on stitches for neck, slip shoulders together and then work back and forth down to armhole. LEFT SHOULDER (when garment is worn): Cast on 18-23-22-27-26-31 stitches (including 2 edge stitches) on circular needle size 3.5 mm with Muskat. Knit 1 row from wrong side and knit 1 row from right side. Switch to circular needle size 4 mm. Work from wrong side. Purl until 2 stitches remain, finish with 2 edge stitches in GARTER STITCH - see explanation above (= towards armhole). Work next row as follows from right side: Work 2 edge stitches in garter stitch, A.1 over next stitch, work A.2 (= 10 stitches) over the next 10-20-10-20-20-20 stitches (= 1-2-1-2-2-2 times in width), finish with 5-0-9-4-3-8 stitches in stocking stitch (= towards neck). Continue pattern like this. REMEMBER THE KNITTING TENSION! When piece measures 2 cm, put piece aside and work right shoulder (adjust so that last row is worked from right side). RIGHT SHOULDER (when garment is worn): Cast on 18-23-22-27-26-31 stitches (including 2 edge stitches) on circular needle size 3.5 mm with Muskat. Knit 1 row from wrong side and knit 1 row from right side. Switch to circular needle size 4 mm. Work as follows from wrong side: Work 2 edge stitches in garter stitch (= towards armhole), purl the rest of row. Work next row as follows from right side (= from the neck): Work 6-1-10-5-4-9 stitches in stocking stitch, work A.2 over the next 10-20-10-20-20-20 stitches (= 1-2-1-2-2-2 times in width) and finish with 2 edge stitches in garter stitch. Continue pattern like this. When piece measures 2 cm, adjust measurement with left shoulder, same number of rows should now have been worked as on left shoulder (i.e. last row is worked from right side), cast on stitches for neck between right shoulder and left shoulder from wrong side as follows: Work right shoulder as follows: 2 edge stitches in garter stitch, pattern as before over remaining stitches, cast on 39-39-41-41-43-43 new stitches, work pattern as before over left shoulder until 2 stitches remain and finish with 2 edge stitches in garter stitch. YOKE AT THE BACK: = 75-85-85-95-95-105 stitches. Work next row as follows from right side: Work 2 edge stitches in garter stitch, A.1 over next stitch as before, work A.2 over the next 70-80-80-90-90-100 stitches (= 7-8-8-9-9-10 times in width), and finish with 2 edge stitches in garter stitch. Continue pattern like this until piece measures 14-15-15-16-13-14 cm. Now increase 1 stitch – read INCREASE TIP - for armhole inside 2 edge stitches in garter stitch in each side of piece on every row from right side (= 2 stitches increased). Increase like this 4-4-6-6-11-11 times in total = 83-93-97-107-117-127 stitches. Work the increased stitches in stocking stitch. Cast on 4-3-5-5-7-8 stitches at the end of next row from wrong side and 5-4-6-6-8-9 stitches at the end of next row from right side = 92-100-108-118-132-144 stitches. Work 1 row from wrong side, knit the stitches cast on from wrong side. Piece now measures approx. 18-19-20-21-22-23 cm. Put piece aside and work the front piece. FRONT PIECE: LEFT SHOULDER: Cast on 18-23-22-27-26-31 stitches (including 2 edge stitches) on circular needle size 3.5 mm with Muskat. Knit 1 row from wrong side and knit 1 row from right side. Switch to circular needle size 4 mm. Work from wrong side. Work 2 edge stitches in garter stitch (= towards armhole), purl the rest of row. Work next row as follows from right side (= from the neck): Work 6-1-10-5-4-9 stitches in stocking stitch, work A.2 over the next 10-20-10-20-20-20 stitches (= 1-2-1-2-2-2 times in width) and finish with 2 edge stitches in garter stitch. Continue pattern like this. When piece measures 4-4-5-5-6-6 cm, cast on new stitches for neck at the end of every row from wrong side as follows: Cast on 1 stitch 4 times, 2 stitches 3 times = 28-33-32-37-36-41 stitches. Work 1 row from wrong side. RIGHT SHOULDER: Cast on 18-23-22-27-26-31 stitches (including 2 edge stitches) on circular needle size 3.5 mm with Muskat. Knit 1 row from wrong side and knit 1 row from right side. Switch to circular needle size 4 mm. Work from wrong side. Purl until 2 stitches remain, finish with 2 edge stitches in garter stitch. Work next row as follows from right side (= from the armhole): Work 2 edge stitches in garter stitch, A.1 over next stitch, work A.2 over the next 10-20-10-20-20-20 stitches (= 1-2-1-2-2-2 times in width), finish with 5-0-9-4-3-8 stitches in stocking stitch. When piece measures 4-4-5-5-6-6 cm, cast on new stitches for neck at the end of every row from right side as follows: Cast on 1 stitch 4 times, 2 stitches 3 times = 28-33-32-37-36-41 stitches. Purl 1 row from wrong side. Now slip shoulder together as follows: Work right shoulder: 2 edge stitches in garter stitch, pattern as before over remaining stitches, cast on 19-19-21-21-23-23 new stitches, work pattern as before over left shoulder until 2 stitches remain and finish with 2 edge stitches in garter stitch. YOKE AT THE FRONT: = 75-85-85-95-95-105 stitches. Work as yoke on back piece = 92-100-108-118-132-144 stitches. BODY: Now work all parts together from right side as follows: Work as follows: Work * 6-5-7-7-9-10 stitches in garter stitch, 4-4-6-6-11-11 stitches in stocking stitch, A.1 over next stitch, A.2 over the next 70-80-80-90-90-100 stitches as before (= 7-8-8-9-9-10 times in width), 4-4-6-6-11-11 stitches in stocking stitch and 7-6-8-8-10-11 stitches in garter stitch *, work from *-* 2 times in total. There are now 184-200-216-236-264-288 stitches on needle, join piece to work in the round. Work 1 ridge over stitches between front and back piece, then work in stocking stitch over these stitches = 21-19-27-27-41-43 stitches in stocking stitch in total between front and back piece in each side of piece. Insert 1 marker in the piece. NOW MEASURE PIECE FROM HERE! Work in the round. When piece measures 2 cm, decrease 1 stitch on each side of both marker threads (= 4 stitches decreased) - read DECREASE TIP. Decrease like this every 2-2-3-3-2-9 cm 6-5-4-4-6-2 times in total = 160-180-200-220-240-280 stitches. 9-9-19-19-29-39 stitches in stocking stitch remain between front and back piece in each side of piece. When piece measures 11-12-13-14-15-16 cm from marker, adjust to finish with a whole repetition of A.2, work A.3a over all stitches (= 16-18-20-22-24-28 times in width). Continue pattern like this. Increase stitch in A.3a. When A.3a has been worked 1 time vertically, there are 256-288-320-352-384-448 stitches on needle. Work A.3b over A.3a. When all stitches in A.3b has been increased, there are 336-342-360-396-432-448 stitches on row. When 4 rows remain in A.3b, switch to circular needle size 3.5 mm. On last round in A.3b cast off as shown in diagram, make sure to avoid a tight cast-off edge, cast off on 1 needle size larger. Piece measures approx. 62-64-66-68-70-72 cm in total. ASSEMBLY: Sew shoulder seams in outer loops of edge stitches. NECK EDGE: Pick up 90-112 stitches around the neck on circular needle size 3.5 mm. Work 2 ridges in GARTER STITCH - see explanation above, in the round. Then cast off, make sure to avoid a tight cast-off edge, cast off with 1 larger needle size if needed. |
||||||||||||||||||||||||||||
Diagram explanations |
||||||||||||||||||||||||||||
|
||||||||||||||||||||||||||||
 |
||||||||||||||||||||||||||||
 |
||||||||||||||||||||||||||||
 |
||||||||||||||||||||||||||||
 |
||||||||||||||||||||||||||||
Have you finished this pattern?Tag your pictures with #dropspattern #lilianatop or submit them to the #dropsfan gallery. Do you need help with this pattern?You'll find 27 tutorial videos, a Comments/Questions area and more by visiting the pattern on garnstudio.com. © 1982-2026 DROPS Design A/S. We reserve all rights. This document, including all its sub-sections, has copyrights. Read more about what you can do with our patterns at the bottom of each pattern on our site. |
||||||||||||||||||||||||||||


With over 40 years in knitting and crochet design, DROPS Design offers one of the most extensive collections of free patterns on the internet - translated to 17 languages. As of today we count 324 catalogues and 12290 patterns translated into English (UK/cm). 12290
We work hard to bring you the best knitting and crochet have to offer, inspiration and advice as well as great quality yarns at incredible prices! Would you like to use our patterns for other than personal use? You can read what you are allowed to do in the Copyright text at the bottom of all our patterns. Happy crafting!
Post a comment to pattern DROPS 190-41
We would love to hear what you have to say about this pattern!
If you want to leave a question, please make sure you select the correct category in the form below, to speed up the answering process. Required fields are marked *.