
Popular categories
Looking for a yarn?


Comments / Questions (18)
![]() Hegedűs Jánosné wrote:
Hegedűs Jánosné wrote:
Az A5 nem szimetrikus az A7-el. Az A 5 sorokban egymás fölött a 8 soros diagramban 2 sor fordított szem, még az A 7. 8 soros diagramban 3 sor fordított van. Így a két oldal nem egyezik!
26.08.2024 - 18:22
![]() Annalisa wrote:
Annalisa wrote:
Buongiorno, sto eseguendo il modello indicato, ma dalle foto sembra che le spalle siano rifinite con un motivo a zig zag che non è indicato negli schemi illustrati. È possibile avere le istruzioni? Grazie mille
22.11.2023 - 23:05DROPS Design answered:
Buonasera Annalisa, tutte le istruzioni per lavorare il modello sono riportate, non ci sono spiegazioni aggiuntive necessarie. Buon lavoro!
26.11.2023 - 23:22
![]() VALERIE COTE wrote:
VALERIE COTE wrote:
Bonjour, question concernant les diminutions #2 Dos & Devant si je comprend bien, nous devons diminué à chaque 4 cm 3mailles on répète ceci 7 fois. Ce qui devrait être une diminution de 21 mailles et non pas 24 (166m - 4m= 162m - dim#2 = 141 et non pas 138 tel qu'indiqué. Devons-nous putôt diminué 8 fois 3 mailles? de plus, est-ce qu'on diminue seulement le 1er fil marqueur ou au 2, car si c'est au 2, là non plus ça ne fonctionne pas. merci
27.05.2023 - 20:18DROPS Design answered:
Bonjour Mme Cote, on doit diminuer 4 mailles à chaque fois (1 maille de chaque côté de chaque fil marqueur comme indiqué sous DIMINUTIONS-2 (dos & devant): ); et ce 7 fois au total, vous aviez (en taille L) 194 mailles - 28 mailles (7 fois 4 mailles) = il reste 166 mailles. bon tricot!
30.05.2023 - 10:33
![]() Dawn Banner wrote:
Dawn Banner wrote:
I’m still confused! So on A5 I work row 3 but on A7 I work row 2? Is this right?
02.07.2022 - 10:02DROPS Design answered:
Dear Dawn, sorry, it was typo, you work the 3rd row in both charts. Happy knitting!
02.07.2022 - 16:27
![]() Dawn Banner wrote:
Dawn Banner wrote:
I am totally baffled by this pattern! So, the first row on the back piece is on the wrong side and is row 2 on the chart reading left to right is A7, Purl, then A5. Next row , right side reading right to left is A7 (work 2 stitches in one stitch (twice) Yarn over, Knit 2 together) A6, B6, A5 (K4) Next row, Wrong side, reading left to right A5 (yarn over K2 tog, work 2 stitches in one stitch twice, A6B, A6A, A7 (Cast off 1 stitch, twice, K 4). Is this right? I’m totally confused!
27.06.2022 - 10:05DROPS Design answered:
Dear Mrs Banner, First row is worked from WS as you wrote, but next row from RS will be worked as follows: A.5 (work now row 3), decrease 1 (armhole - see decrease tip-3), knit 0 to 12 sts (see size) , then work A.6A over 48-60 sts, A.6B (3 sts), 0 to 12 sts in stocking stitch, decrease 1 stitch (armhole), and finish with A.7 (2nd row). From WS: A.7, purl, A.6B, repeat A.6A, purl, A.5. Can this help?
27.06.2022 - 15:11
![]() Hanne wrote:
Hanne wrote:
Mangler mønster til ærmegabet, kan se på billedet at der er strikket et mønster, men har ikke kunnet finde vejledningen
21.03.2021 - 20:40
![]() Pauline Semb wrote:
Pauline Semb wrote:
Hei! Holder på med bakstykket og jeg blir så forvirret av A.5 og A.7. Skal jeg alltid starte fra venstre når A.7 strikkes fra vrangen? Og er det vare første gang fra retten man strikker 3 masker etter felling? Jeg er på 2.pinne fra retten ( mener det er linje nr. 5 i A.5 og A.7 og linje nr. 3 i A.6. Har nå strikket A.5 linje nr.5, fellt en maske, men nå får jeg ikke A.6 til å stemme??
21.05.2020 - 22:05DROPS Design answered:
Hej Pauline, sæt et mærke på hver side af A.6, det maskeantal forandres ikke, det er kun de yderste masker i hver side som går over 4-6 masker ifølge diagrammerne. Sørg for at du altid lukker de 2 yderste masker af ifølge diagrammet, i starten af pinden. God fornøjelse!
29.05.2020 - 09:57
![]() Jessicah wrote:
Jessicah wrote:
What are the finished measurements? I just want to make sure I'm picking the right size and I didnt see them. Thank you :)
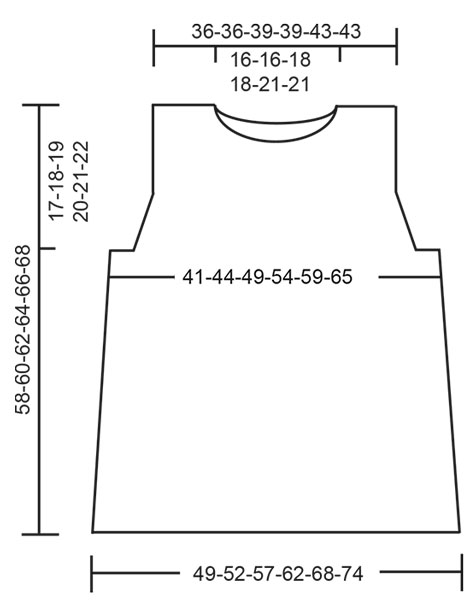
04.05.2020 - 01:36DROPS Design answered:
Hi Jessicah, There is a diagram at the bottom of the page with all the measurements for each size. Happy knitting!
04.05.2020 - 08:01
![]() Lieve Samyn wrote:
Lieve Samyn wrote:
Zou je hier ook mouwtjes kunnen inzetten ? leuk patroontje ! bedankt
31.03.2020 - 10:34DROPS Design answered:
Dag Lieve Samyn,
Je zou mouwtjes uit een ander patroon kunnen nemen met ongeveer dezelfde afmetingen van het armsgat. En dan zou je het telpatroon ietsje aan moeten passen, bij voorbeeld in plaats van A.5 en A.7 een ribbelsteek breien oid.
05.05.2020 - 14:53
![]() Anika wrote:
Anika wrote:
Liebes Drops team, ich bin gerade dabei das Rückenteil in Größe L zu stricken. Hier schreibt ihr, dass ich bei einer Länge von 62 cm die mittleren 29 Maschen (Halsausschnitt) abketten soll. Dann wird jede Schulter einzeln weitergeschrickt. Weiter schreibt ihr, dass ich wiederum bei einer Gesamtlänge von ebenfalls 62 cm abketten soll. Da das Vorderteil auch eine Gesamtlänge von 62 cm hat, gehe ich davon aus, dass der Halsausschnitt beim Rückenteil bei ca. 60 cm gearbeitet werden muss?
29.03.2020 - 13:17DROPS Design answered:
Liebe Anika, die mittleren 29 Maschen für den Halsausschnitt würde ich dann 2 cm früher (nach 60 cm) abketten, so stimmt die gesamte Länge. Unser designteam wird das mal schauen. Viel Spaß beim stricken!
03.04.2020 - 14:17
|
|||||||||||||||||||||||||
Rocky Bay#rockybaytop |
|||||||||||||||||||||||||
 |
 |
||||||||||||||||||||||||
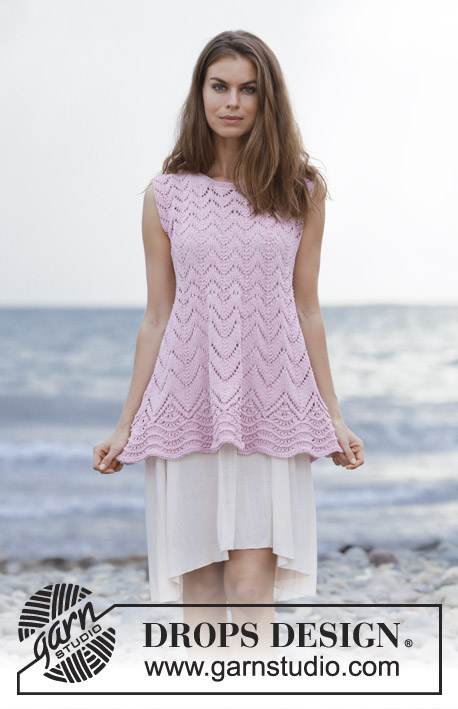
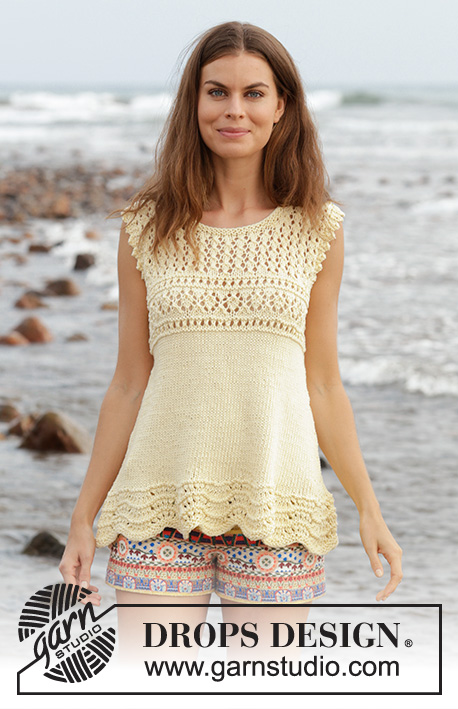
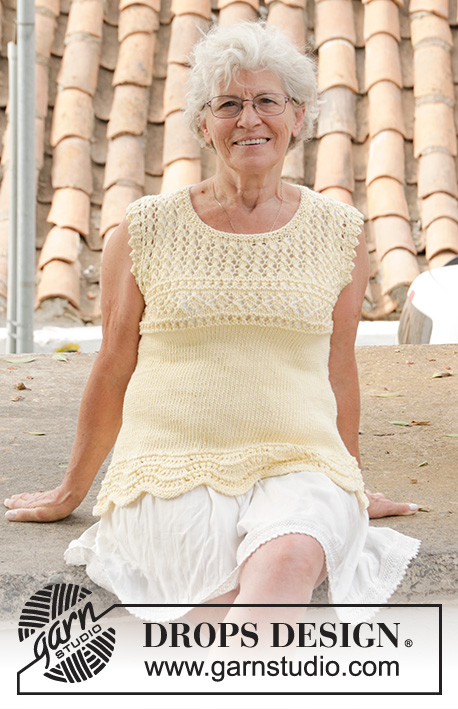
Knitted top with lace pattern. Sizes S - XXXL. The piece is worked in DROPS Paris.
DROPS 190-16 |
|||||||||||||||||||||||||
|
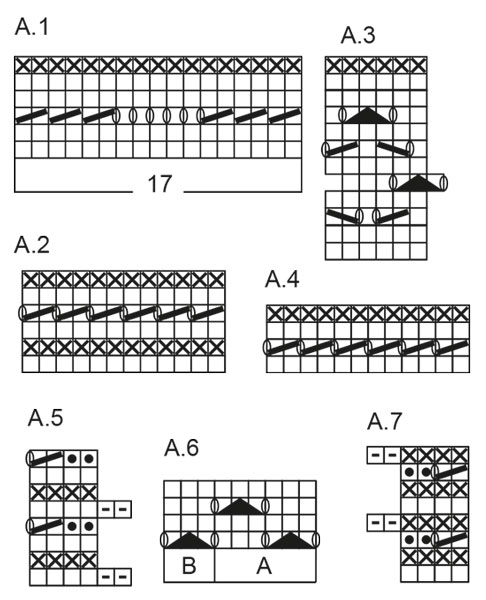
INFORMATION FOR THE PATTERN: RIDGE/GARTER STITCH (worked in the round): 1 ridge = 2 rounds. Knit 1 round and purl 1 round. PATTERN: See diagrams A.1 to A.7. The diagrams show all the rows in the pattern seen from the right side. DECREASE TIP-1 (evenly spaced): To work out how to decrease evenly, count the total number of stitches on the needle (e.g. 204 stitches) and divide by the number of decreases to be made (e.g. 38) = 5.3. In this example, work approx. every 4th and 5th stitch together. DECREASE TIP-2 (for body): Start 3 stitches before the marker thread, slip 1 stitch as if to knit, knit 1, pass the slipped stitch over the knitted stitch, knit 2 (the marker thread sits in the middle of these 2 stitches), knit 2 together. DECREASE TIP-3 (for armholes): Decrease on the inside of A.5/A.7 in each side. All decreases are made from the right side! Decrease as follows after A.5: Slip the next stitch as if to knit, knit 1, pass the slipped stitch over the knitted stitch. Decrease as follows before A.7: Start 2 stitches before A.7: Knit 2 together. ---------------------------------------------------------- TOP: The piece is worked in the round with circular needle as far as the armholes, then the front and back pieces are worked separately, back and forth. BODY: Cast on 204-221-238-255-272-289 stitches with circular needle size 5 mm and Paris. Work 2 RIDGES – see description above. Then work according to A.1 (= 12-13-14-15-16-17 repeats in width). Work A.1 three times in height. Knit 1 round where you decrease 38-43-44-45-42-39 stitches evenly on round – read DECREASE TIP-1 = 166-178-194-210-230-250 stitches. Insert 1 marker thread in each side, 1 at the beginning of the round and 1 after 83-89-97-105-115-125 stitches (= sides). When the piece measures 8 cm decrease 1 stitch on each side of the marker threads in the sides (= 4 stitches decreased) – read DECREASE TIP-2. Decrease every 4-4-4-4-4½-4½ cm a total of 7 times = 138-150-166-182-202-222 stitches. When the piece measures 33-34-35-36-37-38 cm work A.2 over all stitches, on the last round in A.2 decrease 0-0-4-2-4-0 stitches evenly on round = 138-150-162-180-198-222 stitches. Work A.3, on the last round in A.3 increase 0-0-4-2-4-0 stitches evenly on round = 138-150-166-182-202-222 stitches. The next round is worked as follows: Work garter stitch over the first 7-7-8-8-9-10 stitches, A.4 over the next 55-61-67-75-83-91 stitches (finish with knit 1), garter stitch over the next 14-14-16-16-18-20 stitches, A.4 over the next 55-61-67-75-83-91 stitches and finish with 7-7-8-8-9-10 stitches garter stitch. Work A.4 one time in height (continue with garter stitch in each side). Then work next round as follows: Cast off the first 3-3-4-4-5-6 stitches, knit 63-69-75-83-91-99 stitches, cast off the next 6-6-8-8-10-12 stitches, knit 63-69-75-83-91-99 stitches and cast off the last 3-3-4-4-5-6 stitches. Now finish the front and back pieces separately, working back and forth. BACK PIECE: = 63-69-75-83-91-99 stitches. Continue as follows, the first row is worked from the wrong side: A.7, start on row 2 in the pattern (from the left side of the diagram) (= 4 stitches), purl 55-61-67-75-83-91 stitches, A.5 (start on row 2 in the pattern). The next row is worked as follows – from the right side: A.5, decrease 1 stitch – read DECREASE TIP-3, work 0-3-3-7-8-12 stitches stocking stitch, A.6 A over the next 48-48-54-54-60-60 stitches, A.6 B (= 3 stitches), 0-3-3-7-8-12 stitches stocking stitch, decrease 1 stitch, A.7. Continue this pattern upwards and decrease on each row from the right side 0-3-3-7-8-12 more times = 61-61-67-67-73-73 stitches. Continue this pattern until the piece measures 56-58-60-62-64-66 cm, cast off the middle 25-25-29-29-33-33 stitches. Each shoulder is finished separately. On the next row cast off 1 stitch from the neck = 17-17-18-18-19-19 stitches left on the shoulder. NOTE: The stitches which do not fit the pattern as you decrease towards the neck are worked in stocking stitch. Cast off when the piece measures 58-60-62-64-66-68 cm. Repeat on the other shoulder. FRONT PIECE: = 63-69-75-83-91-99 stitches. Work as for back piece until the piece measures 52-54-56-58-60-62 cm = 61-61-67-67-73-73 stitches. Now place the middle 19-19-23-23-27-27 stitches on a thread for the neck and each shoulder is finished separately. Continue to cast off for the neck at the beginning of each row from the neck as follows: Cast off 2 stitches 1 time and 1 stitch 2 times = 17-17-18-18-19-19 stitches left on shoulder – NOTE: The stitches which do not fit the pattern as you decrease towards the neck are worked in stocking stitch. Continue the pattern as before. Cast off when the piece measures 58-60-62-64-66-68 cm. Repeat on the other shoulder. ASSEMBLY: Sew the shoulder seams; sew edge to edge in the outermost stitch so that the seam is flat. NECKLINE: Knit up approx. 65 to 80 stitches around the neck (including the stitches on the thread) with short circular needle size 5 mm. Work 2 ridges, then cast off with knit. |
|||||||||||||||||||||||||
Diagram explanations |
|||||||||||||||||||||||||
|
|||||||||||||||||||||||||
 |
|||||||||||||||||||||||||
 |
|||||||||||||||||||||||||
Have you finished this pattern?Tag your pictures with #dropspattern #rockybaytop or submit them to the #dropsfan gallery. Do you need help with this pattern?You'll find 27 tutorial videos, a Comments/Questions area and more by visiting the pattern on garnstudio.com. © 1982-2026 DROPS Design A/S. We reserve all rights. This document, including all its sub-sections, has copyrights. Read more about what you can do with our patterns at the bottom of each pattern on our site. |
|||||||||||||||||||||||||


With over 40 years in knitting and crochet design, DROPS Design offers one of the most extensive collections of free patterns on the internet - translated to 17 languages. As of today we count 324 catalogues and 12290 patterns translated into English (UK/cm). 12290
We work hard to bring you the best knitting and crochet have to offer, inspiration and advice as well as great quality yarns at incredible prices! Would you like to use our patterns for other than personal use? You can read what you are allowed to do in the Copyright text at the bottom of all our patterns. Happy crafting!
Post a comment to pattern DROPS 190-16
We would love to hear what you have to say about this pattern!
If you want to leave a question, please make sure you select the correct category in the form below, to speed up the answering process. Required fields are marked *.