
Popular categories
Looking for a yarn?


Comments / Questions (31)
![]() Claire wrote:
Claire wrote:
Trying to add this to favorites but cannot see a link anywhere for add to favorites. Help please.
05.04.2018 - 20:55DROPS Design answered:
Dear Claire, you can find the add to favorites button right above the detailed instructions for the patterns, in line with the, and to the right of the part's title that says "Pattern Instruction". I hope this helps. Happy Crafting!
05.04.2018 - 23:27
![]() Lene wrote:
Lene wrote:
Pinne 6, skulle det være.
10.03.2018 - 15:27
![]() Lene wrote:
Lene wrote:
Mitt ferdig strikkede mønster måler 42 cm, ikke 55 cm som oppgitt i oppskriften. Strikker med Drops Air og pinne 5, som oppgitt i oppskriften. Strikker normalt.
10.03.2018 - 15:22Ekaterina wrote:
Zunahmetipp: "1 Masche zunehmen, indem 1 Umschlag zwischen 2 Maschen gearbeitet wird. Den Umschlag in der nächsten Reihe links stricken, um ein Loch zu vermeiden". Sollte vielleicht den Loch zu bilden, sondern nicht zu vermeiden?
08.03.2018 - 15:02DROPS Design answered:
Liebe Ekaterina, ja genau, es sollte "um ein Loch zu bilden", Anleitung wird angepasst, danke für den Hinweis. Viel Spaß beim stricken!
08.03.2018 - 15:36
![]() Carina Pedersen wrote:
Carina Pedersen wrote:
Teksten ved diagram står på to sprog, ville for mit vedkommende have været godt hvis det kun var dansk :-)
28.02.2018 - 09:16
![]() Kari Andersen wrote:
Kari Andersen wrote:
Feil i diagrammet til matelot
01.02.2018 - 12:01
![]() Joselin Ale wrote:
Joselin Ale wrote:
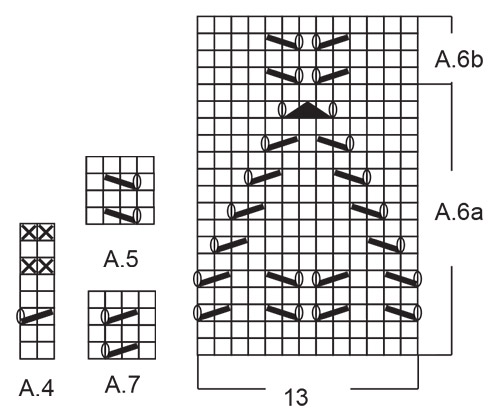
Hei, jeg tror det er en feil i diagrammet? Figuren som er en sort pyramide og sier: "ta 1 maske løs av pinnen, strikk 1 maske rett, løft den løse masken over masken som ble strikket" Skal det kanskje være snakk om 2 masker?
29.01.2018 - 12:59DROPS Design answered:
Hei Joselin. Her var nok de to siste diagramikonene tekstene blitt lik, dette er nå rettet opp i og siste diagramikon har fått riktig tekst. Takk for at du gjorde oss oppmerksom på dette. God fornøyelse med strikkingen.
30.01.2018 - 11:25
![]() Carol Derrick wrote:
Carol Derrick wrote:
Hello, I love your patterns, designs and yarns but why are they all knitted top-down on circular needles? Please, please can we have some straight-forward normal two-needle, worked-upwards patterns that most of us are used to... circular knitting is only suitable for the most supple of fingers, so will exclude many of your subscribers. Many thanks, Carol.
19.01.2018 - 16:51DROPS Design answered:
Dear Carol, no, not all of our patterns are like that. In fact if you look at the earlier catalogs we have lots of patterns knitted in pieces, from the bottom up, and now in this new catalog we paid particular attention to include pieces like that. Please keep check as the new patterns are published, you will find a few that are knitted and pieced together in the old fashioned way. Happy Knitting!
20.01.2018 - 01:13
![]() Marina Aniram wrote:
Marina Aniram wrote:
Hallo, dass dieser Pulli in die Auswahl gekommen ist, freut mich sehr, ich finde ihn sooooo toll! Danke!
19.01.2018 - 16:23
![]() Sigrid wrote:
Sigrid wrote:
Super, finde ich toll
16.01.2018 - 19:21
|
|||||||||||||||||||
Matelot#matelotsweater |
|||||||||||||||||||
|
|
|||||||||||||||||||
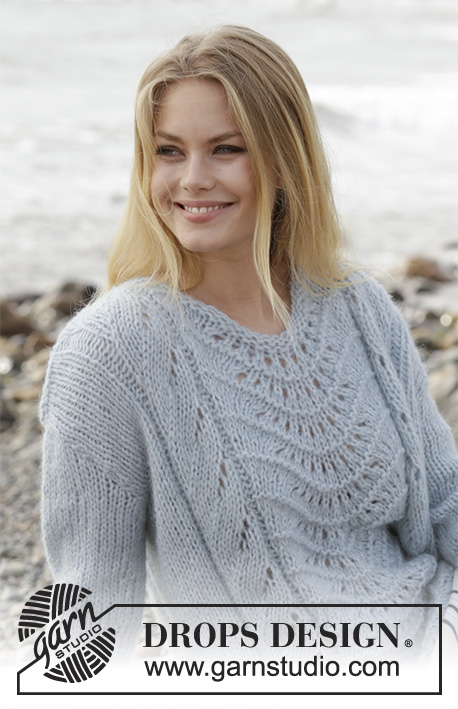
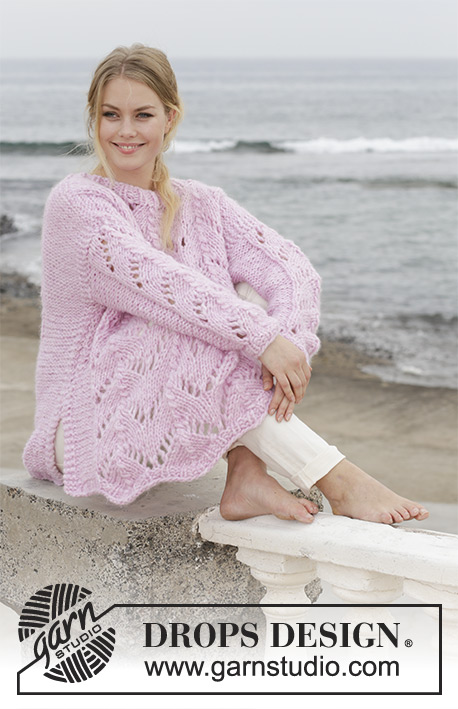
Knitted jumper with lace pattern, garter stitch, V-neck and split in sides. Sizes S - XXXL. The piece is worked in DROPS Air.
DROPS 188-21 |
|||||||||||||||||||
|
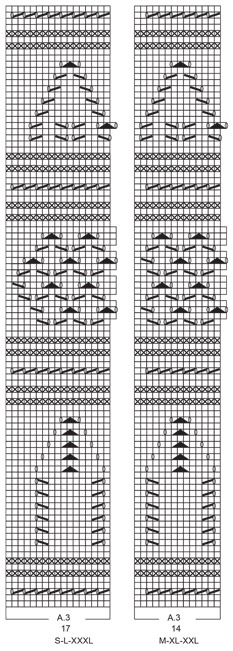
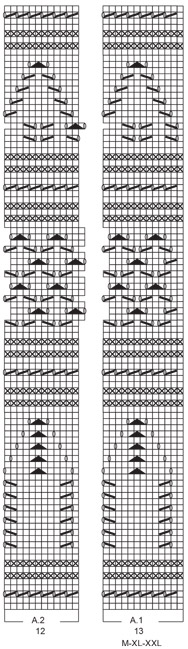
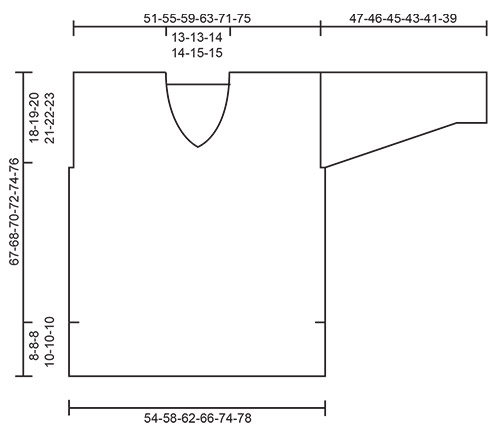
INFORMATION FOR THE PATTERN: RIDGE/GARTER STITCH (worked back and forth): 1 ridge = Knit 2 rows. PATTERN: See diagrams A.1 to A.7. Choose diagram for your size (applies to A.1 and A.3). The diagrams show all the rows in the pattern seen from the right side. DECREASE TIP (for neck): All decreases are made from the right side! Decrease for neck inside the 3 edge stitches in garter stitch. Decrease as follows before the 3 edge stitches: Knit 2 together. Decrease as follows after the 3 edge stitches: Slip 1 stitch as if to knit, knit 1, pass the slipped stitch over the knitted stitch. INCREASE TIP (for sleeves): All increases are made from the right side! Increase with 1 yarn over between 2 stitches. Purl the yarn over on the next row to leave a hole. ---------------------------------------------------------- JUMPER: The front and back pieces are worked separately back and forth on circular needle. The front piece is worked with lace pattern and garter stitch. The back piece is worked in garter stitch. The sleeves are worked back and forth on circular needle with lace pattern and stocking stitch. BACK PIECE: Cast on 81-87-93-99-111-117 stitches with circular needle size 6 mm and Air. Work GARTER STITCH – see description above. When the piece measures 8-8-8-10-10-10 cm cast on 1 edge stitch in each side of the piece at the end of the next 2 rows = 83-89-95-101-113-119 stitches. REMEMBER THE KNITTING TENSION! Continue with garter stitch over all stitches. When the piece measures 49-49-50-51-52-53 cm cast off 3 stitches at the beginning of the next 2 rows for armholes = 77-83-89-95-107-113 stitches. When the piece measures 65-66-68-70-72-74 cm cast off the middle 17-17-19-19-21-21 stitches for neck (= 30-33-35-38-43-46 stitches on each shoulder). Each shoulder is now finished separately. On the next row from the right side decrease 1 stitch for the neck inside the 3 stitches – read DECREASE TIP = 29-32-34-37-42-45 stitches. Cast off when the piece measures 67-68-70-72-74-76 cm. Work the other shoulder in the same way. FRONT PIECE: Cast on 81-87-93-99-111-117 stitches with circular needle size 6 mm and Air. Work garter stitch. When the piece measures 8-8-8-10-10-10 cm cast on 1 edge stitch in each side of the piece at the end of the next 2 rows = 83-89-95-101-113-119 stitches. The edge stitch in each side is worked in garter stitch. On the next row from the right side, work as follows: Work 1 edge stitch in garter stitch, A.1 (= 16-13-16-13-13-16 stitches), work A.2 (= 12 stitches) over the next 48-60-60-72-84-84 stitches (= 4-5-5-6-7-7 times in width), A.3 (= 17-14-17-14-14-17 stitches) and finish with 1 edge stitch in garter stitch. When the piece measures 49-49-50-51-52-53 cm cast off 3 stitches at the beginning of the next 2 rows for armholes = 77-83-89-95-107-113 stitches. The other stitches are worked in pattern as before. The stitches which do not fit into the pattern are worked in stocking stitch when all stitches are worked in stocking stitch/lace pattern and in garter stitch when they are worked in garter stitch. When A.1 to A.3 have been completed in height, the piece measures approx. 55-55-55-57-57-57 cm. Work garter stitch to finished length. When the piece measures 57-58-59-61-62-64 cm decrease 1 stitch in middle of piece on the next row from the right side as follows: Work the first 37-40-43-46-52-55 stitches from the right side, knit the next 2 stitches together (= 1 stitch decreased), turn and work back = 38-41-44-47-53-56 stitches on each shoulder. Now finish each shoulder separately as follows: LEFT SHOULDER (when the garment is worn): Decrease for neck as follows: Decrease 1 stitch inside the 3 stitches at end of each row from the right side a total of 9-9-10-10-11-11 times = 29-32-34-37-42-45 stitches on shoulder. When the piece measures 67-68-70-72-74-76 cm cast off all stitches. RIGHT SHOULDER (when the garment is worn): Work as left shoulder, but decrease for neck inside the 3 stitches at the beginning of each row from the right side. SLEEVE: The piece is worked back and forth on circular needle. Cast on 37-37-39-39-43-43 stitches (including 1 edge stitch in each side of piece) with circular needle size 6 mm and Air. Work 6 ridges. Then work 1 edge stitch in garter stitch, A.4 (= 2 stitches) until there are 2 stitches left, finish with 1 stitch stocking stitch and 1 edge stitch in garter stitch. When A.4 has been worked 1 time in height, work the next row as follows from the right side: Work 1 edge stitch in garter stitch, A.5 (= 4 stitches), 7-7-8-8-10-10 stitches stocking stitch, A.6a (= 13 stitches), 7-7-8-8-10-10 stitches stocking stitch, finish with A.7 (= 4 stitches) and 1 edge stitch in stocking stitch. Continue with pattern AT THE SAME TIME as you increase mid under sleeve as follows: PATTERN: A.5 and A.7 are repeated in height, A.6a is repeated a total of 4 times in height, then work A.6b over A.6a. INCREASE: When the piece measures 9 cm increase 1 stitch after A.5 and 1 stitch before A.7 – read INCREASE TIP! Increase in this way every 3½-3-2½-2-2-1½ cm a total of 10-12-12-14-13-15 times = 57-61-63-67-69-73 stitches. The increased stitches are worked in stocking stitch. When the piece measures 44-43-42-40-38-36 cm cast off the 1 edge stitch in garter stitch at the end of the next 2 rows = 55-59-61-65-67-71 stitches. Insert 1 marker in both sides of piece (there are now 2 cm left to full length). The markers show where the sleeve will be sewn to the armhole on the jumper later (marker = side seam of jumper). Continue working back and forth in stocking stitch over all stitches until the sleeve measures 47-46-45-43-41-39 (shorter measurements in larger sizes due to broader shoulders). Cast off; make sure the cast-off edge is not tight, use a 1 size larger needle if necessary. Work the other sleeve in the same way. ASSEMBLY: Sew the shoulder seams inside the cast-off edge – make sure the seam is not tight. Sew in sleeves in the outermost loop of the outermost stitch and sew the bottom of the armhole (marker on sleeve should match side seam on body). Sew sleeve seams and side seams in one go inside the 1 edge stitch to where the 1 edge stitch was cast on, both on front and back pieces (= approx. 8-8-8-10-10-10 cm split). |
|||||||||||||||||||
Diagram explanations |
|||||||||||||||||||
|
|||||||||||||||||||
 |
|||||||||||||||||||
 |
|||||||||||||||||||
 |
|||||||||||||||||||
 |
|||||||||||||||||||
 |
|||||||||||||||||||
Have you finished this pattern?Tag your pictures with #dropspattern #matelotsweater or submit them to the #dropsfan gallery. Do you need help with this pattern?You'll find 23 tutorial videos, a Comments/Questions area and more by visiting the pattern on garnstudio.com. © 1982-2026 DROPS Design A/S. We reserve all rights. This document, including all its sub-sections, has copyrights. Read more about what you can do with our patterns at the bottom of each pattern on our site. |
|||||||||||||||||||


With over 40 years in knitting and crochet design, DROPS Design offers one of the most extensive collections of free patterns on the internet - translated to 17 languages. As of today we count 324 catalogues and 12290 patterns translated into English (UK/cm). 12290
We work hard to bring you the best knitting and crochet have to offer, inspiration and advice as well as great quality yarns at incredible prices! Would you like to use our patterns for other than personal use? You can read what you are allowed to do in the Copyright text at the bottom of all our patterns. Happy crafting!
Post a comment to pattern DROPS 188-21
We would love to hear what you have to say about this pattern!
If you want to leave a question, please make sure you select the correct category in the form below, to speed up the answering process. Required fields are marked *.