
Popular categories
Looking for a yarn?


Comments / Questions (10)
![]() Catherine Papuchon wrote:
Catherine Papuchon wrote:
Merci beaucoup pour votre réponse
27.11.2024 - 23:13
![]() Catherine Papuchon wrote:
Catherine Papuchon wrote:
Bonjour Je ne comprends pas la construction du pouce? Doit on mettre les mailles de la main en attente pour tricoter le pouce en rond? Merci pour votre réponse
27.11.2024 - 12:09DROPS Design answered:
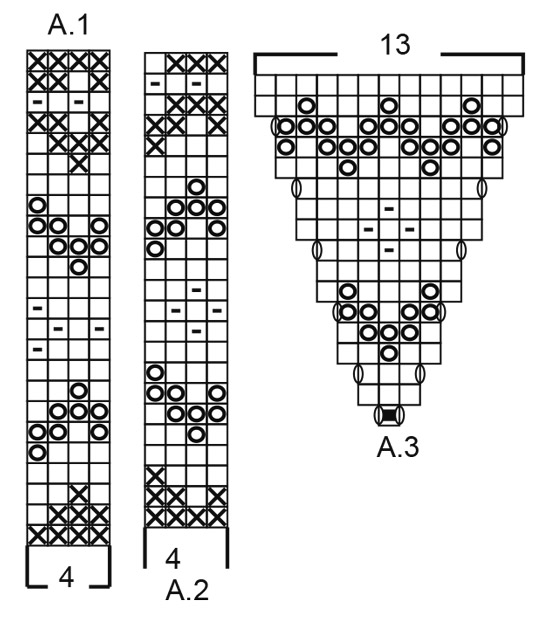
Bonjour Mme Papuchon, lorsque les augmentations du pouce sont faites, et que A.3 est terminé, on met les 13 mailles du pouce en attente sur un fil, on monte 1 maille au-dessus des mailles en attente et on continue la mitaine e rond. On tricote le pouce en rond à la fin: on reprend les mailles en attente et on relève 3 mailles supplémentaires et on tricote 1,5 cm de côtes. Bon tricot!
27.11.2024 - 13:56
![]() Catherine Papuchon wrote:
Catherine Papuchon wrote:
Bonjour Je ne comprends pas la construction du pouce? Doit on mettre les mailles de la main en attente pour tricoter le pouce en rond? Merci pour votre réponse
27.11.2024 - 12:06
![]() Maria wrote:
Maria wrote:
Hei, takk for svar, jeg er fortsatt like blank, det er uklart. Du nevner A1, men er det ikke A.2 som skal følges for å strikke pulsvanter? Og fortsatt skjønner jeg ikke at 4 masker (= 1 rapport) x 10 blir 39 masker. Uansett, jeg har strikket ferdig vantene, men med noen synlige feil der mønsteret ikke har gått opp (i overgangen mellom A.2 og A.3)
24.01.2024 - 16:33DROPS Design answered:
Hei Maria. Jo, selvsagt, det skal være A.2 (tastefeil). Etter vrangborden og 1. omgang i A.2 har du 40 masker, men når du begynner å øke til tommelkile går den ene masken (1. maske i A.2) til A.3 (se diagrammet) og når du har strikket A.3 ferdig i høyden og disse 13 maskene settes på 1 tråd, legges det opp 1 ny maske bak tommelen, slik at det igjen er 40 masker når du skal fortsette rundt med bare A.2. mvh DROPS Design
05.02.2024 - 08:34
![]() Maria wrote:
Maria wrote:
Hei, jeg får ikke mønsteret i A2 til å gå opp når man begynner med A3. Slik jeg forstår det, vil det være én maske mindre i A2 (=1. maske i A3, der økningene begynner). Det vil da være for få masker til å strikke 10 fulle rapporter i A2 (39 masker, da første masken i A2 nå er blitt en del av A3).
14.01.2024 - 13:10DROPS Design answered:
Hej Maria, jo du fortsætter med A.1 over de 39 masker på hver side af tommelfingerkilen, men selve tommelfingerkilen strikkes ifølge A.3
16.01.2024 - 14:10
![]() Marianne Gagnum wrote:
Marianne Gagnum wrote:
Jeg forstår heller ikke hva det betyr at man skal strikke A. 2,men som A. 3. Da må det stå hvilket vi skal strikke. Hva er poenget med å strikke et diagram som et annet diagram? Det står også at vi skal strikke andre omgang i A. 2, og når A.3 er ferdig... Hva betyr det liksom? Veldig forvirrende.
09.02.2021 - 20:00DROPS Design answered:
Hei Marianne. Du strikker A.2 og A.3 samtidig, bortsett fra 1. omgang av A.2 og når A.3 er strikker ferdig i høyden (A.3 viser økningen til tommelkile). Du strikker 1. omgang av A.2 og når du skal begynne på 2. omgang skal du også begynne på A.3/økningen til tommelkile . Første kryss i A.2 i 2 omgang skal strikkes som 1. maske i A.3 (nå strikkes A.2 og A.3 sammen). Husk å lese diagramikon tekstene. mvh DROPS design
15.02.2021 - 13:50
![]() Christiane Fouere wrote:
Christiane Fouere wrote:
Ce modèle est SUPER j'en suis à ma 7eme paires , ce sera mes cadeaux de noël 2020 merci pour tous vos supers modèles
26.11.2020 - 17:57
![]() Wenche Tveråen wrote:
Wenche Tveråen wrote:
Denne oppskriften på pulsvarmer er vanskelig å forstå. Man får ikke mønsteret til å stemme i A2 når man øker med masker som i A3 Det virker umulig å få til.
29.06.2020 - 00:59DROPS Design answered:
Hej Wenche, de nye masker er tegnet ind i diagrammet. Hvilken pind er det du ikke kan få til at stemme?
30.06.2020 - 13:57
![]() Wenche Tveråen wrote:
Wenche Tveråen wrote:
Skal man strikke A2, men øke i henhold til A3 -altså 2, 3, 6, 9, 12 for tommelkile -eller er det KUN en økning på andre omgang i A2? Det står også at A3 skal strikkes, -men får ikke det til å passe med bildet av pulsvarmer -for der er vel ikke "plass" for mer enn A2, som da blir 23 omganger?
25.06.2020 - 12:53DROPS Design answered:
Hej. Du stickar själva vanten enligt A.2 och tummen är enligt A.3. Du ökar till tummen som visat i A.3, dvs ökningar på alla de pinnar med kast. Mvh DROPS Design
26.06.2020 - 10:36
![]() Janneke wrote:
Janneke wrote:
Pulsvärmare - ska jag bara göra 1 varv på A2 och därefter gå till A3. Känns som ökning för tummen börjar tidigt.
13.02.2020 - 20:02DROPS Design answered:
Hej Janneke, Du strikker hele A.2 men allerede på varv 2 strikker du første maske ifølge A.3. Fod fornøjelse!
14.02.2020 - 11:34
|
|||||||||||||||||||
Nanette#nanetteset |
|||||||||||||||||||
 |
 |
||||||||||||||||||
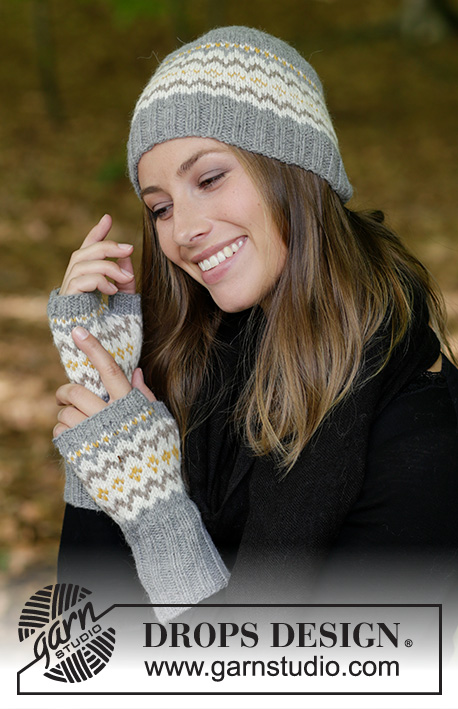
The set consists of: Knitted hat and wrist warmers with multi-coloured Nordic pattern. The set is worked in DROPS Lima.
DROPS 182-24 |
|||||||||||||||||||
|
INFORMATION FOR THE PATTERN: PATTERN: Hat: See diagram A.1. Wrist warmers: See diagrams A.2 and A.3. The whole pattern is worked in stocking stitch. DECREASE/INCREASE TIP (evenly spaced): To work out how to decrease/increase evenly, count the total number of stitches on the needle (e.g. 112 stitches) and divide by the number of decreases/increases to be made (e.g. 4) = 28. In this example, knit every 27th and 28th stitch together when decreasing. When increasing, make 1 yarn over after every 28th stitch. On the next round work the yarn overs twisted to avoid holes. DECREASE TIP (for hat): Decrease as follows after the marker: Knit 2 together (= 1 stitch decreased). ---------------------------------------------------------- HAT: The piece is worked in the round with circular needle, bottom up. Change to double pointed needles when necessary. Cast on 112-116 stitches with circular needle size 3 mm and grey. Knit 1 round. Then work rib (= knit 2 / purl 2) for 4 cm. Knit 1 round where you decrease 4 stitches evenly on round - read DECREASE/INCREASE TIP = 108-112 stitches. Change to circular needle size 3.5 mm and work A.1 in the round (= 27-28 repeats of 4 stitches). REMEMBER THE KNITTING TENSION! When A.1 has been completed, continue with stocking stitch and grey. When the piece measures 15-17 cm work 1 round where you decrease 0-4 stitches evenly on round = 108-108 stitches. Now insert 6 markers in the hat with 18-18 stitches between each. On the next round decrease 1 stitch after each marker - read DECREASE TIP (= 6 stitches decreased). Decrease in this way every 2nd round a total of 12-12 times = 36 stitches left in both sizes. On the next round knit all stitches together 2 and 2 = 18 stitches. Repeat the last round = 9 stitches. Cut the strand, pull it through the remaining stitches, tighten and fasten well. The hat measures approx. 24-26 cm. ---------------------------------------------------------- RIGHT WRIST WARMER: The piece is worked in the round with double pointed needles. Cast on 48-52 stitches with double pointed needles size 3 mm and grey. Knit 1 round. Then work rib (= knit 2 / purl 2) for 10 cm. Knit 1 round where you decrease 8-8 stitches evenly on round - read DECREASE/INCREASE TIP = 40-44 stitches. Change to double pointed needles size 3.5 mm and work the first round of A.2 (= 4 stitches) a total of 10-11 times in width. On the next round of A.2 start to increase to thumb gusset and increase on each side of the first stitch on the round as shown in A.3. REMEMBER THE KNITTING TENSION! When A.3 has been completed in height, place the 13 thumb stitches on a thread and cast on 1 new stitch behind the thumb = 40-44 stitches. Continue in the round until A.2 is finished in height. Then knit 2-7 rounds with grey. Change to double pointed needles size 3 mm and work 1 round where you increase 4 stitches evenly on round for both sizes = 44-48 stitches. Then work rib (= knit 2 / purl 2) for 1½ cm. Cast off with knit over knit and purl over purl. The wrist warmer measures approx. 20-22 cm. THUMB: Place the 13 stitches from the thumb back on double pointed needles size 3 mm and in addition knit up 3 stitches at the back of the thumb with grey = 16 stitches. Work rib (= knit 2 / purl 2) for 1½ cm. Cast off with knit over knit and purl over purl. LEFT WRIST WARMER: Work as for the right, but in reverse. Increase to thumb on each side of the last stitch on the round instead of the first stitch. |
|||||||||||||||||||
Diagram explanations |
|||||||||||||||||||
|
|||||||||||||||||||
 |
|||||||||||||||||||
Have you finished this pattern?Tag your pictures with #dropspattern #nanetteset or submit them to the #dropsfan gallery. Do you need help with this pattern?You'll find 24 tutorial videos, a Comments/Questions area and more by visiting the pattern on garnstudio.com. © 1982-2026 DROPS Design A/S. We reserve all rights. This document, including all its sub-sections, has copyrights. Read more about what you can do with our patterns at the bottom of each pattern on our site. |
|||||||||||||||||||


With over 40 years in knitting and crochet design, DROPS Design offers one of the most extensive collections of free patterns on the internet - translated to 17 languages. As of today we count 324 catalogues and 12290 patterns translated into English (UK/cm). 12290
We work hard to bring you the best knitting and crochet have to offer, inspiration and advice as well as great quality yarns at incredible prices! Would you like to use our patterns for other than personal use? You can read what you are allowed to do in the Copyright text at the bottom of all our patterns. Happy crafting!
Post a comment to pattern DROPS 182-24
We would love to hear what you have to say about this pattern!
If you want to leave a question, please make sure you select the correct category in the form below, to speed up the answering process. Required fields are marked *.