
Popular categories
Looking for a yarn?


Comments / Questions (47)
![]() Anna Rita wrote:
Anna Rita wrote:
Bellissimo capo. L'ho realizzato in poco tempo, di facile esecuzione. Per distinguere il davanti dal dietro ho applicato alla base dello scollo sul davanti un fiore, sempre realizzato all'uncinetto.
26.10.2016 - 08:59Estela Paula wrote:
PREGUNTAR ME SALE MUY BIEN LOS CUADRADOS PERO SON MUY CHICO COMO TENIE QUE SER EL HILO. GRACIAS ESTELA
18.09.2016 - 18:42
![]() Karen wrote:
Karen wrote:
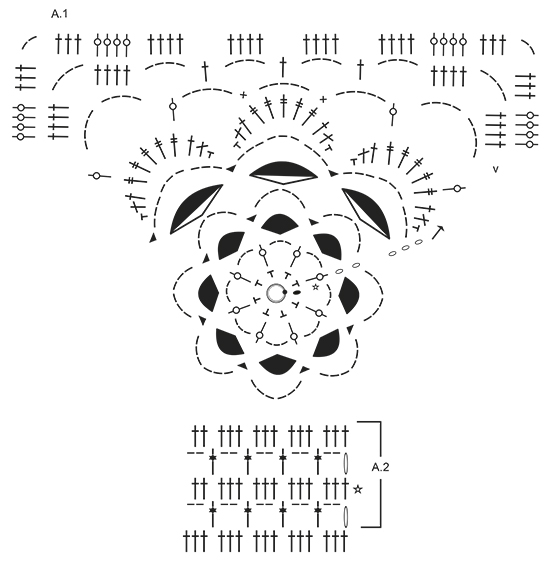
ROUND 8: Work sl sts until first dtr on first leaf, 3 ch (= 1 tr), * 8 ch (= corner), skip 3 dtr, 1 dc in last dtr on same leaf etc Is it telling me to ch3, then ch8 (making ch11), then skip 3dtr and 1dc in the last dtr (but there are FIVE dtr in the row).
29.06.2016 - 22:23DROPS Design answered:
Dear Karen, this round start in first of the 5 dtr from previous round with sl sts then 3 ch, then 8 ch (= 11 ch), then skip the next 3 dtr, 1 dtr in last dtr (= 5th dtr) from previous round. Happy crocheting!
30.06.2016 - 08:41
![]() Kerstin Holdorf wrote:
Kerstin Holdorf wrote:
Hallo, bei der Anleitung ist mir nicht klar, wie ich zum Halsausschnitt komme, wenn ich die 4 Teile zusammen häkel. In der Anleitung wird da auch nicht explizit drauf hingewiesen, oder habe ich einen Denkfehler? Vielen Dank für Hilfe. Mfg Kerstin Holdorf
26.05.2016 - 17:54DROPS Design answered:
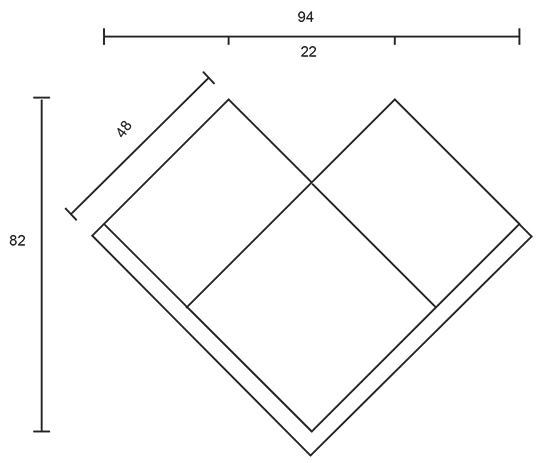
Hallo Kerstin, wie der Halsausschnitt entsteht, sehen Sie unten auf der Schnittübersicht.
27.05.2016 - 08:06Gail Robertson wrote:
Moving on from row 10, where you have sl sts to ch in first corner, find A2 diagram totally confusing, do you make 3 ch in this space or 3tr 2ch 3tr ? How many 2ch spaces should you have, any help appreciated
18.04.2016 - 14:40DROPS Design answered:
Dear Mrs Robertson, you work A.2 along the 4 sides and in each corner you work 3 tr, 2 ch, 3 tr. At beg of row, replace 1st tr with 3 ch - see 1st st in A.2 - next to last symbol in diagram text. Happy crocheting!
18.04.2016 - 15:58
![]() IAM Uncinetto wrote:
IAM Uncinetto wrote:
Un paio di imprecisioni nelle spiegazioni (almeno in quelle in italiano), ma molto semplice e di veloce esecuzione. Bello. Grazie.
05.04.2016 - 15:42DROPS Design answered:
Buonasera IAM Uncinetto, grazie per la segnalazione, può indicarci dove sono le imprecisioni, così possiamo controllare ed eventualmente modificare il testo per rendere migliori le spiegazioni? Buon lavoro!
05.04.2016 - 20:37
![]() Cindy Thomas wrote:
Cindy Thomas wrote:
Wait lemme check again does the 3 chain allow for the head hole???
28.03.2016 - 21:50DROPS Design answered:
Dear Mrs Thomas, the 3 ch are transition between squares - the "head hole" is made with 2 sides of the squares on each side - see pictures in link below. Happy assembly!
31.03.2016 - 13:43Cindy Thomas wrote:
Ok I got the three squares together then I went to place last square and it isn't laying right it still is quite confusing now two rectangles can fit against a triangle? The front piece is perfect and all my squares are the same It has that point on front piece But in the back I'm so confused Any tips Cry haha I've learned so much on this poncho Help
28.03.2016 - 19:15DROPS Design answered:
Dear Mrs Thomas, when you look at measurement chart, you can see one middle square, then on either side 1 square folded double (along the middle, where the "48cm" are written) so that you will have the same on both side of piece when sewn tog. Happy crocheting!
29.03.2016 - 11:49
![]() Wies wrote:
Wies wrote:
Wat je nou zegt bedoelde ik ook.maar in de beschrijving staat 1 stokje 8 losse 1 vaste in het laatste dubbele stokje van het blaadje.
11.03.2016 - 20:44
![]() Wies wrote:
Wies wrote:
Als ik toer 8 volgens de beschrijving doe krijg ik in elke hoek 1 stokje en op het tel patroon staan 2 in elke hoek
10.03.2016 - 17:08DROPS Design answered:
Hoi Wies. Toer 8 heeft niet 2 stk samen in elk hoek. Je haakt hv tot het eerste dstk van toer 7. Hier haak je 1 stk, 8 lossen, 1 stk in laatste dstk van het blad = deze 1 stk, 8 l, 1 stk vormen de hoek.
11.03.2016 - 11:24
|
|||||||||||||||||||||||||||||||||||||||||||||||||||||||
Rhapsody in Rose#rhapsodyinroseponcho |
|||||||||||||||||||||||||||||||||||||||||||||||||||||||
|
|
|||||||||||||||||||||||||||||||||||||||||||||||||||||||
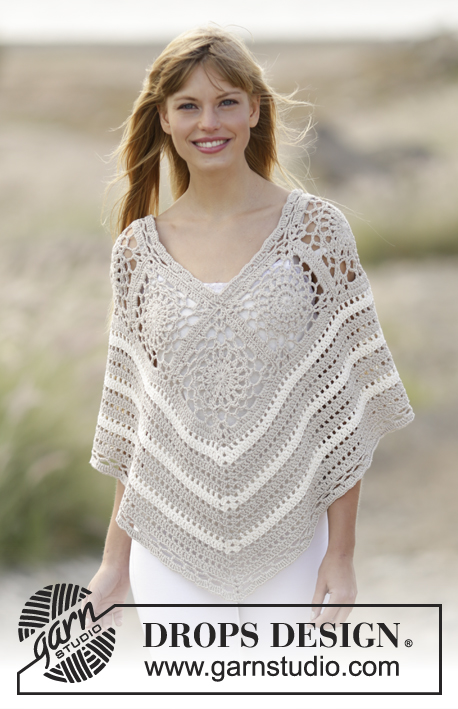
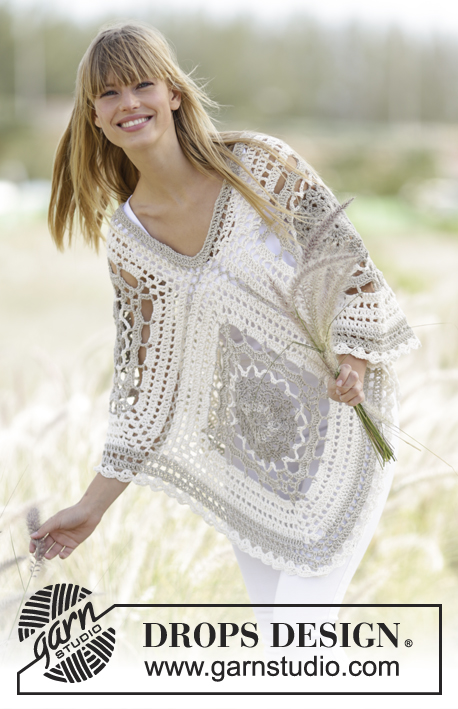
Crochet DROPS poncho with lace pattern in squares in 2 strands ”Belle”. One-size
DROPS 167-22 |
|||||||||||||||||||||||||||||||||||||||||||||||||||||||
|
PATTERN: See diagrams A.1 and A.2. A.1 shows entire square on 1st-4th round, then 1 side and 2 corners on square. CROCHET INFO: Replace first tr on every round with 3 ch. Finish round with 1 sl st in 3rd ch at beg of round. ---------------------------------------------------------- PONCHO: Work 4 large squares as explained below. Then work squares tog into a poncho. Finish by working a neck edge and a border along bottom edge before fastening fringes at the bottom around the entire poncho. Work entire poncho with 2 strands. Work A.1 as follows: Work 4 ch on hook size 8 mm with 2 strands Belle and form a ring with 1 sl st in first ch. ROUND 1: 1 ch, 8 dc in ch-ring, finish with 1 sl st in first dc. ROUND 2: Work 6 ch (= 1 tr + 3 ch) - READ CROCHET INFO, * 1 tr in next dc, 3 ch *, repeat from *-* a total of 7 times and finish with 1 sl st in 3rd ch from beg of round = 8 tr with 3 ch between each. ROUND 3: 1 ch, then work as follows in every ch-space: 1 dc, 1 htr, 3 tr, 1 htr and 1 dc, finish round with 1 sl st in ch from beg of round = 8 leaves. REMEMBER THE CROCHET TENSION! ROUND 4: Work 7 ch, * 1 dc between the next 2 leaves, 6 ch *, repeat from *-* a total of 7 times, finish round with 1 sl st in 1st ch from beg of round = 8 ch-spaces. ROUND 5: 1 ch, then work as follows in every ch-space: 1 dc, 1 htr, 5 tr, 1 htr and 1 dc, finish round with 1 sl st in ch from beg of round = 8 leaves. ROUND 6: Work 10 ch, * 1 dc between the next 2 leaves, 9 ch *, repeat from *-* a total of 7 times, finish round with 1 sl st in 1st ch from beg of round = 8 ch-spaces. ROUND 7: 1 ch, then work as follows in every ch-space: 1 dc, 1 htr, 1 tr, 5 dtr, 1 tr, 1 htr and 1 dc, finish round with 1 sl st in ch from beg of round = 8 leaves. ROUND 8: Work sl sts until first dtr on first leaf, 3 ch (= 1 tr), * 8 ch (= corner), skip 3 dtr, 1 dc in last dtr on same leaf, 5 ch, 1 dc in first dtr on next leaf, 5 ch, skip 3 dtr, 1 dc in last dtr on same leaf, 5 ch, 1 tr in first dtr on next leaf *, repeat from *-* a total of 4 times but finish with 1 sl st in 3rd ch from beg of round (instead of 1 tr in 1st dtr on next leaf). ROUND 9: 1 sl st in 8-ch-space, * 4 tr + 4 ch + 4 tr in ch-space in the corner, (4 ch, 1 tr in next ch-space), repeat from (-) a total of 3 times, 4 ch *, repeat from *-* a total of 4 times, finish with 1 sl st in first tr (= 3rd ch) from beg of round. ROUND 10: * 1 tr in each of the first 4 tr, in ch-space in the corner work 3 tr + 2 ch + 3 tr, 1 tr in each of the next 4 tr, 4 tr in each of the next 4 ch-spaces *, repeat from *-* a total of 4 times, finish round with 1 sl st in first tr (= 3rd ch) from beg of round. There are now 30 tr along each side and 2 ch in every corner. Work sl sts until ch in first corner. Then work according to A.2 along the sides on square, around ch in corners work 3 tr + 2 ch + 3 tr. Continue according to A.2 until square measures approx. 38 x 38 cm - adjust after round with tr. NOTE: If you want a bigger poncho continue according to A.2 until desired measurements. Fasten off. ASSEMBLY: Place squares as shown in chart. Beg in the bottom edge, up to neck and down on opposite side of middle square as follows: Place 2 squares on top of each other WS against WS, and crochet them tog with 2 strands as follows: ** Work 1 dc around ch-space in corner on 1st square, 1 ch, 1 dc around ch-space in corner on 2nd square, * 3 ch, 1 dc between 2 tr-groups on 1st square, 1 ch, 1 dc between 2 tr-groups on 2nd square *, repeat from *-* until next corner, finish with 3 ch for transition to next square **, repeat from **-** down along other side of middle square and next square. Cut the yarn and work the same way on opposite side of poncho. NECK EDGE: Work a finishing edge on 2 rows around the neck on hook size 8 mm as follows: Continue working according to A.2 - remember CROCHET INFO. - but adjust in the corner mid front and mid back so that neck edge lies nicely. Fasten off. EDGE AROUND THE BOTTOM OF PONCHO: Work a finishing edge on 2 rows at the bottom around the poncho on hook size 8 mm with 2 strands as follows: Continue working according to diagram A.2. NOTE: To continue the edge into a nice tip as on squares it is important to continue inc mid front and mid back, i.e. in the middle ch-space mid front and mid back work 3 tr + 2 ch + 3 tr on every round. When edge is done, fasten off. FRINGES: 1 fringe = 6 threads of approx. 40 cm. Fold the threads double, thread the space through the opening between 2 tr-groups and pull the yarn ends through the loop (so that 12 strands hang down in every fringe). Beg with 1 fringe in ch-space in the tip mid front and mid back, then insert fringes along the diagonal edge on poncho between every other tr-group. |
|||||||||||||||||||||||||||||||||||||||||||||||||||||||
Diagram explanations |
|||||||||||||||||||||||||||||||||||||||||||||||||||||||
|
|||||||||||||||||||||||||||||||||||||||||||||||||||||||
 |
|||||||||||||||||||||||||||||||||||||||||||||||||||||||
 |
|||||||||||||||||||||||||||||||||||||||||||||||||||||||
Have you finished this pattern?Tag your pictures with #dropspattern #rhapsodyinroseponcho or submit them to the #dropsfan gallery. Do you need help with this pattern?You'll find 10 tutorial videos, a Comments/Questions area and more by visiting the pattern on garnstudio.com. © 1982-2026 DROPS Design A/S. We reserve all rights. This document, including all its sub-sections, has copyrights. Read more about what you can do with our patterns at the bottom of each pattern on our site. |
|||||||||||||||||||||||||||||||||||||||||||||||||||||||


With over 40 years in knitting and crochet design, DROPS Design offers one of the most extensive collections of free patterns on the internet - translated to 17 languages. As of today we count 324 catalogues and 12290 patterns translated into English (UK/cm). 12290
We work hard to bring you the best knitting and crochet have to offer, inspiration and advice as well as great quality yarns at incredible prices! Would you like to use our patterns for other than personal use? You can read what you are allowed to do in the Copyright text at the bottom of all our patterns. Happy crafting!
Post a comment to pattern DROPS 167-22
We would love to hear what you have to say about this pattern!
If you want to leave a question, please make sure you select the correct category in the form below, to speed up the answering process. Required fields are marked *.