
Popular categories
Looking for a yarn?


Comments / Questions (77)
![]() Steffi wrote:
Steffi wrote:
Hallo, ich verstehe den Rand um die Blende nicht. Muß ich das Stb und Hstb immer in die fm/R häkeln oder um die Doppelstäbchen? Ist dann der Abstand nicht zu kurz, da ja noch doe dstb dazwischen sind?
26.07.2019 - 22:44DROPS Design answered:
Liebe Steffi, Sie häkeln immer um die feste-Maschen-Reihe, nicht um die Doppelstäbchen-Reihe. Durch die Menge an Maschen, die Sie um die feste Masche häkeln (5 Maschen insgesamt - 1 Stb + 1 H-Stb + 1 Lm + 1 H-Stb + 1 Stb), wird der Abstand zur nächsten festen-Maschen-Reihe überbrückt. Viel Spaß beim Tragen der schönen Jacke!
27.07.2019 - 08:57
![]() Valentina wrote:
Valentina wrote:
Buongiorno, non capisco bene il diagramma... le misure indicate a cosa si riferiscono? Solo dietro... o dietro più un fianco.... ? Scusatemi ma non riesco a controllare se le parti che ho fatto corrisponderanno alle misure fornite.. grazie
05.03.2019 - 14:24DROPS Design answered:
Buongiorno Valentina. La misura in basso (p.es 50 per la taglia più piccola) è riferita solo al dietro. Buon lavoro!
05.03.2019 - 16:13
![]() Nina wrote:
Nina wrote:
Hei! jeg arbeider med venstre forstykke nå. Men jeg forstår ikke hvordan jeg skal følge oppskriften fra høyre forstykke. Finnes det en video eller bedre forklaring på venstre forstykke?
14.02.2019 - 10:39DROPS Design answered:
Hei Nina. Du hekler akkurat slik du gjorde på det høyre forstykket til arebidet måler 46 cm. Luftmaskene som legges opp til erme legges nå opp i motsatt side fra høyre forstykke: altså du legger opp luftmaskene på slutten av RAD 1 ( i forklaringen) isteden for raden før. Når du videre øker til ermhull må dette skje fra vrangen, ellers hekler du på samme måte som høyre forstykke. Sjalskragen hekles også på samme måte, men med start fra retten, da blir den speilvendt. God fornøyelse
21.02.2019 - 07:37
![]() Nina wrote:
Nina wrote:
Jeg har akkurat begynt på denne oppskriften i M størrelse. Jag er jobber med bakstykket nå. Jeg forstår ikke helt hvordan jeg går videre fra å ha heklet de 45 dbl-st. Er det neste i opprskriften å hekle 7 nye lm? Hvordan gjør man i så fall dette. Jeg har igjen 3 lm fra første omg./rad.
01.02.2019 - 16:42DROPS Design answered:
Hei Nina. Etter at du har heklet det 45 dblst har du ingen luftmasker igjen fra forrige omgang. Du hekler 1 dblst i den 5 lm, 1 dblsti hver av de neste 3, *hopp over 1 lm, hekle 1 dblst i de neste 10 lm* gjenta fra *-* 3 ganger til (=totalt 4 ganger) Videre skal du hekle som forklart under MØNSTER: 1 omgang (fra vrangen) begynner med 1 lm (hekletips). Videre hekler du 1 fm i hver av dblst på omgangen under, og du hekler i det fremste leddet (buen) i hver dblst. 2 omgang starter med 4 lm (hekletips). Videre hekler du 1 dblst i hver fm, men nå hekler du i det bakre leddet (buen) av fastmasken. Disse 2 omgangene gjentar du oppover til arebidet måler 46 cm. God fornøyelse
07.02.2019 - 09:07
![]() Lena Tollefsen wrote:
Lena Tollefsen wrote:
Hei Hvor begynner man på sjalskragen? Er det på toppen av forstykket og nedover mot midten av jakken Eller bare på toppen.
05.06.2018 - 13:46DROPS Design answered:
Hei Lena. Sjalkragen hekles på toppen av forstykket, over de 20 maskene nærmest åpningen på jakken foran. Om du ser på målskissen får du et bilde av hvordan plagget skal se ut når det er ferdig. God fornøyelse
12.06.2018 - 09:45
![]() Ursula wrote:
Ursula wrote:
Hoe moet ik de mouwen moet haken? Dit is niet duidelijk beschreven in het patroon.
19.02.2018 - 11:58DROPS Design answered:
Hallo Ursula, De mouwen worden eraan gehaakt door op de panden steken te meerderen. Het was inderdaad niet heel duidelijk aangegeven in de beschrijving, dus ik heb er een zin bij gezet bij de panden. Hopelijk is het nu wel duidelijk.
19.02.2018 - 20:57
![]() Barbara wrote:
Barbara wrote:
Ik had het fijn gevonden als duidelijker stond aangegeven waar de mouwen vandaan komen. Ik zit nu met een vest zonder mouwen in een garen dat zich niet laat uithalen. En simpele toevoeging van: -BLIJF meerderen terwijl je doorgaat in patroon zodat de mouwen ontstaan- had mij een grote teleurstelling bespaard.
12.02.2018 - 02:52DROPS Design answered:
Hallo Barbara, Dankjewel voor de tip. Bij het voor- en achterpand heb ik er nu een regel bij gezet, zodat het duidelijker is.
19.02.2018 - 20:56
![]() Anna Bengtsson wrote:
Anna Bengtsson wrote:
Hej. Jag förstår verkligen inte hur jag ska virka sjalkragen. Det blir fel hur jag än försöker! Desperat!! Tack på förhand!
11.12.2017 - 11:22DROPS Design answered:
Sjalkragen virkas fram och tillbaka med förkortade varv. Ifall du behöver mer hjälp rent teknikmässigt kan du kontakta närmaste DROPS återförsäljare. De hjälper dig gärna.
11.12.2017 - 17:18
![]() Christine wrote:
Christine wrote:
Where is the sleeve part of the pattern I did the back but it looks not right. it called for decreasing at each end and it look pointy. No extension to add for the sleeves, maybe I missed something. thanks for helping
06.11.2017 - 21:45DROPS Design answered:
Dear Christine, you start increase for sleeve on bakc piece when piece measures 17¾''-18''-18½''-19''-19¼''-19¾'' casting on 7-6-5 ch (see size) at the end of row, and then continue as explained under ROW 1 to ROW 5 to increase new sts for sleeve at the end of each of these rows. Happy crocheting!
07.11.2017 - 09:09
![]() Bregit wrote:
Bregit wrote:
Hallo, hoeveel bolletjes heb je nodig om dit vest te maken en van hoeveel gram? Ik zie het namelijk nergens staan. Alvast bedankt!
04.10.2017 - 12:07DROPS Design answered:
Hallo Bregit, Dit staat helemaal bovenaan het patroon bij 'materiaal': DROPS CLOUD van Garnstudio 500-550-600-650-750-800 gr. kleur nr. 04, grijs
07.10.2017 - 17:13
|
|
Loch Ness#lochnessjacket |
|
 |
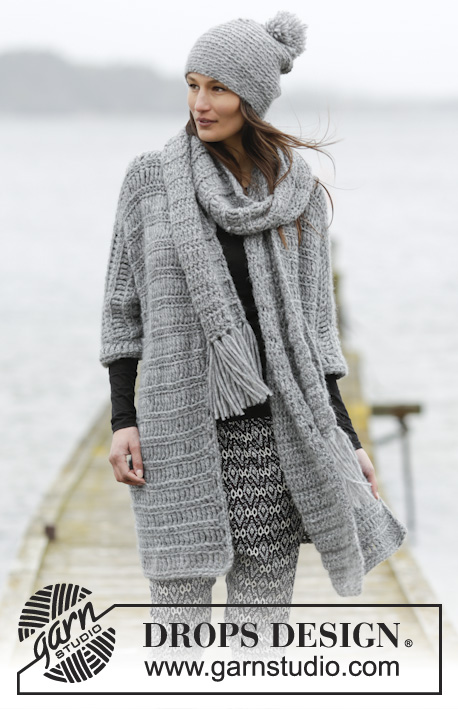 |
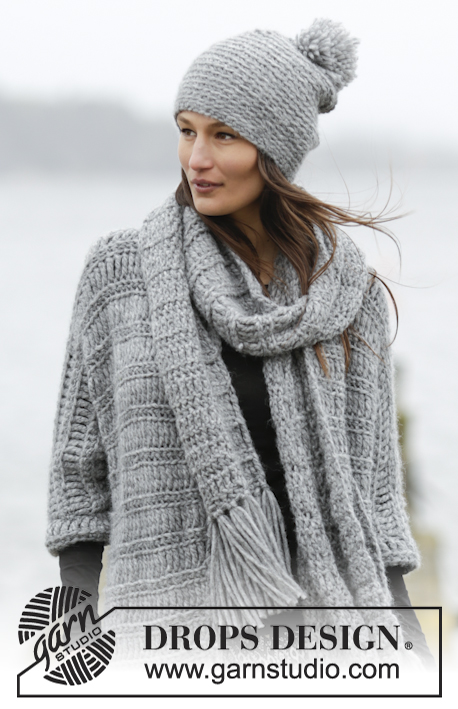
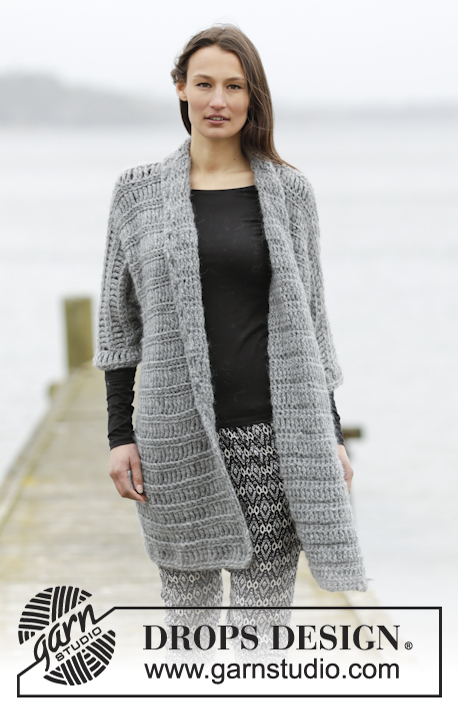
Crochet DROPS jacket with double trebles and double crochet in 1 thread Cloud or 2 threads Air. Size: S - XXXL.
DROPS 166-6 |
|
|
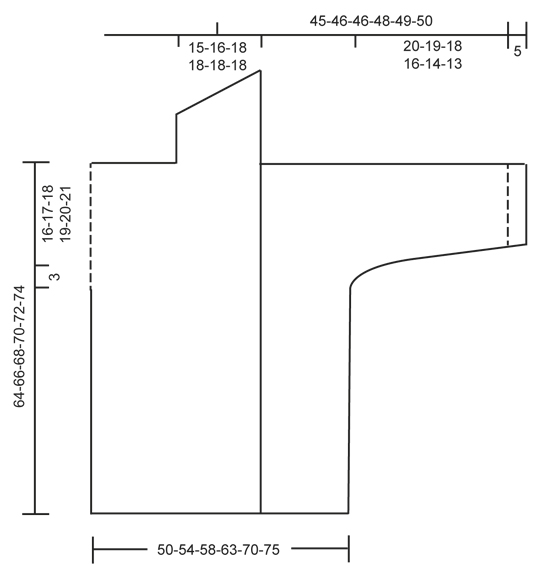
CROCHET INFO: At beg of every round/row with dc work 1 ch. Ch does not replace dc. At beg of every round/row with dtr replace first dtr with 4 ch. DECREASE TIP: Dec 1 dc by working 2 dc tog as follows: * Insert hook in next st, get yarn *, repeat from *-* one more time, make a YO and pull yarn through all 3 sts on hook = 1 dc dec. PATTERN: ROW 1 (= from WS): Work 1 dc in front loop of every st from previous row. ROW 2 (from RS): Work 1 dtr in back loop of every st from previous row. Repeat 1st and 2nd row. ---------------------------------------------------------- JACKET: Worked back and forth in several pieces and sewn tog when finished. BACK PIECE: Work 49-52-55-60-66-71 ch on hook size 9 mm with 1 thread Cloud or 2 threads Air. Then work as follows from RS: 1 dtr in 5th ch from hook (= 2 dtr), 1 dtr in each of the next 0-3-6-0-6-0 ch, * skip 1 ch, 1 dtr in each of the next 10 ch *, repeat from *-* 3-3-3-4-4-5 more times = 42-45-48-52-58-62 dtr - READ CROCHET INFO. Now work PATTERN - see explanation above, until finished measurements. REMEMBER THE CROCHET TENSION! When piece measures 45-46-47-48-49-50 cm - adjust so that last row worked is 2nd row in pattern, insert a marker in the outermost st in each side of piece. Work 7-7-6-6-5-5 new ch at the end of row = 49-52-54-58-63-67 sts. Now work as follows: ROW 1 (= WS): Work 1st row in pattern over the 7-7-6-6-5-5 new ch, and continue over back piece, work 7-7-6-6-5-5 new ch at the end of row = 56-59-60-64-68-72 sts. ROW 2: (Remember Crochet info) Work 1 dc in each of the first 3-3-2-2-1-1 ch (4 ch remain before st with marker), work 1 htr in each of the next 2 ch, then 1 tr in each of the next 2 ch. Continue with 2nd row in pattern over back piece until next marker. Work 1 tr in each of the next 2 dc, then 1 htr in each of the next 2 dc, 1 dc in each of the remaining 3-3-2-2-1-1 dc on row, work 4-4-4-3-3-2 new ch at the end of row = 60-63-64-67-71-74 sts. ROW 3: Work 1st row in pattern over all sts on back piece, work 4-4-4-3-3-2 new ch at the end of row = 64-67-68-70-74-76 sts. ROW 4: Work 1 dc in each of the first 7-7-6-5-4-3 sts (= 4 sts remain before st with marker), work 1 htr in each of the next 2 dc, then 1 tr in each of the next 2 dc, continue with 2nd row in pattern over back piece until next marker, work 1 tr in each of the next 2 dc, then 1 htr in each of the next 2 dc, 1 dc in each of the remaining 7-7-6-5-4-3 dc on row, work 5-4-4-4-3-3 new ch at the end of row = 69-71-72-74-77-79 sts. ROW 5: Work 1st row in pattern over all sts on back piece, work 5-4-4-4-3-3 new ch at the end of row = 74-75-76-78-80-82 sts on row. Continue with pattern as before (i.e. work dtr from RS and dc from WS). When piece measures 62-64-66-68-70-72 cm, adjust so that next row is 2nd row in pattern, work as follows: Work the first 31-31-31-32-33-34 sts. Cut the yarn. Skip the next 12-13-14-14-14-14 dc from previous row (= neck), work the remaining 31-31-31-32-33-34 sts. Cut the yarn. RIGHT FRONT PIECE: Work 41-43-45-47-51-53 ch (incl 4 ch to turn with) on hook size 9 mm 1 thread Cloud or 2 threads Air. Then work as follows from RS: Work 1 dtr in 5th ch from hook (= 2 dtr), 1 dtr in each of the next 3-5-7-9-2-4 ch, * skip 1 ch, 1 dtr in each of the next 10 ch *, repeat from *-* 2-2-2-2-3-3 more times = 35-37-39-41-44-46 dtr. Continue with pattern as on back piece until piece measures 45-46-47-48-49-50 cm, adjust according to back piece and so that last row is 2nd row in pattern. Insert a marker in last st seen from RS, work 7-7-6-6-5-5 new ch at the end of row = 42-44-45-47-49-51 sts. ROW 1 (= WS): Continue with 1st row in pattern over the 7-7-6-6-5-5 new ch, then continue over the remaining sts. ROW 2: Work 2nd row in pattern to st with marker, 1 tr in each of the next 2 ch, then 1 htr in each of the next 2 ch, 1 dc in each of the remaining 3-3-2-2-1-1 ch on row, work 4-4-4-3-3-2 new ch at the end of row = 46-48-49-50-52-53 sts. ROW 3: Work 1st row in pattern over all sts. ROW 4: Work 2nd row in pattern over all sts to st with marker, 1 tr in each of the next 2 dc, then 1 htr in each of the next 2 dc, 1 dc in each of the remaining 7-7-6-5-4-3 dc, work 5-4-4-4-3-3 new ch at the end of row = 51-52-53-54-55-56 sts. ROW 5: Work 1st row in pattern over all sts on row. Continue with pattern over all sts until piece measures 64-66-68-70-72-74 cm, adjust so that last row is 2nd row in pattern. Cut the yarn. SHAWL COLLAR: Then work shawl collar in dc over the outermost 20-21-22-22-22-22 sts towards mid front on jacket. NOTE: Work in front loop of sts from WS and back loop of sts from RS. Beg from WS. Work 1 sl st in 20th-21st-22nd-22nd-22nd-22nd dtr from mid front, 1 ch, 1 dc in same st, 1 dc in each of the remaining sts on row, * turn and work 1 dc in each of the first 10-10-11-11-11-11 dc, turn and work back, turn and work over all the 20-21-22-22-22-22 dc, turn and work back *, repeat from *-* until shawl collar measures 8-8-9-9-9-9 cm along the shortest side. Cut the yarn. LEFT FRONT PIECE: Work as right front piece but reversed. I.e. when piece measures 45-46-47-48-49-50 cm, adjust according to right front piece and so that last row is 2nd row in pattern. ROW 1: Turn piece and work 1st row in pattern over all sts, insert a marker in last st on row (seen from WS), work 7-7-6-6-5-5 new ch. ROW 2: Work 1 dc in each of the first 3-3-2-2-1-1 ch (4 dc remain before st with marker), work 1 tr in each of the next 2 ch, 1 htr in each of the next 2 ch, continue with 2nd row in pattern over the remaining sts. Then continue inc for sleeve on every row from WS the same way as on right front piece. Adjust according to right front piece, and work shawl collar reversed, i.e. beg from RS. ASSEMBLY: Sew shoulder seams, sew underarm seams and side seams in one inside 1 dtr/dc but leave 20 cm for vent in each side. Make sure that to avoid a tight seam. Sew the 2 shawl collars tog mid back and sew it to the neck. EDGE AT THE BOTTOM OF JACKET: Beg in first st (seen from RS) on back piece and work as follows: Fasten yarn with 1 sl st, work 1 dc in every tr, cut the yarn. Then work one more row with dc from RS but now work in back loop of st. Repeat on both front pieces. EDGE ALONG BAND: Fasten yarn with 1 sl st in the corner at the bottom of right band and work as follows from RS: Work 2 ch, skip until first dc-row and work (1 tr, 1 htr, 1 ch, 1 htr, 1 tr) around dc-row, 1 ch, * skip until next dc-row and work (1 tr, 1 htr, 1 ch, 1 htr, 1 tr) around next dc-row *, repeat from *-* around the entire band and collar but when working collar, skip approx. 4 cm before working a new tr-group. I.e. there are approx. 10 tr-groups over collar. CUFF/SLEEVE EDGE: ROUND 1: Fasten yarn with 1 sl st in sleeve seam and work 4 ch (= 1 dtr), work 30 dtr around sleeve opening (i.e. approx. 1 dtr around every dc-row and 3 dtr around every row with dtr). Finish round with 1 sl st in 4th ch at beg of round. ROUND 2: Work 1 ch, continue with 1 dc in every dtr. NOTE: Work in back loop of tr below. Fasten off. Repeat around the other sleeve. ---------------------------------------------------------- Hat and scarf: See DROPS 166-07 or "Related patterns" in pattern on website. ---------------------------------------------------------- |
|
 |
|
Have you finished this pattern?Tag your pictures with #dropspattern #lochnessjacket or submit them to the #dropsfan gallery. Do you need help with this pattern?You'll find 12 tutorial videos, a Comments/Questions area and more by visiting the pattern on garnstudio.com. © 1982-2026 DROPS Design A/S. We reserve all rights. This document, including all its sub-sections, has copyrights. Read more about what you can do with our patterns at the bottom of each pattern on our site. |
|


With over 40 years in knitting and crochet design, DROPS Design offers one of the most extensive collections of free patterns on the internet - translated to 17 languages. As of today we count 324 catalogues and 12290 patterns translated into English (UK/cm). 12290
We work hard to bring you the best knitting and crochet have to offer, inspiration and advice as well as great quality yarns at incredible prices! Would you like to use our patterns for other than personal use? You can read what you are allowed to do in the Copyright text at the bottom of all our patterns. Happy crafting!
Post a comment to pattern DROPS 166-6
We would love to hear what you have to say about this pattern!
If you want to leave a question, please make sure you select the correct category in the form below, to speed up the answering process. Required fields are marked *.