
Popular categories
Looking for a yarn?


Comments / Questions (29)
![]() Concetta wrote:
Concetta wrote:
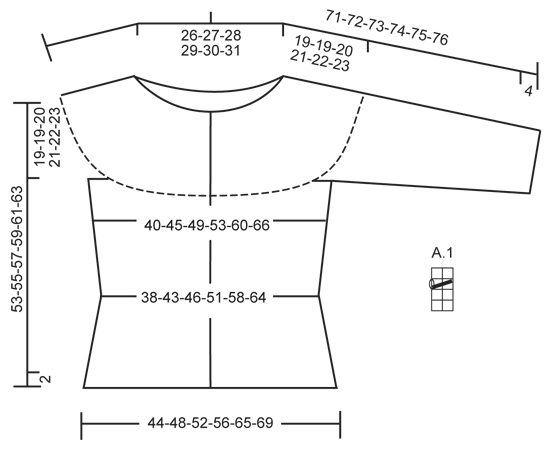
Volevo sapere come prendere le misure. Devo prendere la misura del collo e poi e in base a questo con il mio campione avvio le maglie. Grazie, vi chiedo per cortesia di essere chiare.
17.03.2023 - 16:22DROPS Design answered:
Buonasera Concetta, in fondo alla pagina trova uno schema con le misure: lo paragoni a un capo che possiede per trovare la taglia da lavorare. Buon lavoro!
18.03.2023 - 15:08
![]() Martha wrote:
Martha wrote:
Hi I must say your patterns are not the easiest to follow. What does "in every section P on row" mean in this part of the yoke:- "When rib measures 2 cm / 3/4'', inc by making 1 YO before K st in every section P on row (= 40-43-47-49-53-56 sts inc) = 169-181-197-205-221-233 sts" Thanks
26.08.2022 - 11:20DROPS Design answered:
Dear Martha, you have now to increase the number of stitches purled in the rib, so that you worked before ribbing K1, P2 - you increase 1 purl to get K1, P3 all the row (with front band sts as before) - then repeat the increase the same way after 4 cm to get rib K1, P4. Hope it's now more clear. Happy knitting!
26.08.2022 - 11:52
![]() Martha E Janik wrote:
Martha E Janik wrote:
Hi I'm making the cardigan and I'm a bit confused. After A1 is completed, the last row is worked on the wrong side, therefore the next row starts on the right side. Then it continues with working in garter stitch and increasing on the 2nd ridge. However instructions say to increase on right side of work. The 2nd ridge is on the wrong side so how can it be to increase on the right side? With the 5th ridge that would work out ok. Thanks
24.08.2022 - 14:15DROPS Design answered:
Dear Mrs Janik, depending on the size you will work a total of 7-7-8-8-8-10 ridges, this means 14-14-16-16-16-20 rows in total (all knitted); you will increase on the first row in 2nd ridge = 3rd of these 14-16-20 rows (= RS row) and on the first row of the 5th ridge = 10th of these 14-16-20 rows (RS row). Can this help? Happy knitting!
24.08.2022 - 15:18
![]() Carina wrote:
Carina wrote:
Hola. Si quiero hacer una elevación en la espalda que patrón me recomiendas para hacerla?. Gracias
24.02.2022 - 09:58DROPS Design answered:
Hola Carina, la elevación en la espalda es una técnica, por lo que para cada patrón tienes que calcular sus puntos. Algunos ejemplos son: 232-1, 223-11, 223-12, 191-3, 191-17. También puedes consultar el siguiente vídeo: https://www.garnstudio.com/video.php?id=894&lang=es
27.02.2022 - 18:39
![]() Maren Butti wrote:
Maren Butti wrote:
Ich habe diese wunderschöne Jacke aus Brushed alpaca silk, grün gestrickt. Beim Halsausschnitt und Armbündchen habe ich daran gedacht, den Faden doppelt zu nehmen für mehr Stabilität. Bei den Blenden habe ich es leider versäumt. Gibt es eine Idee, die Blenden nachträglich zu festigen? Sie sind so labberig/ empfindlich. Lieben Dank im Voraus, Maren
15.02.2022 - 16:39DROPS Design answered:
Liebe Frau Butti, vielleicht können Sie die Maschen an den Vorderteilen auffassen und so eine gefaltete Kante stricken? Vielleicht hat Ihr DROPS Laden noch weitere Idee dazu, gerne wird man Ihnen dort weiter helfen, auch telefonisch oder per E-Mail. Viel Spaß beim stricken!
16.02.2022 - 10:45
![]() Annette Van Helvoirt wrote:
Annette Van Helvoirt wrote:
Ik zou graag willen weten of ik bij dit patroon de rondbreinaalden kan vervangen door gewone breinaalden, waarbij ik wel een naad heb, die ik later dicht moet naaien.
23.07.2021 - 15:27DROPS Design answered:
Dag Annette,
De pas kun je eigenlijk niet op rechte naalden breien. Tenzij je een kleine maat breit, maar dan wordt het nog steeds behoorlijk proppen met de steken. Het lijf kun je wel op rechte naalden breien. Voor het lijf moet je dan in de zijnaden extra kantsteken opzetten, die weer weg vallen bij het in elkaar naaien. De mouwen worden van boven naar onder gebreid. Het eerste stuk zou je in de rondt kunnen breien op sokkenbreinaalden en daarna, als er genoeg ruimte is, kun je rechte naalden gebruiken. Bij de mouwen moet je dan ook aan elke kant extra kantsteken opzetten.
26.07.2021 - 16:46
![]() Duverneix wrote:
Duverneix wrote:
Bonjour Peut-on réaliser les manches uniquement avec les aiguilles circulaires car je ne sais pas tricoter avec des aiguilles doubles pointes ? Merci pour vos vonseils.
01.03.2021 - 20:34DROPS Design answered:
Bonjour Mme Duverneix, tout à fait, vous pouvez tout tricoter sur aiguille circulaire, pour les plus petites pièces (manches, mais aussi chaussettes, mitaines, etc...) vous pouvez utiliser la technique dite du magic loop (cf vidéo ici). Bon tricot!
02.03.2021 - 08:13
![]() Rita wrote:
Rita wrote:
Hi there can anyone clarify Inc Tip 1 and how it relates to the A1 pattern. Also I have watched the videos but I find A1 row 2 very Confusing as the video is very fast. I'm a good knitter but this is my first project to knit from the top down. Tkd
07.11.2020 - 18:40DROPS Design answered:
Dear Rita, increase-tip-1 applies to the first row in A.1 where you have to increase evenly 12 to 20 sts (see size), this meansn when working first row in A.1 = knit all stitches from RS, you will make 12 to 20 yarn overs evenly spaced (read here) - on next row (= row 2 in A.1), purl all stitches from WS, purl yarn overs twisted to avoid holes. Now work row 3 (= K2 tog, YO all the row) and finish with purl all sts from WS (= row 4). Hope this helps, happy knitting!
09.11.2020 - 10:08
![]() Riviere Francoise wrote:
Riviere Francoise wrote:
Bonjour, j'en suis à 7 cm puis il faut 2 rangs jersey . s'agit-il de 1 aller retour jersey ou 2 aller retour jersey ? j'ai fait beaucoup de tricot en rond et là j'ai un doute. Merci
02.04.2020 - 12:58DROPS Design answered:
Bonjour Mme Rivière, on tricote 2 rangs jersey, soit 1 rang sur l'endroit + 1 rang sur l'envers (avec les mailles des bordures des devants au point mousse comme avant). Bon tricot :)
02.04.2020 - 14:57
![]() Maria Luiza Hasegawa wrote:
Maria Luiza Hasegawa wrote:
Olá, adorei esta peça,é maravilhosa....estou com dificuldade para fazer o A 1....
30.07.2019 - 19:33
|
|||||||
Athena Cardigan#athenacardigan |
|||||||
 |
 |
||||||
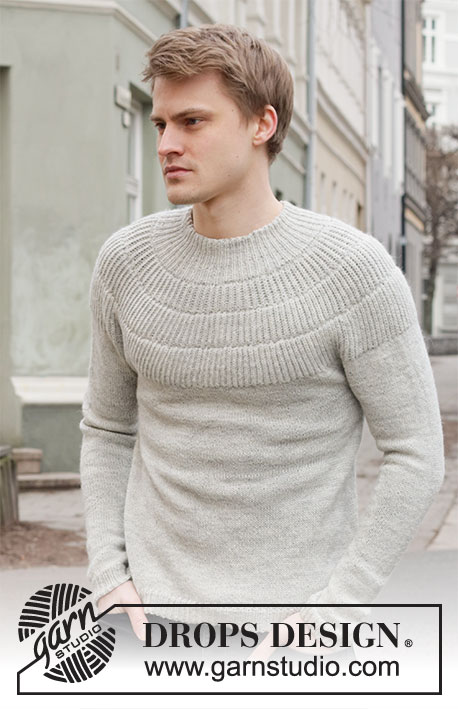
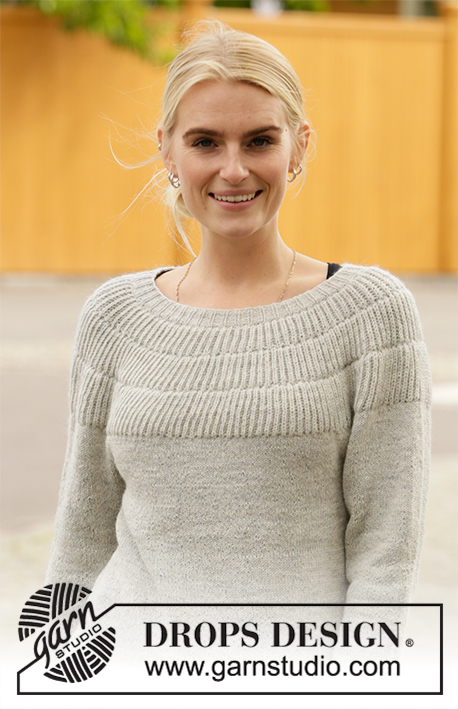
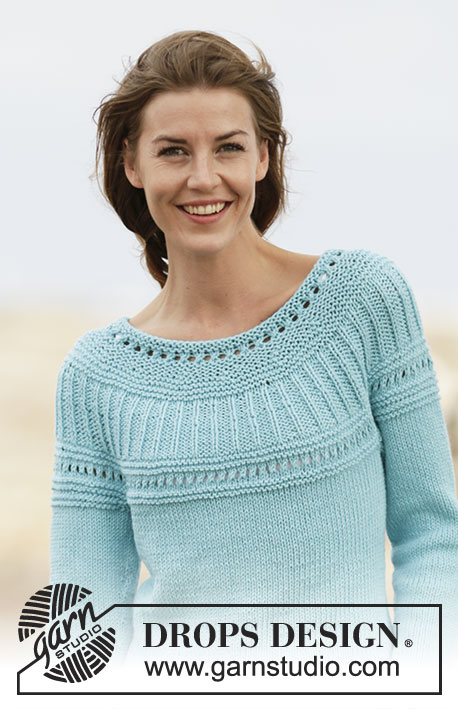
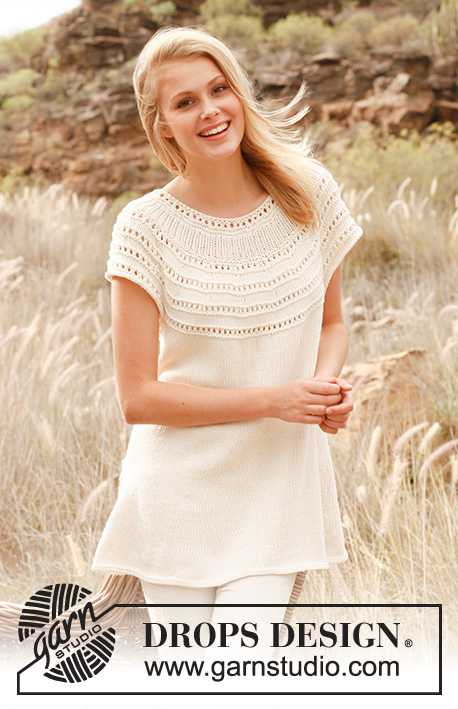
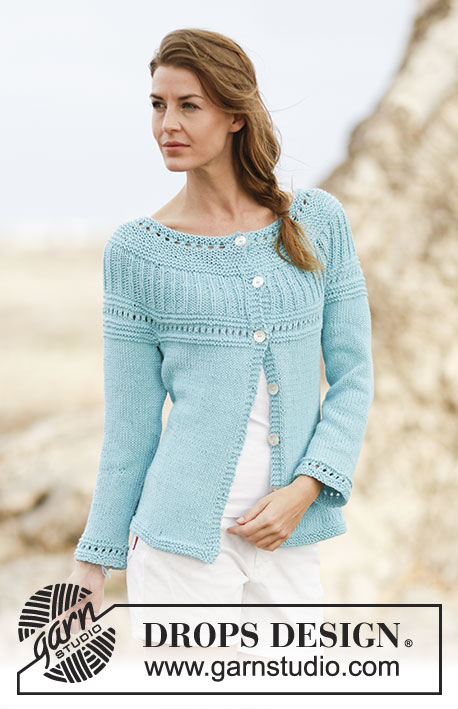
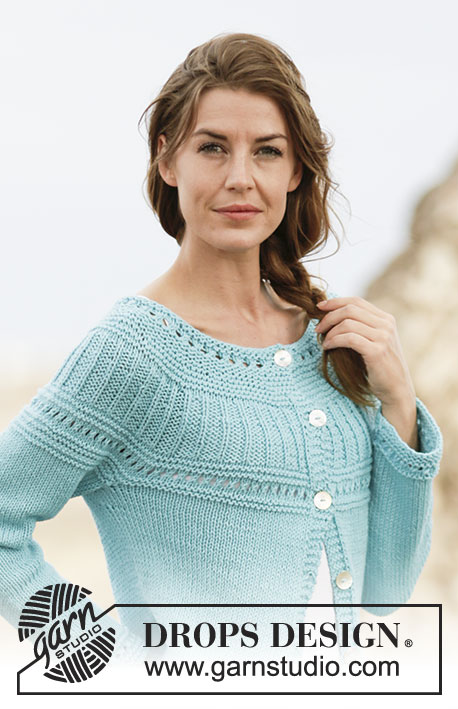
Knitted DROPS jacket in stocking st, garter st with lace pattern and round yoke, worked top down in ”Paris”. Size: S - XXXL.
DROPS 161-10 |
|||||||
|
GARTER ST (back and forth): K all rows. 1 ridge = 2 rows K. GARTER ST (worked in the round): * K 1 round and P 1 round *, repeat from *-*. 1 ridge = 2 rounds. PATTERN: See diagram A.1. The diagrams show all rows in pattern seen from RS. INCREASE TIP 1: Inc 1 st by making 1 YO, on next row work YO twisted (i.e. work in the back loop of st instead front) to avoid holes. INCREASE TIP 2: Inc with YO on each side of 2 sts in each side (the marker sits inbetween these sts). Purl YO twisted on next row. DECREASE TIP: All dec are done from RS! Dec as follows before 1 st in stocking st and marker: K 2 tog. Dec after marker and 1 st in stocking st as follows: Slip 1 st as if to K, K 1, psso. BUTTONHOLES: Dec for buttonholes on right band. 1 buttonhole = K tog third and fourth st from edge and make 1 YO. Dec for buttonholes when piece measures: SIZE S: 2, 10, 18, 26, 34, 42 and 51 cm SIZE M: 2, 10, 18, 26, 34, 43 and 52 cm SIZE L: 2, 10, 18, 26, 35, 44 and 53 cm SIZE XL: 2, 11, 20, 29, 38, 47 and 56 cm SIZE XXL: 2, 11, 20, 29, 38, 48 and 58 cm SIZE XXXL: 2, 11, 20, 29, 39, 49 and 59 cm ---------------------------------------------------------- JACKET: Worked back and forth on circular needle, top down. YOKE: Cast on 101-105-109-113-117-121 sts on circular needle size 4.5 mm with Paris. Work 2 ridges in GARTER ST - see explanation above. Switch to circular needle size 5 mm and work like this inside 4 band sts in garter st in each side (continue until finished measurements): A.1, AT THE SAME TIME on first row in diagram inc 12-16-18-18-20-20 sts evenly - READ INCREASE TIP 1 = 113-121-127-131-137-141 sts (on 3rd row in A.1 K last st before band sts). When A.1 has been worked vertically, switch back to circular needle size 4.5 mm. Work in garter st AT THE SAME TIME inc 10 sts evenly on 2nd ridge and 6-7-13-15-21-26 sts on 5th ridge (NOTE: Inc on a row from RS. Do not inc over band sts) = 129-138-150-156-168-177 sts. REMEMBER THE KNITTING TENSION When 7-7-8-8-8-10 ridges have been worked in total, piece measures 7-7-8-8-8-9 cm, switch to circular needle size 5 mm. Work 2 rows in stocking st. Now work rib as follows: * K 1, P 2 *, repeat from *-* (K last st before band sts). When rib measures 2 cm, inc by making 1 YO before K st in every section P on row (= 40-43-47-49-53-56 sts inc) = 169-181-197-205-221-233 sts. On next round K YO twisted (i.e. work in the back loop of st instead of front) to avoid holes. Continue with K 1/P 3. Repeat inc before every st with K when rib measures 4-4-4-5-6-6 cm = 209-224-244-254-274-289 sts. Continue with K 1/P 4 until rib measures 6-6-6-7-8-8 cm in total. Work 2 rows in stocking st. Now switch to circular needle size 4.5 mm. Work 2 ridges while AT THE SAME TIME on first row inc 8-11-11-15-21-28 sts evenly = 217-235-255-269-295-317 sts. Switch to circular needle size 5 mm, and continue with A.1 (on 3rd row in A.1 work last st before band sts in stocking st). When A.1 has been worked vertically, switch to circular needle size 4.5 mm. Work 2 ridges while AT THE SAME TIME on first round inc 8-10-10-16-22-28 sts evenly = 225-245-265-285-317-345 sts. Now continue on circular needle size 5 mm as follows: Work the first 34-38-41-45-51-56 sts (= front piece), slip the next 48-50-54-56-60-64 sts on a stitch holder (= sleeve), cast on 8 new sts under sleeve, work the next 61-69-75-83-95-105 sts (= back piece), slip the next 48-50-54-56-60-64 sts on a stitch holder (= sleeve), cast on 8 new sts under sleeve, work the remaining 34-38-41-45-51-56 sts (= front piece). BODY: There are now 145-161-173-189-213-233 sts for body. Insert a marker in each side of body where new sts were cast on under sleeve (= 4 new sts on each side of marker). MEASURE PIECE FROM HERE. Continue in stocking st. When piece measures 4 cm, dec 1 st on each side of each markers (= 4 sts dec) - READ DECREASE TIP! Repeat dec when piece measures 11-10-9-8-7-6 cm = 137-153-165-181-205-225 sts. When piece measures 18-17-16-15-14-13 cm, inc 1 st on each side of each marker - READ INCREASE TIP 2! (= 4 sts inc). Repeat inc every 2-2½-3-3-3½-4 cm 4 more times = 157-173-185-201-225-245 sts. When piece measures 32-33-34-35-36-37 cm, inc 10-8-11-10-14-8 sts evenly = 167-181-196-211-239-253 sts. Switch to circular needle size 4.5 mm and work 3 ridges. Cast off. SLEEVE: Work sleeve in stocking st in the round on circular needle/double pointed needles. There are 48-50-54-56-60-64 sts for each sleeve. Slip sts from stitch holder back on circular needle/double pointed needles size 5 mm and cast on 8 new sts under sleeve = 56-58-62-64-68-72 sts. Work in stocking st, AT THE SAME TIME insert a marker in the middle of the new sts under sleeve. NOW MEASURE THE PIECE FROM HERE. When piece measures 4 cm, dec 1 st on each side of marke - READ DECREASE TIP! Repeat dec every 4-3½-3-2½-2½-2 cm 7-8-9-9-11-12 more times = 40-40-42-44-44-46 sts. When sleeve measures 35-35-35-34-34-34 cm, work 1 ridge over all sts and then work A.1. When A.1 has been worked vertically, switch to double pointed needles size 4.5 mm and inc 1-1-3-3-3-3 sts evenly = 41-41-45-47-47-49 sts. Work 2 ridges and cast off, sleeve measures approx. 39-39-39-38-38-38 cm. Knit another sleeve the same way. ASSEMBLY: Sew the openings under the sleeves. Sew the buttons on to left band. |
|||||||
Diagram explanations |
|||||||
|
|||||||
 |
|||||||
Have you finished this pattern?Tag your pictures with #dropspattern #athenacardigan or submit them to the #dropsfan gallery. Do you need help with this pattern?You'll find 25 tutorial videos, a Comments/Questions area and more by visiting the pattern on garnstudio.com. © 1982-2026 DROPS Design A/S. We reserve all rights. This document, including all its sub-sections, has copyrights. Read more about what you can do with our patterns at the bottom of each pattern on our site. |
|||||||


With over 40 years in knitting and crochet design, DROPS Design offers one of the most extensive collections of free patterns on the internet - translated to 17 languages. As of today we count 324 catalogues and 12290 patterns translated into English (UK/cm). 12290
We work hard to bring you the best knitting and crochet have to offer, inspiration and advice as well as great quality yarns at incredible prices! Would you like to use our patterns for other than personal use? You can read what you are allowed to do in the Copyright text at the bottom of all our patterns. Happy crafting!
Post a comment to pattern DROPS 161-10
We would love to hear what you have to say about this pattern!
If you want to leave a question, please make sure you select the correct category in the form below, to speed up the answering process. Required fields are marked *.