
Popular categories
Looking for a yarn?


Comments / Questions (102)
![]() Lebigot wrote:
Lebigot wrote:
Bonjour, Je viens de commencer une manche de ce modèle et je viens de faire les premières augmentations à une maille du bord. Il est indique qu'il faut tricoter ces augmentations en point fantaisie mais je ne vois pas comment sachant qu'il n'y a qu'une maille ajoutée de chaque coté et que je ne veux pas décaler le motif des autres mailles? Que faut-il faire de ces augmentations? Surtout au début? Merci
15.10.2017 - 23:02DROPS Design answered:
Bonjour, ces augmentations se font tous les 4½-4-3½-3-2½-2½ cm, cela vous facilitera votre travail. Il faut tricoter ces augmentations en point fantaisie: pour la premiere fois, au debut du rang vous faites 1 maille endroit (derniere maille du diagramme A.1). Bon tricot!
16.10.2017 - 09:25
![]() Linda wrote:
Linda wrote:
Hej jeg er ved at strikke denne opskrift. hvor skal jeg starte på mønstret jf. mønsterfiguren når jeg er igang med ryggen. Jeg har 77 masker og den første og sidste skal være en kantmaske. Vh. Linda
15.10.2017 - 21:20DROPS Design answered:
Hej Linda, Du skal fortsætte mønsteret på den pind du er kommet til i diagrammet, den eneste forskel er at kantmasken i hver side strikkes i retstrik. God fornøjelse!
31.10.2017 - 08:09
![]() Nina Carlsson wrote:
Nina Carlsson wrote:
Hej! Jag stickar denna modell i st M. Så länge man stickar bak- och framstycken i ett, består den slätstickade framkanten av två m slätst, en m hela tiden avigt och 28 m slätst, och sedan mönsterdelen däremellan. När det är dags att sticka bak- och framstyckena var för sig, ändras de 28 m slätst till 27... Jag förstår inte riktigt varför, eller hur det ska fungera med mönsterdelen i så fall? Är det ett korrekturfel, eller är det jag som missat något? Hälsningar, Nina
17.09.2017 - 14:25DROPS Design answered:
Hej Nina, Kan det vara för att få mönstret till att gå upp... ? Eller så tycker jag bara du skall sticka samma antal m slätst som tidigare. Lycka till!
22.09.2017 - 10:36Dragica wrote:
Gechte, ik heb 185 st. op de nld. ik heb niet genoeg st. om 20 keer telpatroon a 1a en a 1b te breien. hartelijk dank, dragica residovic bosnie en hercegovina
01.06.2017 - 19:25
![]() Michelle Dowdeswell wrote:
Michelle Dowdeswell wrote:
I'm a little lost in the grid repeat it states rep 22 times in total for body across the row and there's 10 stitches total per a1a/a1b section so that would make up to 220 stitches and I've only 201 (knitting the medium ) plus I've to save 31 stitches either side for edges 28 st st and the p1, 2st in st stocking st. Please help !!
24.04.2017 - 22:10DROPS Design answered:
Dear Mrs Dowdeswell, work as follows in size M: 2 sts in stocking st, P 1, 28 sts in stocking st (= band), then work A.1A (= 4 sts) 1 time in width, repeat A.1B (= 6 sts) 22 times in total, then work A.1C (= 3 sts) 1 time in width (= A.1 will be worked over 4 + (22x6) + 3 = 139 sts), 28 sts in stocking st, P 1 and 2 sts in stocking st (= band) = 2 + 1 + 28 (band) + A.1 (= 139 sts) + 28 + 1 + 2 (band) = 201 sts. Happy knitting!
25.04.2017 - 08:09
![]() Agnetha Olsson wrote:
Agnetha Olsson wrote:
Alltså det jag inte förstår är om A. 1C ska ingå i mönstret eller komma sist som det står?
12.04.2017 - 08:41DROPS Design answered:
A.1C stickas sist, precis som det står i mönstret. Endast A.1B ska upprepas på varvet.
18.04.2017 - 16:35
![]() Agnetha Olsson wrote:
Agnetha Olsson wrote:
Jag förstår inte detta mönster! Har lagt upp 211 m, stickat som mönstret anger, A 1A, A1B (fast det blir inte 24 ggr), A1C, 27 räta maskor men då har jag fått öka 3 maskor annars räcker det inte till kantmaskorna. Nästa fråga, hur gör jag på avigsidan, stickas alla maskor omvänt?
11.04.2017 - 17:03DROPS Design answered:
Då jag räknar ihop alla m i mönstret så ska det stämma: Du stickar 2 m slätst, 1 am, 27 m slätst, A.1A (4 m), A.1B 24 ggr (24 x 6 = 144 m), A.1C (3 m), 27 m slätst, 1 am, 2 m slätst. Detta blir då totalt 211 m. Från avigsidan stickar du alla m aviga enligt diagrammet.
18.04.2017 - 16:44
![]() Holly wrote:
Holly wrote:
In working the sleeves, it says to incorporate the extra stitches into the pattern. Does that mean to make the lace pattern incorporate them and keep 2 st in st st? Or does it mean to make the st st bordering the lace larger?
10.03.2017 - 22:17DROPS Design answered:
Dear Holly, when inc on each side of sleeve, you will work more and more sts in lace pattern, make sure you have enough sts to work the dec and matching yo's so that you keep correct number of sts. Happy knitting!
13.03.2017 - 09:44Alyssa wrote:
Do I purl all the wrong side rows?
05.03.2017 - 08:09DROPS Design answered:
Dear Alyssa, all WS rows in diagram will be worked P. Happy knitting!
06.03.2017 - 10:32
![]() Cecilia wrote:
Cecilia wrote:
Hej, jag håller på med vänster framställer men är osäker på kragen. Stickar förkortade varv så att kortsidan blir mot ärmhålet. Är det korrekt? Jag förstår inte hur kragen ska se ut när den är klar. Tacksam för hjälp!
21.02.2017 - 22:24DROPS Design answered:
Hej Cecilia. Ja, ydersiden (midt for) bliver bredere end indersiden. Saa naar tager jakken paa saa ligger den bredde kant af kragen yderst (du folder den).
22.02.2017 - 12:09
|
||||||||||||||||
Lace Affair#laceaffairjacket |
||||||||||||||||
 |
 |
|||||||||||||||
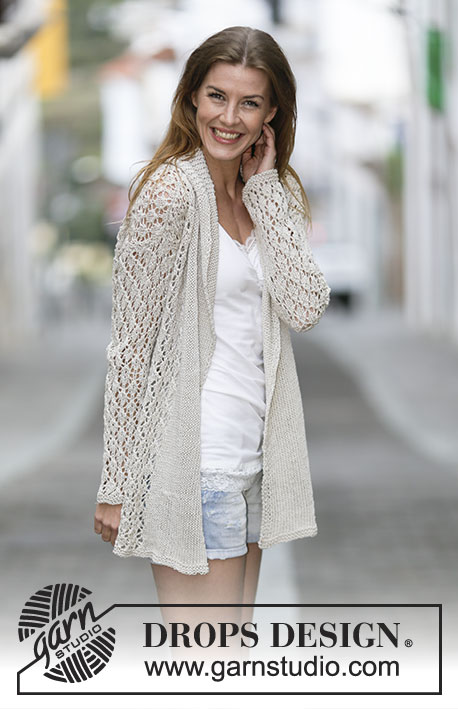
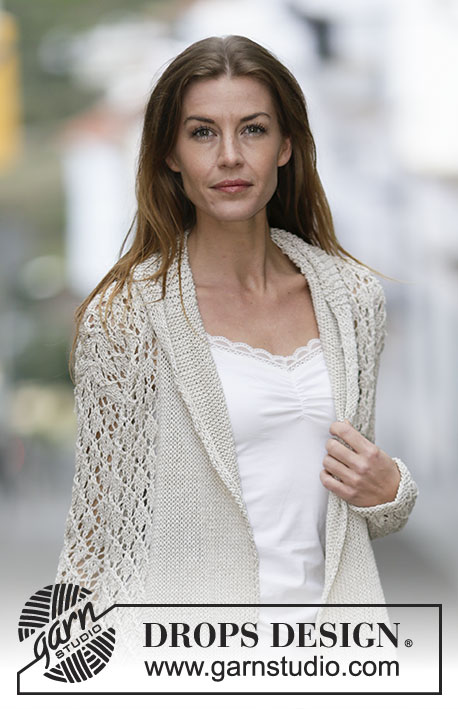
Knitted DROPS jacket with lace pattern and shawl collar in "Bomull-Lin" or "Paris". Size: S - XXXL.
DROPS 159-2 |
||||||||||||||||
|
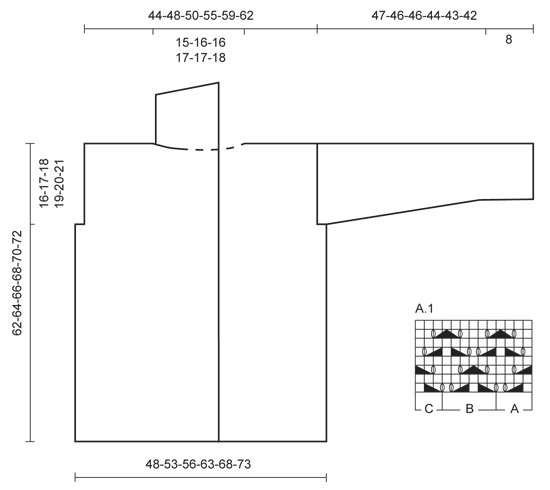
GARTER ST (back and forth): K all rows. 1 ridge = 2 rows K. PATTERN: See diagram A.1. The diagram show all rows in pattern seen from RS. KNITTING TIP: Band sts will wrinkle inwards when working but lay flat after assembly. INCREASE TIP: Inc 1 st by making 1 YO, on next row work YO twisted (i.e. work in the back loop of st instead front) to avoid holes. ---------------------------------------------------------- BODY: Worked back and forth on circular needle from mid front. Loosely cast on 185-201-211-235-251-265 sts on circular needle size 4.5 mm with Bomull-Lin or Paris. Work 2 ridges in GARTER ST - see explanation above. Switch to circular needle size 5.5 mm, work next row (= RS) as follows: 2 sts in stocking st, P 1, and stocking st over the next 26-28-27-27-26-24 sts (= band), work A.1A (= 4 sts), A.1B (= 6 sts) 20-22-24-28-31-34 times in total, A.1C (= 3 sts), work in stocking st over the next 26-28-27-27-26-24 sts, P 1 and 2 sts in stocking st (= band). Continue like this - READ KNITTING TIP AND REMEMBER THE KNITTING TENSION. When piece measures approx. 46-47-48-49-50-51 cm, insert 2 markers; 54-58-60-67-71-75 sts in from each side (= 77-85-91-101-109-115 sts between markers on back piece). On next row cast off 3-4-5-6-7-8 sts for armholes on each side of both markers (= 6-8-10-12-14-16 cast off sts in each side). Now divide the piece and finish each part separately. BACK PIECE: = 71-77-81-89-95-99 sts. Continue pattern as before with 1 edge st in garter st in each side until piece measures 60-62-64-66-68-70 cm. Then cast off the middle 21-23-23-25-25-27 sts for neck and finish each shoulder separately. Continue to dec 1 st on next row from neck = 24-26-28-31-34-35 sts remain on the shoulder. Cast off when piece measures 62-64-66-68-70-72 cm. LEFT FRONT PIECE: = 51-54-55-61-64-67 sts. Work 1 edge st in garter st towards the armhole and continue with pattern as before, and finish with 26-27-27-27-27-24 sts in stocking st, P 1 and 2 sts in stocking st (= band sts) towards mid front until piece measures 62-64-66-68-70-72 cm. At beg of next row from RS cast off the first 24-26-28-31-34-36 sts for shoulder = 27-28-27-30-30-31 sts remain for collar. Work in garter st over these sts - AT THE SAME TIME work short rows, beg from WS as follows: * Work 1 ridge over all sts. On next row from WS K 21-22-21-24-24-25, turn and K back *, repeat from *-* until piece measures approx. 9-10-10-10½-10½-11 cm from cast off for shoulder (short side). Loosely cast off all sts. RIGHT FRONT PIECE: Work as left front piece but reversed. Beg short rows on collar from RS. SLEEVE: Worked back and forth on needle. Loosely cast on 35-37-39-39-41-43 sts (incl 1 edge st each side) on circular needle size 4.5 mm with Bomull-Lin or Paris. Work 2 ridges. Switch to circular needle size 5.5 mm, work next row (= RS) as follows: 1 edge st in garter st, 1-2-0-0-1-2 sts in stocking st, work A.1A (= 4 sts), A.1B over the next 24-24-30-30-30-30 sts (= 4-4-5-5-5-5 times), A.1C (= 3 sts), 1-2-0-0-1-2 sts in stocking st, finish with 1 edge st in garter st. When piece measures 8 cm, inc 1 st inside 1 edge st in each side - READ INCREASE TIP above, work the inc sts in pattern. Repeat inc every 4½-4-3½-3-2½-2½ cm 8-9-10-11-12-13 more times = 53-57-61-63-67-71 sts. When piece measures 45-44-43-40-39-37 cm, insert 1 marker in each side of sleeve (for assembly). When piece measures 47-46-46-44-43-42 cm (shorter measurements in the larger sizes because of wider shoulders), cast off all sts. ASSEMBLY: Sew shoulder seams and sew in sleeves in outer loops of edge sts. Sew the sleeve seams in one inside 1 edge st - NOTE: Section worked after marker at the top of sleeve should fit the cast off for armhole. Sew band tog mid back and sew band to the neck egde - NOTE! Seam should be at the back so that is is not visible when collar is folded down. Lightly steam the band with iron, it will then be flat. |
||||||||||||||||
Diagram explanations |
||||||||||||||||
|
||||||||||||||||
 |
||||||||||||||||
Have you finished this pattern?Tag your pictures with #dropspattern #laceaffairjacket or submit them to the #dropsfan gallery. Do you need help with this pattern?You'll find 21 tutorial videos, a Comments/Questions area and more by visiting the pattern on garnstudio.com. © 1982-2026 DROPS Design A/S. We reserve all rights. This document, including all its sub-sections, has copyrights. Read more about what you can do with our patterns at the bottom of each pattern on our site. |
||||||||||||||||


With over 40 years in knitting and crochet design, DROPS Design offers one of the most extensive collections of free patterns on the internet - translated to 17 languages. As of today we count 324 catalogues and 12290 patterns translated into English (UK/cm). 12290
We work hard to bring you the best knitting and crochet have to offer, inspiration and advice as well as great quality yarns at incredible prices! Would you like to use our patterns for other than personal use? You can read what you are allowed to do in the Copyright text at the bottom of all our patterns. Happy crafting!
Post a comment to pattern DROPS 159-2
We would love to hear what you have to say about this pattern!
If you want to leave a question, please make sure you select the correct category in the form below, to speed up the answering process. Required fields are marked *.