
Popular categories
Looking for a yarn?


Comments / Questions (36)
![]() Teri wrote:
Teri wrote:
For shaping armholes after back and front pieces are separated , what do I do where the small size has 0 time bind off: “AT SAME TIME bind off for armholes at beg of every row in each side as follows: bind off 3 sts 0-0-0-1-1-2 times, 2 sts 0-1-2-2-4-4 times, 1 st 1-3-4-3-6-7 times = 92-92-96-104-104-108 sts”? Do I knit a row without any bind off, or skip to the 1st bind off 1time? Thank you
25.09.2025 - 23:48DROPS Design answered:
Hi Teri, In S size you have to bind off 1 st 1 time from each side (2 stitches decreased for armholes). Happy knitting!
26.09.2025 - 07:43
![]() Maja wrote:
Maja wrote:
Hej! Jag förstår inte riktigt om jag ska fortsätta sticka resår till sista varv på A.1 eller A.2. Hur ska jag göra? Mvh Maja
14.09.2025 - 18:39DROPS Design answered:
Hei Maja. Du strikker vrangborden slik den er forklart (8 omganger), men når du kommer til siste omgang strikkes det etter ny forklaring i oppskriften, der det felles masker og det felles i A.1 og A.2. mvh DROPS Design
29.09.2025 - 11:28
![]() Eef Van Schie wrote:
Eef Van Schie wrote:
Wat een perfect patroon van dit model. Goed gelukt en ben er heel blij mee! Vindt het zo knap om een patroon goed te beschrijven! Dank dat ik het mocht gebruiken. Vr. Gr. Eef.
27.02.2025 - 09:05
![]() Catherine Vaesben wrote:
Catherine Vaesben wrote:
Dans les explications c'est note :tricoter les 43 m en jersey, en meme temps repartir9 diminutons au dessus de ces m ! faut-il que je fasse les diminutions dans les 43 m !!
02.02.2021 - 13:47DROPS Design answered:
Bonjour Mme Vaesben, tout à fait, vous diminuez 9 mailles à intervalles réguliers (cette leçon explique comment procéder) pour qu'il ne reste que: 43-9= 34 mailles jersey. Bon tricot!
02.02.2021 - 14:15
![]() Charra Monique wrote:
Charra Monique wrote:
Bonjour, est-il possible d'adapter les explications du le modèle DROPS 160-17 pour tricoter séparément le devant et le dos? Merci pour votre réponse Monique Charra
29.11.2020 - 16:05DROPS Design answered:
Bonsoir, Si vous préférez tricoter en allers et retours au lieu d'en rond, vous pouvez naturellement ajuster les explications pour tricoter les pièces séparément et les assembler ensuite à la fin. Divisez le nombre de mailles par 2, ajoutez 1 maille lisière de chaque côté (pour les coutures) et tricotez le devant et le dos séparément. Vous pouvez lire ici: https://www.garnstudio.com/lesson.php?id=13&cid=8
29.11.2020 - 18:17
![]() Charra Monique wrote:
Charra Monique wrote:
Bonjour, est-il possible d'adapter les explications du le modèle DROPS 160-17 pour tricoter séparément le devant et le dos? Merci pour votre réponse Monique Charra
29.11.2020 - 16:04DROPS Design answered:
Voir la response dessus
29.11.2020 - 18:19
![]() Nicole wrote:
Nicole wrote:
Bonjour pouvez vous m'expliquer où me donner une vidéo sur les diagramme A3 et A5 je n'arrive pas à comprendre les jeté je tricotte à la française Mes trou sont pas de la même circonférence j'ai visualise votre diagramme de A4 si vous n'avez pas de vidéo pouvez vous me dire comment procéder pour tous les les jeté de se pul merci de vôtre aide
18.10.2020 - 10:25DROPS Design answered:
Bonjour Nicole, quelque soit la façon dont vous tenez votre fil, le jeté se fera de la même façon: au début de A.3: tricotez 2 mailles ensemble à l'endroit, placez le fil devant l'ouvrage puis de nouveau derrière (= 1 jeté) et tricotez 1 m env. à la fin de A.3, tricotez 1 m env, laissez le fil devant, tricotez 2 m ens à l'end et continuez le diagramme. N'hésitez pas à vous entrainer si besoin sur des échantillons pour que vos jetés aient la bonne taille et ne déforme pas l'ouvrage. Bon tricot!
19.10.2020 - 08:54
![]() Nicole wrote:
Nicole wrote:
Bonjour merci pour vôtre réponse mais ma question est : les diminutions se font juste avant et après les diagramme?? et pas au niveau des côtés du pul juste cette question et pas le détails
30.09.2020 - 09:11DROPS Design answered:
Bonjour Nicole, tout à fait, les diminutions se font aux marqueurs, pas en début/fin de rang: le 1er marqueur est avant A.3, vous diminuez avant le 1er marqueur = avant A.3, le 2ème marqueur est après A.5, vous diminuez après le 2ème marqueur = après A.5; le 3ème marqueur est avant A.3 = comme le 1er marqueur, vous diminuez avant A.3 et le 4ème marqueur est après A.5 = comme le 2ème marqueur, vous diminuez après A.5. Bon tricot!
30.09.2020 - 10:54
![]() Nicole wrote:
Nicole wrote:
Bonjour pour les diminution il y a 4 marqueur. sur le devant 2 à l'extrémité du diagramme ddos et devant J'en ai. Mis 2de plus sur les côté je dois diminuer sur les côtés du pul où de chaque côté juste avant le diagramme j'espère que vous comprendrais mon explication Jr vous remercie pour votre aide
29.09.2020 - 17:42DROPS Design answered:
Bonjour Nicole, les diminutions à 8 cm de hauteur totale se font aux 4 marqueurs que vous avez inséré, et vous allez maintenant diminuer (cf DIMINUTIONS) 1 m avant le 1er et le 3ème marqueur + 1 m après le 2ème et le 4ème marqueur - vous augmenterez ensuite - cf AUGMENTATIONS 1 m avant le 1er et le 3ème marqueur et 1 m après le 2ème et le 4ème marqueur. Vous diminuez d'abord 4 mailles par rang et augmentez ensuite 4 m par rang (toujours 1 m à chaque marqueur, soit avant, soit après). Bon tricot!
30.09.2020 - 08:05
![]() Brenda Freeman wrote:
Brenda Freeman wrote:
For both front and back pieces - after the middle stitches have been separated, is the decreasing for the neck, at the neck edge only. The outer edges, later to be attached to the top of the sleeve, remaining straight up to the shoulders - or are the shoulders shaped as well as the neck?
18.07.2020 - 18:42DROPS Design answered:
Dear Mrs Freeman, yes correct, there is no shaping for shoulders, after you have slipped the middle stitches on a thread, you finish each shoulder separately binding off at the beginning of each row from neck towards shoulder. Happy knitting!
20.07.2020 - 09:29
|
|||||||||||||||||||||||||
Darling#darlingsweater |
|||||||||||||||||||||||||
 |
 |
||||||||||||||||||||||||
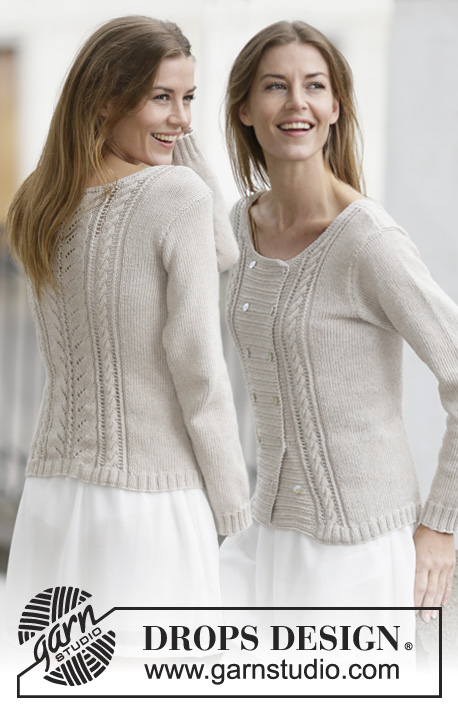
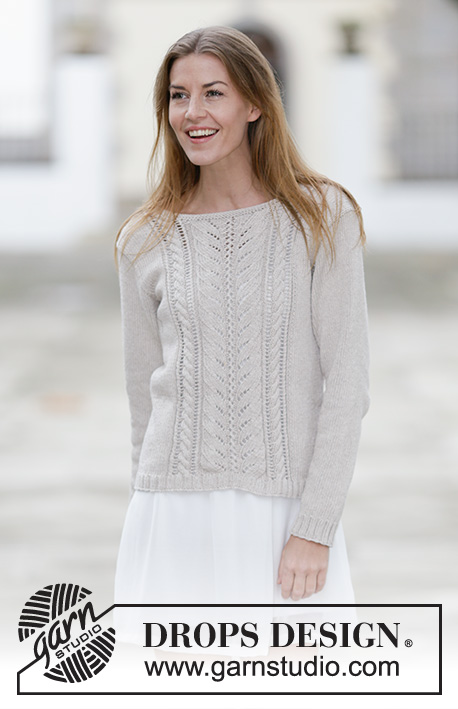
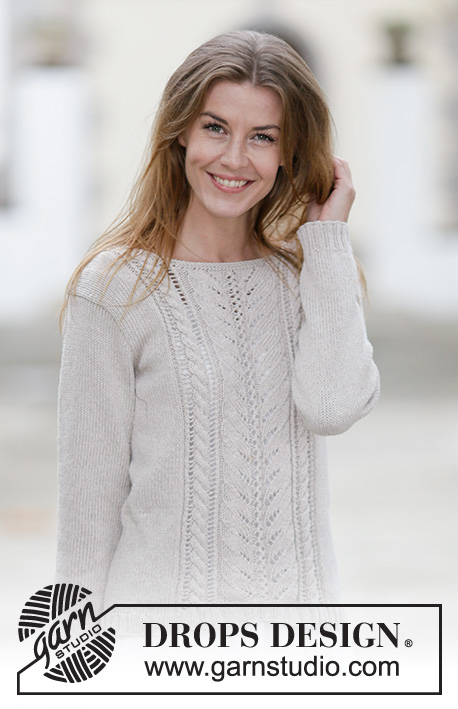
Knitted DROPS jumper with lace pattern and cables in ”Cotton Light” or "Belle". Size: S - XXXL.
DROPS 160-17 |
|||||||||||||||||||||||||
|
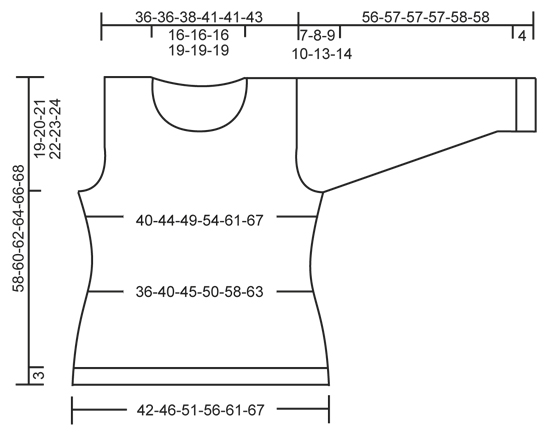
PATTERN: See diagrams A.1 to A.5. Choose diagram for correct size. DECREASE TIP: Dec as follows before 1st and 3rd marker: Beg 2 sts before marker and K 2 tog. Dec as follows after 2nd and 4th marker: Slip 1 st as if to K, K 1, psso. INCREASE TIP: Inc 1 st by making 1 YO before 1st and 3rd marker and after 2nd and 4th marker. On next round K YO twisted to avoid holes. ---------------------------------------------------------- BODY: Worked in the round on circular needle. Cast on 256-272-304-324-356-388 sts on circular needle size 3 mm with Cotton Light or Belle. K 1 round. Work next round as follows: P 1, * K 2, P 2 *, repeat from *-* 7-8-10-10-12-14 times in total (= 28-32-40-40-48-56 sts rib), K 2, work A.1 (= 18 sts), A.2 (= 30-30-30-40-40-40 sts), A.1 (= 18 sts), work rib (= K 2/P 2) over the next 62-70-86-86-102-118 sts (beg and end with K 2), work A.1 (= 18 sts), A.2 (= 30-30-30-40-40-40 sts), A.1 (= 18 sts), work rib over the next 30-34-42-42-50-58 (beg and end with K 2) and finish round with P 1. Continue rib like this until last round in A.1/A.2 remains. Work last round as follows: Work in stocking st over the first 31-35-43-43-51-59 sts AT THE SAME TIME dec 7-7-9-7-9-11 sts evenly over these sts, work last round in A.1, A.2 and A.1 (= 10-10-10-12-12-12 sts dec), work in stocking st over the next 62-70-86-86-102-118 sts AT THE SAME TIME dec 14-14-18-14-18-22 sts evenly over these sts, work last round in A.1, A.2 and A.1 (= 10-10-10-12-12-12 sts dec) and work in stocking st over the last 31-35-43-43-51-59 sts AT THE SAME TIME dec 7-7-9-7-9-11 sts evenly over these sts = 208-224-248-272-296-320 sts remain on needle. Switch to circular needle size 3.5 mm and K 1 round. Then work as follows: Work 24-28-34-36-42-48 sts in stocking st, insert 1 marker, work A.3 (= 16 sts), A.4 (= 24-24-24-32-32-32 sts), A.5 (= 16 sts), insert 1 marker, work 48-56-68-72-84-96 sts in stocking st, insert 1 marker, work A.3 (= 16 sts), A.4 (= 24-24-24-32-32-32 sts), A.5 (= 16 sts), insert 1 marker and work the last 24-28-34-36-42-48 sts in stocking st. Continue pattern like this. REMEMBER THE KNITTING TENSION When piece measures 8 cm, dec 1 st on the outside of each of the 4 markers - READ DECREASE TIP (= 4 sts dec). Repeat dec every 2½-2½-2½-2½-4-4 cm 6-6-6-6-4-4 times in total = 184-200-224-248-280-304 sts. When piece measures 24 cm, inc 1 st on the outside the 4 markers - READ INCREASE TIP (= 4 sts inc). Repeat inc every 4-4-4-5-5-5 cm a total of 4 times = 200-216-240-264-296-320 sts. When piece measures 39-40-41-42-43-44 cm, work next round as follows: Cast off 3-3-4-4-5-5 sts for armhole, work the next 94-102-112-124-138-150 sts as before, cast off 6-6-8-8-10-10 sts for armhole, work the next 94-102-112-124-138-150 sts as before and cast off the last 3-3-4-4-5-5 sts for armhole. Finish front and back piece separately. BACK PIECE: = 94-102-112-124-138-150 sts. Continue back and forth in stocking st with pattern as before. AT THE SAME TIME cast off for armholes at beg of every row in each side as follows: Cast off 3 sts 0-0-0-1-1-2 times, 2 sts 0-1-2-2-4-4 times, 1 st 1-3-4-3-6-7 times = 92-92-96-104-104-108 sts. Continue to work until piece measures 56-58-60-62-64-66 cm. Now cast off the middle 44-44-44-52-52-52 sts for neck and finish each shoulder separately. Continue to dec 1 st on next row from neck = 23-23-25-25-25-27 sts remain on the shoulder. Continue until piece measures 58-60-62-64-66-68 cm and cast off. Repeat on the other shoulder. FRONT PIECE: = 94-102-112-124-138-150 sts. Continue back and forth in stocking st with pattern as on back piece AT THE SAME TIME cast off for armholes in each side as on back piece = 92-92-96-104-104-108 sts. Continue to work until piece measures 50-52-53-55-56-58 cm. Now slip the middle 22-22-22-30-30-30 sts on 1 stitch holder for neck and finish each shoulder separately. Then cast off at beg of every row from neck as follows: Cast off 2 sts 4 times and 1 st 4 times = 23-23-25-25-25-27 sts remain on shoulder. Continue until piece measures 58-60-62-64-66-68 cm and cast off. SLEEVE: Worked in the round on double pointed needles. Cast on 56-60-60-64-68-68 sts on double pointed needles size 3 mm with Cotton Light or Belle. K 1 round. Then work rib = K 2/P 2. When rib measures 4 cm, dec 8-10-8-10-12-10 sts evenly = 48-50-52-54-56-58 sts. Insert 1 marker at beg of round (= mid under sleeve). Switch to double pointed needles size 3.5 mm and work in stocking st. When piece measures 8-10-8-10-6-8 cm, inc 2 sts mid under sleeve. Repeat inc every 3½-2½-2½-2-2-1½ cm 12-15-16-18-19-22 times in total = 72-80-84-90-94-102 sts. When piece measures 49-49-48-47-45-44 cm (shorter measurements in the larger sizes because of longer sleeve cap and wider shoulders), cast off 6-6-8-8-10-10 sts mid under sleeve and work back and forth until finished measurements. Cast off for sleeve cap at beg of every row in each side as follows: 2 sts 3-3-3-4-4-5 times and 1 st 2-4-5-5-7-8 times. Then cast off 2 sts in each side until piece measures 55-56-56-56-57-57 cm. Cast off 3 sts at beg of the next 2 rows before loosely casting off all sts. Knit another sleeve. ASSEMBLY: Sew the shoulder seams. Sew in sleeves. NECK EDGE: Pick up approx. 100 to 120 sts around the neck (incl sts on stitch holder at the front) on circular needle size 3 mm with Cotton Light or Belle. P 1 round, K 1 round and P 1 round. Then loosely cast off with K. |
|||||||||||||||||||||||||
Diagram explanations |
|||||||||||||||||||||||||
|
|||||||||||||||||||||||||
 |
|||||||||||||||||||||||||
 |
|||||||||||||||||||||||||
 |
|||||||||||||||||||||||||
Have you finished this pattern?Tag your pictures with #dropspattern #darlingsweater or submit them to the #dropsfan gallery. Do you need help with this pattern?You'll find 28 tutorial videos, a Comments/Questions area and more by visiting the pattern on garnstudio.com. © 1982-2026 DROPS Design A/S. We reserve all rights. This document, including all its sub-sections, has copyrights. Read more about what you can do with our patterns at the bottom of each pattern on our site. |
|||||||||||||||||||||||||


With over 40 years in knitting and crochet design, DROPS Design offers one of the most extensive collections of free patterns on the internet - translated to 17 languages. As of today we count 325 catalogues and 12298 patterns translated into English (UK/cm). 12298
We work hard to bring you the best knitting and crochet have to offer, inspiration and advice as well as great quality yarns at incredible prices! Would you like to use our patterns for other than personal use? You can read what you are allowed to do in the Copyright text at the bottom of all our patterns. Happy crafting!
Post a comment to pattern DROPS 160-17
We would love to hear what you have to say about this pattern!
If you want to leave a question, please make sure you select the correct category in the form below, to speed up the answering process. Required fields are marked *.