
Popular categories
Looking for a yarn?


Comments / Questions (55)
![]() Séverine wrote:
Séverine wrote:
Bonjour, j'ai une question concernant les augmentations au début du tricot. Quand je fais les augmentations du raglan pour les manches, (1 jeté au début et à la fin de chaque manche) ça me donne 4 augmentations par rang (et non pas 8 comme dans les indications). Et je n'ai pas très bien compris où faire les augmentations du dos et devant (est ce 4 fois ? : à la fin du devant droit + au début du dos + à la fin du dos + au début du devant gauche ?). Merci pour votre réponse,
17.01.2017 - 18:22DROPS Design answered:
Bonjour Séverine, en fonction de la taille, vous augmenterez soit uniquement sur les manches (= 4 augm par rang), soit juste sur le dos et les devants (= 4 augm par rang), soit partout (= 8 augm par rang). Augmentez pour le devant gauche avant A.1 et la manche, pour le devant droit après la manche et A.1, et pour le dos au début et à la fin du dos, soit après le A.1 après la manche et avant le A.1 avant la 2ème manche. Bon tricot!
18.01.2017 - 09:23
![]() Marjolaine wrote:
Marjolaine wrote:
Bonjour, on parle de marqueur dans les augmentations, hors il n'y a nulle part où on dit où placer ces marqueurs, pouvez-vous m'aider svp :) ? Est ce que je les place tout de suite avant le raglan ? merci beaucoup
13.10.2016 - 00:22DROPS Design answered:
Bonjour Marjolaine, pour les augmentations du raglan, on augmente avant A.1 et/ou après A.1 - pour les augmentations des côtés après l'empiècement, on place un marqueur au niveau des mailles montées sous la manche lorsqu'on les place en attente. Bon tricot!
13.10.2016 - 07:52
![]() Manon Kerste wrote:
Manon Kerste wrote:
Hoi. als ik patroon met meerderINGen uitschrijf dan begin ik met meerderen aan beide kanten(goede en verkeerde) om erna alleen aan verkeerde kant te meerderen. klopt dat? hoor graag van u!
01.09.2016 - 20:56DROPS Design answered:
Hoi Manon. Ja, dat kan afhankelijk van welke maat je maakt
02.09.2016 - 14:13
![]() Emanuela wrote:
Emanuela wrote:
Ops, come non detto ;/ mi sono accorta che occorre seguire le indicazione relative agli aumenti per la RAGLAN. Scusi per la distrazione è la voglia di capire per iniziare al più presto :). Ancora grazie per la sollecitudine e l'attenzione
22.02.2016 - 13:07DROPS Design answered:
Bene Emanuela, siamo contente che sia riuscita a risolvere il suo dubbio. Buon lavoro!
23.02.2016 - 11:24
![]() Emanuela wrote:
Emanuela wrote:
Quindi gli aumenti da fare nello sprone seguono solo la regola di essere uniformi? Non è necessario aumentare, mentre si lavora lo sprone, con la tecnica della maglia gettata, posso utilizzare la tecnica dell'aumento "invisibile", seguendo il vostro video tutorial "Aumentare - M1 (fare un aumento)"? Grazie :)
22.02.2016 - 12:58DROPS Design answered:
Bene Emanuela, siamo contente che sia riuscita a risolvere il suo dubbio. Buon lavoro!
23.02.2016 - 11:24
![]() Emanuela wrote:
Emanuela wrote:
Eccomi pronta ad iniziare ma ancora non capisco una cosa, relativa ai "suggerimenti per gli aumenti": cosa significa lavorare finché non rimane 1 maglia prima del segno? di che segno si parla? ancora grazie :)
21.02.2016 - 21:46DROPS Design answered:
Buongiorno Emanuela. Alla fine dello sprone, mette in attesa le m per le maniche e avvia 8 m per ogni sotto manica; deve mettere un segno al centro di queste 8 m. Questi due segni indicano i lati del davanti e del dietro. E sono i segni a cui fa riferimento il suggerimento per gli aumenti. Quindi dovrà lavorare finché non rimane 1 m prima dei questi segni e poi seguire le indicazioni per gli aumenti. Buon lavoro!
22.02.2016 - 11:06
![]() Emanuela wrote:
Emanuela wrote:
Approfitto ancora della gentilezza per chiedere se posso lavorare 162 maglie su un ferro diritto, perché nella sua massima estensione se ho capito bene (speriamo) le indicazioni, dovrei avere questo numero di maglie. Grazie
20.02.2016 - 15:58DROPS Design answered:
Buonasera Emanuela, questo è uno dei motivi per cui si utilizzano i ferri circolari: i cavi di lunghezza variabile consentono di lavorare con un numero di maglie elevato, cosa che invece non è semplice con i ferri dritti,deve fare delle prove. Buon lavoro!
21.02.2016 - 20:15
![]() Emanuela wrote:
Emanuela wrote:
Scusate, sono nuova del mestiere :) non ho mai lavorato con i ferri circolari, a vostro giudizio, posso realizzare lo stesso modello con i ferri diritti? grazie per l'aiuto
19.02.2016 - 18:35DROPS Design answered:
Buonasera Emanuela, il modello che ha scelto è un cardigan, non è lavorato in tondo, per cui può tranquillamente lavorare con i ferri dritti seguendo le spiegazioni. Buon lavoro!
19.02.2016 - 19:40
![]() Caterina wrote:
Caterina wrote:
Salve, volevo sapere se gli aumenti x il raglan si fanno sia sul dritto che sul rovescio, quando è previsto che si facciano su tutti i ferri, oppure se si intende tutti i ferri dal dritto del lavoro. Grazie
18.12.2015 - 09:09DROPS Design answered:
Buongiorno Caterina. Nel raglan, quando indicato di aumentare ad ogni ferro, si intende sia sul diritto che sul rovescio del lavoro. Buon lavoro!
18.12.2015 - 11:35
![]() Katharina Oppenberg wrote:
Katharina Oppenberg wrote:
Hallo...ich habe eine kurze Frage zu der Anleitung. Nach dem Bündchen soll 1 Hin-R re gestrickt werden und GLEICHZEITIG 8-8-7-7-8-8 M gleichmäßig verteilt zunehmen (= 62-62-65-65-66-66 M). Muss ich hiernach auch eine Rückreihe stricken oder in der Rückreihe dann das Muster anfangen? Das Muster sollte doch wahrscheinlich in einer Hinreihe beginnen oder?
22.07.2015 - 10:24DROPS Design answered:
Ja, ich denke auch, dass A.1 mit einer Hin-R beginnen sollte. Ich werde das Problem an die Designerinnen weiterleiten. Sie können es für sich lösen, indem Sie entweder in einer glatt re gestrickten Rück-R (d.h. Rück-R li) die Zunahmen machen oder nach der Zunahme-Hin-R noch 1 Rück-R stricken und dann mit A.1 und den Raglanzunahmen beginnen.
29.07.2015 - 11:31
|
|||||||
Virginia Cardigan#virginiacardigan |
|||||||
|
|
|||||||
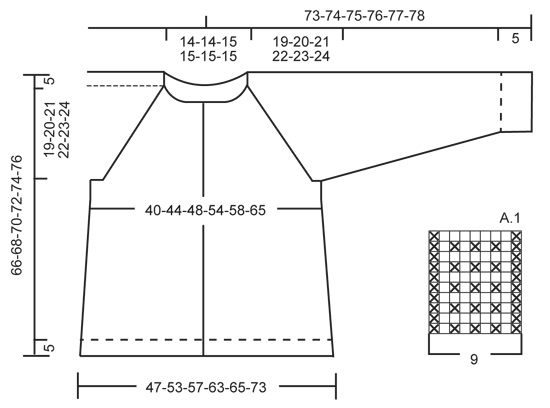
Knitted DROPS jacket with rib and raglan, worked top down in ”Snow”. Size: S - XXXL.
DROPS 157-28 |
|||||||
|
GARTER ST (back and forth on needle): K all rows. 1 ridge = 2 rows K. PATTERN: See diagram A.1. The diagram shows all rows in pattern seen from RS. RAGLAN: Inc on each side of every A.1 by making 1 YO (= 8 inc on row). On next row work YOs twisted (i.e. work in the back loop of st instead of front) to avoid holes. INCREASE TIP (applies to body): Work until 1 st remains before marker, 1 YO, K 2, 1 YO = 2 sts inc. Repeat in the other side. On next row K YOs twisted (i.e. work in the back loop of st instead of front) to avoid holes. DECREASE TIP (applies to sleeves): Dec before marker and 1 st as follows: K 2 tog. Dec after marker and 1 st as follows: Slip 1 st as if to K, K 1, psso. BUTTONHOLES: Dec for buttonholes on right band. 1 buttonhole = K 2 tog and make 1 YO. Dec for buttonholes when piece measures (measured from edge at the bottom of body): SIZE S: 5, 14, 23, 32, 41, 50 and 59 cm SIZE M: 5, 15, 25, 34, 43, 52 and 61 cm SIZE L: 5, 15, 25, 35, 45, 54 and 63 cm SIZE XL: 5, 15, 25, 35, 45, 55 and 65 cm SIZE XXL: 5, 14, 23, 32, 41, 50, 59 and 67 cm. SIZE XXXL: 5, 15, 24, 33, 42, 51, 60 and 69 cm. ---------------------------------------------------------- JACKET: Worked back and forth, top down. Work sleeves in the round on double pointed needles. YOKE: Cast on 54-54-58-58-58-58 sts on circular needle size 8 mm. Continue to work rib as follows: P 2, * K 2, P 2 *, repeat from *-*. When rib has been worked for 3 cm, work 1 row in stocking st from RS while AT THE SAME TIME inc 8-8-7-7-8-8 sts evenly = 62-62-65-65-66-66 sts. Now work pattern as follows: 5-5-6-6-6-6 sts in stocking st (= front piece), A.1, 3 sts in stocking st (= sleeve), A.1, 10-10-11-11-12-12 sts in stocking st (= back piece), A.1, 3 sts in stocking st (= sleeve ), A.1, 5-5-6-6-6-6 sts in stocking st (= front piece). There is now 1 repetition A.1 in each raglan. REMEMBER THE KNITTING TENSION! Continue with pattern like this, AT THE SAME TIME on next row from RS beg inc for RAGLAN – see explanation above! Inc differently on body and sleeves: BODY: Repeat inc every row 0-2-5-8-10-12 times, every other row 4-4-3-4-4-8 times and every 4th row 5-5-5-4-4-2 times. SLEEVE: Repeat inc every row 6-6-7-7-10-11 times, every other row 3-4-4-5-4-4 times and every 4th row 4 times in all sizes. When all inc are done and piece measures 24-25-26-27-28-29 cm, there are 150-162-177-193-210-230 sts in total on needle. Then continue in stocking st as follows: Work the first 18-20-23-26-28-32 sts, slip the next 39-41-43-45-49-51 sts on a stitch holder for sleeve, cast on 8 new sts under sleeve, insert a marker in the middle of these sts, work the next 36-40-45-51-56-64 sts, slip the next 39-41-43-45-49-51 sts on a stitch holder for sleeve, cast on 8 new sts under sleeve, insert a marker in the middle of these sts, work the remaining 18-20-23-26-28-32 sts. Work the new sts under each sleeve in stocking st. BODY: There are now 88-96-106-118-128-144 sts for body. Continue in stocking st. When piece measures 4 cm from the new sts under sleeve, beg inc on each side of markers - READ INCREASE TIP! Repeat inc every 8-6½-7-7-9-9 cm 3-4-4-4-3-3 more times = 104-116-126-138-144-160 sts. When piece measures 61-63-65-67-69-71 cm in total, inc 2-2-4-4-2-2 sts = 106-118-130-142-146-162 sts. Now work rib as follows: P 2, * K 2, P 2 *, repeat from *-*. Continue like this until rib has been worked for 5 cm. Cast off with K over K and P over P. SLEEVE: Slip sts back on double pointed needles. Work in stocking st and cast on 8 new sts at the end of row = 47-49-51-53-57-59 sts. Insert a marker in the middle of the new sts under the sleeve. NOW MEASURE THE PIECE FROM HERE. Then work in stocking st in the round – AT THE SAME TIME dec 1 st on each side of marker – READ DECREASE TIP. Repeat dec every other round 2 more times in all sizes = 41-43-45-47-51-53 sts. Then dec every 4-3½-4-3½-3-3 cm 9-10-9-10-12-11 times = 23-23-27-27-27-31 sts. When sleeve measures 42-42-41-41-41-41 cm, inc 1 st in all sizes = 24-24-28-28-28-32 sts. Continue with rib as follows: K 1, * P 2, K 2 *, repeat from *-* until 1 st remains, K 1. Continue like this until rib has been worked for 5 cm. Cast off with K over K and P over P. RIGHT BAND: Pick up sts for band as follows from RS: Beg at the bottom on right front piece and pick up 86-90-90-94-98-102 sts evenly inside 1 st in stocking st. Then work rib, beg from WS as follows: 2 sts in GARTER ST – see explanation above -, * K 2, P 2 *, repeat from *-* until 4 sts remain, P 2, 2 sts in garter st. Continue like this back and forth, AT THE SAME TIME on 1st row from RS dec for BUTTONHOLES – see explanation above! Cast off when band measures 4 cm. LEFT BAND: Pick up sts and work band the same way as right band but reversed. I.e. pick up sts from neck edge st at the top (= from RS). Do not dec for buttonholes. ASSEMBLY: Sew the holes under the sleeves. Sew the buttons on to the left band. |
|||||||
Diagram explanations |
|||||||
|
|||||||
 |
|||||||
Have you finished this pattern?Tag your pictures with #dropspattern #virginiacardigan or submit them to the #dropsfan gallery. Do you need help with this pattern?You'll find 25 tutorial videos, a Comments/Questions area and more by visiting the pattern on garnstudio.com. © 1982-2026 DROPS Design A/S. We reserve all rights. This document, including all its sub-sections, has copyrights. Read more about what you can do with our patterns at the bottom of each pattern on our site. |
|||||||


With over 40 years in knitting and crochet design, DROPS Design offers one of the most extensive collections of free patterns on the internet - translated to 17 languages. As of today we count 324 catalogues and 12290 patterns translated into English (UK/cm). 12290
We work hard to bring you the best knitting and crochet have to offer, inspiration and advice as well as great quality yarns at incredible prices! Would you like to use our patterns for other than personal use? You can read what you are allowed to do in the Copyright text at the bottom of all our patterns. Happy crafting!
Post a comment to pattern DROPS 157-28
We would love to hear what you have to say about this pattern!
If you want to leave a question, please make sure you select the correct category in the form below, to speed up the answering process. Required fields are marked *.