
Popular categories
Looking for a yarn?


Comments / Questions (34)
![]() Toni wrote:
Toni wrote:
Do you have a step by step photos and or tutorial on how to do the broomstick lace pattern on the hat? I am able to do the broomstick lace as demonstrated on the video but it is difficult to do and understand when making a hat as it is round not straight like the video.
20.02.2015 - 04:12DROPS Design answered:
Dear Toni, you can work as shown in the video with the help of the 2 straight needles, first slip the sts on one of the needles until you reach middle of row, then take the 2nd needle to slip the sts on the 2nd straight needle. Happy crocheting!
20.02.2015 - 09:15
![]() Katuki wrote:
Katuki wrote:
Prosím o vysvětlení značek "*-*" "*1 KS" (mám na mysli ty hvězdičky) Co znamenají?
17.02.2015 - 12:55DROPS Design answered:
Dobrý den, Katuki! Hvězdičky označují pasáž, která se opakuje (obdobně jako v matematice třeba závorky). Tedy: ten postup, který je vepsán mezi hvězdičkami, se pak v průběhu řady/kruhové řady stále dokola opakuje. Hodně zdaru! Hana
17.02.2015 - 21:23
![]() Isabelle wrote:
Isabelle wrote:
Bonjour, moi aussi je suis perdue. J'ai regardé les commentaires mais je ne comprends toujours pas comment mettre les mailles sur l'aiguille droite #20 alors que j'ai un rond. J'ai bien regardé les vidéos je sais comment faire le point Broomstick Lace mais, ma difficulté c'est de mettre toutes mes mailles du bonnet qui est rond sur une aiguille droite. En fait ma question est la même que Mme Plante du 5 décembre, la réponse que vous donnez ne m'aide pas. Merci de m'expliquer davantage.
06.02.2015 - 12:27DROPS Design answered:
Bonjour Isabelle, vous allez utiliser les 2 aiguilles droites 20 pour y placer les mailles, l'une pour la 1ère moitié et l'autre pour la 2e moitié par ex. Ensuite, vous tournez (on crochète ce point en allers et retours) et crochetez le 2ème rang en prenant les mailles posées sur l'aiguille droite. Bon crochet!
06.02.2015 - 14:08
![]() Monika Waibel wrote:
Monika Waibel wrote:
Hallo liebes drops - Team, Wieviele cm in der länge sollte die mütze haben ?
14.01.2015 - 11:33DROPS Design answered:
Die Länge wurde bei den Designerinnen angefragt. Der obere Teil, vor dem Muster, hat eine Länge von 15-16-17 cm (je nach Größe).
06.03.2015 - 14:11
![]() Angela wrote:
Angela wrote:
Grazie, ho risolto, impossibile lavorare il punto avendo la base tonda, ho risolto usando 2 ferri x il punto
11.01.2015 - 20:39
![]() Marie-Anne Fillion wrote:
Marie-Anne Fillion wrote:
Bonjour, vous dites 15 cm, mais est-ce à partir du centre ou la longueur total ? Merci
26.12.2014 - 21:22DROPS Design answered:
Bonjour Mme Fillion, pour le bonnet, on mesure les 15 cm depuis la chaînette de base. Bon crochet!
30.12.2014 - 13:26
![]() Jenneke wrote:
Jenneke wrote:
Tot en met toer 9 van de muts is mij duidelijk. Daarna begrijp ik het niet meer. Moet ik na toer 9 doorhaken totdat ik 17 cm heb? En als ik dan de eerste toer 0 meerder, de tweede toer 3 meerder enz. dan heb ik meer dan 54 vasten. Dus die eerste toer herhalen totdat ik 17 cm heb? Of moet ik na toer 9 een toer haken zonder te meerderen, dan het bezemsteelkant, dan toer 3 en 4 en dan weer opnieuw beginnen bij de eerste toer en dan 3 steken meerderen?
16.12.2014 - 17:37DROPS Design answered:
Hoi Janneke. Na toer 8 moet je 1 v haken in de achterste lus van elke v. Je meerdert alleen in maat M/L. Daarna ga je door met 1 v in elke v tot een hoogte van 17 cm.
17.12.2014 - 17:43
![]() BOS wrote:
BOS wrote:
Je reviens sur ma demande précédente. Je sais déjà faire le broomstick lace, mais j'ai l'impression que le point fantaisie est différent pour plusieurs raisons : - pourquoi ne pas utiliser le même terme sur tout le modèle ? - et la photo montre un point différent entre le tour de cou et le bonnet. Etes-vous sur qu'il n'existe pas un point fantaisie en particulier ? Je peux bien sûr me tromper mais je voulais juste être sûre... Merci beaucoup pour votre grande réactivité ;)
15.12.2014 - 21:08DROPS Design answered:
Bonjour Mme Bos, le bonnet et le tour de cou sont bien réalisés tous les 2 en broomstick lace, la seule différence, c'est qu'on va augmenter le nombre de ms crochetées dans chacune des mailles de l'aiguille 20 pour le tour du cou pour qu'il soit plus large en bas qu'en haut. Bon crochet!
16.12.2014 - 09:47
![]() Ida Costagliola wrote:
Ida Costagliola wrote:
Come è possibile passare i punti sul ferro 20 essendo il lavoro chiuso in tondo? ho provato ma c'è qualcosa che non va
12.11.2014 - 20:47DROPS Design answered:
Buongiorno Ida, abbiamo risposto al suo commento nei video e nel forum, in ogni caso il punto traforato è lavorato su righe e non in tondo, ed è spiegato come passare al lavoro in piano nelle istruzioni del modello. Probabilmente risulterà difficile fare il passaggio ai ferri del 20 dato che si lavora con l'uncinetto n° 7, ma dopo le prime righe il lavoro sarà più morbido. Buon lavoro!!
13.11.2014 - 11:27Rocio wrote:
Hi! I'm making the neck warmer and I got stuck... when you say, *then work 4 dc in the 3 sts on needle* what does it mean? 4dc in each st on needle? 1 dc in each st and one extra out of the needle? I am confused, help me please :) Thanks!
01.10.2014 - 10:04DROPS Design answered:
Dear Mrs Rocio, you are making increasing on this row, ie you will crochet 4 dc in the 3 sts on needle where you earlier made only 3 (row 2 in broomstick lace). Happy crocheting!
01.10.2014 - 10:20
|
|
Cozy Crimson#cozycrimsonset |
|
|
|
|
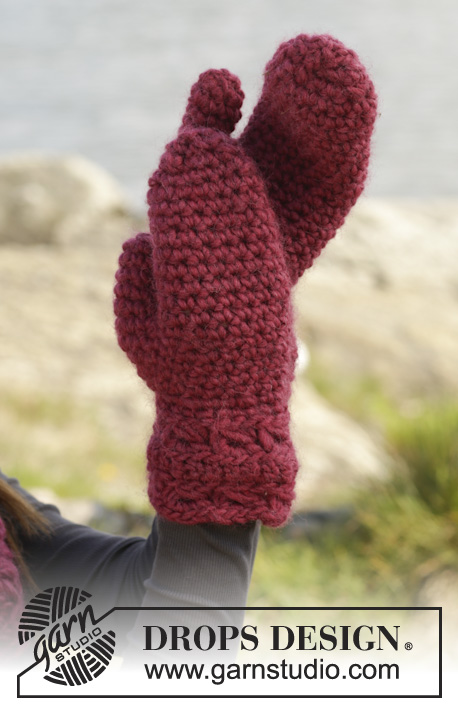
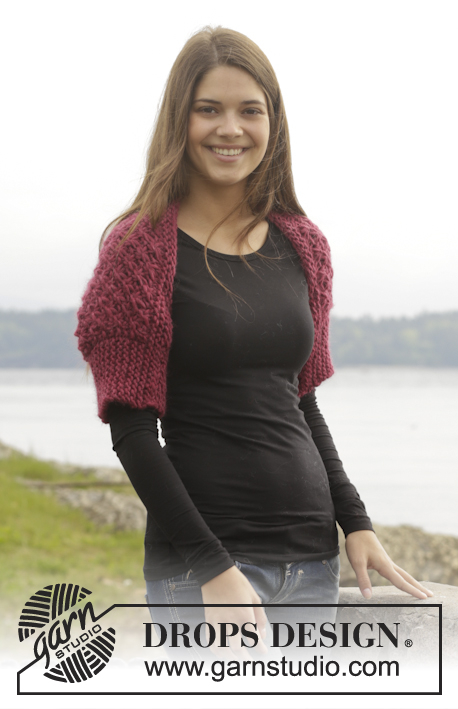
Crochet DROPS hat and neck warmer with broomstick lace in ”Snow”.
DROPS 158-13 |
|
|
CROCHET INFO: Beg every dc round with 1 ch instead of 1st dc. Finish every round with 1 sl st in ch at beg of round. ---- BROOMSTICK LACE: ROW 1 (= WS): Slip the first ch on needle size 20 mm, * pick up 1 st with hook through front loop of next st and slip st loosely on to needle size 20 mm *, repeat from *-* the entire row. All sts on row are now loosely on needle size 20 mm. ROW 2 (= RS): * Insert hook through the first 3 sts on needle, work 1 sl st (this binds the 3 sts tog), slip sts off the needle and work 1 ch, 3 dc through the 3 sts, work 1 ch *, repeat from *-* until 3 sts remain on needle, insert hook through the last 3 sts on the needle, work 1 sl st (this binds the 3 sts tog), work 1 ch, slip sts off the needle and work 3 dc through the 3 sts. ---------------------------------------------------------- HAT: The piece is worked top down. Crochet 4 ch on hook size 7 mm with Snow and form 1 ring with 1 sl st in first ch. ROUND 1: Work 6 dc in ch-ring. READ CROCHET INFO! ROUND 2: Work 2 dc in back loop of every dc = 12 dc. ROUND 3: Work * 1 dc in back loop of next dc, 2 dc in back loop of next dc *, repeat from *-* = 18 dc. ROUND 4: Work * 1 dc in back loop of each of the next 2 dc, 2 dc in back loop of next dc *, repeat from *-* = 24 dc. REMEMBER THE CROCHET TENSION! ROUND 5: Work * 1 dc in back loop of each of the next 3 dc, 2 dc in back loop of next dc *, repeat from *-* = 30 dc. ROUND 6: Work * 1 dc in back loop of each of the next 4 dc, 2 dc in back loop of next dc *, repeat from *-* = 36 dc. ROUND 7: Work * 1 dc in back loop of each of the next 5 dc, 2 dc in back loop of next dc *, repeat from *-* = 42 dc. ROUND 8: Work * 1 dc in back loop of each of the next 6 dc, 2 dc in back loop of next dc *, repeat from *-* = 48 dc. Inc in S/M and M/L are now done. SIZE L/XL: ROUND 9: Work * 1 dc in back loop of each of the next 7 dc, 2 dc in back loop of next dc *, repeat from *-* = 54 dc. Then work next round as follows: Work 1 dc in back loop of every dc but inc 0-3-0 dc evenly = 48-51-54 dc. Continue to work 1 dc in back loop of every dc until piece measures 15-16-17 cm. Now work back and forth. Then work as follows: Work BROOMSTICK LACE - see explanation above = 16-17-18 repetitions in width. ROW 3 (= WS): Work 1 dc in front loop of every dc on previous row = 48-51-54 dc. ROW 4 (= RS): Work 1 dc in back loop of every dc. Repeat these 4 rows a total of 3 times vertically. Fasten off. ASSEMBLY: Sew tog in the side at Broomstick lace in every dc row. ---------------------------------------------------------- NECK WARMER: Worked back and forth, top down. Work 66-75 LOOSE ch (incl 3 ch to turn with) on hook size 8 mm with Snow. Work 1 tr in 4th ch from hook, then 1 tr in every ch = 63-72 tr (first 3 ch = 1 tr). Then work BROOMSTICK LACE - see explanation above = 21-24 repetitions in width. Repeat rows 1-2 in pattern until finished measurements. REMEMBER THE CROCHET TENSION! When piece measures approx. 18 cm, adjust so that next row is 2nd row in pattern, work as before over the next 9-12 sts (= 3-4 repetitions of pattern), * then work 4 dc in the 3 sts on needle *, repeat from *-* 2 more times (= 3 repetitions of pattern), work as before over the next 24-27 sts (= 8-9 repetitions of pattern), * then work 4 dc in the 3 sts on needle *, repeat from *-* 2 more times (= 3 repetitions of pattern), work as before over the last 12-15 sts (= 4-5 repetitions of pattern) = 69-78 dc on row. Continue pattern as before, now work 23-26 repetitions of pattern in width. When piece measures 26 cm, adjust so that last row is 2nd row in lace, fasten off. ASSEMBLY: Sew neck warmer tog in the side in each of the dc/tr rows. |
|
Have you finished this pattern?Tag your pictures with #dropspattern #cozycrimsonset or submit them to the #dropsfan gallery. Do you need help with this pattern?You'll find 8 tutorial videos, a Comments/Questions area and more by visiting the pattern on garnstudio.com. © 1982-2026 DROPS Design A/S. We reserve all rights. This document, including all its sub-sections, has copyrights. Read more about what you can do with our patterns at the bottom of each pattern on our site. |


With over 40 years in knitting and crochet design, DROPS Design offers one of the most extensive collections of free patterns on the internet - translated to 17 languages. As of today we count 324 catalogues and 12290 patterns translated into English (UK/cm). 12290
We work hard to bring you the best knitting and crochet have to offer, inspiration and advice as well as great quality yarns at incredible prices! Would you like to use our patterns for other than personal use? You can read what you are allowed to do in the Copyright text at the bottom of all our patterns. Happy crafting!
Post a comment to pattern DROPS 158-13
We would love to hear what you have to say about this pattern!
If you want to leave a question, please make sure you select the correct category in the form below, to speed up the answering process. Required fields are marked *.