
Popular categories
Looking for a yarn?


Comments / Questions (298)
![]() Jacqueline Cartier wrote:
Jacqueline Cartier wrote:
J'ai fait cette veste en taille M mais en 3 parties je voudrais vous envoyer mon descriptif de ces 3 parties mais je je ne sais pas comment faire
08.09.2018 - 15:46
![]() Inez Schepens wrote:
Inez Schepens wrote:
Als je niet met rondbreinaalden kan/wil werken, hoe moet je dit dan aanpakken?
22.05.2018 - 17:08DROPS Design answered:
Hallo Inez, In deze instructie wordt uitgelegd hoe je een patroon aan kunt passen voor rechte naalden. Let er bij dit patroon even goed op of je uitkomt met de kabels in de zijnaden.
23.05.2018 - 11:05
![]() Bente Egaa Andreasen wrote:
Bente Egaa Andreasen wrote:
Hej - jeg er lidt forvirret mht indtagningerne efter 10 cm. Jeg har sat de 2 mærker og 4 tråde i arbejdet. Opskiften siger "tag ind i hvert parti", men hvad menes der ?
15.05.2018 - 10:10DROPS Design answered:
Hei Bente. Da du strikket mønster på bolen var det innimellom diagrammene totalt 5 partier med 14-16-16-16-16-16 vrangmasker i hvert parti. Du skal felle som anvist i oppskriften i disse partiene med vrangmasker. Samtidig skal det felles 1 m etter 1.merke og 1 m før 2.merke som anvist i felletips. God fornøyelse
16.05.2018 - 13:07
![]() Brigitte wrote:
Brigitte wrote:
Bonjour, je voulais une explication sur le décalage des torsades sur les manches. Au troisième rang , je ne sais pas combien de maille je dois faire entre les torsades. Si vous pouvez m'éclairer. Merci.
04.05.2018 - 23:53DROPS Design answered:
Bonjour Brigitte, vous diminuez 2 m entre A.4 et A.5 tous les 2 rangs, en commençant par 33 m entre ces torsades, au 2ème rang (= après la 1ère diminution, vous aurez 31 m entre les diagrammes), n'oubliez pas de bien augmenter avant A.4 et après A.5 en même temps que vous diminuez entre les diagrammes pour que le nombre de mailles soit toujours le même. Continuez ainsi jusqu'à ce qu'il ne reste que 2 m entre A.4 et A.5. Bon tricot!
07.05.2018 - 08:36
![]() Delchet Brigitte wrote:
Delchet Brigitte wrote:
Bonjour, Taille L , aprés dim. j'ai 252 m. au lieu de 257, (8 x 10 m. = 80) + ( 7 x 2 m. = 14 m.) + ( 2 x 16 m. = 32 m. 378 - 126 = 252 m. Merci de m'aider.
12.03.2018 - 14:27DROPS Design answered:
Bonjour Mme Delchet, quand on diminue dans les sections de 16 m env, la dernière fois on ne diminue que 5 mailles car on tricote les 2 dernières mailles envers ensemble à l'envers, on va ainsi avoir: (7 x 10 m + 1 x 5 m) + (7 x 2 m) + (2 x 16 m) = 121 diminutions soit 378-121= 257 m. Bon tricot!
12.03.2018 - 16:22
![]() Charlotte Bygballe wrote:
Charlotte Bygballe wrote:
Hvordan kan det være at snoningerne ikke er ens i højre og venstre side? I starten af pinden på retsiden starter man med A.4, så A.5 og så A.4 hvor i mod man slutter med A5 + A.4 + A5. Når snoningerne så senere flettes sammen bliver det jo ikke ens på begge sider! Det kan man også se på billederne..
29.01.2018 - 06:36DROPS Design answered:
Hej, vi har valgt at vende snoningerne så de passer sammen når de går imod hinanden. Du må gerne vende på dem så de passer bedre til din smag. God fornøjelse!
26.02.2018 - 13:33
![]() Sylba wrote:
Sylba wrote:
Bonjour, Je suis en train de faire les manches. J'utilise des aiguilles circulaire et la technique du magic loop. Lorsque j'arrive dans la phase de rabatte, je ne tricote plus en rond mais je reprend une technique classique de tricotage à plat ? est-ce bien ca ? Je n'ai jamais fais de rabattage sur des aiguilles circulaires :) merci pour votre réponse.
04.12.2017 - 11:06DROPS Design answered:
Bonjour Sylba, tout à fait, arrivée à l'arrondi de la manche, rabattez 4 m de chaque côté du marqueur du milieu sous la manche et continuez en allers et retours en rabattant les mailles de l'arrondi au début de chaque rang de chaque côté. Bon tricot!
04.12.2017 - 13:45
![]() Meg wrote:
Meg wrote:
I am very frustrated with this sweater. I've ripped it out 4 times. I can get the 422 on the needles but then when I try to get my stitches of the first row on the needles I am always short. I do not understand the A3. In some answers you say it's 2 stitches in other answers you count them as 3. Where am I going wrong? I am about to give up on this gorgeous sweater!
09.11.2017 - 15:15DROPS Design answered:
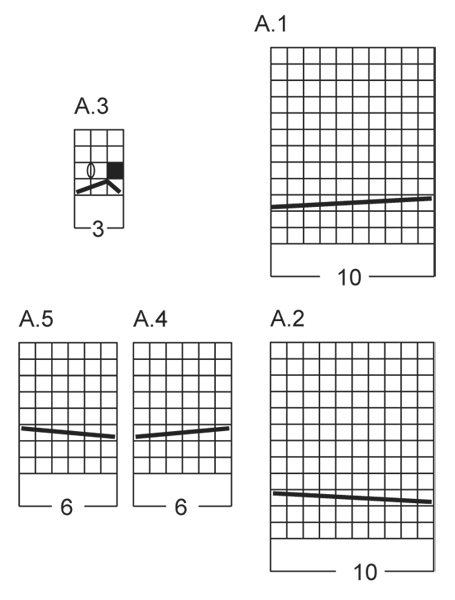
Dear Meg, A.3 is worked over 3 sts on 1st row (= slip 1 st as if to K, K 2, psso the 2 K sts), only 2 sts remain in each A.3 after row 1, then inc with a YO on row 2 (= P1, YO, P1) = 3 sts in each A.3 again. see also this video. Happy knitting!
09.11.2017 - 16:39
![]() Charlotte Bygballe wrote:
Charlotte Bygballe wrote:
Hvilket garn holder bedst formen efter vask? Uld? Alpaca? eller et blandingsgarn?
04.11.2017 - 15:32DROPS Design answered:
Hej Charlotte, Hvis du følger vaskeanvisningerne, vasker separat, lader det ligge til tørre (ikke hænge) så kan du vaske både Uld og Alpaca og det skal holde formen. God fornøjelse!
13.11.2017 - 14:53
![]() Stelilou wrote:
Stelilou wrote:
Re bonjour, C'est la ou je comprend pas. étant donnée que l'on fait les manches sur des aiguilles double pointe, si l'on ne fais que des mailles envers entre les torsades , visuellement cela va donné du 'jersey' et a l'identique pour les torsades, si l'on suit le schéma, on va se retrouver avec des torsades en point mousse non ?
13.10.2017 - 15:13DROPS Design answered:
Bonjour Stelilou, les manches se tricotent en rond, donc on va tricoter sur l'endroit les mailles telles qu'elles doivent être vues, soit toutes les mailles envers seront tricotées à l'envers et les mailles endroit des torsades à l'endroit tous les tours (voir comment monter les mailles et tricoter en jersey sur aiguilles doubles pointes en vidéo) et pour le point mousse, on va tricoter alternativement 1 tour end et 1 tour env (voir vidéo). Bon tricot!
13.10.2017 - 15:46
|
|||||||||||||||||||||||||
Morning Glory#morningglorycardigan |
|||||||||||||||||||||||||
 |
 |
||||||||||||||||||||||||
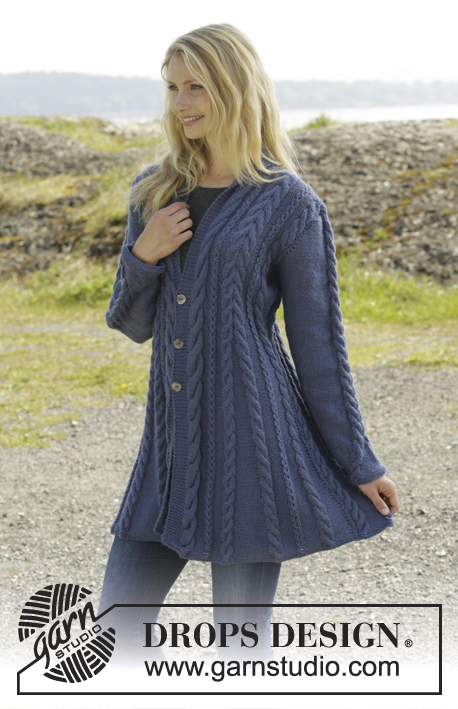
Knitted DROPS jacket with cables and shawl collar in ”Karisma”. Size: S - XXXL.
DROPS 158-1 |
|||||||||||||||||||||||||
|
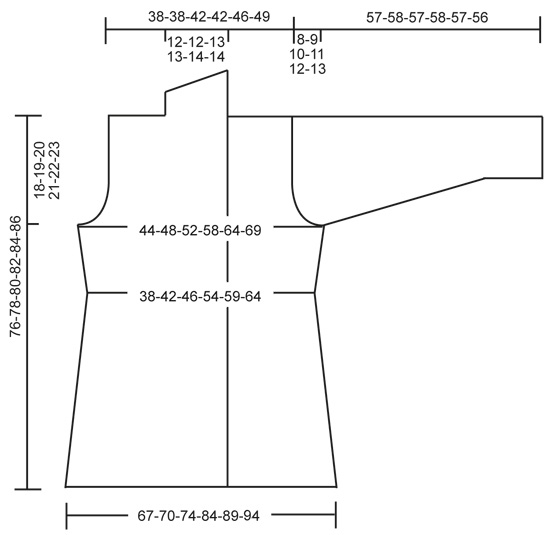
GARTER ST (back and forth on needle): K all rows. 1 ridge = 2 rows K. GARTER ST (in the round on double pointed needles): * K 1 round and P 1 round *, repeat from *-*. 1 ridge = 2 rounds. DECREASE TIP: Dec 1 st before marker/A.3 as follows: Work until 2 sts remain before marker, P 2 tog. Dec 1 st after marker/A.3 as follows: P 2 tog. PATTERN 1: See diagrams A.1-A.5. The diagrams show all rows in pattern seen from RS. PATTERN 2: P 7-7-8-8-9-10, A.3, P 7-7-8-8-9-10. PATTERN 3: P 4-5-6-6-7-8, A.3, P 4-5-6-6-7-8. BUTTONHOLES: Dec for buttonholes on right band. 1 buttonhole = K tog second and third st from edge and make 1 YO. Dec for buttonholes when piece measures: SIZE S: 31, 39 and 47 cm SIZE M: 31, 39 and 47 cm SIZE L: 31, 39 and 47 cm SIZE XL: 32, 40 and 48 cm SIZE XXL: 32, 40 and 48 cm SIZE XXL: 32, 40 and 48 cm ---------------------------------------------------------- BODY: Worked back and forth on circular needle. Cast on 306-318-334-378-398-418 sts (incl 8 band sts in each side of piece) on circular needle size 3.5 mm with Karisma. Work 2 ridges in GARTER ST - see explanation above AT THE SAME TIME on last row inc 44 sts evenly = 350-362-378-422-442-462 sts. Switch to circular needle size 4 mm. Then work from RS AT THE SAME TIME insert 2 markers and 0-0-0-4-4-4 strands in the piece as follows: Work 8 band sts in garter st, A.2, PATTERN 2 – see explanation above, A.4, P 14-16-16-16-16-16, A.5, pattern 2, A.4, P 0-0-0-8-9-10, insert 1 strand in size XL-XXL-XXXL, A.3 0-0-0-1-1-1 time, insert 1st marker, P 8-9-9-9-9-9, A.3 0-0-0-1-1-1 time, insert 1 strand in size XL-XXL-XXXL, P 0-0-0-8-9-10, A.5, pattern 2, A.4, P 14-16-16-16-16-16, A.5, pattern 2, A.1, P 14-16-16-16-16-16, A.2, pattern 2, A.4, P 14-16-16-16-16-16, A.5, pattern 2, A.4, P 0-0-0-8-9-10, insert 1 strand in size XL-XXL-XXXL, A.3 0-0-0-1-1-1 time, P 8-9-9-9-9-9, insert 2nd marker, A.3 0-0-0-1-1-1 time, insert 1 strand in size XL-XXL-XXXL, P 0-0-0-8-9-10, A.5, pattern 2, A.4, P 14-16-16-16-16-16, A.5, pattern 2, A.1, 8 band sts in garter st. Move the markers and strands upwards when working. Work band sts in garter st until finished measurements. Work K over K sts between cables from WS, i.e. P sts seen from RS. Continue pattern like this. Remember BUTTONHOLES - see explanation above. REMEMBER THE KNITTING TENSION! When piece measures 8-10-10-10-10-10 cm, dec as follows: Dec in every section with 14-16-16-16-16-16 P sts by working as follows: P 2 tog, P 10-12-12-12-12-12, P 2 tog (= 10 sts dec in total). Repeat this dec every 5-4-4-4-4-4 cm 6-7-7-7-7-7 more times. NOTE: On last dec work the remaining 2 P tog. AT THE SAME TIME when piece measures 8-10-10-10-10-10 cm, dec as follows: Dec 1 st after 1st marker and 1 st before 2nd marker - see DECREASE TIP. Repeat this dec every 6-4½-4½-4½-4½-4½ cm 5-6-6-6-6-6 more times. AT THE SAME TIME when piece measures 16 cm, dec as follows in pattern 2: Dec 1 st before A.3 and 1 st after A.3 (= 16 sts dec). Repeat this dec every 10-20-20-20-20-20 cm 2-1-1-1-1-1 more times. AT THE SAME TIME in size XL-XXL-XXXL dec as follows at every strand: Dec 1 st by working the 2 P sts closes to A.3 P tog (= 4 sts dec). Repeat this dec every 20 cm 1 more time. When all dec are done, there are 225-241-257-293-313-333 sts on needle. There are now 2 P st at markers in the sides and 1 P st between A.4 and A.5 and between A.1 and A.2 and 4-5-6-6-7-8 P sts on each side of A.3. When piece measures 44 cm, adjust so that next row is from RS, inc as follows: 8 band sts in garter st, A.2, PATTERN 3 – see explanation above, A.4, P 1, A.5, pattern 3, A.4, P 0-0-0-6-7-8, A.3 0-0-0-1-1-1 time, 1 YO, P 2, 1 YO, A.3 0-0-0-1-1-1 time, P 0-0-0-6-7-8, A.5, pattern 3, A.4, P 1, A.5, pattern 3, A.1, P 1, A.2, pattern 3, A.4, P 1, A.5, pattern 3, A.4, P 0-0-0-6-7-8, A.3 0-0-0-1-1-1 time, 1 YO, P 2, 1 YO, A.3 0-0-0-1-1-1 time, P 0-0-0-6-7-8, A.5, pattern 3, A.4, P 1, A.5, pattern 3, A.1, 8 band sts in garter st (= 4 sts inc). K YOs twisted on next row to avoid holes. Repeat inc every 6th-6th-6th-12th-10th-12th row 5-5-5-3-4-4 more times = 249-265-281-309-333-353 sts. Work inc sts P from RS and K from WS. When piece measures 58-59-60-61-62-63 cm, divide the piece, finish front and back pieces separately as follows: Slip the first and last 66-70-74-81-87-92 sts on a stitch holder for front pieces, cut the yarn, then work only over the middle 117-125-133-147-159-169 sts (= back piece). BACK PIECE: Now cast off for armholes at beg of every row in each side as follows: Cast off 3 sts 1 time, then 2 sts 1-1-1-3-4-4 times and 1 st 1-1-1-4-4-5 times = 105-113-121-121-129-137 sts. Then dec on next row from RS as follows: Dec 1 st before A.3 and 1 st after A.3 0-1-1-1-1-1 time = 105-105-113-113-121-129 sts. When piece measures 73-75-77-79-81-83 cm, dec 5 sts over A.1 and 5 sts over A.2 by working 2 and 2 sts K tog = 95-95-103-103-111-119 sts on needle. Then cast off the middle 25-25-27-27-29-31 sts for neck and finish each shoulder separately = 35-35-38-38-41-44 sts remain on each shoulder. When piece measures 75-77-79-81-83-85 cm, dec 3 sts over every A.4 and A.5 (= 9 sts dec) = 26-26-29-29-32-35 sts remain on needle. Cast off. RIGHT FRONT PIECE: = 66-70-74-81-87-92 sts. Now cast off for armhole at beg of every row from the side as follows: Cast off 3 sts 1 time, then 2 sts 1-1-1-3-4-4 times and 1 st 1-1-1-4-4-5 times = 60-64-68-68-72-76 sts. Then dec on next row from RS as follows: Dec 1 st before A.3 and 1 st after A.3 0-1-1-1-1-1 time = 60-60-64-64-68-72 sts on needle. When piece measures 75-77-79-81-83-85 cm, dec 5 sts over A.2 by working 2 and 2 sts K tog and 3 sts over every A.4 and A.5 = 46-46-50-50-54-58 sts. Then cast off the first 26-26-29-29-32-35 sts for shoulder, work the rest of row = 20-20-21-21-22-23 sts. Then work shawl collar in garter st over the remaining sts, beg mid front (1st row = RS) as follows: * Work 2 rows back and forth over the first 12-12-13-13-14-15 sts, work 2 rows back and forth over all sts *, repeat from *-* until shawl collar measures 8-8-9-9-10-10 cm at the shortest. Cast off. LEFT FRONT PIECE: Work as right front piece but reversed. Dec 5 sts over A.1 instead of A.2. Shawl collar beg from WS. SLEEVE: Worked in the round on double pointed needles. Cast on 48-50-52-54-54-56 sts on double pointed needles size 3.5 mm with Karisma. Work 2 ridges in GARTER ST - see explanation above AT THE SAME TIME on last round inc 5 sts = 53-55-57-59-59-61 sts. Switch to double pointed needles size 4 mm. READ ALL OF THE FOLLOWING SECTION BEFORE CONTINUING! Work as follows: P 4-5-6-7-7-8, A.4, P 33, A.5, finish with P 4-5-6-7-7-8. Insert 1 marker at the beg of the round. On next round move A.4 and A.5 1 st towards the middle as follows: P 4-5-6-7-7-8, 1 YO, A.4, P 2 tog, P 29, P 2 tog, A.5, 1 YO, finish with P 4-5-6-7-7-8. P YO twisted on next round. Move A.4 and A.5 towards the middle 1 st every other round until 1 st remains between A.4 and A.5. Piece measures approx. 12 cm. Continue to work P and A.4/A.5 with 1 P st between until finished measurements. AT THE SAME TIME when piece measures 10 cm, inc 1 st on each side of marker. Repeat inc every 4-3½-2½-2½-2-1½ cm 9-10-12-13-16-17 more times = 73-77-83-87-93-97 sts. When piece measures 49-49-47-47-46-43 cm (shorter measurements in the larger sizes because of longer sleeve cap and wider shoulders) cast off for sleeve cap at beg of every row in each side: Cast off 4 sts 1 time, 2 sts 3 times and 1 st 6 times, then cast off 2 sts in each side until piece measures 56-57-56-57-56-55 cm, then cast off 3 sts 1 time in each side AT THE SAME TIME dec 2 sts over every cable. Cast off the remaining sts, piece measures approx. 57-58-57-58-57-56 cm. Knit another sleeve. ASSEMBLY: Sew the shoulder seams. Sew in sleeves. Sew the collar tog mid back and sew it to the neckline. Sew the buttons on to left band. SHAPING: Moisten piece and place it on a carpet or mattress - carefully stretch it out to measurements. Leave to dry. |
|||||||||||||||||||||||||
Diagram explanations |
|||||||||||||||||||||||||
|
|||||||||||||||||||||||||
 |
|||||||||||||||||||||||||
 |
|||||||||||||||||||||||||
Have you finished this pattern?Tag your pictures with #dropspattern #morningglorycardigan or submit them to the #dropsfan gallery. Do you need help with this pattern?You'll find 31 tutorial videos, a Comments/Questions area and more by visiting the pattern on garnstudio.com. © 1982-2026 DROPS Design A/S. We reserve all rights. This document, including all its sub-sections, has copyrights. Read more about what you can do with our patterns at the bottom of each pattern on our site. |
|||||||||||||||||||||||||


With over 40 years in knitting and crochet design, DROPS Design offers one of the most extensive collections of free patterns on the internet - translated to 17 languages. As of today we count 324 catalogues and 12290 patterns translated into English (UK/cm). 12290
We work hard to bring you the best knitting and crochet have to offer, inspiration and advice as well as great quality yarns at incredible prices! Would you like to use our patterns for other than personal use? You can read what you are allowed to do in the Copyright text at the bottom of all our patterns. Happy crafting!
Post a comment to pattern DROPS 158-1
We would love to hear what you have to say about this pattern!
If you want to leave a question, please make sure you select the correct category in the form below, to speed up the answering process. Required fields are marked *.