
Popular categories
Looking for a yarn?


Comments / Questions (298)
![]() Desiree De Koeijer wrote:
Desiree De Koeijer wrote:
Sorry ,al eerder gevraagd om dit patroon als trui te breien zou t dan graag op de rondbreinaald rond willen breien , ipv heen en weer , moet ik dan nog met iets speciaals rekening houden ? mvg Desiree
22.01.2024 - 21:42DROPS Design answered:
Dag Desiree,
Het is voor ons helaas niet mogelijk om patronen aan te passen naar persoonlijke wensen, maar kijk even goed hoe het uitkomt met het kabelpatroon midden voor, wanneer je er een trui van maakt en de sluiting wegvalt.
24.01.2024 - 09:46
![]() Desiree De Koeijer wrote:
Desiree De Koeijer wrote:
Sorry ,al eerder gevraagd om dit patroon als trui te breien zou t dan graag op de rondbreinaald rond willen breien , ipv heen en weer , moet ik dan nog met iets speciaals rekening houden ? mvg Desiree
22.01.2024 - 21:41
![]() Anita wrote:
Anita wrote:
In der Anleitung steht, dass der 1. Markierungsfaden VOR den 9 Maschen angelegt werden soll…. Im Abnahmetipp steht dass 2 Maschen VOR der Markierung links zusammen gestrickt werden müssen. Das würde ja bedeuten, dass ich im Diagramm A4 diese 2 Maschen abnehmen müsste. … was glaube ich, nicht richtig ist oder?
28.11.2022 - 10:44DROPS Design answered:
Liebe Anita, nein, Sie müssen hier die linke Maschen abnehmen, nicht die Maschen von den Diagrammen. Viel Spaß beim stricken!
28.11.2022 - 11:24
![]() Anita wrote:
Anita wrote:
Vielen Dank für die Antwort. Was ist mit der Abnahme, es wäre lieb, wenn Sie mir diesbezüglich auch noch antworten und Helfen können 😊. Herzliche Grüße
28.11.2022 - 09:52DROPS Design answered:
Liebe Anita, es wird wie unter ABNAHMETIPP:, abgenommen, dh bei der 1. Abnahme: 7 M li, 2 M li zs vor der Markierung / 2 M li zs, 7 M li nach der Markierung; bei der nächsten Abnahmen stricken Sie: 6 M li, 2 M li zs vor der Markierung / 2 M li zs, 6 M li nach der Markierung. Oder misverstehe ich Ihre Frage? Viel Spaß beim stricken!
28.11.2022 - 10:34
![]() Anita wrote:
Anita wrote:
Hallo, das erste mit den Maschen bei A3 habe ich gelöst. Was ich nicht verstehe ist die Abnahme bei 10 cm in Größe M. In dieser Größe sind die markierer bei den 9 Maschen angebracht und nicht vor oder nach A3. Ist das richtig? … und wenn ja müsste ich innerhalb der 9 Maschen abnehmen oder? Und wenn das nicht richtig ist, bin ich dankbar für eine Erklärung. Vielen Dank!!!
27.11.2022 - 22:53DROPS Design answered:
Liebe Anita, ja genau, diese Abnahmen entstehen in den 9 linken Maschen nach A.3 und vor A.3 - siehe ABNAHMETIPP:, dh die linke Maschen nehmen Sie ab, nicht die Maschen von A.3. Viel Spaß beim stricken!
28.11.2022 - 10:12
![]() Anita wrote:
Anita wrote:
Hallo, ich habe Probleme bei A3. Wenn ich die Hinreihe gestrickt habe, habe ich 2 Maschen dicht beieinander. Wie wird das auf der Rückseite gestrickt? Von den 2 dicht beieinander liegenden Maschen die erste stricken, dann einen Umschlag und dann die zweite stricken, so dass ich wieder 3 Maschen habe? Das irritiert mich, weil es nicht so aussieht wie auf dem Bild. Oder mache ich etwas falsch? Vielen Dank für deine Hilfe 🌻😊
25.11.2022 - 19:57DROPS Design answered:
Liebe Anita, ja genauso wird A.3 gestrickt. 1. Reihe (Hin-R): 1 M wie zum Rechtsstricken abheben, 2 M re, die abgehobene M über die 2 Rechts-M ziehen, 2. Reihe (Rück-R): 1 M li, 1 Umschlag, 1 M li; 3. Reihe: 3 M re, 4. Reihe: 4 M li. Viel Spaß beim stricken!
28.11.2022 - 08:46
![]() Anna wrote:
Anna wrote:
Hallo, ich habe mir die Anleitung durchgelesen und denke, dass es grundsätzlich kein Problem sein dürfte. Dennoch muss ich etwas übersehen haben, weil ich die Zunahmen für den Schalkragen bis zur Schulterabnahme nicht finde. Wie komme ich von 8 M auf 21 (Größe L). Eigentlich müssten diese Zunahmen doch bei der Beschreibung des Vorderteils stehen. Ich muss sie in der umfangreichen Beschreibung überlesen haben.
19.09.2022 - 12:52DROPS Design answered:
Liebe Anna, wenn alle Abnahmen gestrickt sind, sind es nur noch 50 Maschen übrig, dann ketten Sie die 29 Maschen für den Schulter = es sind 21 Maschen übrig (einsch. die 8 Blenden-Maschen), diese 21 Maschen stricken Sie jetzt kraus rechts miti verkürzten Reihen für den Schalkragen. Also nicht nur die 8 Blenden-Maschen werden krausrechts gestrickt aber alle die übrigen 21 Maschen vom Vorderteil. Viel Spaß beim stricken!
20.09.2022 - 09:41
![]() Berita wrote:
Berita wrote:
Welke maat heeft dit model. Dank
28.08.2022 - 21:17DROPS Design answered:
Dag Berita,
Je kunt dit model in 6 maten breien, van S tot en met XXL. De reeks getallen die je steeds ziet correspondeert met de reeks maten. Dus het eerste getal geldt voor maat S, het tweede getal geldt voor maat M, enzovoorts.
31.08.2022 - 13:49
![]() Karen Bice wrote:
Karen Bice wrote:
Before I start this, what is the A1, A2, A3 and the parts id the pattern they address? I thought they signified DIFFERENT patterns but I still haven't figured if they are the next steps,cables, or what.....would be more helpful if there was some type of explanation of what they were somewhere.
03.01.2022 - 00:42DROPS Design answered:
Hi Karen, You will find the diagrams corresponding to each pattern at the bottom of the page. Happy knitting!
03.01.2022 - 07:40
![]() Desiree De Koeijer wrote:
Desiree De Koeijer wrote:
Hallo zou ik dit ook als trui kunnen breien ? het voorpand net als achterpand ? en hoeveel materiaal heb ik dan nodig ? bvd Desiree
17.11.2021 - 23:50DROPS Design answered:
Dag Desiree,
Ja, dat zou kunnen. Je hebt dan ongeveer dezelfde hoeveelheid materiaal nodig. Voor de zekerheid kun je een extra bol bestellen, als je de hals aan de voorkant ook hoger wilt maken.
23.11.2021 - 12:45
|
|||||||||||||||||||||||||
Morning Glory#morningglorycardigan |
|||||||||||||||||||||||||
 |
 |
||||||||||||||||||||||||
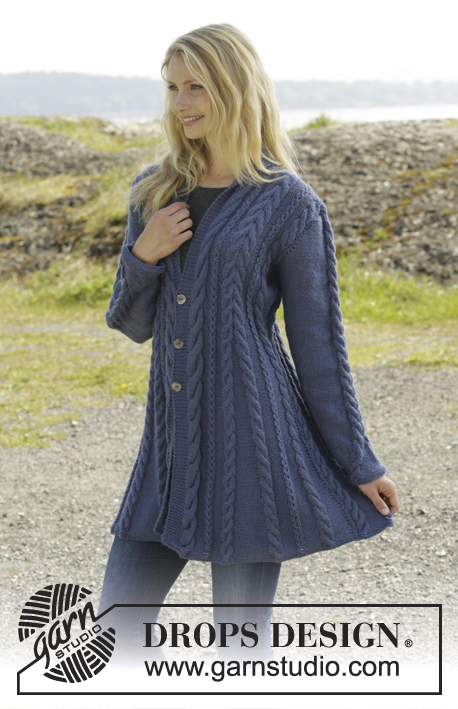
Knitted DROPS jacket with cables and shawl collar in ”Karisma”. Size: S - XXXL.
DROPS 158-1 |
|||||||||||||||||||||||||
|
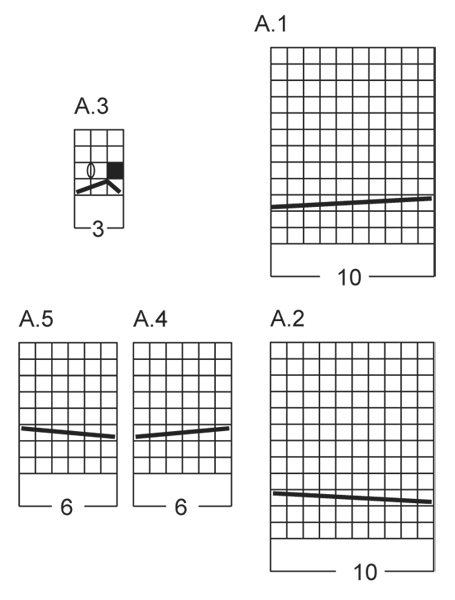
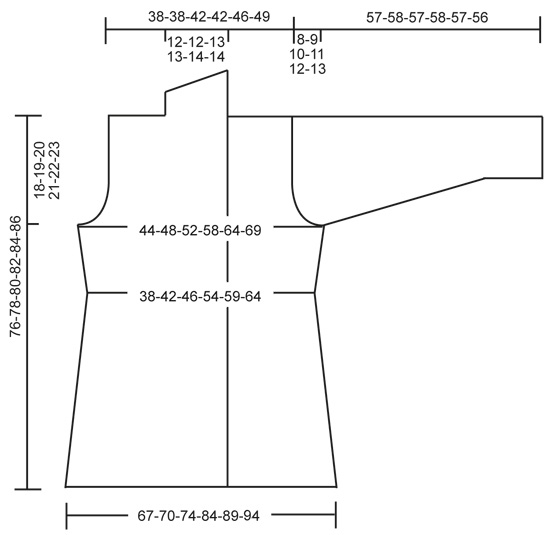
GARTER ST (back and forth on needle): K all rows. 1 ridge = 2 rows K. GARTER ST (in the round on double pointed needles): * K 1 round and P 1 round *, repeat from *-*. 1 ridge = 2 rounds. DECREASE TIP: Dec 1 st before marker/A.3 as follows: Work until 2 sts remain before marker, P 2 tog. Dec 1 st after marker/A.3 as follows: P 2 tog. PATTERN 1: See diagrams A.1-A.5. The diagrams show all rows in pattern seen from RS. PATTERN 2: P 7-7-8-8-9-10, A.3, P 7-7-8-8-9-10. PATTERN 3: P 4-5-6-6-7-8, A.3, P 4-5-6-6-7-8. BUTTONHOLES: Dec for buttonholes on right band. 1 buttonhole = K tog second and third st from edge and make 1 YO. Dec for buttonholes when piece measures: SIZE S: 31, 39 and 47 cm SIZE M: 31, 39 and 47 cm SIZE L: 31, 39 and 47 cm SIZE XL: 32, 40 and 48 cm SIZE XXL: 32, 40 and 48 cm SIZE XXL: 32, 40 and 48 cm ---------------------------------------------------------- BODY: Worked back and forth on circular needle. Cast on 306-318-334-378-398-418 sts (incl 8 band sts in each side of piece) on circular needle size 3.5 mm with Karisma. Work 2 ridges in GARTER ST - see explanation above AT THE SAME TIME on last row inc 44 sts evenly = 350-362-378-422-442-462 sts. Switch to circular needle size 4 mm. Then work from RS AT THE SAME TIME insert 2 markers and 0-0-0-4-4-4 strands in the piece as follows: Work 8 band sts in garter st, A.2, PATTERN 2 – see explanation above, A.4, P 14-16-16-16-16-16, A.5, pattern 2, A.4, P 0-0-0-8-9-10, insert 1 strand in size XL-XXL-XXXL, A.3 0-0-0-1-1-1 time, insert 1st marker, P 8-9-9-9-9-9, A.3 0-0-0-1-1-1 time, insert 1 strand in size XL-XXL-XXXL, P 0-0-0-8-9-10, A.5, pattern 2, A.4, P 14-16-16-16-16-16, A.5, pattern 2, A.1, P 14-16-16-16-16-16, A.2, pattern 2, A.4, P 14-16-16-16-16-16, A.5, pattern 2, A.4, P 0-0-0-8-9-10, insert 1 strand in size XL-XXL-XXXL, A.3 0-0-0-1-1-1 time, P 8-9-9-9-9-9, insert 2nd marker, A.3 0-0-0-1-1-1 time, insert 1 strand in size XL-XXL-XXXL, P 0-0-0-8-9-10, A.5, pattern 2, A.4, P 14-16-16-16-16-16, A.5, pattern 2, A.1, 8 band sts in garter st. Move the markers and strands upwards when working. Work band sts in garter st until finished measurements. Work K over K sts between cables from WS, i.e. P sts seen from RS. Continue pattern like this. Remember BUTTONHOLES - see explanation above. REMEMBER THE KNITTING TENSION! When piece measures 8-10-10-10-10-10 cm, dec as follows: Dec in every section with 14-16-16-16-16-16 P sts by working as follows: P 2 tog, P 10-12-12-12-12-12, P 2 tog (= 10 sts dec in total). Repeat this dec every 5-4-4-4-4-4 cm 6-7-7-7-7-7 more times. NOTE: On last dec work the remaining 2 P tog. AT THE SAME TIME when piece measures 8-10-10-10-10-10 cm, dec as follows: Dec 1 st after 1st marker and 1 st before 2nd marker - see DECREASE TIP. Repeat this dec every 6-4½-4½-4½-4½-4½ cm 5-6-6-6-6-6 more times. AT THE SAME TIME when piece measures 16 cm, dec as follows in pattern 2: Dec 1 st before A.3 and 1 st after A.3 (= 16 sts dec). Repeat this dec every 10-20-20-20-20-20 cm 2-1-1-1-1-1 more times. AT THE SAME TIME in size XL-XXL-XXXL dec as follows at every strand: Dec 1 st by working the 2 P sts closes to A.3 P tog (= 4 sts dec). Repeat this dec every 20 cm 1 more time. When all dec are done, there are 225-241-257-293-313-333 sts on needle. There are now 2 P st at markers in the sides and 1 P st between A.4 and A.5 and between A.1 and A.2 and 4-5-6-6-7-8 P sts on each side of A.3. When piece measures 44 cm, adjust so that next row is from RS, inc as follows: 8 band sts in garter st, A.2, PATTERN 3 – see explanation above, A.4, P 1, A.5, pattern 3, A.4, P 0-0-0-6-7-8, A.3 0-0-0-1-1-1 time, 1 YO, P 2, 1 YO, A.3 0-0-0-1-1-1 time, P 0-0-0-6-7-8, A.5, pattern 3, A.4, P 1, A.5, pattern 3, A.1, P 1, A.2, pattern 3, A.4, P 1, A.5, pattern 3, A.4, P 0-0-0-6-7-8, A.3 0-0-0-1-1-1 time, 1 YO, P 2, 1 YO, A.3 0-0-0-1-1-1 time, P 0-0-0-6-7-8, A.5, pattern 3, A.4, P 1, A.5, pattern 3, A.1, 8 band sts in garter st (= 4 sts inc). K YOs twisted on next row to avoid holes. Repeat inc every 6th-6th-6th-12th-10th-12th row 5-5-5-3-4-4 more times = 249-265-281-309-333-353 sts. Work inc sts P from RS and K from WS. When piece measures 58-59-60-61-62-63 cm, divide the piece, finish front and back pieces separately as follows: Slip the first and last 66-70-74-81-87-92 sts on a stitch holder for front pieces, cut the yarn, then work only over the middle 117-125-133-147-159-169 sts (= back piece). BACK PIECE: Now cast off for armholes at beg of every row in each side as follows: Cast off 3 sts 1 time, then 2 sts 1-1-1-3-4-4 times and 1 st 1-1-1-4-4-5 times = 105-113-121-121-129-137 sts. Then dec on next row from RS as follows: Dec 1 st before A.3 and 1 st after A.3 0-1-1-1-1-1 time = 105-105-113-113-121-129 sts. When piece measures 73-75-77-79-81-83 cm, dec 5 sts over A.1 and 5 sts over A.2 by working 2 and 2 sts K tog = 95-95-103-103-111-119 sts on needle. Then cast off the middle 25-25-27-27-29-31 sts for neck and finish each shoulder separately = 35-35-38-38-41-44 sts remain on each shoulder. When piece measures 75-77-79-81-83-85 cm, dec 3 sts over every A.4 and A.5 (= 9 sts dec) = 26-26-29-29-32-35 sts remain on needle. Cast off. RIGHT FRONT PIECE: = 66-70-74-81-87-92 sts. Now cast off for armhole at beg of every row from the side as follows: Cast off 3 sts 1 time, then 2 sts 1-1-1-3-4-4 times and 1 st 1-1-1-4-4-5 times = 60-64-68-68-72-76 sts. Then dec on next row from RS as follows: Dec 1 st before A.3 and 1 st after A.3 0-1-1-1-1-1 time = 60-60-64-64-68-72 sts on needle. When piece measures 75-77-79-81-83-85 cm, dec 5 sts over A.2 by working 2 and 2 sts K tog and 3 sts over every A.4 and A.5 = 46-46-50-50-54-58 sts. Then cast off the first 26-26-29-29-32-35 sts for shoulder, work the rest of row = 20-20-21-21-22-23 sts. Then work shawl collar in garter st over the remaining sts, beg mid front (1st row = RS) as follows: * Work 2 rows back and forth over the first 12-12-13-13-14-15 sts, work 2 rows back and forth over all sts *, repeat from *-* until shawl collar measures 8-8-9-9-10-10 cm at the shortest. Cast off. LEFT FRONT PIECE: Work as right front piece but reversed. Dec 5 sts over A.1 instead of A.2. Shawl collar beg from WS. SLEEVE: Worked in the round on double pointed needles. Cast on 48-50-52-54-54-56 sts on double pointed needles size 3.5 mm with Karisma. Work 2 ridges in GARTER ST - see explanation above AT THE SAME TIME on last round inc 5 sts = 53-55-57-59-59-61 sts. Switch to double pointed needles size 4 mm. READ ALL OF THE FOLLOWING SECTION BEFORE CONTINUING! Work as follows: P 4-5-6-7-7-8, A.4, P 33, A.5, finish with P 4-5-6-7-7-8. Insert 1 marker at the beg of the round. On next round move A.4 and A.5 1 st towards the middle as follows: P 4-5-6-7-7-8, 1 YO, A.4, P 2 tog, P 29, P 2 tog, A.5, 1 YO, finish with P 4-5-6-7-7-8. P YO twisted on next round. Move A.4 and A.5 towards the middle 1 st every other round until 1 st remains between A.4 and A.5. Piece measures approx. 12 cm. Continue to work P and A.4/A.5 with 1 P st between until finished measurements. AT THE SAME TIME when piece measures 10 cm, inc 1 st on each side of marker. Repeat inc every 4-3½-2½-2½-2-1½ cm 9-10-12-13-16-17 more times = 73-77-83-87-93-97 sts. When piece measures 49-49-47-47-46-43 cm (shorter measurements in the larger sizes because of longer sleeve cap and wider shoulders) cast off for sleeve cap at beg of every row in each side: Cast off 4 sts 1 time, 2 sts 3 times and 1 st 6 times, then cast off 2 sts in each side until piece measures 56-57-56-57-56-55 cm, then cast off 3 sts 1 time in each side AT THE SAME TIME dec 2 sts over every cable. Cast off the remaining sts, piece measures approx. 57-58-57-58-57-56 cm. Knit another sleeve. ASSEMBLY: Sew the shoulder seams. Sew in sleeves. Sew the collar tog mid back and sew it to the neckline. Sew the buttons on to left band. SHAPING: Moisten piece and place it on a carpet or mattress - carefully stretch it out to measurements. Leave to dry. |
|||||||||||||||||||||||||
Diagram explanations |
|||||||||||||||||||||||||
|
|||||||||||||||||||||||||
 |
|||||||||||||||||||||||||
 |
|||||||||||||||||||||||||
Have you finished this pattern?Tag your pictures with #dropspattern #morningglorycardigan or submit them to the #dropsfan gallery. Do you need help with this pattern?You'll find 31 tutorial videos, a Comments/Questions area and more by visiting the pattern on garnstudio.com. © 1982-2026 DROPS Design A/S. We reserve all rights. This document, including all its sub-sections, has copyrights. Read more about what you can do with our patterns at the bottom of each pattern on our site. |
|||||||||||||||||||||||||


With over 40 years in knitting and crochet design, DROPS Design offers one of the most extensive collections of free patterns on the internet - translated to 17 languages. As of today we count 324 catalogues and 12290 patterns translated into English (UK/cm). 12290
We work hard to bring you the best knitting and crochet have to offer, inspiration and advice as well as great quality yarns at incredible prices! Would you like to use our patterns for other than personal use? You can read what you are allowed to do in the Copyright text at the bottom of all our patterns. Happy crafting!
Post a comment to pattern DROPS 158-1
We would love to hear what you have to say about this pattern!
If you want to leave a question, please make sure you select the correct category in the form below, to speed up the answering process. Required fields are marked *.