
Popular categories
Looking for a yarn?


Comments / Questions (78)
![]() Maria wrote:
Maria wrote:
Niestety w dalszym ciągu nie rozumiem... Przerabiam w rzędach pierwsze i ostatnie oczka ściegiem fr - zawsze prawe. Kończę rząd prawymi i muszę połączyć okrążenie lewymi. Więc pod rozcięciem z jednej strony mam inne oczka niż z drugiej. Cdn
07.03.2018 - 20:11DROPS Design answered:
Witaj Mario, pierwsze i ostatnie oczko w rzędzie jest na prawo (gdy przerabiamy w tę i z powrotem raz przerabiamy z prawej, a raz z lewej strony robótki). Jak połączymy robótkę na okrągło to będziemy mieć obok siebie (lewy i prawy drut) 1 o.p. Od tej chwili przerabiamy wyłącznie na jednej stronie robótki (na prawej stronie robótki). Okrążenie zaczynamy od 3 o.l. i kończymy 3 o.l. („dalej przer. 6 o. ściegiem francuskim na okrągło na drutach z żyłką – patrz powyżej, ponad 3 o. ściegiem francuskim z każdej strony pęknięcia przy dekolcie. Dalej przer. tak samo, aż zostaną przerobione 2 ściągacze francuskie pod pęknięciem przy dekolcie”). Powodzenia!
12.03.2018 - 14:54
![]() Maria wrote:
Maria wrote:
Dziękuję bardzo, ale to nie była odpowiedź na pytanie :) Przerabiam w rzędach, zaczynam i kończę na rozcięciu na górze. Potem mam przerabiać w okrążeniach, zaczynając od motywu A1, nie od rozcięcia, gdzie kończę rząd. Nie rozumiem, jak mam to zrobić. Podobnie przy rozcięciach z boku - w jaki sposób mam zacząć przrabiać w rzędach od rozcięcia, jeśli okrążenie skończyłam przed motywem A1? Pozdrawiam, Maria
05.03.2018 - 13:13DROPS Design answered:
Witaj ponownie Mario, schematu A.1 używamy dopiero na dole poncho. Zaczynamy od góry poncho i wykorzystujemy schemat A.2. Początek rzędu/okrążenia jest sprawą umowną. O ile początek rzędu był na środku przodu, to odkąd zaczynamy przerabiać na okrągło (łączymy robótkę w na środku przodu) początek schematu będzie na początku 1-szego schematu A.2 (najlepiej zaznaczyć markerem). Te kilka , kilkanaście oczek przerobionych tak jakby 'podwójnie' nie będą widoczne w gotowej robótce. Powodzenia i polecam się na przyszłość
05.03.2018 - 18:34
![]() Maria wrote:
Maria wrote:
Nie bardzo rozumiem, w jaki sposób mam \"przesunąć\" początek okrążenia z jednego miejsca w drugie przy rozcięciu na górze i jak zaczynając przed pierwszym motywem A1 zacząć płynnie przerabianie w rzędach od rozcięcia na dole. Pozdrawiam, Maria
02.03.2018 - 21:43DROPS Design answered:
Witaj Mario, przerabiamy of góry w tę i z powrotem. Brzegi robótki będą stanowiły rozcięcie z przodu, są one przerabiane ściegiem francuskim, więc środek robótki z przodu, będzie się znajdował na środku 6 oczek ściegiem francuskim (jak robótka zacznie być przerabiana na okrągło). Powodzenia!
05.03.2018 - 12:41
![]() Claudia wrote:
Claudia wrote:
Hallo, wird tatsächlich jede Reihe rechts gestrickt oder nur die Hinrunde und die Rückrunde links? Lt. Bild sieht das so aus, allerdings liest sich die Beschreibung anders. Dankeschön :-)
06.10.2017 - 16:22DROPS Design answered:
Liebe Claudia, Diagram zeigt alle Reihe. Wenn Sie A.2 in Reihen stricken, stricken Sie so: 1. Reihe (Hinreihe) (1 M re, 2 M li)x 4, 1 M re. 2. Reihe (Rückreihe) = alle M links stricken. Diese 2 Reihen wiederholen. Wenn Sie A.2 in der Runde stricken, wird die 2. Reihe immer rechts gestrickt. Viel Spaß beim stricken!
06.10.2017 - 17:51
![]() Pat wrote:
Pat wrote:
Not sure if I'm missing something, but how many balls do I purchase for each of the sizes. I am a M/L size.
16.05.2017 - 17:44DROPS Design answered:
Dear Pat, you will find amount of yarn required for each size under tab "Materials", ie in first size you need 600 g / 50 g a ball Alaska = 12 balls in size S/M. Happy knitting!
17.05.2017 - 09:19
![]() Dorthe Keller wrote:
Dorthe Keller wrote:
Jeg kan sagtens forstå udtagningerne ... altså hvordan de skal være på hver side af rækkerne med mønster ,men jeg kan simpelthen ikke finde ud af hver 2 4 6 pind x antal gange... Hvordan kan det forenkles eller forklares til mig... alle de rester garn jeg har sat og nu skal jeg også have flere markører til antal omgange og på hver side ... Det er altså for rodet ...
08.03.2016 - 17:10DROPS Design answered:
Hej Dorthe, Hvilken størrelse strikker du, så skal jeg forsøge at forklare det for dig?
09.03.2016 - 15:08
![]() Febe Pardaens wrote:
Febe Pardaens wrote:
Ik vrees dat ik het deel over de meerderingen niet helemaal begrijp. Zouden jullie dit kunnen uitleggen? Danku wel
24.01.2016 - 12:28DROPS Design answered:
Hoi Febe. Je hebt 4 keer A.2 en 8 markeerders. Je meerdert aan elke kant van het A.2 patroon. Je meerdert door een omslag te maken. Je meerdert voor markeerder 1 en 5 en na markeerder 4 en 8 om de nld (= elke 2e nld) 5-6-7 keer, elke 4e nld 4-6-9 keer en elke 6e nld 6-6-4 keer. EN je meerdert voor markeerder 3 en 7 en na markeerder om de nld 7-8-9 keer, elke 4e nld 9-10-11 keer en elke 6e nld 2-2-2 keer. Het is even concentreren en goed volgen. Je kan eventueel de verschillende markeerders (bijv 1-4-5-8) in één kleur en de andere in een andere kleur om ze goed uit elkaar te houden. Succes.
28.01.2016 - 13:30
![]() Hanne Pedersen wrote:
Hanne Pedersen wrote:
Hej. Jeg forstår simpelthen ikke: "Strik 8 P retstrik frem og tilbage-samtidig på 1. P i sidste retrille (=retsiden) tages der 32 m ud jævnt fordelt ....???
15.09.2015 - 23:20DROPS Design answered:
Hej Hanne, Du strikker 8 p retstrik frem og tilbage, på 7.p tager du 32 m ud jævnt fordelt. God fornøjelse!
16.09.2015 - 15:07Hong wrote:
Inc every other row 5-6-7 times, every 4th row/round 4-6-9 times and every 6th round 6-6-4 times. Every other row = every other RS row (4 rows including RS and WS)? Every 4th row = on each 4th RS row, meaning 8 rows including WS? Every 6th row = 6-6-4 times, you're increasing 6 times with size small but only 4 with size large. Is that right, or is it an error? If you only count the RS, then the piece will be twice as long, so I am wondering how the rows/rounds are counted.
15.08.2015 - 00:27DROPS Design answered:
Dear Mrs Hong, when you inc every other row, you inc on next row, then work 1 row without inc. When inc every 4th row, inc on next row, work 3 rows without inc. Number of inc are adjusted to each size, in larger size you inc more times every other row and very 4th row but less time (than other sizees) every 6th row. Happy knitting!
17.08.2015 - 09:08
![]() Elsalöfgren wrote:
Elsalöfgren wrote:
Med beskrivning på 157-37 hur gör man med ökningen ökar man både bak och fram stycket samtidigt eller gör man ökningar på framstycket först klart sedan bakstycket
18.05.2015 - 18:24DROPS Design answered:
Hej. Du gör ökningar på både fram-, bak- och sidostyckena samtidigt men det ökas olika på fram- och bakst och på sidstyckena. Följ bara texten i beskrivningen så ska det bli riktigt. Lycka till!
19.05.2015 - 07:48
|
|||||||
Autumn Stroll#autumnstrollponcho |
|||||||
|
|
|||||||
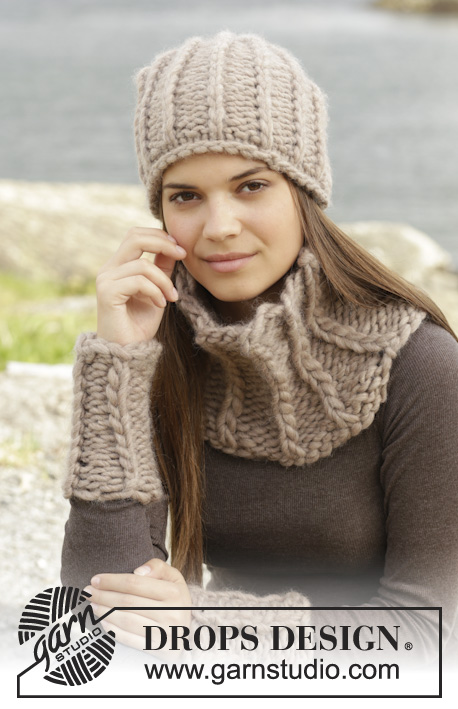
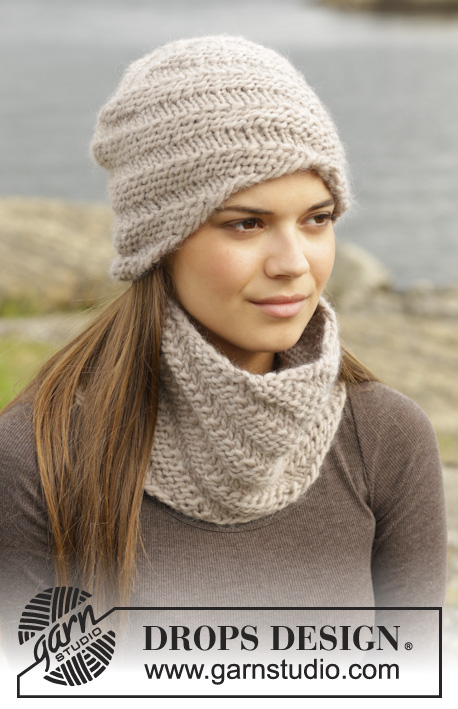
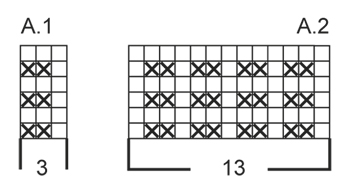
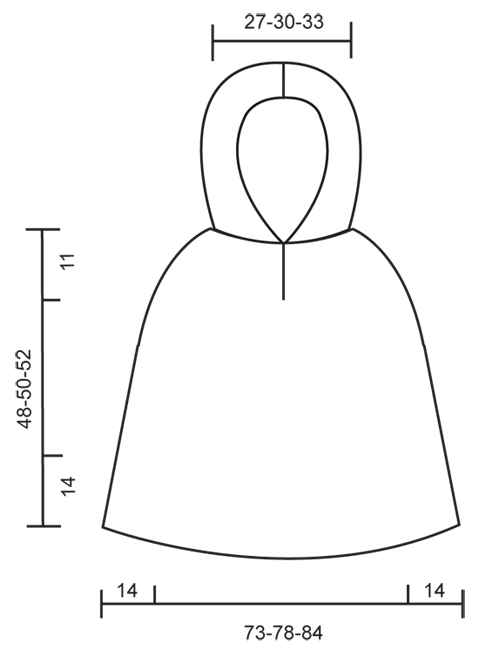
Knitted DROPS poncho with hood and vent, worked top down in ”Alaska”. Size: S -XXXL
DROPS 157-37 |
|||||||
|
GARTER ST (back and forth on needle): K all rows. 1 ridge = 2 rows K. GARTER ST (in the round on circular needle): * K 1 round and P 1 round *, repeat from *-*. 1 ridge = 2 rounds. PATTERN: See diagrams A.1 and A.2. The diagrams show all rows in pattern seen from RS. INCREASE TIP: All inc are done from RS. Inc 1 st by making a YO. On next row work YO twisted to avoid holes. Then work the new sts in stocking st. BUTTONHOLES: Dec for buttonhole on right band. 1 buttonhole = K tog third and fourth st from edge and make 1 YO. Dec for buttonhole when piece measures approx. 2 cm from cast-on edge. ---------------------------------------------------------- PONCHO: Poncho and hood are worked separately and sewn tog at the end. The poncho is worked top down. Work back and forth until vent mid front is done, then work in the round until vents in each side beg, then work front and back piece back and forth. Cast on 92-102-112 sts on circular needle size 5 mm with Alaska. Work 4 ridges in GARTER ST - see explanation above, AT THE SAME TIME on 1st row in last ridge (= RS) inc 30-32-34 sts evenly = 122-134-146 sts. REMEMBER BUTTONHOLES! Then work as follows from mid front: 3 band sts in garter st, 8-10-12 sts in stocking st, insert 1st marker here, A.2 (= 13 sts), insert 2nd marker here, 13-15-17 sts in stocking st, insert 3rd marker here, A.2, insert 4th marker here, 22-26-30 sts in stocking st, insert 5th marker here, A.2, insert 6th marker here, 13-15-17 sts in stocking st, insert 7th marker here, A.2, insert 8th marker here, 8-10-12 sts in stocking st, 3 band sts in garter st. READ ALL OF THE FOLLOWING SECTION BEFORE CONTINUING! REMEMBER THE KNITTING TENSION! Continue like this, AT THE SAME TIME on next row from RS inc on each side of every repetition of A.2 – READ INCREASE TIP! NOTE: Inc differently on front and back piece and on side pieces: Inc as follows before 1st and 5th marker and after 4th and 8th marker: Every other row 5-6-7 times, every 4th row/round 4-6-9 times and every 6th round 6-6-4 times. Inc as follows before 3rd and 7th marker and after 2nd and 6th marker: Every other row 7-8-9 times, every 4th row/round 9-10-11 times and every 6th round 2-2-2 times. When inc are done, there are 254-286-314 sts on round. AT THE SAME TIME when piece measures 11 cm in total, the vent mid front is done and work in the round as follows: Work until first repetition of A.2 (= beg of round), work the round in the round as before with pattern and inc until the 3 sts in garter st before vent mid front, then work 6 sts in GARTER ST in the round on circular needle – see explanation above, over the 3 sts in garter st on each side of vent. Continue like this until there are 2 ridges under vent. Then continue with stocking st, inc and A.2 until piece measures 34-36-38 cm in total. Now work as follows from beg of round: * A.2, 21-24-27 sts in stocking st, 7 sts in garter st, 21-24-27 sts in stocking st *, A.2, stocking st until next A.2, repeat from *-*, A.2, work the rest of round in stocking st. Continue like this until there are 2 ridges on each side piece, AT THE SAME TIME on last round cast off the middle sts of the 7 sts in garter st in each side (= 6 sts in garter st remain), work until cast off st in the side = 252-284-312 sts on round. Then finish front and back piece separately. FRONT PIECE: Turn piece and work as follows from WS: 3 sts in garter st, stocking st over the next 21-24-27 sts, A.2 as before, stocking st over the next 52-62-70 sts, AT THE SAME TIME inc 1-0-1 st, work A.2, 21-24-27 sts in stocking st, 3 sts in garter st = 127-142-157 sts. When piece measures 41-43-45 cm, work as follows from RS: 3 sts in garter st, A.1 until 4 sts remain, K 1 (= 1st st in A.1), 3 sts in garter st. Continue like this back and forth until piece measures 48-50-52 cm in total. Cast off. BACK PIECE: Work as front piece. Adjust length according to front piece. HOOD: Worked back and forth on needle. Cast on 92-102-112 sts on circular needle size 5 mm with Alaska. Work 1 ridge AT THE SAME TIME inc 8-1-0 sts evenly on last row = 100-103-112 sts. Then work as follows: 3 edge sts in garter st, A.1 (= 3 sts) until 4 sts remain, K 1, 3 edge sts in garter st. Continue like this until piece measures 30 cm. Work 1 ridge. Cast off. ASSEMBLY: Fold hood and sew cast-off edge neatly tog st by st. Sew hood to poncho st by st. Sew the button on to left band 2 cm in from egde. Cut and fasten the yarn. |
|||||||
Diagram explanations |
|||||||
|
|||||||
 |
|||||||
 |
|||||||
Have you finished this pattern?Tag your pictures with #dropspattern #autumnstrollponcho or submit them to the #dropsfan gallery. Do you need help with this pattern?You'll find 22 tutorial videos, a Comments/Questions area and more by visiting the pattern on garnstudio.com. © 1982-2026 DROPS Design A/S. We reserve all rights. This document, including all its sub-sections, has copyrights. Read more about what you can do with our patterns at the bottom of each pattern on our site. |
|||||||


With over 40 years in knitting and crochet design, DROPS Design offers one of the most extensive collections of free patterns on the internet - translated to 17 languages. As of today we count 324 catalogues and 12290 patterns translated into English (UK/cm). 12290
We work hard to bring you the best knitting and crochet have to offer, inspiration and advice as well as great quality yarns at incredible prices! Would you like to use our patterns for other than personal use? You can read what you are allowed to do in the Copyright text at the bottom of all our patterns. Happy crafting!
Post a comment to pattern DROPS 157-37
We would love to hear what you have to say about this pattern!
If you want to leave a question, please make sure you select the correct category in the form below, to speed up the answering process. Required fields are marked *.