
Popular categories
Looking for a yarn?


Comments / Questions (78)
![]() Carmen wrote:
Carmen wrote:
Moin, ich verstehe Anleitung für die Zunahmen nicht... Kann mir dabei jemand helfen? Liebe Grüße aus dem hohen Norden Carmen
16.11.2020 - 13:23DROPS Design answered:
Liebe Carmen, die Zunahmen werden unterschiedlich beim Vorder- und Rückenteil und bei den Ärmeln, dh je nach der Größe nehmen Sie entweder 8 Maschen oder 4 Maschen pro Zunahmenrunde - nehmen Sie in Ihre Grösse und zwischen den Markierungen wie unter TIPP ZUR ZUNAHME erklärt wird. Viel Spaß beim stricken!
16.11.2020 - 16:22
![]() ROUVIER wrote:
ROUVIER wrote:
En reponse a votre mail c'est l'explication tout entière qui me gêne. La taille est S/M
27.04.2020 - 12:46DROPS Design answered:
Bonjour Mme Rouvier, lisez attentivement les explications et commencez à tricoter en les suivant scrupuleusement, bien souvent quand on a les mailles sur les aiguilles, toutes les choses prennent leur sens. Si vous bloquez ensuite à un moment précis, n'hésitez pas à revenir ici. Bon tricot!
27.04.2020 - 13:29
![]() Marie-Michele ROUVIER wrote:
Marie-Michele ROUVIER wrote:
Bonjour. Pour assez a l'aise en tricot j'ai du mal a suivre vos explications concernant ce modèle. Pourriez-vous m'aider s'il vous plait? D'avance merci
26.04.2020 - 18:51DROPS Design answered:
Bonjour Mme Rouvier, vous pouvez poser votre question ici si vous le souhaitez, pensez à bien préciser la taille tricotée et le passage précis que vous ne comprenez pas. Bon tricot!
27.04.2020 - 09:25
![]() Christine Weir wrote:
Christine Weir wrote:
Hello .....I'm at the stage where ive done the increses....then the pattern says continue with stocking stitch,inc and A2until piece measures 34 cm....does that mean there are more inc ?..... thank you christine
12.11.2019 - 23:22DROPS Design answered:
Dear Mrs Weir, you increase as explained, but when piece measures 11 cm (= all increases are not finished) you now work in the round as explained, then continue as before with the increases until all increases are done (= there are 254-286-314 sts) and until piece measures 34-36-38 cm. Happy knitting!
13.11.2019 - 09:11
![]() Stefanie wrote:
Stefanie wrote:
Hallo! Waarschijnlijk ligt het eraan dat ik een beginner ben maar ik begrijp echt niets van de meerderingen, zelfs niet met de extra uitleg bij de vragen van andere vragen. Ik begrijp dat je telkens voor en na elke herhaling van A2 moet meerderen maar begrijp de frequentie niet. Om de naald meerderen begrijp ik, maar dan staat er ook elke 4e naald en elke 6e naald, maar dat is dan toch niet aan de goede kant? Alleszins, ik begrijp er geen snars van. Sorry!
01.08.2019 - 09:15DROPS Design answered:
Dag Stefanie,
De meerderingen doe je aan de goede kant en dan meerder je 4 naalden later of 6 naalden later weer; dat is wat er wordt bedoeld met elke 4e of 6e naald. Je meerdert inderdaad steeds naast A.2.
11.08.2019 - 16:15
![]() Jaime wrote:
Jaime wrote:
Hi, I have a question on the number of sts after you bind off the 7sts in garter sts. Before the bind off , the total sts is 254. I don't see how it becomes 252 sts after you bind off. Please clarify. Thank You! Please explain the follow: "AT THE SAME TIME on last round bind off the middle of the 7 sts in garter st in each side (= 6 sts in garter st remain), work until bind off st in the side = 252-284-312 sts on round. Then finish front and back piece separately. "
24.03.2019 - 09:40DROPS Design answered:
Dear Jaime, you will bind off a total of 2 sts = the stitch in the middle of the 7 sts worked in garter stitch on each side of the piece = 252 sts remain. Happy knitting!
25.03.2019 - 11:30
![]() Karen Budd wrote:
Karen Budd wrote:
It would be more helpful to have a line by line explanation of the increases or a chart. If I didn't get help from someone that already had made it and did a line by line chart of the increases I wouldn't have gotten very far. I have just finished the poncho and I really like it though the opening for your head is way too wide, I will have to sew in the sides some so it doesn't slide off my shoulders.
02.03.2019 - 20:20
![]() Karen Budd wrote:
Karen Budd wrote:
Hi, I am making the small size, I am also not doing the top vent, but I will do the bottom vents. I am totally confused by the increases. Is there any way you can help me with this?
09.02.2019 - 20:51DROPS Design answered:
Dear Mrs Budd, the increases are made differently on front & back piece and on "sleeve", you will increase between 2nd and 3rd markers and between 6th and 7th marker for "sleeves" and increase before 1st marker /after 8th marker for front piece + between 4th and 5th marker for back piece. In size S you will increase on front and back pieces Every other row 5 times, every 4th row/round 4 times and every 6th round 6 times and you will increase for "sleeves" Every other row 7 times, every 4th row/round 9 times and every 6th round 2 times . Happy knitting!
11.02.2019 - 09:18
![]() Marie wrote:
Marie wrote:
Pour la capuche, ne serait-il pas plus simple de relever les mailles sur l'encolure ?
04.04.2018 - 16:55DROPS Design answered:
Bonjour Marie, coudre la capuche donne probablement un peu plus de maintien au niveau de l'encolure. Bon tricot!
05.04.2018 - 08:26
![]() Maria wrote:
Maria wrote:
Cd Przerabiam w okrążeniach schemat A2 - w jednym okrążeniu *o.p. o.l. o.l.*, w kolejnym same o.p. W pewnym momencie muszę zacząć przerabiać w rzędach, przy czym koniec okrążenia wypada w środku rzędu - przy jednym schemacie A2 mam robić *o.p. o.l. o.l.*, przy drugim - same o.l. I potem mam przerabiać na całej szerokości schemat A1. Dziękuję i pozdrawiam
07.03.2018 - 20:11DROPS Design answered:
Witaj Mario! Jest dokładnie tak jak piszesz. Powodzenia!
15.03.2018 - 19:52
|
|||||||
Autumn Stroll#autumnstrollponcho |
|||||||
|
|
|||||||
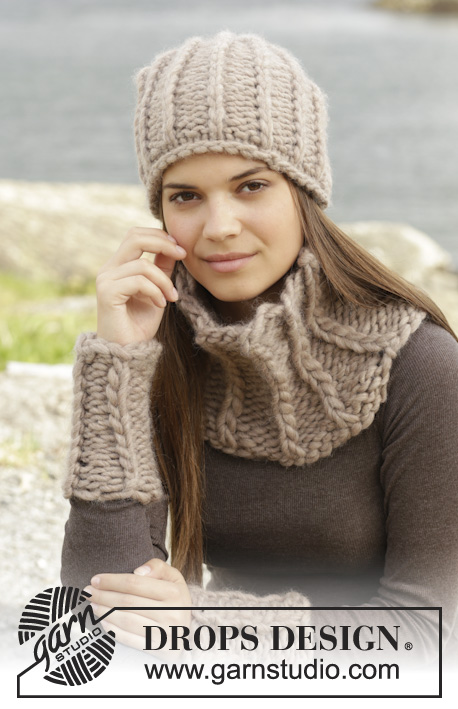
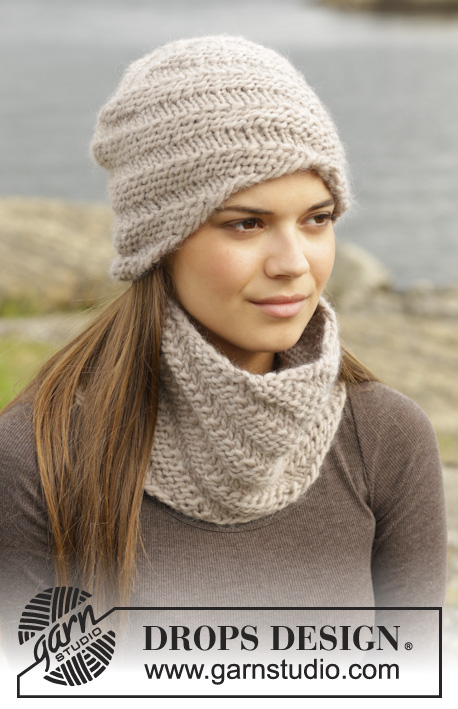
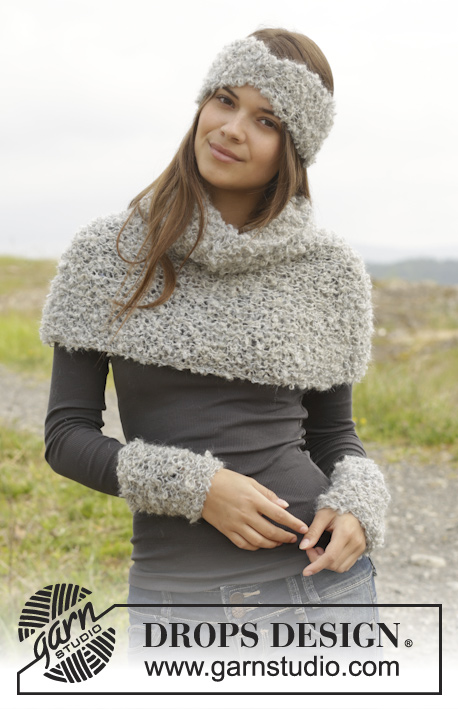
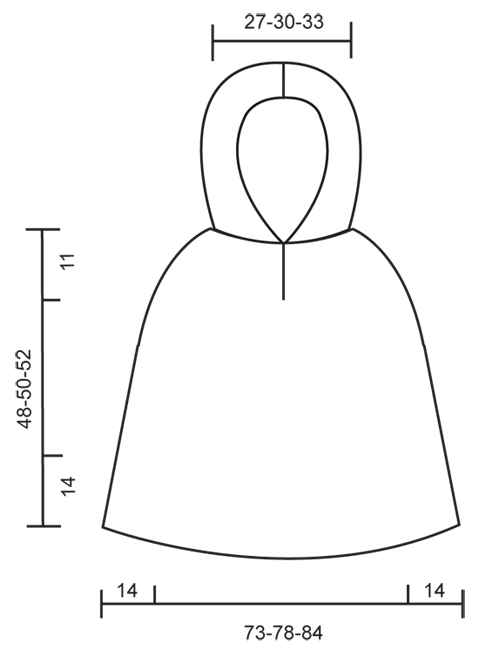
Knitted DROPS poncho with hood and vent, worked top down in ”Alaska”. Size: S -XXXL
DROPS 157-37 |
|||||||
|
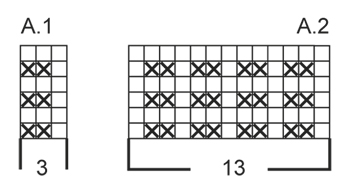
GARTER ST (back and forth on needle): K all rows. 1 ridge = 2 rows K. GARTER ST (in the round on circular needle): * K 1 round and P 1 round *, repeat from *-*. 1 ridge = 2 rounds. PATTERN: See diagrams A.1 and A.2. The diagrams show all rows in pattern seen from RS. INCREASE TIP: All inc are done from RS. Inc 1 st by making a YO. On next row work YO twisted to avoid holes. Then work the new sts in stocking st. BUTTONHOLES: Dec for buttonhole on right band. 1 buttonhole = K tog third and fourth st from edge and make 1 YO. Dec for buttonhole when piece measures approx. 2 cm from cast-on edge. ---------------------------------------------------------- PONCHO: Poncho and hood are worked separately and sewn tog at the end. The poncho is worked top down. Work back and forth until vent mid front is done, then work in the round until vents in each side beg, then work front and back piece back and forth. Cast on 92-102-112 sts on circular needle size 5 mm with Alaska. Work 4 ridges in GARTER ST - see explanation above, AT THE SAME TIME on 1st row in last ridge (= RS) inc 30-32-34 sts evenly = 122-134-146 sts. REMEMBER BUTTONHOLES! Then work as follows from mid front: 3 band sts in garter st, 8-10-12 sts in stocking st, insert 1st marker here, A.2 (= 13 sts), insert 2nd marker here, 13-15-17 sts in stocking st, insert 3rd marker here, A.2, insert 4th marker here, 22-26-30 sts in stocking st, insert 5th marker here, A.2, insert 6th marker here, 13-15-17 sts in stocking st, insert 7th marker here, A.2, insert 8th marker here, 8-10-12 sts in stocking st, 3 band sts in garter st. READ ALL OF THE FOLLOWING SECTION BEFORE CONTINUING! REMEMBER THE KNITTING TENSION! Continue like this, AT THE SAME TIME on next row from RS inc on each side of every repetition of A.2 – READ INCREASE TIP! NOTE: Inc differently on front and back piece and on side pieces: Inc as follows before 1st and 5th marker and after 4th and 8th marker: Every other row 5-6-7 times, every 4th row/round 4-6-9 times and every 6th round 6-6-4 times. Inc as follows before 3rd and 7th marker and after 2nd and 6th marker: Every other row 7-8-9 times, every 4th row/round 9-10-11 times and every 6th round 2-2-2 times. When inc are done, there are 254-286-314 sts on round. AT THE SAME TIME when piece measures 11 cm in total, the vent mid front is done and work in the round as follows: Work until first repetition of A.2 (= beg of round), work the round in the round as before with pattern and inc until the 3 sts in garter st before vent mid front, then work 6 sts in GARTER ST in the round on circular needle – see explanation above, over the 3 sts in garter st on each side of vent. Continue like this until there are 2 ridges under vent. Then continue with stocking st, inc and A.2 until piece measures 34-36-38 cm in total. Now work as follows from beg of round: * A.2, 21-24-27 sts in stocking st, 7 sts in garter st, 21-24-27 sts in stocking st *, A.2, stocking st until next A.2, repeat from *-*, A.2, work the rest of round in stocking st. Continue like this until there are 2 ridges on each side piece, AT THE SAME TIME on last round cast off the middle sts of the 7 sts in garter st in each side (= 6 sts in garter st remain), work until cast off st in the side = 252-284-312 sts on round. Then finish front and back piece separately. FRONT PIECE: Turn piece and work as follows from WS: 3 sts in garter st, stocking st over the next 21-24-27 sts, A.2 as before, stocking st over the next 52-62-70 sts, AT THE SAME TIME inc 1-0-1 st, work A.2, 21-24-27 sts in stocking st, 3 sts in garter st = 127-142-157 sts. When piece measures 41-43-45 cm, work as follows from RS: 3 sts in garter st, A.1 until 4 sts remain, K 1 (= 1st st in A.1), 3 sts in garter st. Continue like this back and forth until piece measures 48-50-52 cm in total. Cast off. BACK PIECE: Work as front piece. Adjust length according to front piece. HOOD: Worked back and forth on needle. Cast on 92-102-112 sts on circular needle size 5 mm with Alaska. Work 1 ridge AT THE SAME TIME inc 8-1-0 sts evenly on last row = 100-103-112 sts. Then work as follows: 3 edge sts in garter st, A.1 (= 3 sts) until 4 sts remain, K 1, 3 edge sts in garter st. Continue like this until piece measures 30 cm. Work 1 ridge. Cast off. ASSEMBLY: Fold hood and sew cast-off edge neatly tog st by st. Sew hood to poncho st by st. Sew the button on to left band 2 cm in from egde. Cut and fasten the yarn. |
|||||||
Diagram explanations |
|||||||
|
|||||||
 |
|||||||
 |
|||||||
Have you finished this pattern?Tag your pictures with #dropspattern #autumnstrollponcho or submit them to the #dropsfan gallery. Do you need help with this pattern?You'll find 22 tutorial videos, a Comments/Questions area and more by visiting the pattern on garnstudio.com. © 1982-2026 DROPS Design A/S. We reserve all rights. This document, including all its sub-sections, has copyrights. Read more about what you can do with our patterns at the bottom of each pattern on our site. |
|||||||


With over 40 years in knitting and crochet design, DROPS Design offers one of the most extensive collections of free patterns on the internet - translated to 17 languages. As of today we count 324 catalogues and 12290 patterns translated into English (UK/cm). 12290
We work hard to bring you the best knitting and crochet have to offer, inspiration and advice as well as great quality yarns at incredible prices! Would you like to use our patterns for other than personal use? You can read what you are allowed to do in the Copyright text at the bottom of all our patterns. Happy crafting!
Post a comment to pattern DROPS 157-37
We would love to hear what you have to say about this pattern!
If you want to leave a question, please make sure you select the correct category in the form below, to speed up the answering process. Required fields are marked *.