
Popular categories
Looking for a yarn?


Comments / Questions (31)
![]() Paula Shorten wrote:
Paula Shorten wrote:
Could a single yarn be used to knit this instead of several yarns used together?
11.09.2024 - 15:19DROPS Design answered:
Dear Paula, this piece is designed / knitted with one strand of DROPS Baby Alpaca Silk yarn. It is discontinued now, but you can substitute other yarns from our yarngroup A, that has similar knitting gauge. e. Please, always do a gauge swatch, wash and block it, and then recalculate stitchnumbers if necessary. Happy Knitting!
12.09.2024 - 03:05
![]() Terttu Matilainen wrote:
Terttu Matilainen wrote:
Kun erotetaan selkäkappaleen silmukat ja niillä jatketaan, niin etupuolelle muodostuu "porras". Miten tämä kohta pitää neuloa?
22.02.2023 - 14:39DROPS Design answered:
Hei, silmukat neulotaan ennen kuin ne siirretään apulangalle. Eli reunasta tulee tasainen.
22.02.2023 - 16:23
![]() Terttu Matilainen wrote:
Terttu Matilainen wrote:
DROPS 152-14 malli 062 neulomatta Miten pitsineuleohjeissa A1 ja A3 silmukkamäärän pitäisi pysyä samana vaikka keskellä on kaksi langan kiertoa ja vain 1 silmukka vähenee kolmesta = kun nosta 1 oikein neulomatta, neulotaan kaksi yhteen ja vedetään nostettu kavennuksen yli
29.12.2022 - 20:52DROPS Design answered:
Silmukkaluku pysyy samana, koska työstä kavennetaan 2 silmukkaa: Nosta 1 silmukka oikein neulomatta, neulo 2 silmukkaa yhteen (työstä kapenee yksi silmukka) ja vedä nostettu silmukka kavennuksen yli (nyt työstä kapenee toinen silmukka).
02.01.2023 - 17:59
![]() Anniina wrote:
Anniina wrote:
Hi, I don't think I am getting this right. When I measure my wrist, the correct number of loops should be closer to 40 than to 100. If I follow the instructions, there is no way my sleeve is going be correct size. Am I misunderstanding something? Thank you! PS. Apparently comments in Finnish don't go through, please check why.
08.08.2021 - 08:59DROPS Design answered:
Dear Anniina, please take it into consideration, that you are using a relatively thin yarn with small needles AND a kind of ribbing that pulls in the knitted fabric. However, you should always make a gauge swatch, if in doubt, knit a swatch with the pattern too, wash it, and recalculate the stitch number of necessary. Happy Stitching!
08.08.2021 - 23:11
![]() Karine Grenet wrote:
Karine Grenet wrote:
Bonjour, je suis arrivée au moment ou je dois continuer avec l\\\'aiguille circulaire 2.5 et je suis un peu perdue car j\\\'ai toujours en attente les 110 mailles qui correspondent au devant droit. A quel moment je dois les reprendre?
05.09.2018 - 16:39DROPS Design answered:
Bonjour Mme Grenet, les 110 mailles en attente pour le haut du dos seront ensuite assemblées aux 110 m en attente de l'autre partie, vous ne tricotez plus ces mailles, vous continuez simplement sur les 94 m du bas de l'ouvrage que vous augmentez à 104 m et tricotez ensuite des rangs raccourcis (pour créer le petit gousset que l'on voit sur la 2ème photo). Bon tricot!
06.09.2018 - 08:23
![]() Claire Daoust wrote:
Claire Daoust wrote:
Si je ne désire pas faire la partie en rangs raccourcis, où dois-je arrêter ? Quels sont les modifications que je dois y apporter. Merci beaucoup
28.07.2017 - 18:23DROPS Design answered:
Bonjour Mme Daoust, les rangs raccourcis font partie intégrante du modèle et permettent de donner la forme souhaitée au dos, si vous ne les faites pas, vous aurez un résultat complètement différent. Bon tricot!
31.07.2017 - 09:19
![]() Claire Daoust wrote:
Claire Daoust wrote:
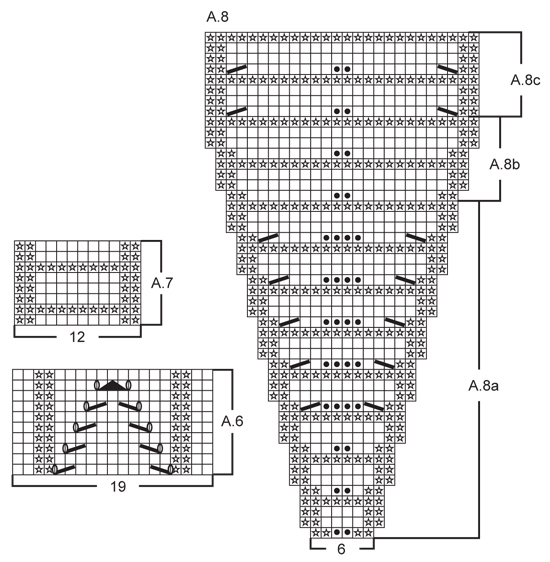
Le module A.7 ne devrait-il pas avoir le même nombre de lignes que A.6. Sinon, j'ai besoin d'explications.
25.07.2017 - 23:47DROPS Design answered:
Bonjour Mme Daoust, ces 2 diagrammes ne se répètent pas sur le même nombre de rangs, mais quand A.7 est terminé, reprenez au 1er rang et continuez A.6 comme avant. Bon tricot!
26.07.2017 - 09:01
![]() Marion Walter wrote:
Marion Walter wrote:
Hallo, werden die 5 x 10 stillgelegten Maschen auf der entgegengesetzten Seite gestrickt? Sprich die Seite entgegengesetzt der 136 stillgelegten Maschen?
28.03.2017 - 11:33DROPS Design answered:
Liebe Frau Walter, nach 19 cm sind die 136 M (= re. Vorderteil) nicht mehr gestrickt, sonder stillgelegt. Dann werden die verkürzten Reihen am Anfang jeder Rück-R gestrickt, dann alle Maschen für den Rücken gestrickt und noch verkürzte Reihen mit kleineren Nadeln gestrickt. Viel Spaß beim stricken!
28.03.2017 - 11:45
![]() Rita Pedersen wrote:
Rita Pedersen wrote:
Hejsa.. jeg har fundet fejlen... og det var en fejl 40... ups
25.01.2017 - 17:44
![]() Rita Pedersen wrote:
Rita Pedersen wrote:
Hovsa.. jeg laver str S
23.01.2017 - 14:16DROPS Design answered:
Hej Rita. Godt at du er kommet videre. God fornöjelse.
26.01.2017 - 11:51
|
||||||||||||||||||||||
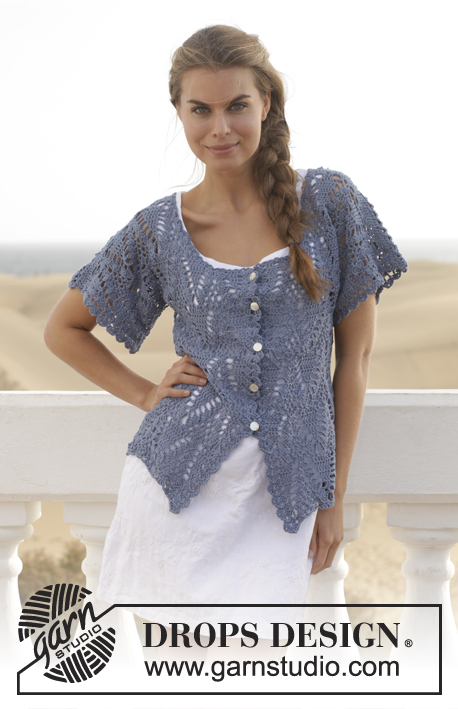
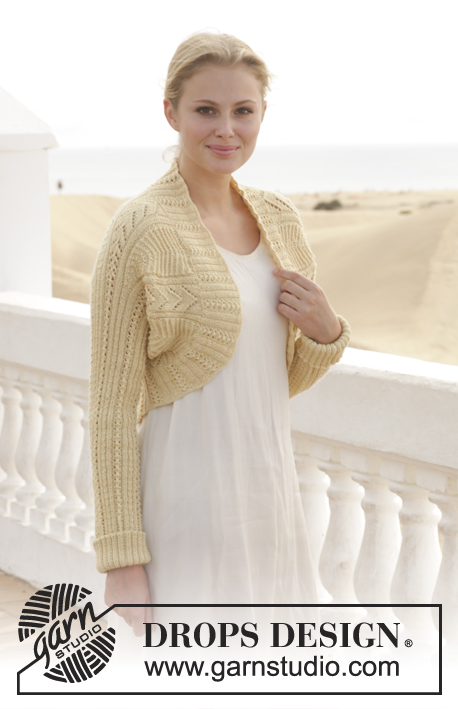
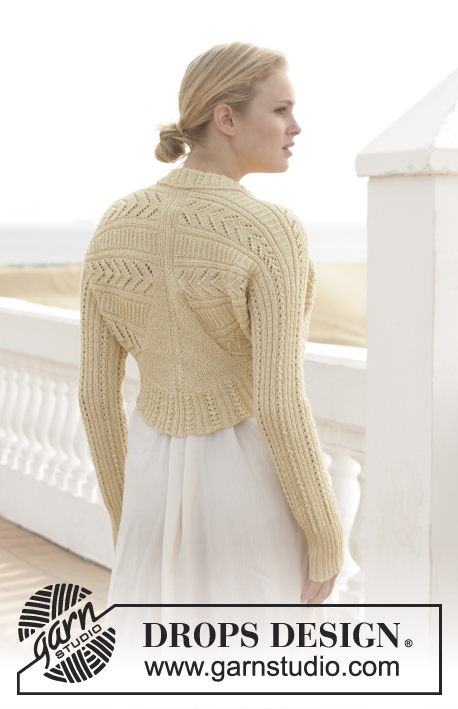
Lemon Shrug#lemonshrugbolero |
||||||||||||||||||||||
 |
 |
|||||||||||||||||||||
Knitted DROPS bolero with lace pattern in ”BabyAlpaca Silk”. Size: S - XXXL.
DROPS 152-14 |
||||||||||||||||||||||
|
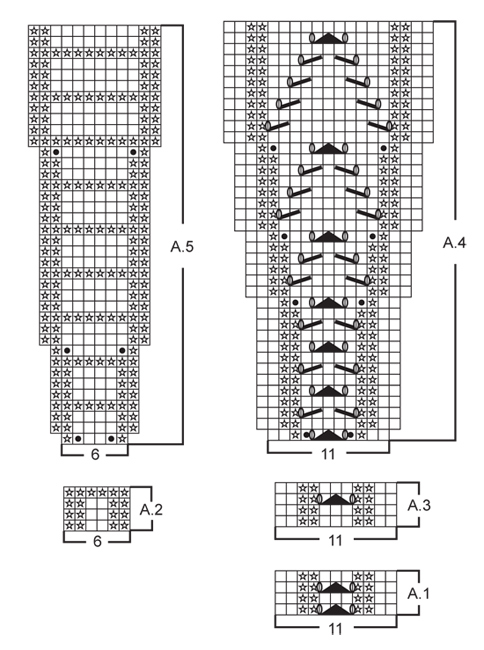
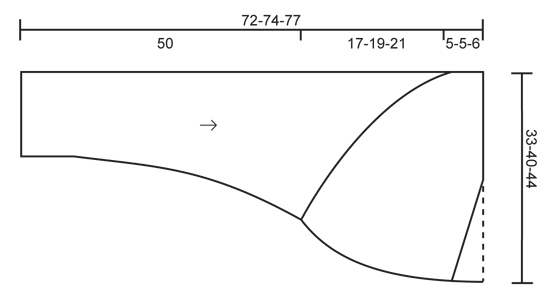
GARTER ST (back and forth on circular needle): K all rows. 1 ridge = 2 rows K. PATTERN: See diagrams A.1 to A.8. The diagrams show all rows in pattern seen from RS. ---------------------------------------------------------- BOLERO: Worked in 2 parts from edge of sleeve to mid back. Then the 2 parts are sewn tog mid back Pick up an edge in rib around the opening of bolero. RIGHT SIDE: Worked back and forth on circular needle from bottom of sleeve. Cast on 98-115-132 sts (incl 1 edge st in each side) on circular needle size 2.5 mm with BabyAlpaca Silk. P 1 row from WS. Work next row as follows from RS: 1 edge st in GARTER ST – see explanation above, * K 2, P 2, K 3, P 2, K 2, P 2, K 2, P 2 *, repeat from *-* 5-6-7 times in total, then * K 2, P 2, K 3, P 2, K 2 *, repeat from *-* 1 time in total and finish with 1 edge st in garter st. Continue rib like this. When piece measures 10 cm, switch to circular needle size 3 mm. Work next row as follows from RS: 1 edge st in garter st, * A.1 (= 11 sts), A.2 (= 6 sts) *, repeat from *-* 5-6-7 times in total, then A.1 (= 11 sts) 1 time in total, finish with 1 edge st in garter st. Continue like this until A.1 has been worked for 5 cm (piece measures approx. 15 cm). Now work A.3 instead of A.1 (continue A.2 as before). When piece measures 50 cm, insert 1 marker in piece. Work next row as follows from RS: 1 edge st in garter st, * A.4 (= 11 sts), A.8 (= 6 sts) *, repeat from *-* 2-3-3 times in total, ** A.4 (= 11 sts), A.5 (= 6 sts) **, repeat from **-** 3-3-4 times in total and finish with A.4 1 time and 1 edge st in garter st. Continue pattern like this. When A.4/ A.5 has been worked 1 time vertically, there are 196-237-268 sts on needle and piece measures approx. 12 cm from marker. Then work A.6 instead of A.4 and A.7 instead of A.5 (continue diagram A.8 as follows: Work A.8b 1 time and continue with A.8c). When A.8b has been worked 1 time vertically, there are 204-249-280 sts on needle. When piece measures 17-19-21 cm from marker, slip the first 110-136-155 sts on needle from RS on 1 stitch holder (work sts before slipping them on holder) = right front piece. There are now 94-113-125 sts on needle for back. Insert another marker (side seam is seamed up to this marker) and continue pattern back and forth over back sts. When piece measures 2-2-3 cm from marker, slip 10 sts on 1 stitch holder 5 times in total from bottom of back and up towards neck every other row (i.e. at beg of every row from WS - work sts before slipping them on holder to avoid cutting the yarn) = 44-63-75 sts remain on needle. Switch to circular needle size 2.5 mm and slip all sts from stitch holder back on needle AT THE SAME TIME work the rest of row from RS = 94-113-125 sts. P 1 row from WS while AT THE SAME TIME inc 10 sts evenly = 104-123-135 sts. Work 1 ridge in garter st over all sts. Slip the first 48-59-63 sts at the top of neck on 1 stitch holder (work sts before slipping them on holder). Then continue in garter st back and forth over the 56-64-72 sts AT THE SAME TIME work short rows as follows: ROW 1 (= RS): K 56-64-72 (from middle of back to bottom edge), turn piece. ROW 2 (= WS): K from bottom edge until 2 sts remain on needle (i.e. towards middle of back), turn piece. ROW 3 (= RS): K 54-62-70 sts, turn piece. ROW 4 (= WS): K from bottom edge until 4 sts remain on needle, turn piece. ROW 5 (= RS): K 52-60-68 sts, turn piece. ROW 6 (= WS): K from bottom edge until 6 sts remain on needle, turn piece. Continue like this until 1 ridge has been worked only over the outermost 2 sts at the bottom of back piece = 28-32-36 ridges. Then work 1 ridge over all 104-123-135 sts (also sts on stitch holder), loosely cast off. Bolero has now been worked until mid of back, i.e. half way. LEFT SIDE: Cast on and work as right side but reversed. I.e. when sts on front piece are slipped on a stitch holder, this is done from WS (not RS) and when sts from back are slipped on stitch holder, this is done at beg of every row from RS (not WS). ASSEMBLY: Sew sleeve seams edge to edge in outer loops of edge sts up to marker at 50 cm, then sew side seams, i.e. continue sleeve seam so that the side on front piece is sewn towards the side on back piece up to marker. Sew back seam. RIB: Pick up sts along the opening of bolero - i.e. up along right front piece, back of neck, down along left front piece and then along back piece as follows: Pick up from RS approx. 340 to 380 sts (incl sts on stitch holders) on circular needle size 2.5 mm and work in the round on needle as follows: P 1 round, then K 1 round while AT THE SAME TIME inc evenly to 390-416-468 sts. Continue to work rib as follows: * Work A.3 (= 11 sts), P 2 *, repeat from *-* the entire round. When rib measures 3 cm, inc every 3rd P-section to 3 P sts = 420-448-504 sts. Repeat inc when edge measures 7 cm, but displace inc so that there now are 2 sections with 3 P sts between every section with 2 P = 450-480-540 sts. When edge measures 8 cm, loosely cast off with K over K and P over P - NOTE: To avoid a tight cast-off edge, 1 YO after approx. every 6th or 12th st can be made and cast off as a regular st. |
||||||||||||||||||||||
Diagram explanations |
||||||||||||||||||||||
|
||||||||||||||||||||||
 |
||||||||||||||||||||||
 |
||||||||||||||||||||||
 |
||||||||||||||||||||||
Have you finished this pattern?Tag your pictures with #dropspattern #lemonshrugbolero or submit them to the #dropsfan gallery. Do you need help with this pattern?You'll find 26 tutorial videos, a Comments/Questions area and more by visiting the pattern on garnstudio.com. © 1982-2026 DROPS Design A/S. We reserve all rights. This document, including all its sub-sections, has copyrights. Read more about what you can do with our patterns at the bottom of each pattern on our site. |
||||||||||||||||||||||


With over 40 years in knitting and crochet design, DROPS Design offers one of the most extensive collections of free patterns on the internet - translated to 17 languages. As of today we count 324 catalogues and 12290 patterns translated into English (UK/cm). 12290
We work hard to bring you the best knitting and crochet have to offer, inspiration and advice as well as great quality yarns at incredible prices! Would you like to use our patterns for other than personal use? You can read what you are allowed to do in the Copyright text at the bottom of all our patterns. Happy crafting!
Post a comment to pattern DROPS 152-14
We would love to hear what you have to say about this pattern!
If you want to leave a question, please make sure you select the correct category in the form below, to speed up the answering process. Required fields are marked *.