
Popular categories
Looking for a yarn?


Comments / Questions (135)
![]() Lidia wrote:
Lidia wrote:
Witam, mam pytanie odnośnie rękawa: w rozmiarze 6/8lat przekrój rękawa to 44 oczka (21+23) natomiast przy wykonaniu rękawa należy przerobić na początku 25 słupków, czy w takim razie na jeden rękaw muszę wykonać dwa elementy według opisu?
11.01.2018 - 21:23DROPS Design answered:
Witaj Lidio! W rozmiarze 6/8lat przekrój rękawa to 42 oczka (21+21). Wg opisu rękaw wykonywany jest oddzielnie od góry do dołu. Należy przerabiać jak w opisie czyli łańcuszek, a następnie 25 słupków – to jest na cały rękaw. Powodzenia!
12.01.2018 - 10:01
![]() Marijke wrote:
Marijke wrote:
Mt. 2. Plaats markeerders voorpand? Cirkel dubbelgevouwen, armsgaten matchen. Ik heb dan midboven en midonder. Op hoeveel stokjes van die punten plaats ik markeerders?
22.11.2017 - 23:57DROPS Design answered:
Hallo Marijke, Je hoeft het werk niet dubbel te vouwen. Bij het linker voorpand heb je 60-68-74-83 stk. Vanuit het midden van deze steken tel je 18-20-22-24 st naar beide kanten (dus richting de hals en richting de onderkant van het werk) toe en dan plaats je een markeerder. Daarna begin je met haken volgens instructies. Het rechter voorpand doe je op dezelfde manier.
23.11.2017 - 08:45Robin wrote:
Thank you for your help. I'm afraid I still don't understand the instructions for the front panels because there is still no instruction on how to treat the slip stitch, single stitch, and half double crochet stitches on the return rows and still increase before and after the markers.
29.09.2017 - 18:24DROPS Design answered:
Dear Robin, you decrease as follows: Work firt row with dc until 3 dc remain, * then work these last 3 dc as follows: in the first of these work 1 hdc, in the next 1 sc and in the last 1 sl st. Turn with ch 1, then skip the sl st, work 1 sl st in the sc, 1 sc in the hdc, 1 hdc in the first dc, continue with dc until 3 dc remain at the end of row, turn and repeat from * on next row. Happy crocheting!
02.10.2017 - 12:06
![]() Robin wrote:
Robin wrote:
I have read all the comments and answers and I still am unsure how to work the front panel. I've completed the first two rows but on the third, when I come back to the hdc, sc, and sl, do I work them each with a dc in order to reach the marker and increase a dc on the next stitch or do I skip them? My question is how to deal with those stitches to get to the markers to make the increases. Also, are the increases made with two dc in one stitch? Thank you for your help.
22.09.2017 - 19:35DROPS Design answered:
Dear Robin, start to dec when 3 dc remains on row then *work 1 hdc, 1 sc, 1 sl st, turn and work 1 ch, skip the sl st, and crochet 1 sl st in the dc, 1 sc in the hdc, 1 hdc in the 1st dc, then continue with dc until 3 dc remains at theh end of row, and repeat from *. At the same time you are dec at the beg and end of each row, increase 2 dc on each row (= crochet 2 dc in 1 dc on every row alternately before and after each marker). Happy crocheting!
25.09.2017 - 09:36
![]() Beth Vandergriff wrote:
Beth Vandergriff wrote:
Thank you!!!
01.09.2017 - 16:21
![]() Beth Vandergriff wrote:
Beth Vandergriff wrote:
I am completely lost on how to create the front panels. Do you have pictures or a video I can watch? Part of the problem is I do not understand what 6-7-7-7 means. Thank you very much
01.09.2017 - 14:17DROPS Design answered:
Dear Mrs Vandergriff, you work stripes and tr back and forth over the 60-68-74-83 sts on front piece increasing at the same time 1 st at each marker on every row until you have worked a total of 6 rows for front piece in the first 2 sizes and 8 rows in the 2 larger sizes. Happy crocheting!
01.09.2017 - 15:29Asha wrote:
Dear DROPS Design, thank you for the pattern. After one row of inc on the front piece before the markers, When the markers move do they stay on the the sts after the 18th sts? Thank You. Asha
02.08.2017 - 16:37DROPS Design answered:
Dear Asha, the stitch markers stay in the stitch where you put them, however, as your work grows, they move, always to the last row. You should do teh increases alternately before and after the markers. I hope this helps. Happy Crocheting!
02.08.2017 - 22:25
![]() Valerie Parenti wrote:
Valerie Parenti wrote:
Hello, thank you for the pattern! I have crocheted all the pieces and need to sew together. Can you clarify how the sleeves fit once again? I have read your previous explanations and they did help, it just doesn't look right? The piece where the stitches are greatest is considered the cap and should be at the top but then the sleeves seem to fall the wrong way. Please expand on this a little more and thank you so much. A happy crocheter. Valerie
26.07.2017 - 00:33DROPS Design answered:
Dear Valerie, the widest part of the sleeves (the rows with more stitches) should be sewn into the armhole. Happy crocheting!
26.07.2017 - 06:09Asha wrote:
Dear DROPS Design, on the front piece decrease you said to work until 3 dc remain and hdc, sc, and sl sts. Now when I work the other two rows and I have to rep the decrease and said to work until 3 dc remain is this mean that I should skip hdc , sc, sl sts, and do the 3 sts before the hdc , sc, sl sts? thank You. Asha
25.07.2017 - 15:29DROPS Design answered:
Dear Asha, you will work until 3 dc remain, ie do not count the hdc, sc, sl st at the end of the row. Happy crocheting!
25.07.2017 - 17:10Asha wrote:
Hi You said add 2 markers: 1 after the 18 first sts and 1 before the 18 last sts. So if this is the case when I worked inc before the markers, one would be an inc on the 18th sts and one would be on the 24th sts. Is this right? Thank You. Asha
17.07.2017 - 17:15DROPS Design answered:
Dear Asha, that's right, then on 2nd row, inc 1 st in the 19th st (after marker) and in the st after 2nd marker. Happy crocheting!
18.07.2017 - 08:32
|
|
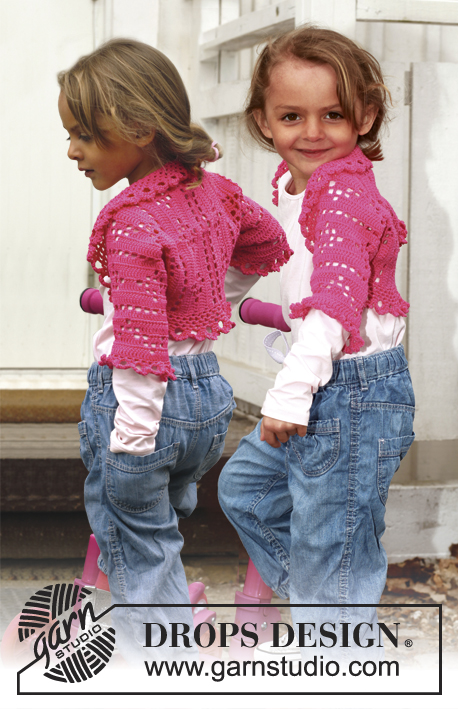
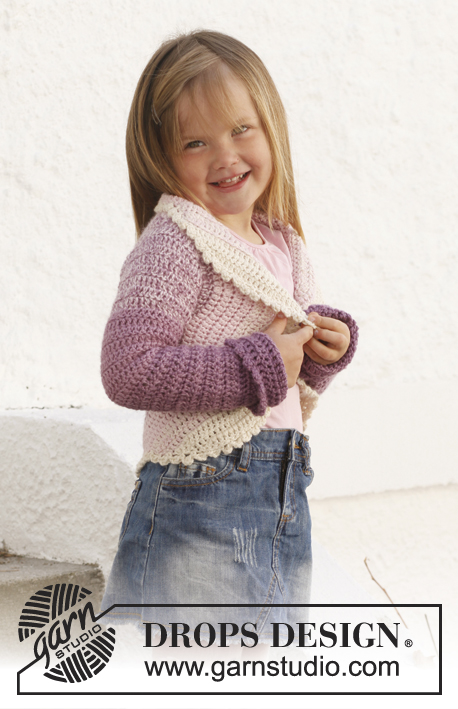
Princess Petal#princesspetalcardigan |
|
 |
 |
Circle jacket crocheted in 2 threads DROPS BabyAlpaca Silk. Size children 3 - 12 years.
DROPS Children 24-1 |
|
|
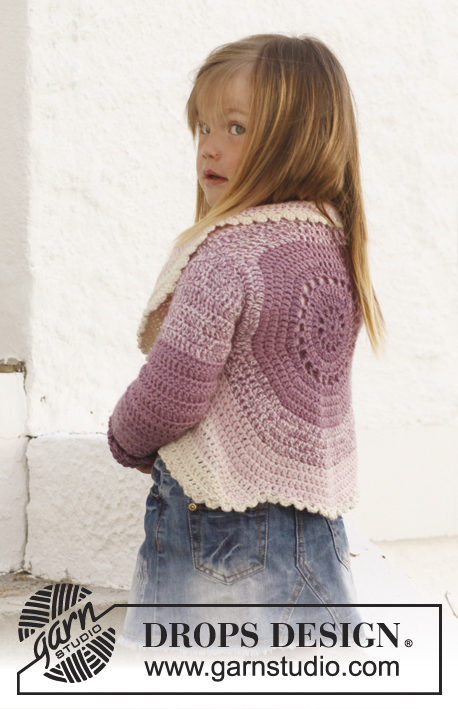
STRIPES - BODY: Worked in a circle from mid back. Beg with 2 strands of colour 4088. Continue as follows: 3-3-4-4 rounds with 2 strands of colour 4088. 3-3-4-4 rounds with 1 strand of colour 4088 + 1 strand of colour 3250. 3-4-4-4 rounds with 2 strands of colour 3250. 4-4-4-5 rounds with 1 strand of colour 3250 + 1 strand of colour 3125. 4-4-4-5 rounds with 2 strands of colour 3125. 3-4-4-4 rounds/rows with 1 strand of colour 3125 + 1 strand of colour 0100. 3-3-5-5 rows with 2 strands of colour 0100. STRIPES - SLEEVE: Worked from sleeve cap and down in stripes as follows: Beg with 1 strand of colour 3250 + 1 strand of colour 3125. Work 9-10-11-12 cm with this colour combination. Continue with 9-10-11-12 cm with 2 strands of colour 3250 and 10-10-11-12 cm with 1 strand of colour 4088 + 1 strand of colour 3250. Then finish the sleeve with 2 strands of colour 4088 = approx. 10-11-12-12 cm. CROCHET INFO: Replace first tr on every round/row with 3 ch. Finish every round with 1 sl st in 3rd ch from beg of round. DECREASE TIP 1 (applies to body): Dec as follows: Work tr until 3 tr remain, * in the first of these work 1 htr, in the next 1 dc and in the last 1 sl st, turn with 1 ch, skip sl st, work 1 sl st in dc, 1 dc in htr, 1 htr in first tr, continue with tr until 3 tr remain at the end of row *, repeat from *-* until 6-7-7-7 rows have been worked in total. DECREASE TIP 2 (applies to sleeves): Dec 1 tr at beg and end of row by working the second and third tr tog and the 2 next to last tr tog, this is done as follows: Work 1 tr in first tr but wait with last pull through, work 1 tr in next tr but on last pull through, pull thread through all 3 loops on hook. -------------------------------------------------------- BODY: Worked in the round in a circle from mid back with 2 strands and STRIPES – see explanation above. Crochet 5 ch on hook size 5 mm and form a ring with 1 sl st in first ch. READ CROCHET INFO! ROUND 1: 12 tr in ch-ring. ROUND 2: 1 tr, * 2 ch, 1 tr in next tr *, repeat from *-* the entire round, finish with 2 ch and 1 sl st in 1st tr = 12 tr with 2 ch between each. ROUND 3: 1 tr in every tr and 2 tr in every ch-space the entire round = 36 tr. ROUND 4: * 1 tr in each of the first 2 tr, 2 tr in next tr *, repeat from *-* the entire round = 48 tr. ROUND 5: 1 tr, * 2 ch, skip 1 tr, 1 tr in next tr *, repeat from *-* the entire round, finish with 2 ch and 1 sl st in 1st tr = 24 tr with 2 ch between each. ROUND 6: 1 tr in every tr and 2 tr in every ch-space the entire round = 72 tr. ROUND 7: Work 1 tr in every tr but in every 6th tr work 2 tr = 84 tr. ROUND 8: Work 1 tr in every tr but in every 7th tr work 2 tr = 96 tr. ROUND 9: Work 1 tr in every tr but in every 8th tr work 2 tr = 108 tr. ROUND 10: Work 1 tr in every tr but in every 9th tr work 2 tr = 120 tr. ROUND 11: Work 1 tr in every tr but in every 10th tr work 2 tr = 132 tr. Piece measures approx. 14 cm from centre and outwards. SIZE 3/5 YEARS: ROUND 12: Work 1 tr in each of the first 30 tr (= up towards neck), work 22 loose ch, skip the next 20 tr (= armhole), then work 1 tr in each of the next 62 tr (= down towards back), work 22 loose ch, skip the next 20 tr (= armhole) and fasten with 1 sl st in first tr at beg of round. ROUND 13: Work 1 tr in each of the first 30 tr but inc 2 tr evenly (= 32 tr), then work 22 tr in ch-row over armhole, work 1 tr in each of the next 62 tr but inc 2 tr evenly (= 64 tr), work 22 tr in ch-row over armhole, and fasten with 1 sl st in first tr at beg of round = 140 tr. ROUND 14 to 17: Continue with tr – at the same time inc 10 tr evenly on every round. After 17th round there are 180 tr on round and piece measures approx. 21 cm from centre and outwards. Fasten off. Then work only over 60 tr in each side - i.e. the 30 tr at the top by neck and the 30 tr at the bottom of back are no longer worked. Continue with explanation below front piece. SIZE 6/8 YEARS: ROUND 12: Work 1 tr in every tr but in every 11th tr work 2 tr = 144 tr. ROUND 13: Work 1 tr in each of the first 35 tr (= up towards neck), work 23 loose ch, skip the next 21 tr (= armhole), then work 1 tr in each of the next 67 tr (= down towards back), work 23 loose ch, skip the next 21 tr (= armhole) and fasten with 1 sl st in first tr at beg of round. ROUND 14: Work 1 tr in each of the first 35 tr but inc 3 tr evenly (= 38 tr), then work 23 tr in ch-row over armhole, work 1 tr in each of the next 67 tr but inc 3 tr evenly (= 70 tr), work 23 tr in ch-row over armhole, and fasten with 1 sl st in first tr at beg of round = 154 tr. ROUND 15 to 19: Continue with tr – at the same time inc 10 tr evenly on every round. After 19th round there are 204 tr on round and piece measures approx. 23 cm from centre and outwards. Fasten off. Then work only over 68 tr in each side - i.e. the 34 tr at the top by neck and the 34 tr at the bottom of back are no longer worked. Continue with explanation below front piece. SIZE 9/10 YEARS: ROUND 12: Work 1 tr in every tr but in every 11th tr work 2 tr = 144 tr. ROUND 13: Work 1 tr in every tr but in every 12th tr work 2 tr = 156 tr. ROUND 14: Work 1 tr in each of the first 38 tr (= up towards neck), work 25 loose ch, skip the next 23 tr (= armhole), then work 1 tr in each of the next 72 tr (= down towards back), work 25 loose ch, skip the next 23 tr (= armhole) and fasten with 1 sl st in first tr at beg of round. ROUND 15: Work 1 tr in each of the first 38 tr but inc 3 tr evenly (= 41 tr), then work 25 tr in ch-row over armhole, work 1 tr in each of the next 72 tr but inc 3 tr evenly (= 75 tr), work 25 tr in ch-row over armhole, and fasten with 1 sl st in first tr at beg of round = 166 tr. ROUND 16 to 21: Continue with tr – at the same time inc 10 tr evenly on every round. After 21st round there are 226 tr on round and piece measures approx. 26 cm from centre and outwards. Fasten off. Then work only over 74 tr in each side - i.e. the 39 tr at the top by neck and the 39 tr at the bottom of back are no longer worked. Continue with explanation below front piece. SIZE 11/12 YEARS: ROUND 12: Work 1 tr in every tr but in every 11th tr work 2 tr = 144 tr. ROUND 13: Work 1 tr in every tr but in every 12th tr work 2 tr = 156 tr. ROUND 14: Work 1 tr in every tr but in every 13th tr work 2 tr = 168 tr. ROUND 15: Work 1 tr in each of the first 42 tr (= up towards neck), work 27 loose ch, skip the next 25 tr (= armhole), then work 1 tr in each of the next 76 tr (= down towards back), work 27 loose ch, skip the next 25 tr (= armhole) and fasten with 1 sl st in first tr at beg of round. ROUND 16: Work 1 tr in each of the first 42 tr but inc 4 tr evenly (= 46 tr), then work 27 tr in ch-row over armhole, work 1 tr in each of the next 76 tr but inc 4 tr evenly (= 80 tr), work 27 tr in ch-row over armhole, and fasten with 1 sl st in first tr at beg of round = 180 tr. ROUND 17 to 23: Continue with tr – at the same time inc 10 tr evenly on every round. After 23rd round there are 250 tr on round and piece measures approx. 28 cm from centre and outwards. Fasten off. Then work only over 83 tr in each side - i.e. the 42 tr at the top by neck and the 42 tr at the bottom of back are no longer worked. Continue with explanation below front piece. LEFT FRONT PIECE - ALL SIZES: = 60-68-74-83 tr. Insert 1 marker after 18-20-22-24 sts in from each side (= 24-28-30-35 sts between markers). Then work stripes and tr back and forth while AT THE SAME TIME inc 1 st at each marker on every row (i.e. inc 2 tr on row - inc alternately before and after each marker outwards) until a total of 6-6-8-8 rows have been worked back and forth AT THE SAME TIME work according to DECREASE TIP 1. Fasten off. RIGHT FRONT PIECE: Work same way as on left front piece over 60-68-74-83 tr in right side. SLEEVE: Worked back and forth from sleeve cap and down - see STRIPES - SLEEVE above. Work 24-27-28-34 LOOSE ch with 1 strand of colour 3250 + 1 strand of colour 3125. ROW 1: Turn and work 1 tr in 4th ch from hook (the first 3 ch = 1 tr), then work 1 tr in every ch the entire row = 22-25-26-32 tr. Turn piece. ROW 2: Work 3 ch + 2 tr in first tr, 1 tr in every tr until last tr and 3 tr in last tr = 26-29-30-36 tr. Turn piece. ROW 3: Work 3 ch + 1 tr in first tr, 1 tr in every tr until 1 tr remains and 2 tr in last tr. Turn piece. Work 1-1-2-2 more rows as 3rd row = 30-33-36-42 tr. NEXT ROW: Work 3 ch + 2 tr in first tr, 1 tr in every tr until last tr and 3 tr in last tr = 34-37-40-46 tr. Turn piece. Now work 1 tr in every tr until piece measures 7-8-9-10 cm. Continue with tr while AT THE SAME TIME dec 1 tr in each side - SEE DECREASE TIP! Repeat dec every 8th-6th-5th-4th row 2-3-4-6 more times = 28-29-30-32 tr. Continue with 1 tr in every tr until sleeve measures 38-41-45-48 cm. Fasten off. ASSEMBLY: Sew sleeve seams edge to edge to avoid a chunky seam. Work 1 round around the entire body as follows with 2 strands of colour 0100: 1 sl st in first st, * 3 ch, 1 tr in first ch (= 1 picot), skip 1 tr, fasten with 1 dc in next st *, repeat from *-* the entire round and finish with 1 sl st in first sl st. Sew sleeves in body - make sure that sleeve cap is sewn in at the top of armholes, i.e. where the distance is shortest. Work an edge around the sleeves the same way as around body but with 2 strands of colour 4088. |
|
 |
|
Have you finished this pattern?Tag your pictures with #dropspattern #princesspetalcardigan or submit them to the #dropsfan gallery. Do you need help with this pattern?You'll find 8 tutorial videos, a Comments/Questions area and more by visiting the pattern on garnstudio.com. © 1982-2026 DROPS Design A/S. We reserve all rights. This document, including all its sub-sections, has copyrights. Read more about what you can do with our patterns at the bottom of each pattern on our site. |
|


With over 40 years in knitting and crochet design, DROPS Design offers one of the most extensive collections of free patterns on the internet - translated to 17 languages. As of today we count 324 catalogues and 12290 patterns translated into English (UK/cm). 12290
We work hard to bring you the best knitting and crochet have to offer, inspiration and advice as well as great quality yarns at incredible prices! Would you like to use our patterns for other than personal use? You can read what you are allowed to do in the Copyright text at the bottom of all our patterns. Happy crafting!
Post a comment to pattern DROPS Children 24-1
We would love to hear what you have to say about this pattern!
If you want to leave a question, please make sure you select the correct category in the form below, to speed up the answering process. Required fields are marked *.