
Popular categories
Looking for a yarn?


Comments / Questions (135)
![]() Carmela Giammanco wrote:
Carmela Giammanco wrote:
Si può avere uno scemo non riesco a lavorare con le spiegazioni scritte biba anni8
17.09.2022 - 01:09DROPS Design answered:
Buonasera Carmela, purtroppo non ci è possibile adattare le spiegazioni alle singole esigenze, ma può rivolgersi al suo rivenditore DROPS di fiducia. Buon lavoro!
17.09.2022 - 19:22
![]() WENDY wrote:
WENDY wrote:
For fronts, I'm making 6/8. Do I place the marker into the 20th stitch? It's confusing because it says "after" . Does that mean the marker goes into the 21st stitch?
06.07.2022 - 14:16DROPS Design answered:
Dear Wendy, insert the markers between 2 stitches: after the 20th stitch at the beginning of the row and when 20 sts remain at the end of the row so that you will have: 20 sts, marker, 28 sts, marker, 20 sts (= 68 sts in total). Happy crocheting!
06.07.2022 - 14:23
![]() WENDY wrote:
WENDY wrote:
I'm making size 6/8 and the front piece instructions have me completely confused about placing the markers. I have 34 stiches at the top and bottom with 68 stitches between them down the sides. I have no idea what you mean by placing markers 20 stitches in from "each side". Starting from where? I'm completely baffled.
05.07.2022 - 20:14DROPS Design answered:
Dear Wendy, fold your circle double so that both armholes matches and insert a marker on top and bottom of circle, then unfold the circle and count 34 sts on the top towards neck (17 sts on each side of the marker you just inserted) and insert now 2 new markers to mark these 34 sts. Repeat on the bottom = there are now 4 markers with 68 sts on each side for the front pieces and 34 sts on top for neck and at the bottom of back piece - you will now work over these 68 sts separately the "oval" part in the chart. Happy crocheting!
06.07.2022 - 09:07
![]() Daria wrote:
Daria wrote:
Dzień dobry, Chciałam zrobić ten sweterek dla 4 letniej córki. O ile tył sweterka był dla mnie prosty, o tyle nie wiem jak zabrać sie do szydelkowania przodów. Przeczytałam wszystkie komentarze do tego wzoru w j.polskim i angielskim. Niestety nadal nie rozumiem. Jak mam dodawać słupki przy markerach i jednocześnie kontynuować zamykanie oczek? Proszę o pomoc, jakieś łatwiejsze \"łopatologiczne\" wytłumaczenie.
07.04.2021 - 13:37DROPS Design answered:
Witaj Dario, na każdym przodzie będziesz dodawać po 1 sł w miejscu 2 markerów (2 dodane sł w rzędzie)> dzięki temu przód będzie się lekko rozszerzał. Jednocześnie zamykasz po 1 słupku na końcach wg wskazówki ZAMYKANIE OCZEK 1, aby brzegi były lekko zaokrąglone. Powodzenia!
08.04.2021 - 17:02
![]() Patricia Ann Anderson wrote:
Patricia Ann Anderson wrote:
Can you please give full instruction on first 2 rows of the fronts. I don't understand how you can Inc and Dec at both ends??
10.03.2021 - 23:19DROPS Design answered:
Dear Mrs Anderson, insert 2 markers as stated and work now over 60-68-74-83 sts for the front piece increasing 1 stitch at each marker on every row at the same time decrease as explained under DECREASE TIP-1: work trebles increasing 2 sts until 3 sts remain, work then: *1 htr, 1 dc, 1 sl st, turn, skip sl st, work 1 sl st, 1 dc, 1 htr, continue with tr increasing 1 st at both markers until 3 sts remain*, repeat now from *. You will decrease on each side to make the rounded edge for the front piece. Happy crocheting!
11.03.2021 - 08:32
![]() Patricia wrote:
Patricia wrote:
I'm sorry but I'm finding your pattern very confusing, not clear what you do in each row especially for the two fronts 😩🤪🤪
10.03.2021 - 19:15
![]() Becky Wood wrote:
Becky Wood wrote:
The way you wrote this pattern is no help. I have crocheted since I was 9 years old. I got to round 11 and then you say just increase as necessary. Well, if you are looking for a pattern, you want instructions! Not just do what you think. Very disappointed. Going to have to pull out the yarn for about 3 or 4 hours of work and start over with a GOOD pattern.
03.03.2021 - 06:35DROPS Design answered:
Dear Mrs Wood, The DROPS patterns are knitted and crocheted by thousands and thousands of people around the world. We understand however that in certain countries, with different knitting/crochet traditions than Scandinavia, our patterns might be written in a way that differs from what some are used to. But of course we want everyone to understand our patterns, so that’s why we have created an extensive library of tutorial videos as well as step by step lessons that explain how to follow the techniques we use and how to read the diagrams in our patterns. Give them a try!
03.03.2021 - 07:19
![]() Hanneke Peeters wrote:
Hanneke Peeters wrote:
Hello I just started with the sleeves. I crocheted 34 loose (12 years) and went on following the pattern. But of I fold it to close the sleeve, it is smaller than the arm hole. Do I need to follow the pattern for the sleeves twice to make one sleeve? Thank you for your reply. Kind regards Hanneke
23.01.2021 - 13:37DROPS Design answered:
Dag Hanneke,
The 34 loose stitches are just for top of the cap of the sleeve. When you continue crocheting end increase on both sides like described in pattern, you will see the shaping of the sleeve cap until the axil.
24.01.2021 - 11:36
![]() Hanneke Peeters wrote:
Hanneke Peeters wrote:
Beste Als ik aan de mouwen begin, haak ik 34 losse (12jaar) en ga heen en weer. Hoe lang moeten deze 34 losse samen zijn? Moet dit even lang zijn als de volledig omtrek van een armsgat? Alvast bedankt voor uw antwoord
22.01.2021 - 12:54DROPS Design answered:
Dag Hanneke,
Nee, die 34 lossen zijn de bovenkant van de mouwkop, Op de volgende toeren ontstaat een afronding aan de zijkanten van de mouwkop door het meerderen.
23.01.2021 - 11:35
![]() Anna Dahlgren wrote:
Anna Dahlgren wrote:
Jag förstår inte hur jag ska virka ärmarna på Princess Petal. Man ska virka från ärmbågen och neråt... Men om jag börjar längst upp och virkar nerår blir det ju bara halva ärmen. Vart ska jag börja ärmen. Ska jag dela dom 25 maskorna och börja 13 maskor innan ärmbågen? Finns det någon video?
16.01.2021 - 01:45DROPS Design answered:
Hei Anna. Du skal hekle ermene for seg selv, frem og tilbake, de skal monteres på bolen til slutt. Om du hekler 6/8 år skal du hekle 1. til 3. rad slik det står i oppskriften, deretter hekles det 1 stav i hver stav, samtidig som det felles masker til ermet måler 41 cm. Når ermene sys fast til bolen pass på at ermtoppen blir sydd til øverst i ermhullene på bolen. mvh DROPS design
25.01.2021 - 14:37
|
|
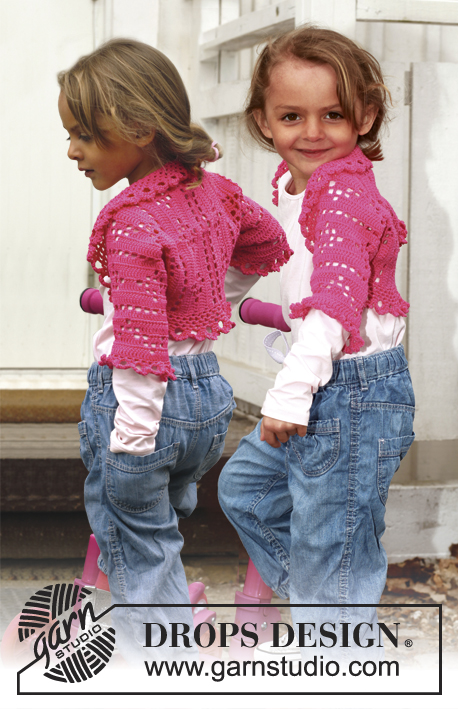
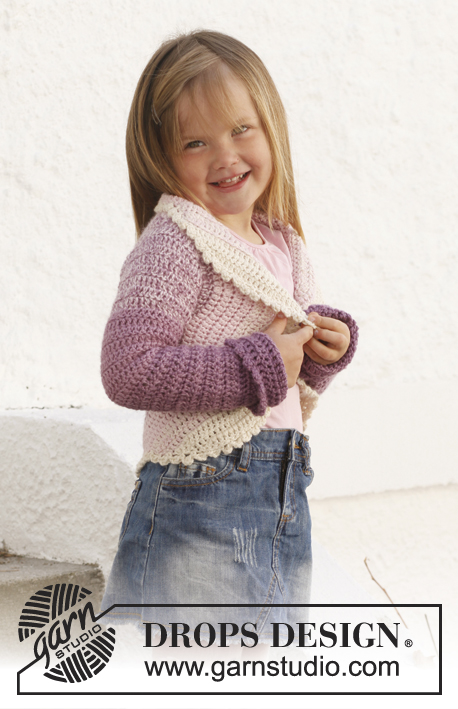
Princess Petal#princesspetalcardigan |
|
 |
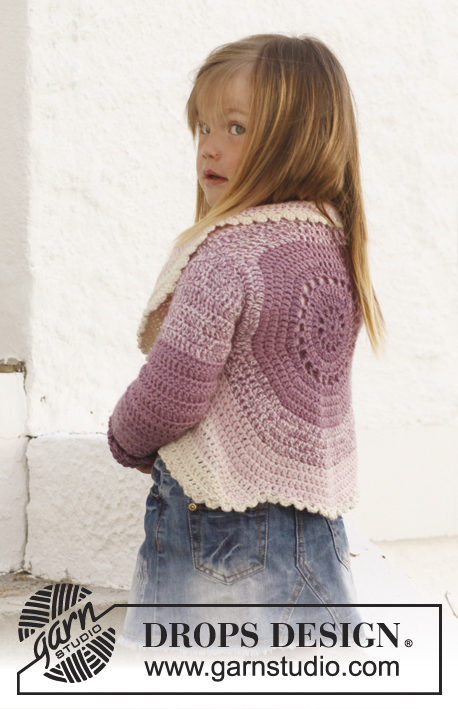 |
Circle jacket crocheted in 2 threads DROPS BabyAlpaca Silk. Size children 3 - 12 years.
DROPS Children 24-1 |
|
|
STRIPES - BODY: Worked in a circle from mid back. Beg with 2 strands of colour 4088. Continue as follows: 3-3-4-4 rounds with 2 strands of colour 4088. 3-3-4-4 rounds with 1 strand of colour 4088 + 1 strand of colour 3250. 3-4-4-4 rounds with 2 strands of colour 3250. 4-4-4-5 rounds with 1 strand of colour 3250 + 1 strand of colour 3125. 4-4-4-5 rounds with 2 strands of colour 3125. 3-4-4-4 rounds/rows with 1 strand of colour 3125 + 1 strand of colour 0100. 3-3-5-5 rows with 2 strands of colour 0100. STRIPES - SLEEVE: Worked from sleeve cap and down in stripes as follows: Beg with 1 strand of colour 3250 + 1 strand of colour 3125. Work 9-10-11-12 cm with this colour combination. Continue with 9-10-11-12 cm with 2 strands of colour 3250 and 10-10-11-12 cm with 1 strand of colour 4088 + 1 strand of colour 3250. Then finish the sleeve with 2 strands of colour 4088 = approx. 10-11-12-12 cm. CROCHET INFO: Replace first tr on every round/row with 3 ch. Finish every round with 1 sl st in 3rd ch from beg of round. DECREASE TIP 1 (applies to body): Dec as follows: Work tr until 3 tr remain, * in the first of these work 1 htr, in the next 1 dc and in the last 1 sl st, turn with 1 ch, skip sl st, work 1 sl st in dc, 1 dc in htr, 1 htr in first tr, continue with tr until 3 tr remain at the end of row *, repeat from *-* until 6-7-7-7 rows have been worked in total. DECREASE TIP 2 (applies to sleeves): Dec 1 tr at beg and end of row by working the second and third tr tog and the 2 next to last tr tog, this is done as follows: Work 1 tr in first tr but wait with last pull through, work 1 tr in next tr but on last pull through, pull thread through all 3 loops on hook. -------------------------------------------------------- BODY: Worked in the round in a circle from mid back with 2 strands and STRIPES – see explanation above. Crochet 5 ch on hook size 5 mm and form a ring with 1 sl st in first ch. READ CROCHET INFO! ROUND 1: 12 tr in ch-ring. ROUND 2: 1 tr, * 2 ch, 1 tr in next tr *, repeat from *-* the entire round, finish with 2 ch and 1 sl st in 1st tr = 12 tr with 2 ch between each. ROUND 3: 1 tr in every tr and 2 tr in every ch-space the entire round = 36 tr. ROUND 4: * 1 tr in each of the first 2 tr, 2 tr in next tr *, repeat from *-* the entire round = 48 tr. ROUND 5: 1 tr, * 2 ch, skip 1 tr, 1 tr in next tr *, repeat from *-* the entire round, finish with 2 ch and 1 sl st in 1st tr = 24 tr with 2 ch between each. ROUND 6: 1 tr in every tr and 2 tr in every ch-space the entire round = 72 tr. ROUND 7: Work 1 tr in every tr but in every 6th tr work 2 tr = 84 tr. ROUND 8: Work 1 tr in every tr but in every 7th tr work 2 tr = 96 tr. ROUND 9: Work 1 tr in every tr but in every 8th tr work 2 tr = 108 tr. ROUND 10: Work 1 tr in every tr but in every 9th tr work 2 tr = 120 tr. ROUND 11: Work 1 tr in every tr but in every 10th tr work 2 tr = 132 tr. Piece measures approx. 14 cm from centre and outwards. SIZE 3/5 YEARS: ROUND 12: Work 1 tr in each of the first 30 tr (= up towards neck), work 22 loose ch, skip the next 20 tr (= armhole), then work 1 tr in each of the next 62 tr (= down towards back), work 22 loose ch, skip the next 20 tr (= armhole) and fasten with 1 sl st in first tr at beg of round. ROUND 13: Work 1 tr in each of the first 30 tr but inc 2 tr evenly (= 32 tr), then work 22 tr in ch-row over armhole, work 1 tr in each of the next 62 tr but inc 2 tr evenly (= 64 tr), work 22 tr in ch-row over armhole, and fasten with 1 sl st in first tr at beg of round = 140 tr. ROUND 14 to 17: Continue with tr – at the same time inc 10 tr evenly on every round. After 17th round there are 180 tr on round and piece measures approx. 21 cm from centre and outwards. Fasten off. Then work only over 60 tr in each side - i.e. the 30 tr at the top by neck and the 30 tr at the bottom of back are no longer worked. Continue with explanation below front piece. SIZE 6/8 YEARS: ROUND 12: Work 1 tr in every tr but in every 11th tr work 2 tr = 144 tr. ROUND 13: Work 1 tr in each of the first 35 tr (= up towards neck), work 23 loose ch, skip the next 21 tr (= armhole), then work 1 tr in each of the next 67 tr (= down towards back), work 23 loose ch, skip the next 21 tr (= armhole) and fasten with 1 sl st in first tr at beg of round. ROUND 14: Work 1 tr in each of the first 35 tr but inc 3 tr evenly (= 38 tr), then work 23 tr in ch-row over armhole, work 1 tr in each of the next 67 tr but inc 3 tr evenly (= 70 tr), work 23 tr in ch-row over armhole, and fasten with 1 sl st in first tr at beg of round = 154 tr. ROUND 15 to 19: Continue with tr – at the same time inc 10 tr evenly on every round. After 19th round there are 204 tr on round and piece measures approx. 23 cm from centre and outwards. Fasten off. Then work only over 68 tr in each side - i.e. the 34 tr at the top by neck and the 34 tr at the bottom of back are no longer worked. Continue with explanation below front piece. SIZE 9/10 YEARS: ROUND 12: Work 1 tr in every tr but in every 11th tr work 2 tr = 144 tr. ROUND 13: Work 1 tr in every tr but in every 12th tr work 2 tr = 156 tr. ROUND 14: Work 1 tr in each of the first 38 tr (= up towards neck), work 25 loose ch, skip the next 23 tr (= armhole), then work 1 tr in each of the next 72 tr (= down towards back), work 25 loose ch, skip the next 23 tr (= armhole) and fasten with 1 sl st in first tr at beg of round. ROUND 15: Work 1 tr in each of the first 38 tr but inc 3 tr evenly (= 41 tr), then work 25 tr in ch-row over armhole, work 1 tr in each of the next 72 tr but inc 3 tr evenly (= 75 tr), work 25 tr in ch-row over armhole, and fasten with 1 sl st in first tr at beg of round = 166 tr. ROUND 16 to 21: Continue with tr – at the same time inc 10 tr evenly on every round. After 21st round there are 226 tr on round and piece measures approx. 26 cm from centre and outwards. Fasten off. Then work only over 74 tr in each side - i.e. the 39 tr at the top by neck and the 39 tr at the bottom of back are no longer worked. Continue with explanation below front piece. SIZE 11/12 YEARS: ROUND 12: Work 1 tr in every tr but in every 11th tr work 2 tr = 144 tr. ROUND 13: Work 1 tr in every tr but in every 12th tr work 2 tr = 156 tr. ROUND 14: Work 1 tr in every tr but in every 13th tr work 2 tr = 168 tr. ROUND 15: Work 1 tr in each of the first 42 tr (= up towards neck), work 27 loose ch, skip the next 25 tr (= armhole), then work 1 tr in each of the next 76 tr (= down towards back), work 27 loose ch, skip the next 25 tr (= armhole) and fasten with 1 sl st in first tr at beg of round. ROUND 16: Work 1 tr in each of the first 42 tr but inc 4 tr evenly (= 46 tr), then work 27 tr in ch-row over armhole, work 1 tr in each of the next 76 tr but inc 4 tr evenly (= 80 tr), work 27 tr in ch-row over armhole, and fasten with 1 sl st in first tr at beg of round = 180 tr. ROUND 17 to 23: Continue with tr – at the same time inc 10 tr evenly on every round. After 23rd round there are 250 tr on round and piece measures approx. 28 cm from centre and outwards. Fasten off. Then work only over 83 tr in each side - i.e. the 42 tr at the top by neck and the 42 tr at the bottom of back are no longer worked. Continue with explanation below front piece. LEFT FRONT PIECE - ALL SIZES: = 60-68-74-83 tr. Insert 1 marker after 18-20-22-24 sts in from each side (= 24-28-30-35 sts between markers). Then work stripes and tr back and forth while AT THE SAME TIME inc 1 st at each marker on every row (i.e. inc 2 tr on row - inc alternately before and after each marker outwards) until a total of 6-6-8-8 rows have been worked back and forth AT THE SAME TIME work according to DECREASE TIP 1. Fasten off. RIGHT FRONT PIECE: Work same way as on left front piece over 60-68-74-83 tr in right side. SLEEVE: Worked back and forth from sleeve cap and down - see STRIPES - SLEEVE above. Work 24-27-28-34 LOOSE ch with 1 strand of colour 3250 + 1 strand of colour 3125. ROW 1: Turn and work 1 tr in 4th ch from hook (the first 3 ch = 1 tr), then work 1 tr in every ch the entire row = 22-25-26-32 tr. Turn piece. ROW 2: Work 3 ch + 2 tr in first tr, 1 tr in every tr until last tr and 3 tr in last tr = 26-29-30-36 tr. Turn piece. ROW 3: Work 3 ch + 1 tr in first tr, 1 tr in every tr until 1 tr remains and 2 tr in last tr. Turn piece. Work 1-1-2-2 more rows as 3rd row = 30-33-36-42 tr. NEXT ROW: Work 3 ch + 2 tr in first tr, 1 tr in every tr until last tr and 3 tr in last tr = 34-37-40-46 tr. Turn piece. Now work 1 tr in every tr until piece measures 7-8-9-10 cm. Continue with tr while AT THE SAME TIME dec 1 tr in each side - SEE DECREASE TIP! Repeat dec every 8th-6th-5th-4th row 2-3-4-6 more times = 28-29-30-32 tr. Continue with 1 tr in every tr until sleeve measures 38-41-45-48 cm. Fasten off. ASSEMBLY: Sew sleeve seams edge to edge to avoid a chunky seam. Work 1 round around the entire body as follows with 2 strands of colour 0100: 1 sl st in first st, * 3 ch, 1 tr in first ch (= 1 picot), skip 1 tr, fasten with 1 dc in next st *, repeat from *-* the entire round and finish with 1 sl st in first sl st. Sew sleeves in body - make sure that sleeve cap is sewn in at the top of armholes, i.e. where the distance is shortest. Work an edge around the sleeves the same way as around body but with 2 strands of colour 4088. |
|
 |
|
Have you finished this pattern?Tag your pictures with #dropspattern #princesspetalcardigan or submit them to the #dropsfan gallery. Do you need help with this pattern?You'll find 8 tutorial videos, a Comments/Questions area and more by visiting the pattern on garnstudio.com. © 1982-2026 DROPS Design A/S. We reserve all rights. This document, including all its sub-sections, has copyrights. Read more about what you can do with our patterns at the bottom of each pattern on our site. |
|


With over 40 years in knitting and crochet design, DROPS Design offers one of the most extensive collections of free patterns on the internet - translated to 17 languages. As of today we count 324 catalogues and 12290 patterns translated into English (UK/cm). 12290
We work hard to bring you the best knitting and crochet have to offer, inspiration and advice as well as great quality yarns at incredible prices! Would you like to use our patterns for other than personal use? You can read what you are allowed to do in the Copyright text at the bottom of all our patterns. Happy crafting!
Post a comment to pattern DROPS Children 24-1
We would love to hear what you have to say about this pattern!
If you want to leave a question, please make sure you select the correct category in the form below, to speed up the answering process. Required fields are marked *.