
Popular categories
Looking for a yarn?


Comments / Questions (21)
![]() Gisele Worley wrote:
Gisele Worley wrote:
Can you please help with how to proceed after row 14 in the diagram. It is so confusing. Please give an example of how to knit row 15. Thank you
07.10.2025 - 14:13
![]() Gisele Worley wrote:
Gisele Worley wrote:
Why rows 13 and 14 missing 4 stitches. What do I do about that?
06.10.2025 - 14:20DROPS Design answered:
Hi Gisele, you start working this part of diagram (4 stitches in each side) from the bottom and you keep working other parts of diagram. Happy knitting!
03.11.2025 - 07:58
![]() Gisele Worley wrote:
Gisele Worley wrote:
Why does the pattern stop half way on both sides of M1 and M2? Also there are 4 stitches on two rows on both sides in the pattern that are empty. What does that refer to or mean?
05.10.2025 - 03:44DROPS Design answered:
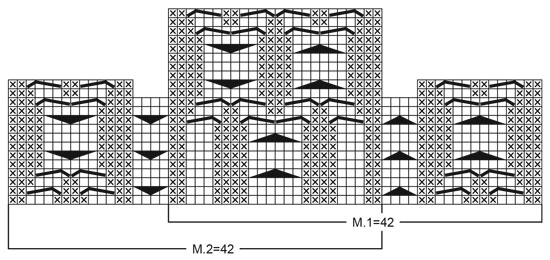
Hi Gisele, The empty squares are knitted, the crossed squares are purled (see diagram explanations above the diagrams). Regards, Drops team.
06.10.2025 - 06:51
![]() Simone Rödiger wrote:
Simone Rödiger wrote:
M2 und M1 sind in einem Diagramm dargestellt. Bis wohin geht der Rapport in der Höhe wegen evtl. wiederholen. Wie geht es weiter, wo die Lücken sind. z.B. wo es nur in der Mitte hoch weiter gezeichnet ist das Diagramm. Was muss ich wann stricken? Vielen Dank für Ihre Hilfe
05.11.2024 - 15:35DROPS Design answered:
Liebe Frau Rödiger, die Zöpfe werden nicht über die gleiche Reihenanzahl gestrickt, dh wenn das Diagram fertig in der Höhe ist, stricken Sie bei der nächsten Reihe wieder, aber die anderen Diagramme stricken Sie wie zuvor weiter. Viel Spaß beim Stricken!
05.11.2024 - 16:49
![]() Rödiger wrote:
Rödiger wrote:
Wie liest man das strickdiagramm? Sind die Rückseiten mit darauf oder geht es hochzu beim zählen Reihe 1, Reihe 3, Reihe 5 usw. Und die Rückreihen werden so gestrickt. Linke Maschen rechts und rechte Maschen links
20.10.2024 - 18:16DROPS Design answered:
Liebe Frau Rödiger, alle Reihen sind im Diagram gezeichnet, die Hin- sowie die Rückreihen; Hinreihen lesen Sie rechts nach links und Rückreihen lesen Sie links nach rechts. 1 leeres Kästchen = 1 Masche glatt rechts (rechts bei den Hinreihen, links bei den Rückreihen gestrickt) und 1 Kreuzchen = 1 Masche glatt links (links bei den Hinreihen, rechts bei den Rückreihen gestrickt). Viel Spaß beim Stricken!
21.10.2024 - 09:03
![]() Elizabeth Petrie wrote:
Elizabeth Petrie wrote:
Me again! I'm ready to decrease for the sleeve cap and have cast off 6 under the arm. Do I work back and forth still on the double-pointed needle, or move everything to regular needles? For the next decreases, they're supposed to be "every other row," but does that mean just the right side? Wouldn't the sleeve then be lopsided, with decreases only on the one side? Or should I split the decreases up: one decrease on the right side, the next on the wrong side, etc.? Thanks!
14.11.2023 - 01:04DROPS Design answered:
Hi Elizabeth, Yes, you continue back and forth for the sleeve cap, so use the needles you feel most comfortable with for this part. Each further cast-off is on both sides of the sleeve cap (both the beginning and end of the row) on the first row, then work the next row without casting off, etc. Hope this helps and happy knitting!
14.11.2023 - 06:35
![]() Elizabeth Petrie wrote:
Elizabeth Petrie wrote:
I've reached the desired length (38 cm), but how to continue is confusing. The 234 stitches include the 1 garter stitch at each side. So I'm continuing the pattern over 232 stitches. If I cast off after 56, that puts me in the middle of a stitch pattern in M3; is that correct? Also, the instructions at this point say "knit the next row as follows: 56, c/o 6, 110, c/o 6, 56." Does this mean "knit" all these stitches, or just continue in the pattern? I'm assuming the latter. Thanks.
31.10.2023 - 22:08DROPS Design answered:
Dear Mrs Petrie, the 56 sts includes the edge stitch, just work this row in pattern as before: 56 sts (front piece), cast off 6 sts, work 110 sts (back piece), cast off 6 sts and work the remaining 56 sts = 234 stitches. Happy knitting!
02.11.2023 - 17:06
![]() Elizabeth wrote:
Elizabeth wrote:
Follow-up question re: M1 and M2: up to row 12, everything is clear. Rows 13 and 14: how do I deal with the "missing" 4 stitches on each side? After that, do I start again at row 1 for the sides of M1 and M2, while continuing on rows 15 through 22 in the middle section? I can't see how the patterns will match up, since there's a difference of 10 rows rather than a straight doubling. It is very frustrating. I'm almost ready to give up and knit something else.
04.10.2023 - 01:47DROPS Design answered:
See previous answer - you just have to repeat the diagram parts in height, not the diagram as drawn in chart. Happy knitting!
04.10.2023 - 08:08
![]() Elizabeth wrote:
Elizabeth wrote:
I'm still confused: after row 12 of the diagrams M1 and M2, rows 13 and 14 have 4 knit stitches missing. From row 15 to 22, there are only 24 stitches illustrated. How do I continue the pattern unit the piece measures the desired length? Just by repeating rows 1 through 12? Or do I assume the "missing" pattern has just continued from row 15 on? Also, when decreasing and casting off for the armholes and neck piece, do I continue in the patterns with the stitches that are left? Thank you!
04.10.2023 - 01:38DROPS Design answered:
Dear Elizabeth, all cable patterns in the diagram are not repeated over the same number of rows in height; when diagram part/cable part is done in height, repeat this section from 1st row but continue the other diagrams just as before. Happy knitting!
04.10.2023 - 08:08
![]() Elizabeth wrote:
Elizabeth wrote:
For this pattern, what length(s) of the circular needles is/are required? This is the one guideline that is missing in many of the DROPS patterns, and is pretty important information! Thanks.🇨🇦🙂
16.09.2023 - 01:54DROPS Design answered:
Dear Elizabeth, we try to add all of the information for the necessary materials in all of our patterns. However, some of our older patterns may be slightly outdated and lack some information available in the newer ones. In this case, you need circular needles of 80cm. For the sleeves you could use double pointed needles or a circular needle of 40cm. Happy knitting!
17.09.2023 - 21:18
|
||||||||||||||||||||||||||||
Blushing Bluebell#blushingbluebelljacket |
||||||||||||||||||||||||||||
 |
 |
|||||||||||||||||||||||||||
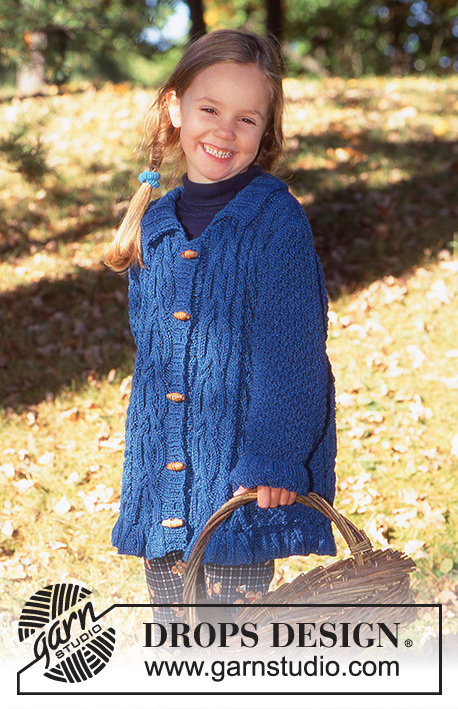
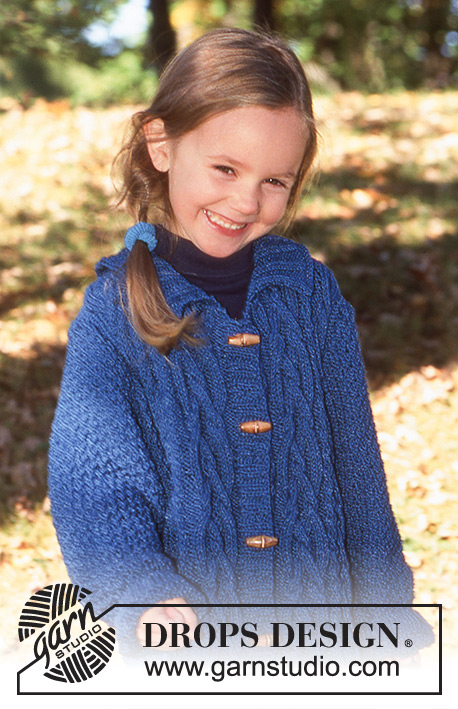
Long sweater with cables in DROPS Den-M-Nit or DROPS Daisy or DROPS Muskat
DROPS Children 9-22 |
||||||||||||||||||||||||||||
|
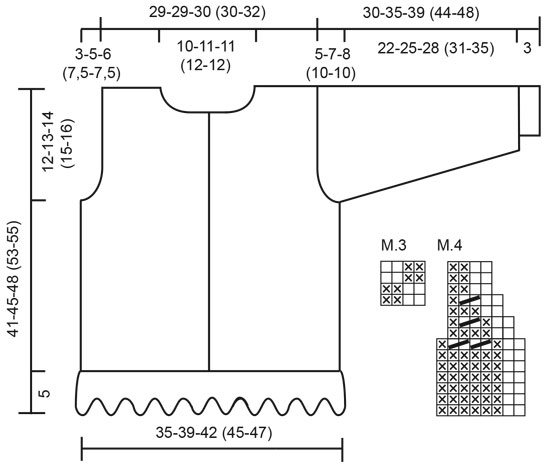
Knitting tension: 22 sts x 30 rows on needle size 3.5 mm and M.3 = 10 x 10 cm. Remember needle sizes are guidelines only! Garter st back and forth on needle: 1st row: K, 2nd row: K. Garter st on circular needle: 1st round: P, 2nd round: K. Rib edge-1: See diagram M.4 Rib edge-2: * K2, P2 *, repeat from *-*. Pattern: See diagram (1 diagram = 1 pattern repeat). Pattern in diagram seen from RS – ensure cables are on RS. Back and front piece: Knitted back and forth on circular needle from mid front. Cast on 308-340-364 (388-412) sts (incl 1 edge st each side towards mid front) on circular needle size 3 mm in blue and Rid edge-1 (see M.4 in diagram) with edge sts in garter st. After Rib edge-1 there are 156-172-184 (196-208) sts on needle. Change to circular needle size 3.5 mm and knit 2 rows garter st at the same time inc 38 sts evenly on row = 194-210-222 (234-246) sts. After 2nd garter st row knit next row (from RS) as follows: 1 edge st in garter st, M.2 = 42 sts, 12-20-26 (32-38) sts of M.3, M.1 = 42 sts, M.2 = 42 sts, 12-20-26 (32-38) sts of M.3, M.1 = 42 sts, 1 edge st in garter st. Cut thread and start next row of pattern from RS again (cables on RS). Continue in pattern. Remember the knitting tension! When piece measures 29-32-34 (38-39) cm knit next row as follows: 46-50-53 (56-59) sts front piece, cast off 6 sts for armhole, 90-98-104 (110-116) sts back, cast off 6 sts for armhole, 46-50-53 (56-59) sts front piece. Complete each piece separately. Right front piece: = 46-50-53 (56-59) sts. Dec for armhole on every other row: 3 sts 0-0-0 (1-1) times, 2 sts 0-3-3 (3-4) times, 1 st 4-2-3 (3-2) times = 42-42-44 (44-46) sts. Continue in pattern but garter st the edge st at armhole. When piece measures 37-41-44 (48-50) cm cast off 5-6-6 (7-7) sts for neck mid front. Then cast off on every other row: 2 sts 2 times, 1 st 3 times = 30-29-31 (30-32) sts left on shoulder. When piece measures 40-44-47 (52-54) cm knit 1 row stocking st at the same time dec 5 sts evenly on shoulder = 25-24-26 (25-27) sts. Knit 2 rows garter st and cast off. Left front piece: Knit like right piece, but reversed. Back piece: = 90-98-104 (110-116) sts. Dec for armhole as described for front piece = 82-82-86 (86-90) sts. Continue until piece measures 39-43-46 (51-53) cm. Cast off the middle 20-22-22 (24-24) sts for neck and dec 1 st on neckline on next row = 30-29-31 (30-32) sts left on each shoulder. Knit 1 row stocking st at the same time inc evenly by 5 sts on shoulder = 25-24-26 (25-27) sts. Knit 2 rows garter st, cast off. Sleeve: Cast on 40-40-44 (44-48) sts on double pointed needles size 3 mm in blue and knit 3 cm Rib edge-2. Change to double pointed needles size 3.5 mm, knit 2 rounds garter st and then continue in M.3. At the same time after 2 rounds garter st inc 2 sts mid under arm: 4-6-7 (9-9) times on every 5.5-4-4 (3-3.5.) cm = 48-52-58 (62-66) sts. When piece measures 25-28-31 (34-38) cm cast off 6 sts mid under arm and finish sleeve back and forth on needle. Cast off for sleeve cap on every other row: 2 sts 2-2-2 (1-2) times, 1 st 1-4-6 (11-9) times, 2 sts 2-2-2 (1-2) times, 3 sts 1-1-1 (1-1) time. Cast off, piece measures approx 30-35-39 (44-48) cm. Assembly: Sew shoulder seams. Front band: Gather approx 84-108 sts up with needle size 3.5 mm and blue along left front band (gather within 1st edge st) and knit 2.5 cm Rib edge-2, cast off. Repeat along right front band, but after 1 cm knit 5-5-5 (6-6) buttonholes evenly distributed (bottom buttonhole approx 5 cm from bottom edge and top 1 cm from top edge): 1 buttonhole = cast off 2 sts, cast on 2 new sts over the cast off sts on return row. Collar: Gather approx 60-72 sts (divisible by 4) up around neckline from WS on needle size 3 mm in blue - start gathering 0.5 cm in on front band (if also gathering up over front band, gather up approx 8 sts more than explained). Knit 2 rows garter st and continue in Rib edge-2 with 1 garter st each side towards mid front. When collar measures 2-2-3 (3-3) cm inc from RS (RS = the side that will show when sweater is worn): P1 st between the 2 P sts – so 2 P sts turn into 3 P sts on entire row. When collar measures 4-4-5 (5-5) cm inc on RS as follows: P1 st between the 3 P sts – so 3 P sts turn into 4 P sts on entire row. When collar measures 6-6-7 (7-7) cm knit 2 rows garter sts and cast off. Set in sleeves and sew on buttons. |
||||||||||||||||||||||||||||
Diagram explanations |
||||||||||||||||||||||||||||
|
||||||||||||||||||||||||||||
 |
||||||||||||||||||||||||||||
 |
||||||||||||||||||||||||||||
Have you finished this pattern?Tag your pictures with #dropspattern #blushingbluebelljacket or submit them to the #dropsfan gallery. Do you need help with this pattern?You'll find 19 tutorial videos, a Comments/Questions area and more by visiting the pattern on garnstudio.com. © 1982-2026 DROPS Design A/S. We reserve all rights. This document, including all its sub-sections, has copyrights. Read more about what you can do with our patterns at the bottom of each pattern on our site. |
||||||||||||||||||||||||||||


With over 40 years in knitting and crochet design, DROPS Design offers one of the most extensive collections of free patterns on the internet - translated to 17 languages. As of today we count 324 catalogues and 12290 patterns translated into English (UK/cm). 12290
We work hard to bring you the best knitting and crochet have to offer, inspiration and advice as well as great quality yarns at incredible prices! Would you like to use our patterns for other than personal use? You can read what you are allowed to do in the Copyright text at the bottom of all our patterns. Happy crafting!
Post a comment to pattern DROPS Children 9-22
We would love to hear what you have to say about this pattern!
If you want to leave a question, please make sure you select the correct category in the form below, to speed up the answering process. Required fields are marked *.