
Popular categories
Looking for a yarn?


Comments / Questions (20)
![]() Katrín wrote:
Katrín wrote:
Engar uppskriftir um hvernig á að gera heklið
13.04.2025 - 15:44DROPS Design answered:
Blessuð Katrín. Ofarlega á síðunni eru dálkar þar sem stendur MYNDBÖND og KENNSLA sem aðstoða þig við að hekla þennan páskaunga. Gangi þér vel.
14.04.2025 - 10:45
![]() Kate Vestergaard wrote:
Kate Vestergaard wrote:
Jeg er noget usikker på monteringen af vingerne. Jeg kan ikke helt gennemskue, hvor og hvordan de skal sidde på kroppen?
26.03.2022 - 21:54DROPS Design answered:
Hej Kate, vingerne sidder i ca samme højde som øjne og næb - se gerne videoen nederst i opskriften :)
30.03.2022 - 14:29
![]() Nancy Fritingee wrote:
Nancy Fritingee wrote:
When do you put stuffing in?
07.12.2021 - 19:31DROPS Design answered:
Dear Mrs Fritingee, fill the chicken after you have worked round 24. Happy crocheting!
08.12.2021 - 07:50
![]() Anna Sarjanen wrote:
Anna Sarjanen wrote:
Jag är textilslöjdslärare får jag skriva ut och använda detta mönster till mina elever?
27.06.2021 - 14:42DROPS Design answered:
Hei Anna. Det kan du. Under alle våre oppskrifter står det mer om COPYRIGHT du kan lese mer om dersom du ønsker det. mvh DROPS DESIGN
28.06.2021 - 15:55
![]() Katja wrote:
Katja wrote:
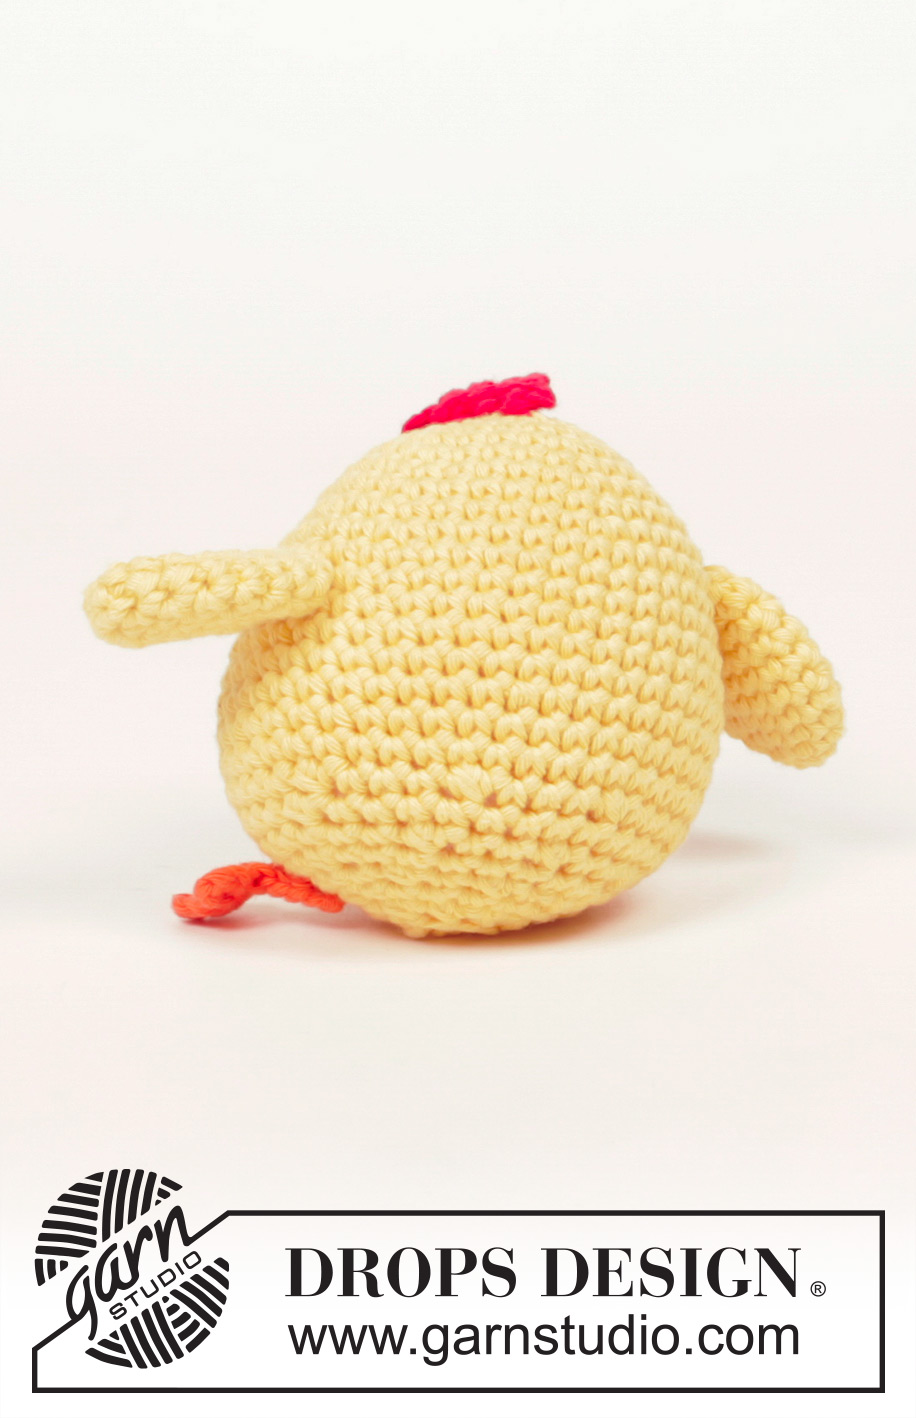
Hallo, können Sie bitte ein Foto von unten und hinten ergänzen. Vielen Dank
01.02.2021 - 21:09DROPS Design answered:
Liebe Katja, jetzt können Sie einige zusätliche Fotos sehen. Viel Spaß beim häkeln!
10.02.2021 - 16:05
![]() Anne-Beate Dokken wrote:
Anne-Beate Dokken wrote:
Takk for hjelpen. Er det mulig og få litt hjelp til hvor man skal plassere f.eks vinger ( i cm. ) Det er ikke så lett og se på bilde.
28.04.2019 - 18:28
![]() Anne-Beate Dokken wrote:
Anne-Beate Dokken wrote:
Jeg lurte på om det er mulig å lage en video hvordan nebbe er heklet. Kan hekle men hadde problemer her. Takk for hjelpen.🐣
14.04.2019 - 15:56DROPS Design answered:
Hei Anne-Beate. Ditt ønske er videreformidlet til vår videoavdeling. Hilsen DROPS
23.04.2019 - 13:12
![]() Daiara Godoy wrote:
Daiara Godoy wrote:
Fiz este pintinho ficou muito lindo obrigado drops design
14.04.2019 - 02:03
![]() Lorraine wrote:
Lorraine wrote:
J'ai du mal à réaliser le bec , mon losange ne ressemble pas à un losange. Pourriez-vous m'aider ?
23.01.2019 - 19:13DROPS Design answered:
Bonjour Lorraine, veillez à bien augmenter et diminuer comme indiqué pour le bec, vous devriez obtenir la bonne forme. N'hésitez pas à montrer votre ouvrage à votre magasin - même en photo par mail, il leur sera plus facile de visualiser ce que vous avez fait et de vous aider. Bon crochet!
24.01.2019 - 09:42
![]() Mátyás Eszter wrote:
Mátyás Eszter wrote:
A magyar fordítás több helyen hibás. Például a 7. és a 9.sor leírása. Mindenképp nézz rá egy másik nyelvű leírásra is (pl.angol), ha meg akarod horgolni. Kedves Eszter, köszönjük, hogy felhívta a figyelmünket a hibákra, amik javításra kerültek.
12.04.2017 - 00:49
|
|
Chicken Little#dropschickenlittle |
|
 |
 |
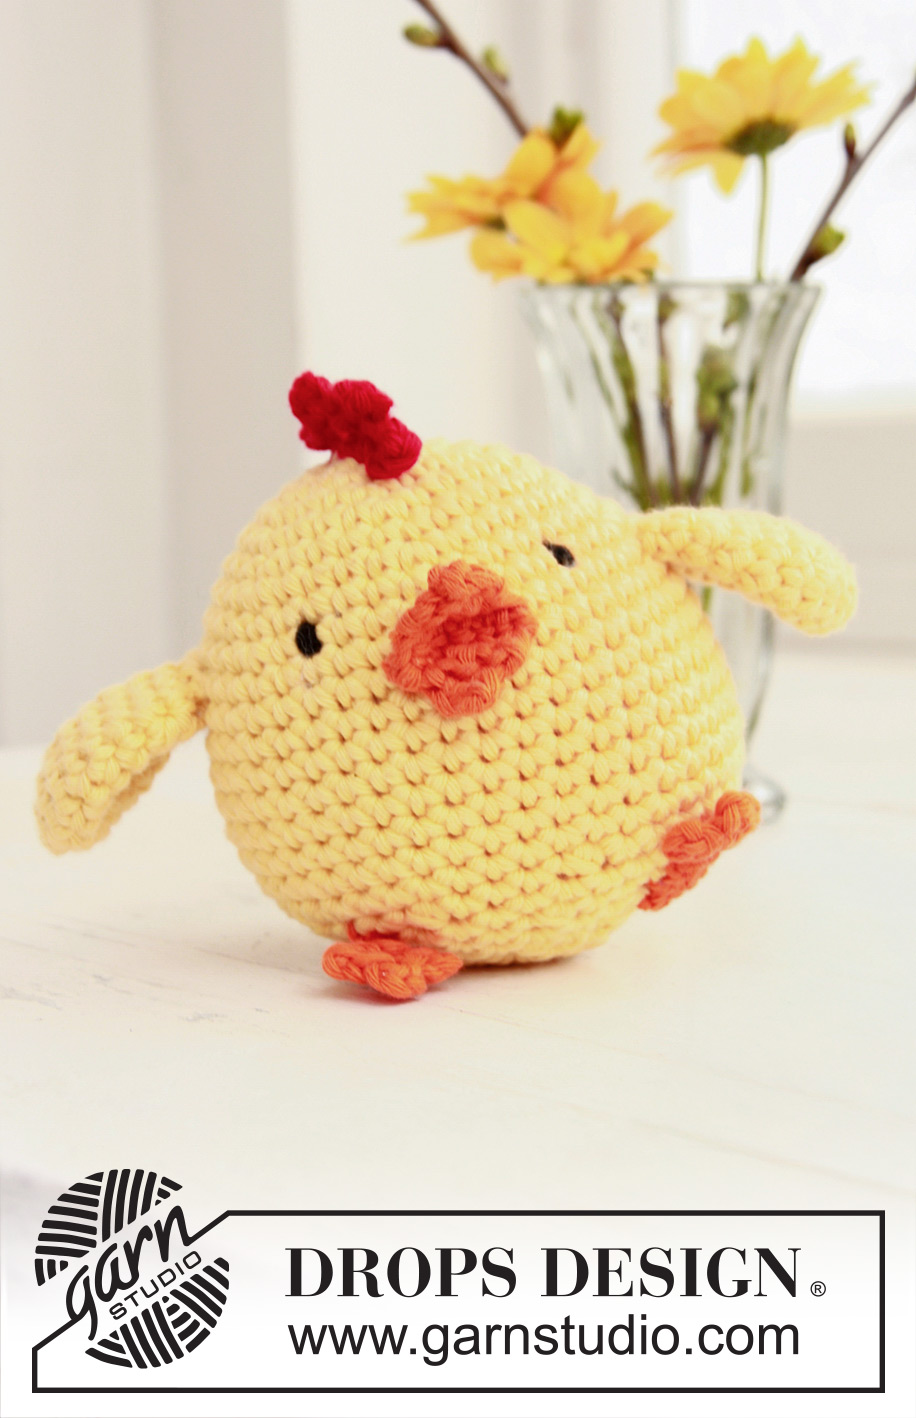
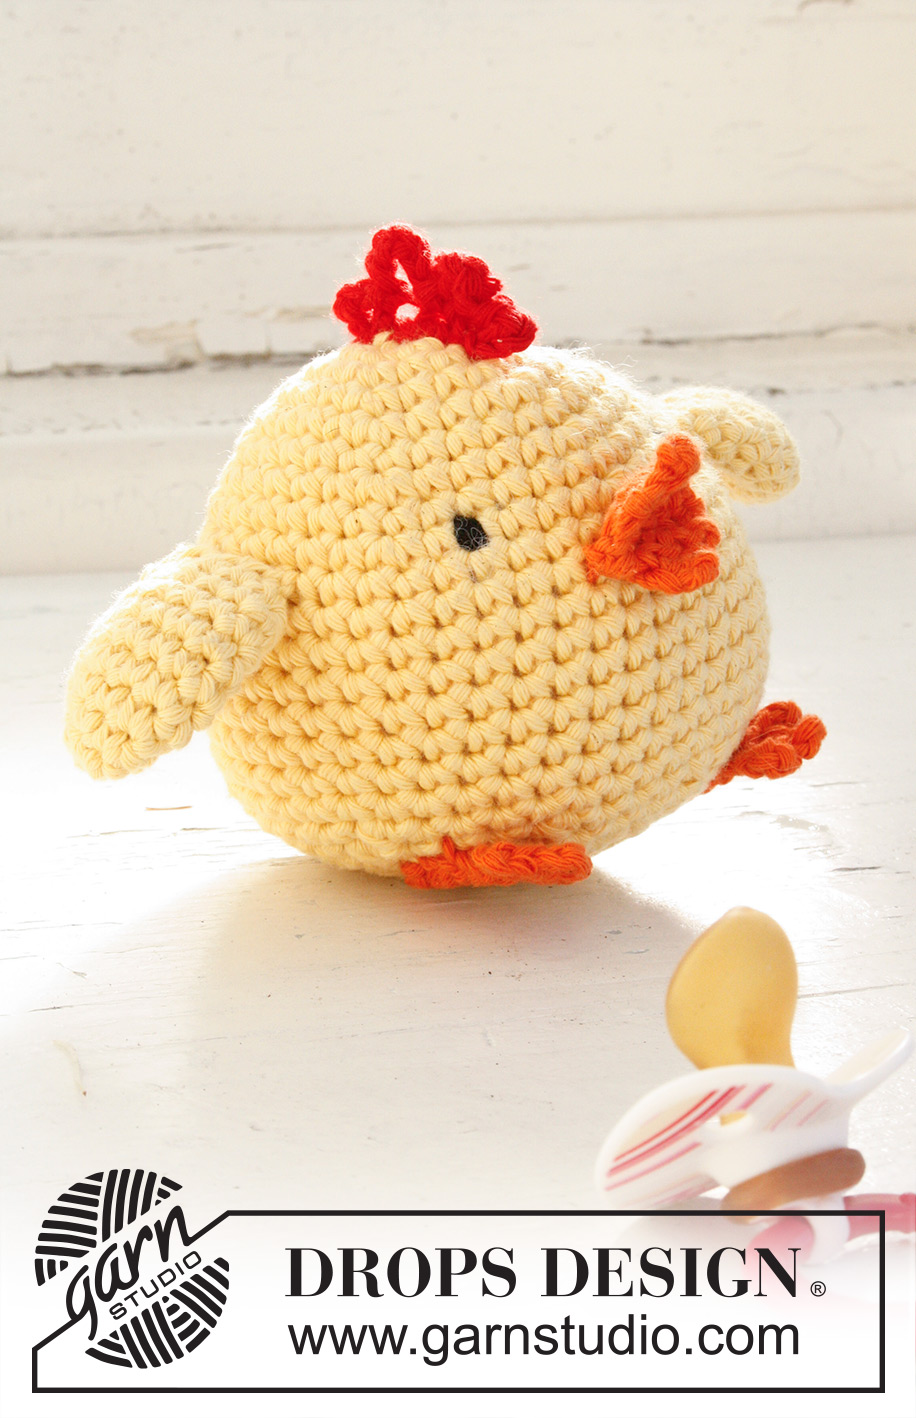
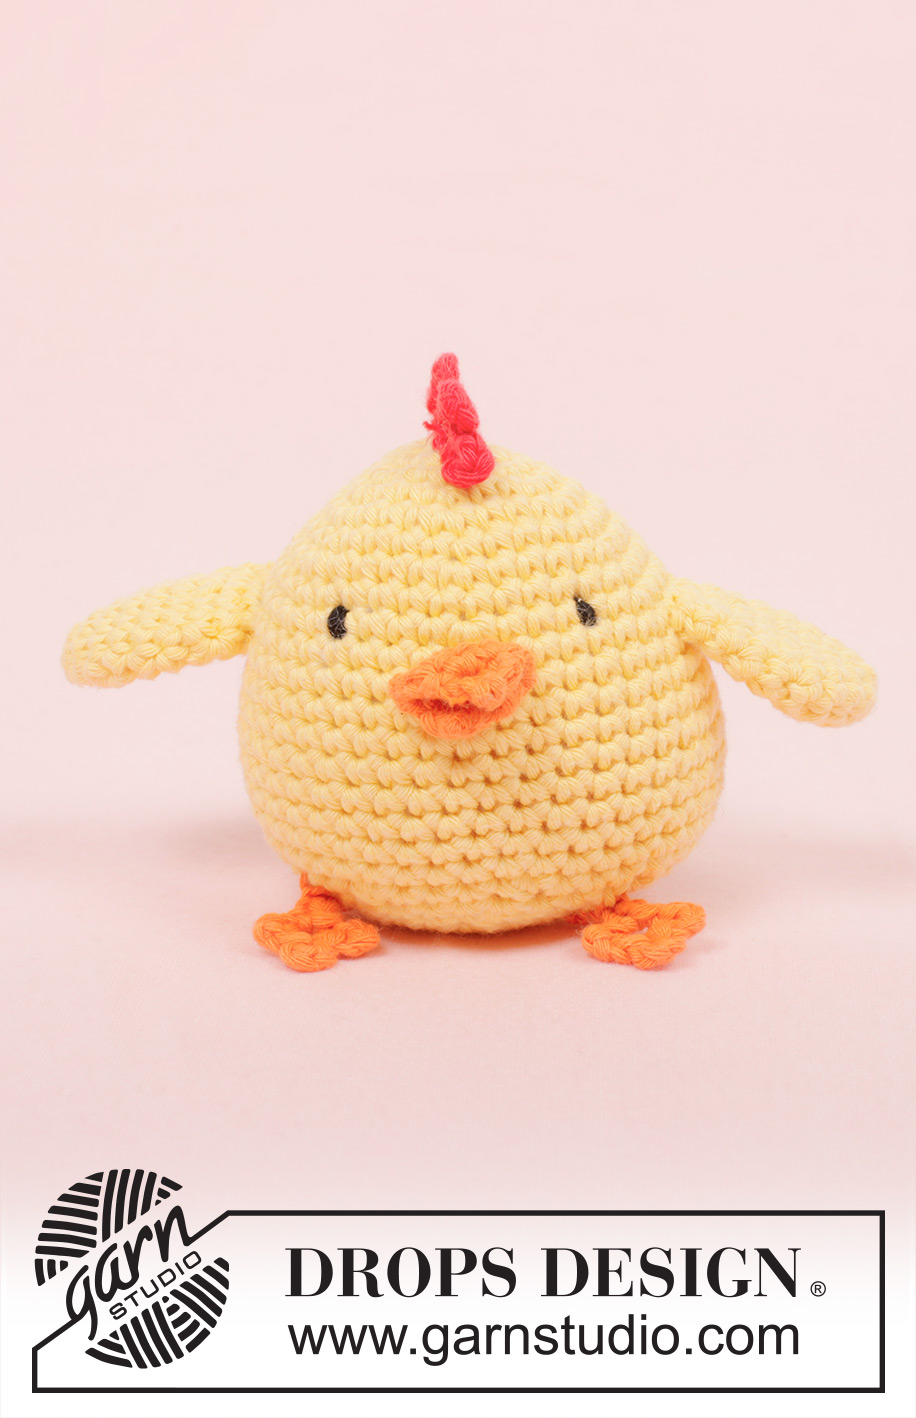
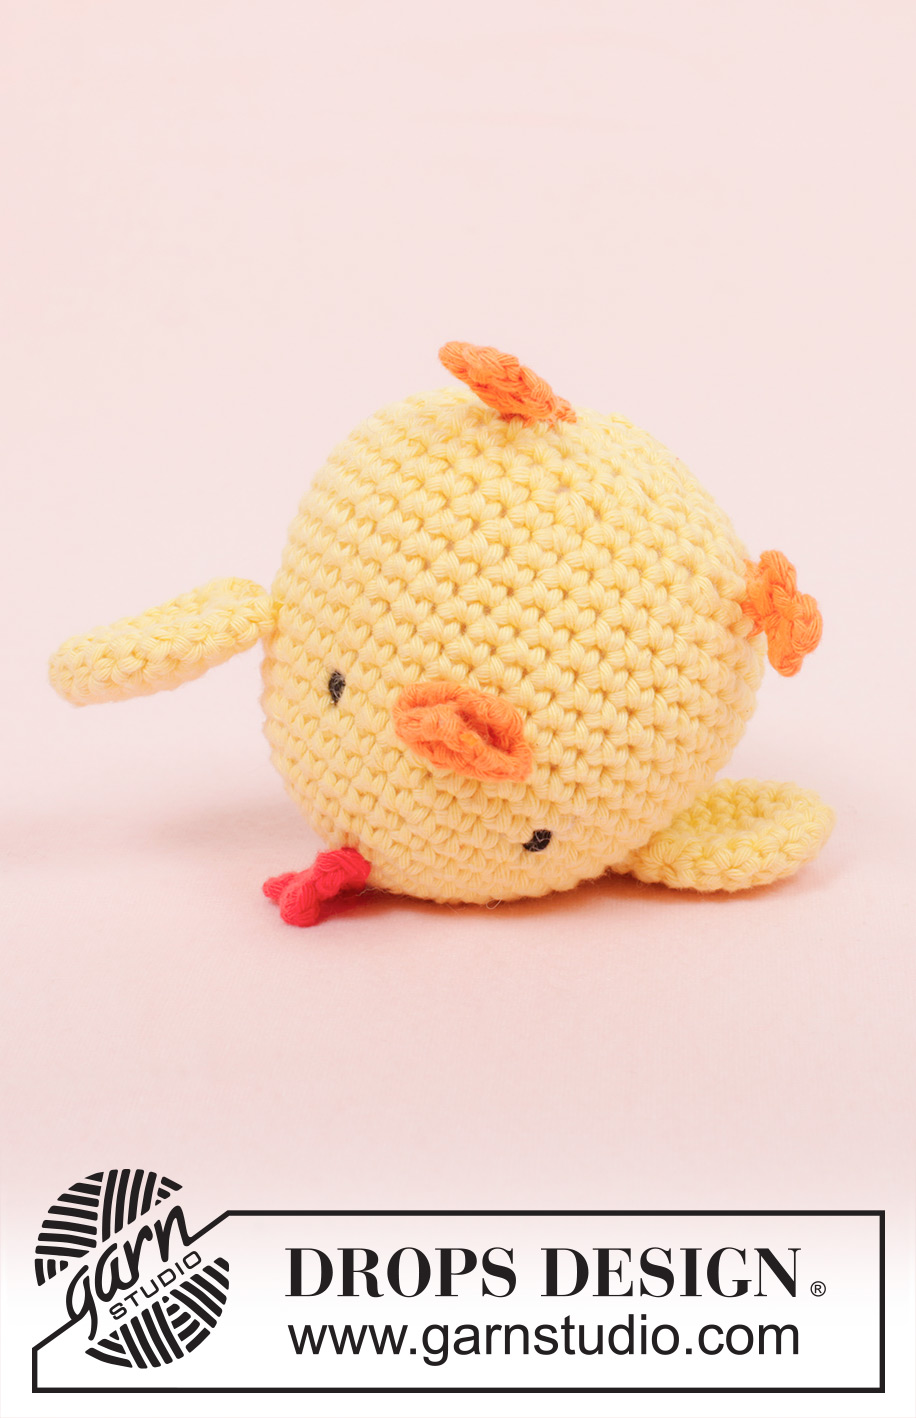
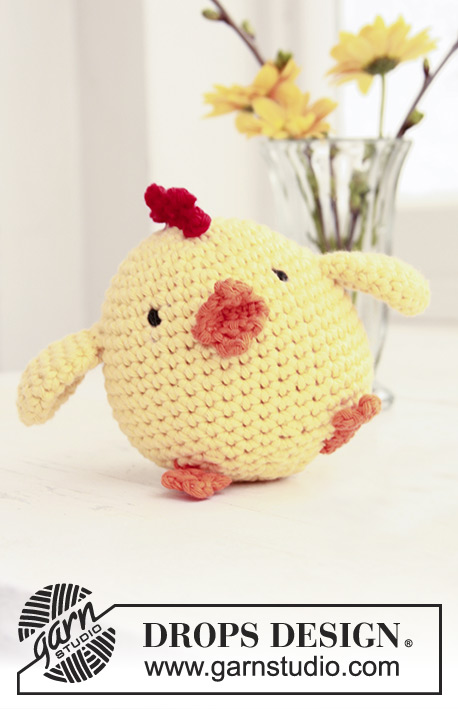
Crochet DROPS Easter chicken in "Paris".
DROPS Extra 0-769 |
|
|
CROCHET INFO: MAGIC CIRCLE: When piece is worked in the round, start with this technique to avoid holes in the middle (instead of ch-ring): Hold the yarn end and wind the yarn one time around the index finger to make a loop. Hold the loop with left thumb and middle finger, place the thread over left index finger. Insert hook through the loop, make a YO and pull thread through loop, work 1 ch, then work dc around the loop. When the desired no of dc have been reached, pull the yarn end to tighten the loop. Fasten the yarn end on the back side. Continue to work in the round in a circle. WORK IN THE ROUND IN A CIRCLE: After last dc on the round, continue to next round with 1 dc in next dc (= first dc on next round). NOTE: Insert a marker at the beg of round between last dc and first dc on the round, move the marker upwards. WORKING 2 DC TOG: * Insert hook in next st, get thread *, repeat from *-* one more time, make a YO and pull thread through all 3 sts on hook. -------------------------------------------------------- CHICKEN: Start at the top of the head by making a Magic circle - READ EXPLANATION ABOVE - on hook size 4 mm with Paris vanilla. ROUND 1: Work 6 dc in circle - READ WORK IN THE ROUND IN A CIRCLE. ROUND 2: 2 dc in every dc = 12 dc. ROUND 3: * 1 dc in next dc, 2 dc in next dc *, repeat from *-* the rest of the round = 18 dc. ROUND 4: * 1 dc in the next 2 dc, 2 dc in next dc *, repeat from *-* the rest of the round = 24 dc. ROUND 5: * 1 dc in the next 3 dc, 2 dc in next dc *, repeat from *-* the rest of the round = 30 dc. ROUND 6: Work 1 dc in every dc = 30 dc. ROUND 7: * 1 dc in the next 4 dc, 2 dc in next dc *, repeat from *-* the rest of the round = 36 dc. ROUND 8: Work 1 dc in every dc = 36 dc. ROUND 9: * 1 dc in the next 5 dc, 2 dc in next dc *, repeat from *-* the rest of the round = 42 dc. ROUND 10-17: Work 1 dc in every dc = 42 dc. ROUND 18: * 1 dc in the next 19 dc, then crochet the next 2 dc tog * - See explanation above, repeat from *-* one more time = 40 dc. ROUND 19: * 1 dc in the next 3 dc, then crochet the next 2 dc tog *, repeat from *-* the rest of the round = 32 dc. ROUND 20: Work 1 dc in every dc = 32 dc. ROUND 21: * 1 dc in the next 2 dc, then crochet the next 2 dc tog *, repeat from *-* the rest of the round = 24 dc. ROUND 22: Work 1 dc in every dc = 24 dc. ROUND 23: * 1 dc in the next 1 dc, then crochet the next 2 dc tog *, repeat from *-* the rest of the round = 16 dc. ROUND 24: Work 1 dc in every dc = 16 dc. Fill the chicken with some cotton wool. ROUND 25: Work all dc tog 2 by 2 = 8 dc, finish with 1 sl st in next dc. Cut the thread and pull it through the remaining sts and tighten tog, fasten tightly. WING: Start by making a magic circle with vanilla on hook size 4 mm. ROUND 1: Work 4 dc in the circle. ROUND 2: Work 2 dc in every dc = 8 dc. ROUND 3: * 1 dc in next dc, 2 dc in next dc *, repeat from *-* the rest of the round = 12 dc. ROUND 4: * 1 dc in the next 2 dc, 2 dc in next dc *, repeat from *-* the rest of the round = 16 dc. ROUND 5-7: Work 1 dc in every dc = 16 dc on the round. ROUND 8: * 1 dc in the next 2 dc, then crochet the next 2 dc tog *, repeat from *-* the rest of the round = 12 dc. ROUND 9: Work 1 dc in every dc, finish with 1 sl st in next dc = 12 dc. Cut the thread and keep 20 cm for assembly. Knit another wing the same way. BEAK: Work on hook size 3 mm with orange as follows: ROW 1: Work 2 ch, work 1 dc in 2nd ch from hook, turn piece = 1 dc. ROW 2: Work 1 ch, 2 dc in dc, turn piece = 2 dc. ROW 3: Work 1 ch, 2 dc in every dc, turn piece = 4 dc. ROW 4: Work 1 ch, 2 dc in 1st dc, 1 dc in next 2 dc, 2 dc in last dc, turn piece = 6 dc. ROW 5: Work 1 ch, skip 1st dc, 1 dc in next 4 dc, turn piece = 4 dc. ROW 6: Work 1 ch, skip 1st dc, 1 dc in next 2 dc, turn piece = 2 dc. ROW 7: Work 1 ch, skip 1st dc, 1 dc in last dc = 1 dc. Cut the thread and keep 20 cm for assembly. LEG: Work on hook size 3 mm with orange as follows: Work 10 ch, work 1 sl st in 5th ch from hook, * 4 ch, 1 sl st in same ch *, repeat from *-* one more time. Then work 1 sl st in every ch remaining on ch-row (= work back to beg). Cut the thread and keep 20 cm for assembly. Work another leg the same way. COCKSCOMB: Work on hook size 3 mm with red as follows: Work 10 ch, work 1 sl st in 7th ch from hook, * 5 ch, 1 sl st in next ch *, repeat from *-* one more time, finish with 6 ch, 1 sl st in last ch. Cut the thread and keep 20 cm for assembly. ASSEMBLY: Place the wings flat and sew them to each side with neat little stitches. Sew the cockscomb at the top of head. Fold the beak on the middle and sew it to the front of the head. Sew on eyes with some left-over black yarn. Sew the legs under the chicken. |
|
Have you finished this pattern?Tag your pictures with #dropspattern #dropschickenlittle or submit them to the #dropsfan gallery. Do you need help with this pattern?You'll find 7 tutorial videos, a Comments/Questions area and more by visiting the pattern on garnstudio.com. © 1982-2026 DROPS Design A/S. We reserve all rights. This document, including all its sub-sections, has copyrights. Read more about what you can do with our patterns at the bottom of each pattern on our site. |
|


With over 40 years in knitting and crochet design, DROPS Design offers one of the most extensive collections of free patterns on the internet - translated to 17 languages. As of today we count 324 catalogues and 12290 patterns translated into English (UK/cm). 12290
We work hard to bring you the best knitting and crochet have to offer, inspiration and advice as well as great quality yarns at incredible prices! Would you like to use our patterns for other than personal use? You can read what you are allowed to do in the Copyright text at the bottom of all our patterns. Happy crafting!
Post a comment to pattern DROPS Extra 0-769
We would love to hear what you have to say about this pattern!
If you want to leave a question, please make sure you select the correct category in the form below, to speed up the answering process. Required fields are marked *.