DROPS Children 49 · Lots of new kid designs!
Product image DROPS Merino Extra Fine yarn
DROPS Merino Extra Fine
100% Wool
from 19.00 RON /50g
Get the yarn to make this pattern from 209.00RON.

The yarn cost is calculated from the pattern’s smallest size and the yarn’s cheapest product type. Looking for an even better price? You might find it on the DROPS Deals!

DROPS AW2425

Iced Mint

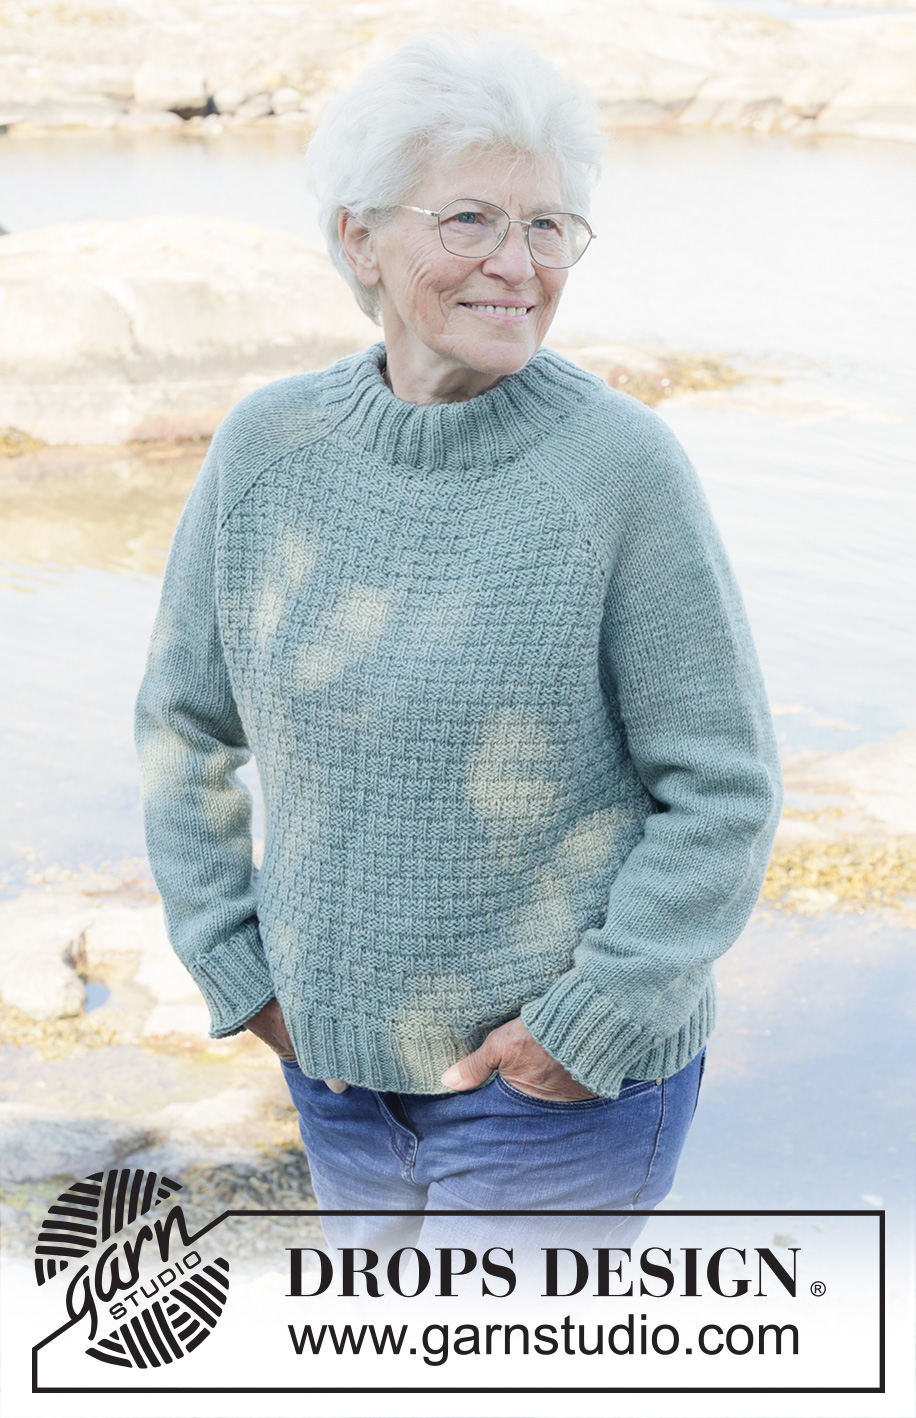
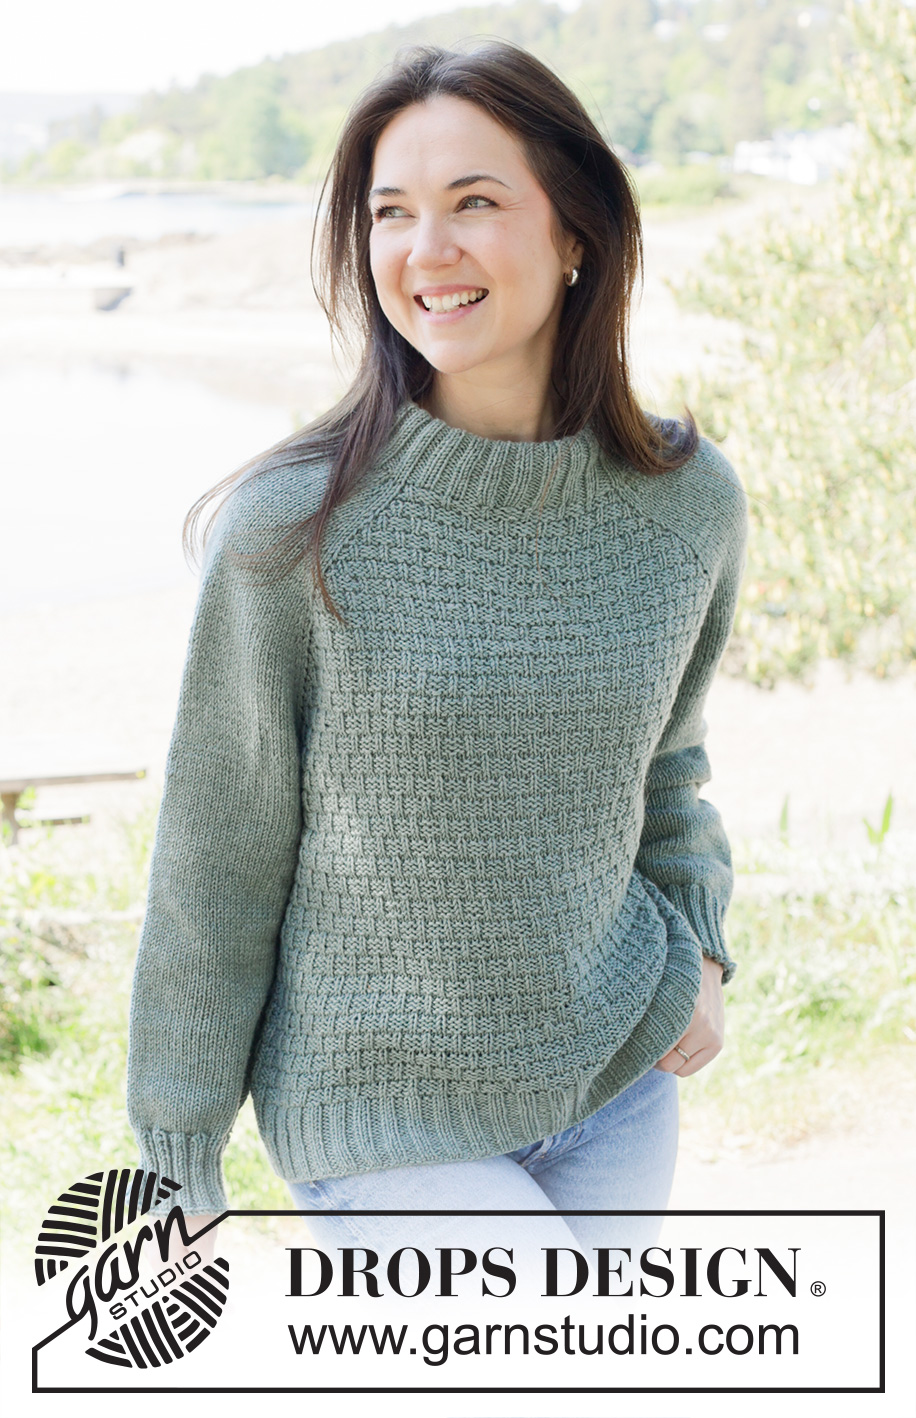
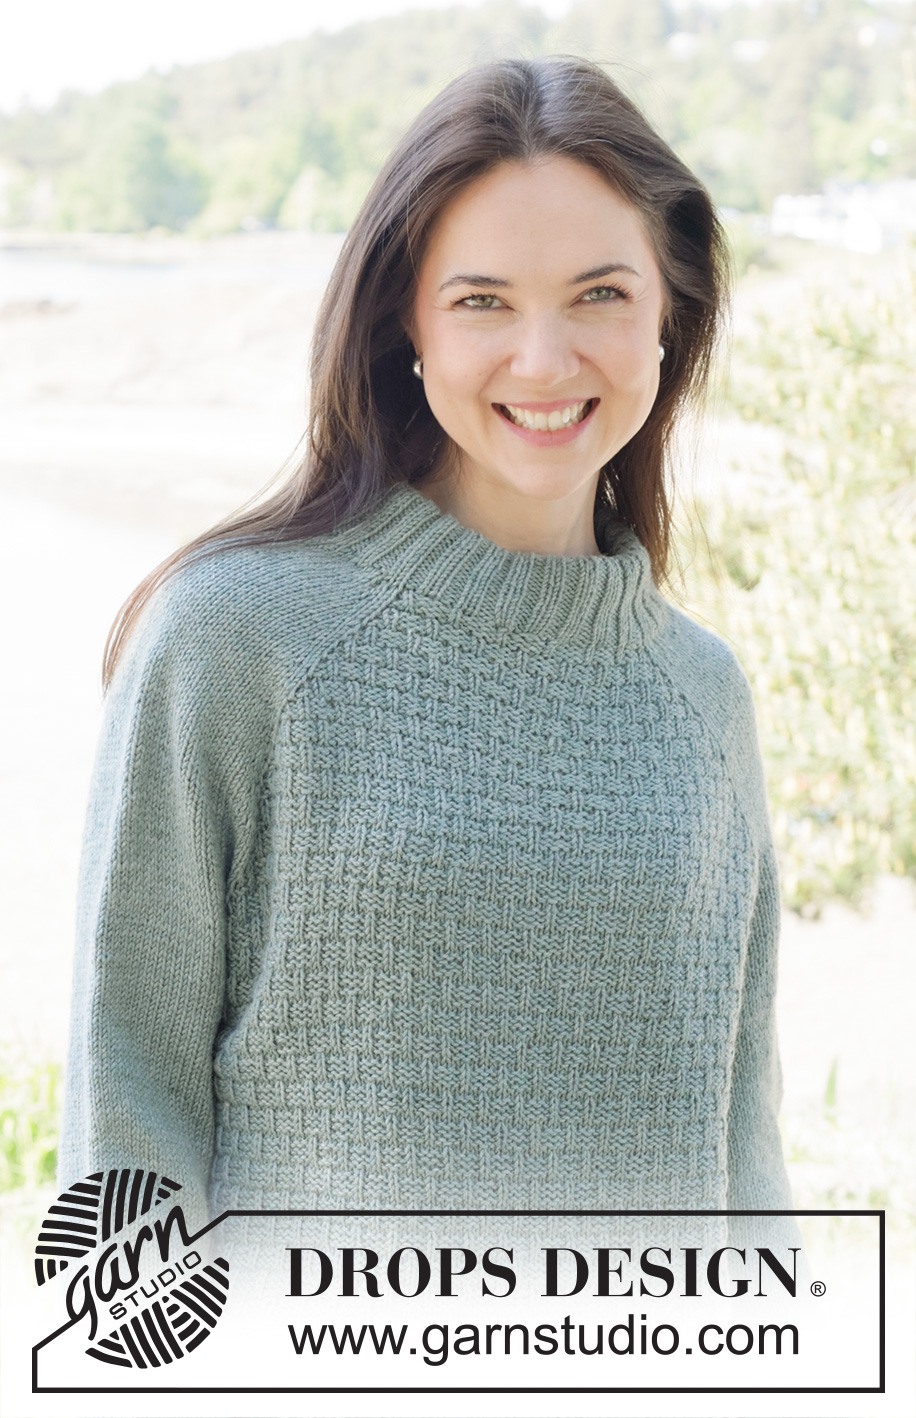
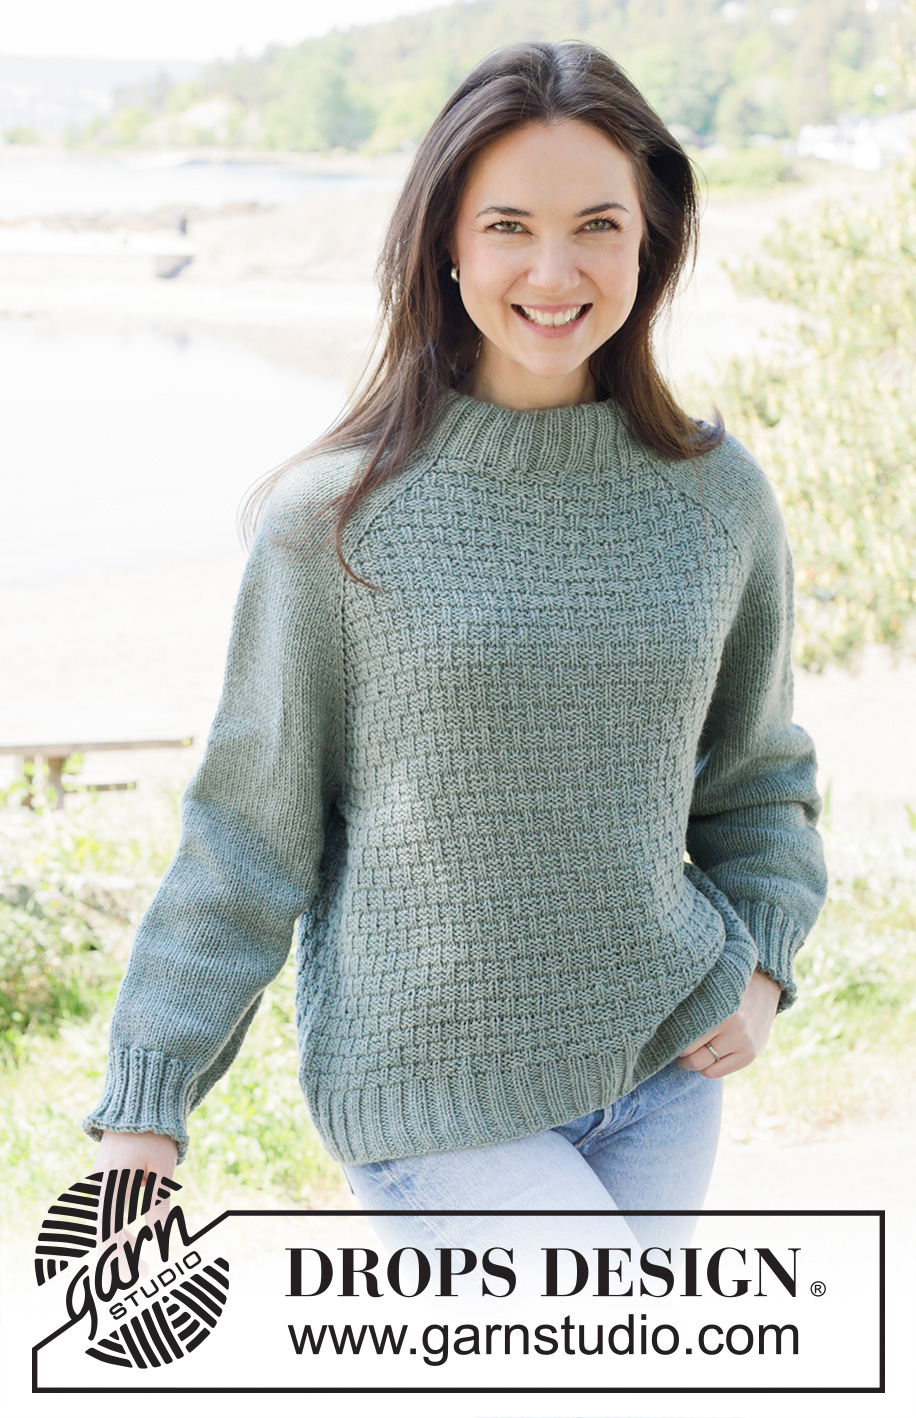
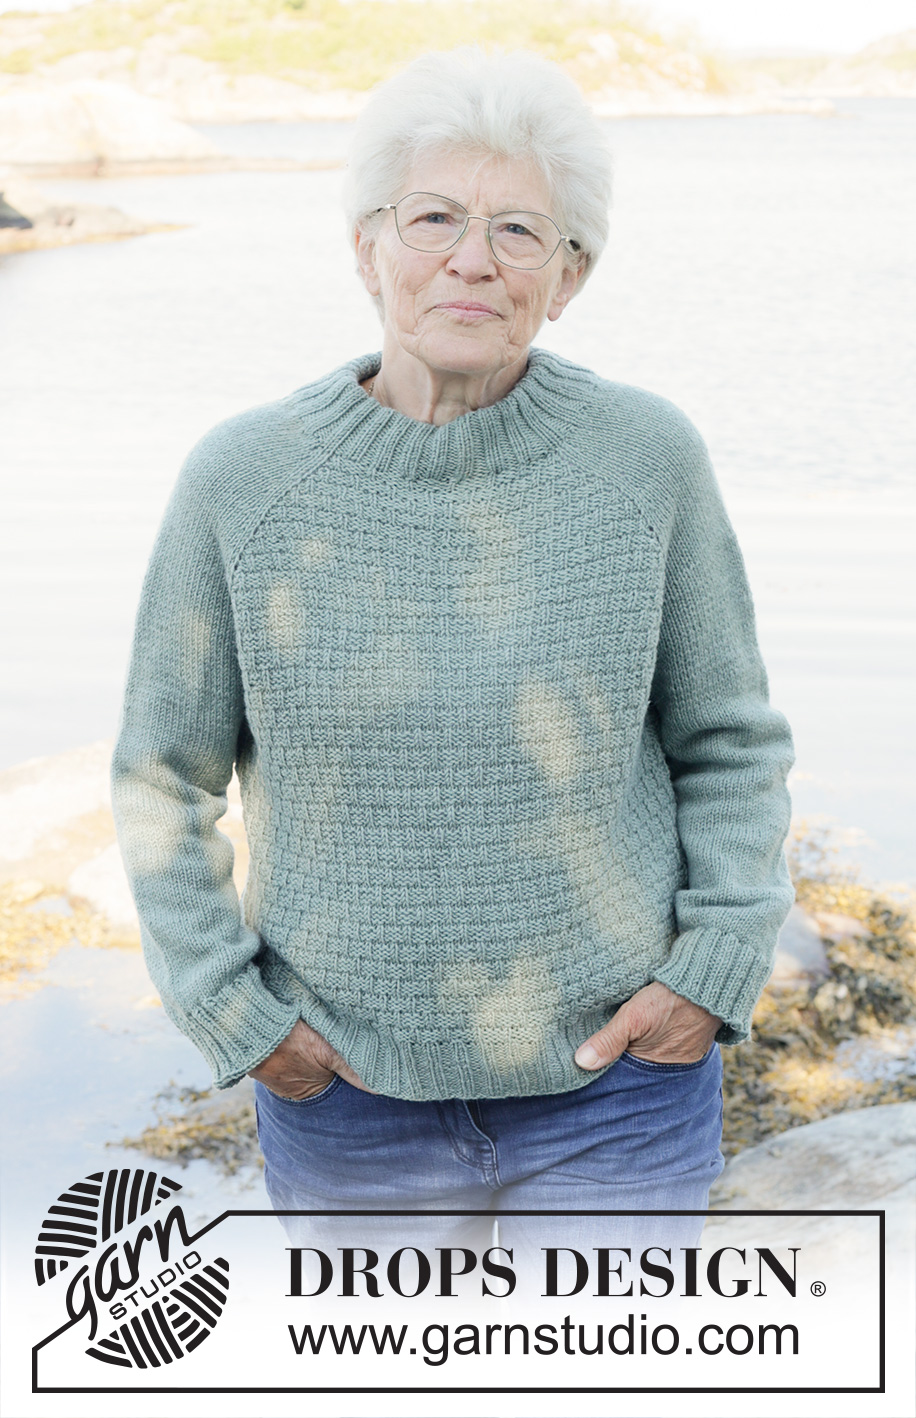
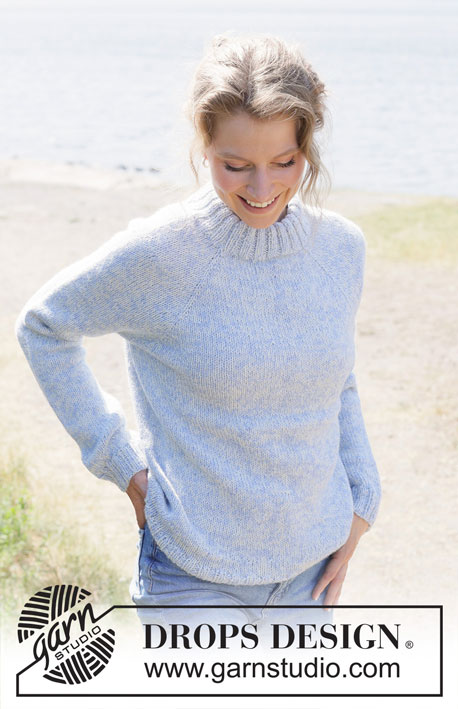
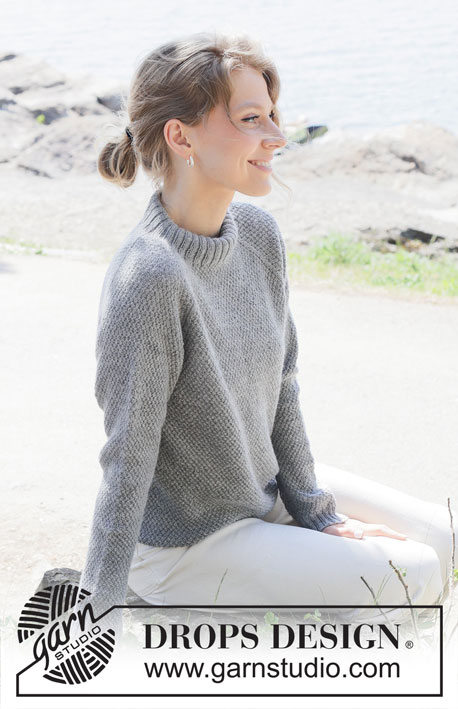
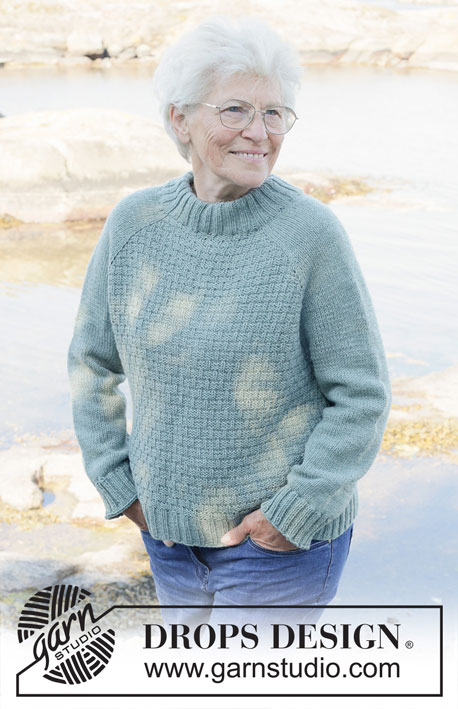
Knitted jumper in DROPS Merino Extra Fine. Piece is knitted top down with raglan and textured pattern. Size: S - XXXL

Highlight Size:
DROPS 255-36

#icedmintsweater

DROPS design: Pattern me-280
Yarn group B
----------------------------------------------------------

SIZE:
S - M - L - XL - XXL - XXXL

YARN:
DROPS MERINO EXTRA FINE from Garnstudio (belongs to yarn group B)
550-600-650-750-800-900 g colour 47, sage green

NEEDLES:
DROPS CIRCULAR NEEDLE SIZE 4 mm: Length 40 and 80 cm.
DROPS CIRCULAR NEEDLE SIZE 3 mm: Length 40 and 80 cm.
DROPS DOUBLE POINTED NEEDLES SIZE 4 mm
DROPS DOUBLE POINTED NEEDLES SIZE 3 mm
The technique MAGIC LOOP can be used – you then only need circular needle of 80 cm in each size.

KNITTING TENSION:
24 stitches in width and 32 rows vertically in textured pattern on needle size 4 mm = 10 x 10 cm.
21 stitches in width and 28 rows vertically in stocking stitch on needle size 4 mm = 10 x 10 cm.
NOTE! Remember that needle size is only a suggestion. If you have too many stitches on 10 cm switch to larger needles. If you have too few stitches on 10 cm switch to smaller needles.

-------------------------------------------------------

Alternative Yarn – See how to change yarns here
Yarn Groups A to F – Use the same pattern and change the yarn here
Yarn usage using an alternative yarn – Use our yarn converter here

-------------------------------------------------------

You might also like...

Product image DROPS Merino Extra Fine
DROPS Merino Extra Fine
100% Wool
from 19.00 RON /50g
Get the yarn to make this pattern from 209.00RON.

The yarn cost is calculated from the pattern’s smallest size and the yarn’s cheapest product type. Looking for an even better price? You might find it on the DROPS Deals!

Pattern instructions

----------------------------------------------------------

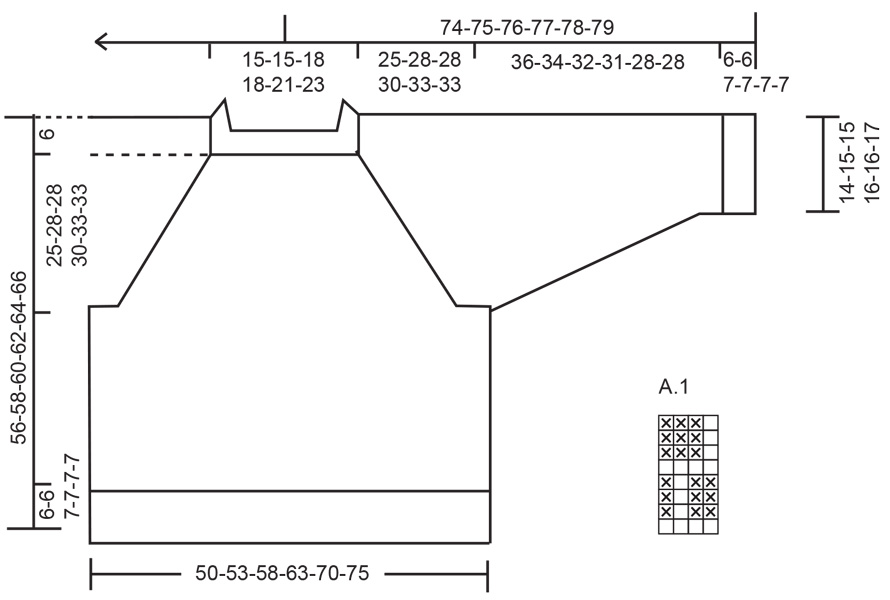
EXPLANATION FOR THE PATTERN:

----------------------------------------------------------

PATTERN:
See diagram A.1.

RAGLAN:
Increase 1 stitch by making 1 yarn over, on next round work yarn over twisted to avoid holes. Then work the new stitch in stocking stitch on sleeves and in A.1 on front piece and on back piece.

DECREASE TIP:
Decrease 1 stitch on each side of marker as follows:
Work until 2 stitches remain before marker, knit 2 together, knit 1 (marker is in this stitch) slip 1 stitch knitwise, knit 1, pass slipped stitch over stitch worked (= 2 stitches decreased).

----------------------------------------------------------

START THE PIECE HERE:

----------------------------------------------------------

JUMPER - SHORT OVERVIEW OF THE PIECE:
In this pattern needles of different length have been used, begin with fitting length for number of stitches and switch as needed.
Work neck edge and yoke in the round on circular needle from right shoulder back, and work top down. When yoke is done, divide piece for body and sleeves. Work body down wards in the round on circular needle while putting the sleeves aside. Then work sleeves downwards in the round on needle. Fold the neck edge double against the wrong side and fasten.
If 0 is given for the chosen size, it means that you skip the information until next information.

NECK EDGE:
Cast on 112-112-120-120-128-128 stitches on a circular needle size 4 mm with DROPS Merino Extra Fine. Switch to circular needle size 3 mm (cast on on a larger needle to get an elastic cast-on edge).
Work rib in the round as follows: Knit 1, * purl 2, knit 2 *, work from *-* until 3 stitches remain, purl 2 and knit 1. Work rib for 15 cm. The neck edge is later folded in towards wrong side and assembled to form a neck edge of approx. 7 cm.
Beginning of round is at right shoulder at the back. Insert 1 marker after the first 26-27-28-28-30-31 stitches on round (= approx. mid front), measures piece from this marker.

YOKE:
Insert 4 marker threads in piece without working the stitches, insert marker threads between 2 stitches, and these stitches are called raglan stitches and are worked in stocking stitch:
Count 24 stitches (= sleeve), insert 1 marker thread before next stitch, count 32-32-36-36-40-40 stitches (= front piece), insert 1 marker thread before next stitch, count 24 stitches (= sleeve), insert 1 marker thread before next stitch, count 32-32-36-36-40-40 stitches (= back piece), insert 1 marker thread before next stitch.

Switch to circular needle size 4 mm and work as follows:
Knit 1, increase 1 stitch for raglan, knit the next 22 stitches, increase for raglan, knit 2, increase for raglan, knit the next 30-30-34-34-38-38 stitches and increase 3-3-7-7-11-15 stitches evenly (this row equals first row in A.1), increase for raglan, knit 2, increase for raglan, knit the next 22 stitches, increase for raglan, knit 2, increase for raglan, knit the next 30-30-34-34-38-38 stitches and increase 3-3-7-7-11-15 stitches evenly (this row equals first row in A.1), increase for raglan, knit 1. There are now 126-126-142-142-158-166 stitches on needle.

Continue with pattern A.1 on front piece and back piece - begin on 2nd round in pattern. Work sleeves and the 2 stitches in every raglan line in stocking stitch. Continue increase for raglan on every other round but on every other increase, increase only on front piece/back piece. I.e. increase on front pieces/back piece on every other round and on sleeves every 4th round, increase alternately 4 and 8 stitches. Increase like this until increase has been done 40-44-40-44-48-50 times on front piece/back piece including the first increase (20-22-20-22-24-25 times on sleeves) = 358-382-374-398-438-458 stitches. Increases in size S and M are done.

In size L-XL-XXL-XXXL continue increase as follows - increases are done in size S and M:
Increase for raglan every other round, increase on front piece/back piece and sleeves, repeat this increase 0-0-4-4-4-2 times in total (= 8 stitches increased per increase round).

ALL SIZES:
You have increased a total of 40-44-44-48-52-52 times have been done in total on front piece/back piece and 20-22-24-26-28-27 times on sleeves. After last increase there are 358-382-406-430-470-474 stitches on row, and piece measures approx. 25-28-28-30-33-33 cm from marker mid front.

DIVIDING FOR BODY AND SLEEVES:
AT THE SAME TIME as next round is worked divide yoke for body and sleeves as follows: Slip the first 64-68-72-76-80-78 stitches on a thread for sleeve, cast on 5-5-9-13-13-21 new stitches on needle (= in the side mid under sleeve), work 115-123-131-139-155- 159 stitches in pattern (= front piece), slip the next 64-68-72-76-80-78 stitches on a thread for sleeve, cast on 5-5-9-13-13-21 new stitches on needle (= in the side mid under sleeve), and work the last 115-123-131-139-155-159 stitches in pattern (= back piece). Finish body and sleeves separately.

BODY:
= 240-256-280-304-336-360 stitches. Work pattern in the round until piece measures 44-46-47-49-51-53 cm from marker mid front.
Switch to circular needle size 3 mm and work rib = knit 2/purl 2. When rib measures 6-6-7-7-7-7 cm cast off.
Jumper measures 50-52-54-56-58-60 cm from marker mid front and approx. 56-58-60-62-64-66 cm from the top of shoulder.

SLEEVES:
Slip 64-68-72-76-80-78 sleeve stitches from one thread on to circular needle size 4 mm and pick in addition up 1 stitch in each of the 5-5-9-13-13-21 stitches cast on under sleeve = 69-73-81-89-93-99 stitches.
Insert 1 marker in the middle of the 5-5-9-13-13-21 new stitches under sleeve - round begins at marker.
Work in stocking stitch in the round on needle - AT THE SAME TIME when sleeve measures 3-3-3-3-2-2 cm from division, decrease mid under sleeve – read DECREASE TIP and decrease as follows: Decrease 2 stitches every 6½-5-3-2-1½-1½ cm 5-6-9-11-12-14 times in total = 59-61-63-67-69-71 stitches.
Work until sleeve measures 36-34-32-31-28-28 cm from division.
Switch to double pointed needles size 3 mm and work rib (= knit 2/purl 2) while AT THE SAME TIME increasing 5-7-9-9-7-9 stitches evenly on 1st round = 64-68-72-76-76-80 stitches.
When rib measures 6-6-7-7-7-7 cm cast off. Sleeve measures approx. 42-40-39-38-35-35 cm from division.

ASSEMBLY:
Fold rib at the top of neck down on inside of garment. Fasten rib to get a double neck edge. To avoid a tight neck edge that sticks out it is important to keep the seam elastic.

Diagram

knit = knit
purl = purl
Diagram for DROPS 255-36
Do you have a question? See a list of frequently asked questions (FAQ)

Knitting tension is what determines the final measurements of your work, and is usually measured per 10 x 10 cm. It is provided like so: number of stitches in width x number of rows in height - eg: 19 stitches x 26 rows = 10 x 10 cm.

The knitting tension is very individual; some people knit/crochet loosely while others work tightly. You adjust the knitting tension with the needle size, which is why the suggested needle size is only meant as a guide! You need to adjust this (up or down) to ensure that YOUR knitting tension matches the knitting tension provided in the pattern. If you work with a different knitting tension than provided you will have a different yarn consumption, and your work will have different measurements than what the pattern suggests.

The knitting tension also determines which yarns can replace each other. As long as you achieve the same knitting tension you can replace one yarn with another.

See DROPS lesson: How to measure your tension/gauge

See DROPS video: How to make a gauge tension swatch

The required amount of yarn is provided in grams, eg: 450 g. To calculate how many balls you’ll need you first need to know how many grams are in 1 ball (25g, 50g or 100g). This information is available if you click on the individual yarn quality on our pages. Divide the amount required with the amount of each ball. For example, if each ball is 50g (the most common amount), the calculation will be as follows: 450 / 50 = 9 balls.

The important thing when changing from one yarn to another is that the knitting/crochet tension remains the same. This is so that the measurements of the finished piece will be the same as on the sketch provided. It is easier to achieve the same knitting tension using yarns from the same yarn group. It is also possible to work with multiple strands of a thinner yarn to achieve the knitting tension of a thicker one. Please try our yarn converter. We recommend you to always work a test swatch.

Please NOTE: when changing yarn the garment might have a different look and feel to the garment in the photo, due to individual properties and qualities of each yarn.

See DROPS lesson: Can I use a different yarn than the one mentioned in the pattern?

All our yarns are categorised into yarn groups (from A to F) according to thickness and knitting tension – group A contains the thinnest yarns and group F the thickest. This makes it easier for you to find alternative yarns to our patterns, should you wish to switch yarn. All yarns within the same group have a similar knitting tension and can easily replace each other. However, different yarn qualities have different structures and properties which will give the finished work a unique look and feel.

Click here for an overview of the yarns in each yarn group

At the top of all our patterns you’ll find a link to our yarn calculator, which is a helpful tool should you wish to use a different yarn than suggested. By filling in the yarn quality you wish to replace, the amount (in your size) and number of strands, the calculator will present good alternative yarns with the same knitting tension. Additionally it will tell you how much you’ll require in the new qualities and whether you’ll need to work with multiple strands. Most skeins are 50g (some are 25g or 100g).

If the pattern is worked with multiple colours, every colour will have to be calculated separately. Similarly, if the pattern is worked with several strands of different yarns (for example 1 strand Alpaca and 1 strand Kid-Silk) you will have to find alternatives for each, individually.

Click here to see our yarn calculator

Since different yarns have different qualities and textures we have chosen to keep the original yarn in our patterns. However, you can easily find options among our available qualities by using our yarn calculator, or simply pick a yarn from the same yarn group.

It is possible that some retailers still have discontinued yarns in stock, or that someone has a few skeins at home that they would like to find patterns for.

The yarn calculator will provide both alternative yarn as well as required amount in the new quality.

If you think it's hard to decide what size to make, it can be a good idea to measure a garment you own already and like the size of. Then you can pick the size by comparing those measures with the ones available in the pattern's size chart.

You'll find the size chart at the bottom of the pattern.

See DROPS lesson: How to read size chart

The needle size provided in the pattern serves only as a guide, the important thing is to follow the knitting tension. And since knitting tension is very individual, you will have to adjust the needle size to ensure that YOUR tension is the same as in the pattern – maybe you’ll have to adjust 1, or even 2 needle sizes, up or down to achieve the correct tension. For this, we recommend that you work test swatches.

Should you work with a different knitting tension than the one provided, the measurements of the finished garment might deviate from the measurement sketch.

See DROPS lesson: How to measure your tension/gauge

See DROPS video: How to make a tension/gauge swatch

Working a garment top-down provides more flexibility and room for personal adjustment. For example it is easier to try the garment on while working, as well as making adjustments to length of yoke and shoulder caps.

The instructions are carefully explaining every step, in the correct order. Diagrams are adjusted to the knitting direction and are worked as usual.

The diagram depicts all rows/rounds, and every stitch seen from the right side. It is read from bottom to top, from right to left. 1 square = 1 stitch.

When working back and forth, every other row is worked from the right side and every other row is worked from the wrong side. When working from the wrong side, the diagram will have to be worked reversed: from left to right, knit stitches are purled, purl stitches are knit etc.

When working in the round every round is worked from the right side and the diagram are worked from right to left on all rounds.

See DROPS lesson: How to read knitting diagrams

The diagram depicts all rows/rounds, and every stitch seen from the right side. It is worked from bottom to top, from right to left.

When working back and forth every other row is worked from the right side: from right to left and every other row is worked from the wrong side: from left to right.

When working in the round, every row in the diagram are worked from the right side, from right to left.

When working a circular diagram you start in the middle and work your way outwards, counter clockwise, row by row.

The rows usually start with a given number of chain stitches (equivalent to the height of the following stitch), this will either be depicted in the diagram or explained in the pattern.

See DROPS lesson: How to read crochet diagrams

Instructions for working several diagrams after each other on the same row/round, will often be written like so: “work A.1, A.2, A.3 a total of 0-0-2-3-4 times". This means you work A.1 once, then A.2 is worked once, and A.3 is repeated (in width) the number of times provided for your size – in this case like so: S = 0 times, M = 0 times, L=2 times, XL= 3 times and XXL = 4 times.

The diagrams are worked as usual: begin with the first row in A.1, then work the first row in A.2 etc.

See DROPS lesson: How to read knitting diagrams

See DROPS lesson: How to read crochet diagrams

The total width of the garment (from wrist-to-wrist) will be larger in the larger sizes, despite the actual sleeves being shorter. The larger sizes have longer sleeve caps and wider shoulders, so there will be a good fit in all sizes.

The measurement sketch/schematic drawing provides information regarding the full length of the garment. If it’s a jumper or a jacket the length is measured from the highest point on the shoulder closest to the neckline, and straight down to the bottom of the garment. It is NOT measured from the tip of shoulder. Similarly, the length of yoke is measured from the highest point on the shoulder and down to where yoke is split into body and sleeves.

On a jacket measures are never taken along bands, unless specifically stated. Always measure inside band stitches when measuring the length.

See DROPS lesson: How to read a schematic drawing

Diagrams are often repeated on the round or in height. 1 repeat is the diagram the way it appears in the pattern. If it says to work 5 repeats of A.1 in the round, then you work A.1 a total of 5 times after/next to each other in the round. If it says to work 2 repeats of A.1 vertically/in height you work the entire diagram once, then begin again at the start and work the entire diagram one more time.

Chain stitches are slightly narrower than other stitches and to avoid working the cast-on edge too tight, we simply chain more stitches to begin with. The stitch count will be adjusted on the following row to fit the pattern and measurement sketch.

The rib edge is more elastic and will contract slightly compared to, for example, stocking stitch. By increasing before the rib edge, you avoid a visible difference in width between the rib edge and the rest of the body.

It’s very easy to cast off too tightly, and by making yarn overs while casting off (and simultaneously casting these off) you avoid a too tight cast off edge.

See DROPS video: How to bind off with yarn overs (yo)

To achieve an even increase (or decrease) you can increase on, for example: every 3rd and 4th row alternately, like so: work 2 rows and increase on the 3rd row, work 3 rows and increase on the 4th. Repeat this until the increase is complete.

See DROPS lesson: Increase or decrease 1 st on every 3rd and 4th row alternately

Should you prefer to work in the round instead of back and forth, you may of course adjust the pattern. You’ll need to add steeks mid-front (usually 5 stitches), and follow the instructions. When you would normally turn and work from the wrong side, simply work across the steek and continue in the round. At the end you’ll cut the piece open, pick up stitches to work bands, and cover the cut edges.

See DROPS video: How to knit steeks and cut open

Should you prefer to work back and forth instead of in the round, you may of course adjust the pattern so you work the pieces separately and then assemble them at the end. Divide the stitches for the body in 2, add 1 edge stitch in each side (for sewing) and work the front and back pieces separately.

See DROPS lesson: Can I adapt a pattern for circular needles into straight needles?

Pattern repeats can vary slightly in the different sizes, in order to get the correct proportions. If you’re not working the exact same size as the garment in the photo, yours might deviate slightly. This has been carefully developed and adjusted so that the complete impression of the garment is the same in all sizes.

Make sure to follow instructions and diagrams for your size!

If you have found a pattern you like which is available in women’s size it’s not very difficult to convert it to men’s size. The biggest difference will be the length of sleeves and body. Start working on the women size that you think would fit across the chest. The additional length will be worked right before you cast off for the armhole/sleeve cap. If the pattern is worked top-down you can add the length right after the armhole or before the first decrease on sleeve.

Regarding additional yarn amount, this will depend on how much length you add, but it is better with a skein too many than too few.

All yarns will have excess fibres (from production) that might come off as lint or shedding. Brushed yarns (ie hairier yarns) have more of these loose, excess fibres, causing more shedding.

Shedding also depends on what is worn under or over the garment, and whether this pulls at the yarn fibres. It’s therefore not possible to guarantee that there will be no shedding

Below are some tips on how to get the best result when working with hairier yarns:

1. When the garment is finished (before you wash it) shake it vigorously so the looser hairs come off. NOTE: do NOT use a lint roller, brush or any method that pulls at the yarn.

2. Place the garment in a plastic bag and put it in your freezer - the temperature will cause the fibres to become less attached to each other, and excess fibres will come off easier.

3. Leave in the freezer for a few hours before taking it out and shaking it again.

4. Wash the garment according to the instructions on the yarn label.

Pilling is a natural process that happens to even the most exclusive of fibers. It's a natural sign of wear and tear that is hard to avoid, and that is most visible in high friction areas of your garment like a sweater's arms and cuffs.

You can make your garment look as new by removing the pilling, using a fabric comb or a pill/lint remover.

Still can't find the answer you need? Then scroll down and leave your question so one of our experts can try to help you. This will be done normally within 5 to 10 working days.
In the meantime, you can read the questions and answers that others have left to this pattern or join the DROPS Workshop on Facebook to get help from fellow knitters/crocheters!

Post a comment to pattern DROPS 255-36

We would love to hear what you have to say about this pattern!

If you want to leave a question, please make sure you select the correct category in the form below, to speed up the answering process. Required fields are marked *.

Comments / Questions (5)

country flag Andrea wrote:

Wenn ich beim Vorder und Rückenteil die zweite Runde des Diagramms stricke endet meine Reihe nicht wie das Diagramm mit einer linken Masche,obwohl die Anzahl der Maschen richig ist ...? Gruß Andrea

23.11.2024 - 20:15

DROPS Design answered:

Siehe Antwort unten :)

25.11.2024 - 08:26

country flag Andrea wrote:

Strickt man die zugenommenen Maschen im Muster A1 in der zweiten Runde beginnend also links ab? Vielen Dank

23.11.2024 - 09:47

DROPS Design answered:

Liebe Andrea, die neuen Maschen beim Vorder- und Rückenteil stricken Sie im Muster, dh am Anfang Vorder/Rückenteil stricken Sie die neuen Maschen wie ein neues Rapport aber lesen Sie das Diagram links nach rechts und am Ende Vorder/Rückenteil stricken Sie die neuen Maschen wie ein neues Rapport aber dieses Mal lesen Sie das Diagram rechts nach links, so wird sich das Muster erweitern. Viel Spaß beim Stricken!

25.11.2024 - 08:03

country flag Sigrid wrote:

Tere, Passe osas on vist väike viga: “Jätka kasvatustega raglaani jaoks igal ringil, aga iga teine kord kasvata ainult hõlmadel ja seljaosal”. Peaks vist ikka olema: “ Jätka kasvatustega raglaani jaoks igal TEISEL ringil, aga iga teine kord….”. Muidu ei lähe järgnevaga sugugi kokku ja inglise keeles on samuti kirjas “every other round” ehk igal teisel. Saan ma õigesti aru? Aitäh!

07.11.2024 - 21:43

DROPS Design answered:

Tere Sigrid! Viga parandatud, tänan teatamast!

13.11.2024 - 23:18

country flag Christiane wrote:

Beste,jullie hebben fantastische patronen,spijtig genoeg kan ik ze niet breien met rondbreinaalden. Zijn er gewone patronen met gewone priemen ook aub Dank u

07.11.2024 - 13:43

country flag Femke Verdegem wrote:

Word bij de halsrand de 1ste markeerdraad geplaatst na de eerste de eerste 28 gebreen steken of moet je die gewoon overzetten zonder te breien en begint de pas hier?

23.10.2024 - 11:48

DROPS Design answered:

Dag Femke,

Je breit die steken niet wanneer je die markeerdraad invoegt en je zet de steken ook niet over. Je plaatst dus een markeerdraad 28 steken verderop.

30.10.2024 - 19:42