
Popular categories
Looking for a yarn?


Comments / Questions (71)
![]() Eliane wrote:
Eliane wrote:
Explication impossible à comprendre ne travaillons pas avec des aiguilles circulaires mais à plat merci de me répondre
07.11.2025 - 09:20DROPS Design answered:
Bonjour Éliane, seul le col se tricote ici en rond, le devant et le dos se tricotent en allers et retours sur aiguille circulaire pour avoir suffisamment de place pour y loger toutes les mailles, l'ouvrage va donc se tricoter de la même façon sur aiguilles droites (sauf le col donc que l'on doit tricoter en rond). Bon tricot!
07.11.2025 - 17:06
![]() Martine Grubch wrote:
Martine Grubch wrote:
Bonsoir,quand on fait le biais des épaules on n’a plus les 6 mailles de la bordure ? Il n’y a plus de bordure ? Merci de vos réponses. Cordialement.
06.11.2025 - 23:30DROPS Design answered:
Bonjour Mme Grubch, vous tricotez les rangs raccourcis en commençant par l'emmanchure (cf. vidéo) = c'est le côté où vous aurez le plus de rangs car cette partie va passer par-dessus l'épaule (pour le début de l'épaule dos en même temps), vous conservez donc les mailles point mouse de la bordure d'emmanchure tout du long. Bon tricot!
07.11.2025 - 08:30
![]() Bernard wrote:
Bernard wrote:
Très difficile de comprendre les explications car je fais le tricot à deux aiguilles à plat
06.11.2025 - 17:35DROPS Design answered:
Bonjour Bernard, vous trouverez en haut de page une liste de vidéos et de leçons relatives à ce modèle qui pourront peut-être vous aider, et vous pouvez également poser votre question ici afin que nous puissions essayer de vous aider. Bon tricot!
07.11.2025 - 07:57
![]() Eliane wrote:
Eliane wrote:
Bonjour, j'hésite entre la taille L et XL. Mon échantillon est 21 mailles sur 24 rangs avec les aiguilles 4,5. L'échantillon avec aiguilles 5 les mailles sont trop lâches. Mais j'ai 18 mailles sur 24 rangs Que me conseillez vous tout en sachant que je veux tricoter avec des aiguilles 4,5. Je voudrais savoir si les chiffres sur le croquis du bas est un demi devant. Merci
03.11.2025 - 14:26DROPS Design answered:
Bonjour Éliane, vous pouvez essayer de bloquer votre échantillon pour voir si cela change quelque chose, ou bien vous aider d'un modèle dans la tension/texture souhaitée - retrouvez tous les pulls sans manches ici, ajoutez des filtres si besoin pour affiner la recherche. Bon tricot!
03.11.2025 - 16:35
![]() Agneta Schyllert wrote:
Agneta Schyllert wrote:
Kan jag köpa en utskrift av detta mönster, då jag inte har möjlighet att skriva ut själv. Det är nu andra gången jag frågar. Hoppas få svar, då jag redan köpt garnet.
01.11.2025 - 00:57DROPS Design answered:
Hei Agneta. Ta kontakt med din lokale garnbutikk og hør om de kan hjelpe deg med en utskrift, eller dra til et bibliotekt, der vil du nok få hjelp til å skrive ut. Vi legger ut alle våre oppskrifter gratis på nett, men vi skriver ikke ut oppskriften og sender til kunder. mvh DROPS Design
17.11.2025 - 07:53
![]() Monique wrote:
Monique wrote:
Bonjour ,je voudrai télécharger le PDF d'un modèle sans l'imprimer , comment je peux faire ? je pense que c'est possible ,je n'ai pas d'imprimante .... merci ,cordialement Monique
26.10.2025 - 10:51DROPS Design answered:
Bonjour Monique, nos modèles peuvent seulement être imprimés, mais en choisissant une imprimante virtuelle, vous pourrez alors les sauvegarder en format . PDF. Bon tricot!
28.10.2025 - 19:22
![]() Serene wrote:
Serene wrote:
Bonjour, Faut-il continuer la bordure I-CORD quand on fait les rangs raccourcis à l'allemande ? Merci !
19.10.2025 - 14:51DROPS Design answered:
Bonjour Serene, non, vous tricotez les rangs raccourcis à l'allemande, sans la bordure I-cord. Bon tricot!
19.10.2025 - 17:59
![]() Eliane Bernard wrote:
Eliane Bernard wrote:
LES AIGUILLES CIRCULAIRE SONT ELLES OBLIGATOIRES POUR CE MODELE PULL SANS MANCHES DRIFTWWOOD VEST MERCI
15.10.2025 - 17:36DROPS Design answered:
Bonjour Eliane, vous pouvez realiser ce pull sur les aiguilles droites. Seul le col est fait en rond sur les aiguilles circulaires ou double pointes. Bon tricot!
16.10.2025 - 09:44
![]() Vale wrote:
Vale wrote:
Je ne comprend rien aux explications
26.09.2025 - 12:15DROPS Design answered:
Bonjour Mme Vale, vous trouverez sous les onglets "Vidéos" et "Leçons" en haut de page différentes aides/astuces qui pourront vous aider; n'hésitez pas à poser votre question et à exposer ici ce que vous ne comprenez pas, nous pourrons alors plus facilement tenter de vous aider. Merci pour votre compréhension.
26.09.2025 - 16:55
![]() Judy wrote:
Judy wrote:
Struggling with short rows at shoulder. Knitting the right shoulder first - do the \'short rows\' come onto the arm border side? If so, how do I knit the wool which is passed over on row 2 as they seem to be left after the turns? Sorry can you understand what I\'m trying to say - I seem to be ending up with too many stitches as I don\'t have a way to knit in the wool passed over on the purl on row 2.
16.08.2025 - 16:17DROPS Design answered:
Dear Judy, in this video we show how to work the short rows for the diagonal shoulders for this pattern, this might help you. Happy knitting!
18.08.2025 - 08:31
|
|
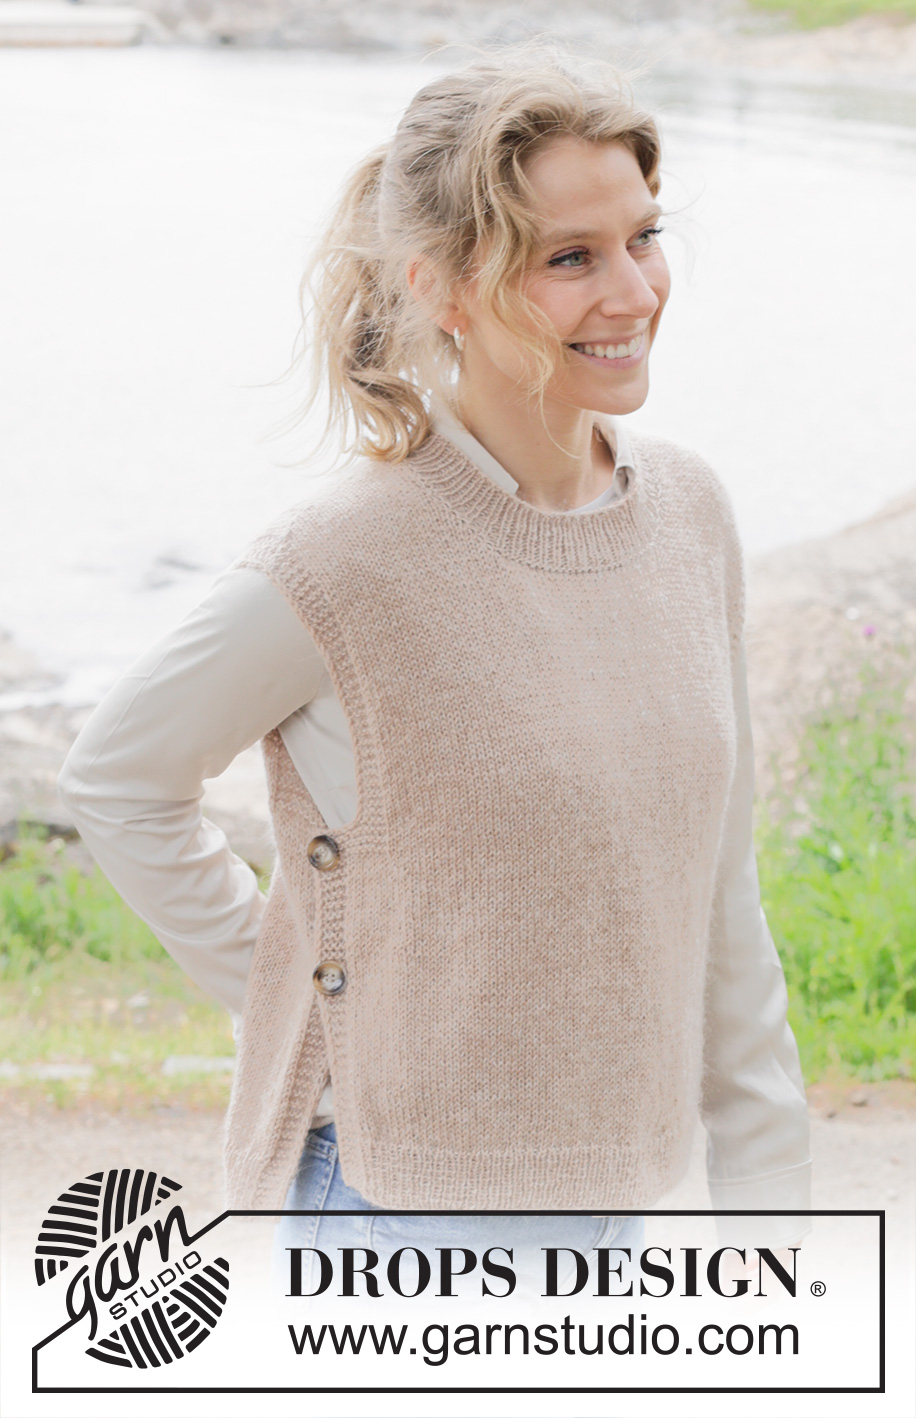
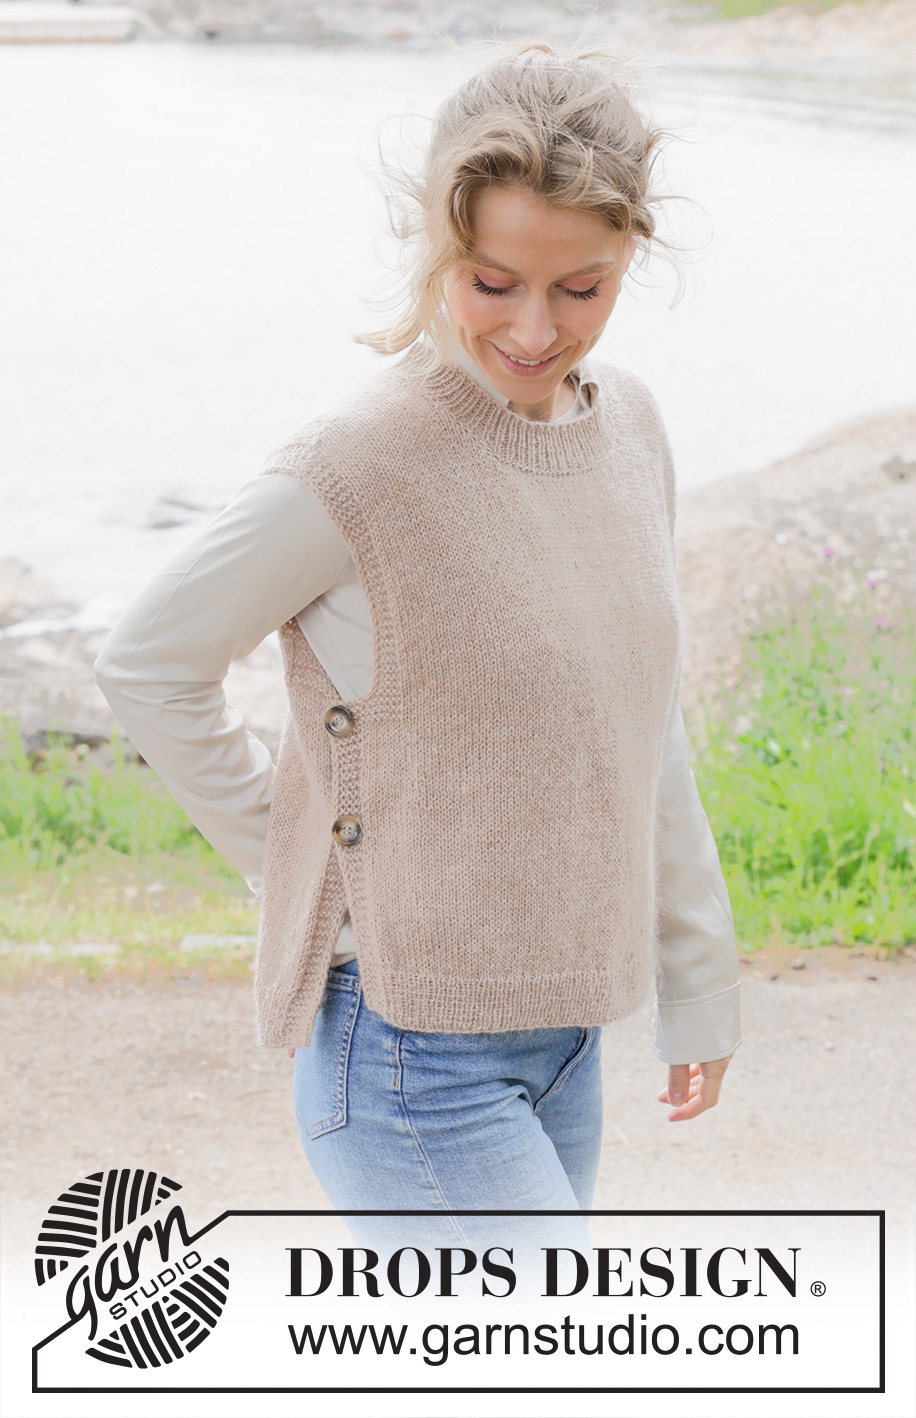
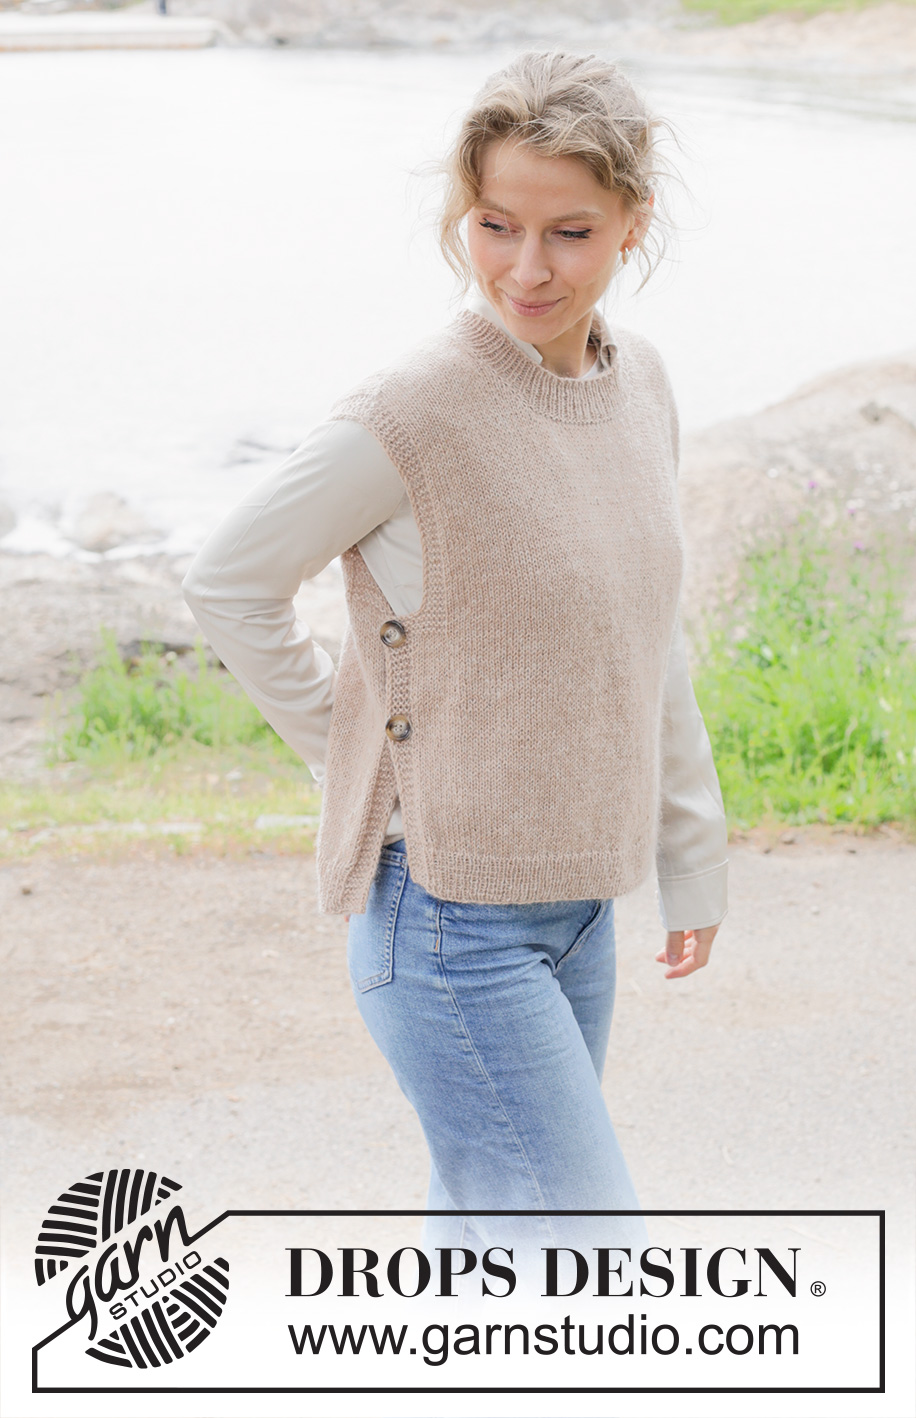
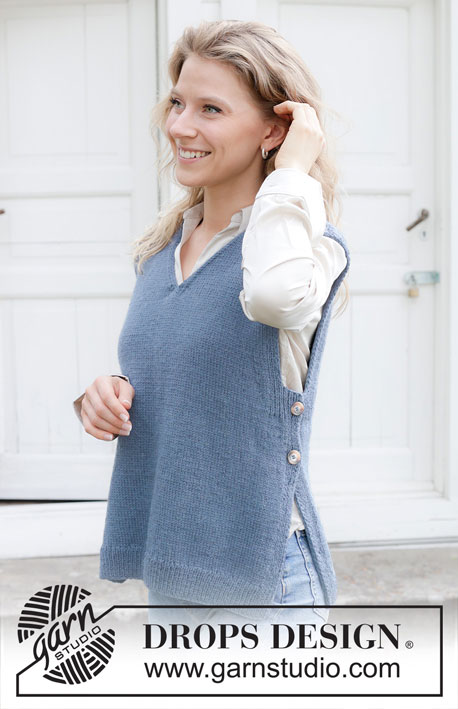
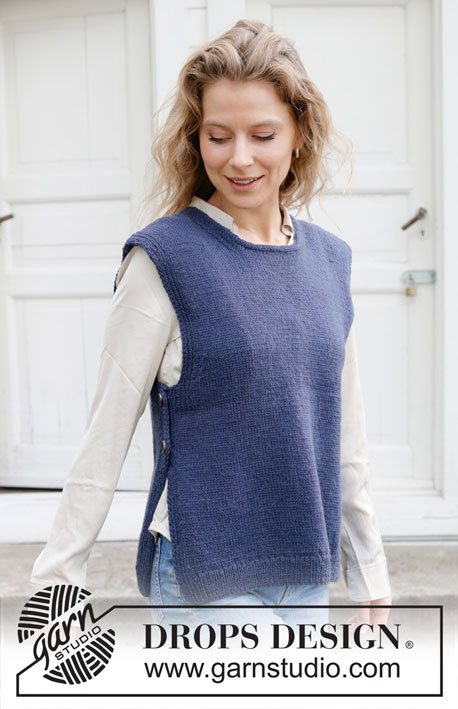
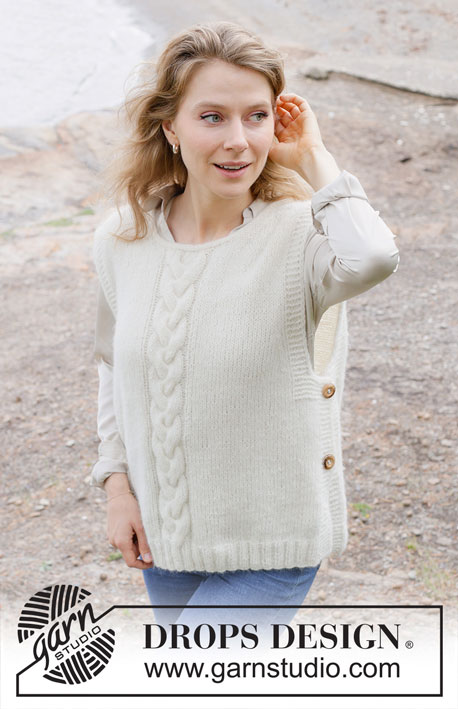
Driftwood Vest#driftwoodvest |
|
 |
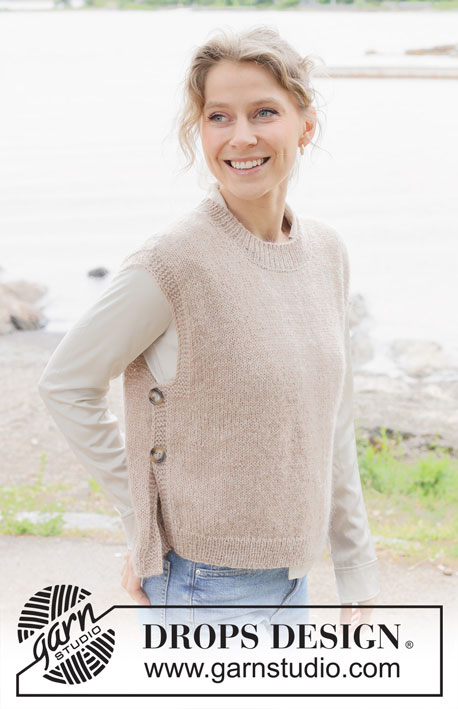 |
Knitted vest in DROPS Alpaca and DROPS Kid-Silk or DROPS Flora and DROPS Kid-Silk. The piece is worked with diagonal shoulders. Sizes S - XXXL.
DROPS 255-9 |
|
|
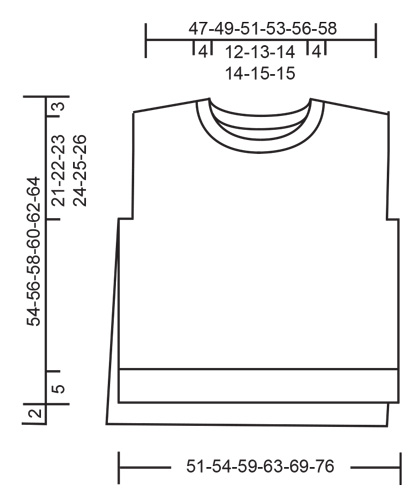
------------------------------------------------------- EXPLANATIONS FOR THE PATTERN: ------------------------------------------------------- BANDS WITH I-CORD BEGINNING OF ROW: Slip 1 stitch purl-wise with strand in front, knit 1, work 4 garter stitches. END OF ROW: Work until there are 6 stitches left on the row, work 4 garter stitches, slip 1 stitch purl-wise with strand in front, knit 1. Work in the same way from both the right and wrong side. GARTER STITCH (worked back and forth): Knit all rows, from both the right and wrong side. 1 ridge in height = knit 2 rows. BUTTONHOLES: Work the buttonholes on both bands from the right side. ROW 1 (right side): Knit together the 4th and 5th stitch from the edge, make 1 yarn over, work until there are 5 stitches left on the row, make 1 yarn over, knit 2 together and finish the band as before. ROW 2 (wrong side): Work both bands as before, knitting the yarn overs to leave holes. The first set of buttonholes is worked when the piece measures 19-20-21-22-23-24 cm, the second set when the piece measures 28-29-30-31-32-33 cm. KNITTING TIP: When working short rows, there will be a slight hole after each turn. The holes can be closed by tightening the strand or working the technique German Short Rows as follows: Slip the first stitch purl-wise, lay the strand over the right needle and tighten well at the back (2 loops on the needle which are knitted together on the next row). ------------------------------------------------------- START THE PIECE HERE: ------------------------------------------------------- VEST - SHORT OVERVIEW OF THE PIECE: The piece is worked back and forth. The front piece is worked bottom up to the neckline, then the diagonal shoulders are worked separately. The shoulders are joined before working the back piece, top down. The back piece is longer than the front piece. Stitches are knitted up around the neckline before working the neck. FRONT PIECE: Cast on 113-119-129-139-151-165 stitches with circular needle size 3 mm, and 1 strand DROPS Alpaca and 1 strand DROPS Kid-Silk (= 2 strands), or 1 strand DROPS Flora and 1 strand DROPS Kid-Silk (= 2 strands). Work rib, starting from the wrong side as follows: Work 6 stitches according to BANDS WITH I-CORD – read description above, work rib (purl 1, knit 1) until there are 7 stitches left, purl 1 and 6 stitches according to bands with I-cord. Work the rib and the bands with I-cord for 5 cm. Change to circular needle size 4.5 mm. Work 1 row of stocking stitch with the bands as before. AT THE SAME TIME decrease 15-15-17-19-21-23 stitches evenly on the first row (do not decrease across the bands) = 98-104-112-120-130-142 stitches. Continue with stocking stitch and 6 band-stitches as before on each side – remember the BUTTONHOLES and remember to maintain the knitting tension. When the piece measures 28-29-30-31-32-33 cm, continue as follows: Work 6 band-stitches as before, 7-8-10-12-15-19 GARTER STITCHES – read description above, work stocking stitch until there are 13-14-16-18-21-25 stitches left, 7-8-10-12-15-19 garter stitches and 6 band-stitches as before. When the piece measures 30-31-32-33-34-35 cm, cast off on each side for the armholes as follows: ROW 1: Knit 2 together (= 1 stitch decreased), cast off 6-7-9-11-14-18 stitches, work as before to end of row = 91-96-102-108-115-123 stitches. ROW 2: Knit 2 together (= 1 stitch decreased), cast off 6-7-9-11-14-18 stitches, work as before until there are 6 stitches left, work 6 band-stitches as before = 84-88-92-96-100-104 stitches. Continue with stocking stitch back and forth and 6 band-stitches as before on each side. When the piece measures 46-47-48-49-50-51 cm, work from the right side, placing AT THE SAME TIME the middle 24-24-26-26-28-28 stitches on a thread for the neckline and finishing each shoulder separately. RIGHT SHOULDER (when garment is worn): = 30-32-33-35-36-38 stitches. The first row = wrong side. Continue with stocking stitch and the band as before. AT THE SAME TIME cast off for the neckline as follows: Cast off the first stitch from the neck every 2nd row 5-6-5-5-5-5 times, then every 4th row 1-1-2-2-2-2 times = 24-25-26-28-29-31 shoulder-stitches. Continue with stocking stitch and the band as before. When the piece measures 51-53-55-57-59-61 cm, read KNITTING TIP, then work RIGHT DIAGONAL SHOULDER as described below, with the first row from the right side. RIGHT DIAGONAL SHOULDER: Work short rows with turning stitches/German Short Rows as follows: ROW 1 (= right side): Work 22-23-24-26-27-29 stitches as before, turn, ROW 2 (= wrong side): Slip the first stitch purl-wise, with strand in front, tighten the strand over the right needle (2 loops on the needle) and work to end of row as before. Continue like this back and forth, with fewer stitches worked each time. ROW 3: Work 20-21-22-24-25-27 stitches from the right side as before, turn ROW 4: Work in the same way as row 2 ROW 5: Work 18-19-20-22-23-25 stitches from the right side as before, turn ROW 6: Work in the same way as row 2 ROW 7: Work 15-16-16-18-19-21 stitches from the right side as before, turn ROW 8: Work in the same way as row 2 ROW 9: Work 12-13-12-14-15-16 stitches from the right side as before, turn ROW 10: Work in the same way as row 2 ROW 11: Work 9-10-8-10-11-11 stitches from the right side as before, turn ROW 12: Work in the same way as row 2 ROW 13: Work 5-6-4-6-7-6 stitches from the right side as before, turn ROW 14: Work in the same way as row 2 Now increase the shoulder towards the neck: Increase 1 stitch by casting on 1 stitch at the end of each row by the neck. Increase like this every 2nd row a total of 4 times = 28-29-30-32-33-35 stitches. The last row is from the wrong side. Cut the strand and work the left shoulder. LEFT SHOULDER (when garment is worn): = 30-32-33-35-36-38 stitches. The first row is from the wrong side. Continue with stocking stitch and the band as before. AT THE SAME TIME cast off for the neckline as follows: Cast off the first stitch from the neck every 2nd row 5-6-5-5-5-5 times, then every 4th row 1-1-2-2-2-2 times = 24-25-26-28-29-31 shoulder-stitches. Continue with stocking stitch and the band as before. When the piece measures 51-53-55-57-59-61 cm (remember KNITTING TIP), work LEFT DIAGONAL SHOULDER as described below, with the first row from the wrong side. LEFT DIAGONAL SHOULDER: Work short rows with turning stitches/German Short Rows as follows: ROW 1 (= wrong side): Work 22-23-24-26-27-29 stitches as before, turn, ROW 2 (= right side): Slip the first stitch purl-wise, with strand in front, tighten the strand over the right needle (2 loops on the needle) and work to end of row as before. Continue like this back and forth, with fewer stitches worked each time. ROW 3: Work 20-21-22-24-25-27 stitches from the wrong side as before, turn ROW 4: Work in the same way as row 2 ROW 5: Work 18-19-20-22-23-25 stitches from the wrong side as before, turn ROW 6: Work in the same way as row 2 ROW 7: Work 15-16-16-18-19-21 stitches from the wrong side as before, turn ROW 8: Work in the same way as row 2 ROW 9: Work 12-13-12-14-15-16 stitches from the wrong side as before, turn ROW 10: Work in the same way as row 2 ROW 11: Work 9-10-8-10-11-11 stitches from the wrong side as before, turn ROW 12: Work in the same way as row 2 ROW 13: Work 5-6-4-6-7-6 stitches from the wrong side as before, turn ROW 14: Work in the same way as row 2 Insert 1 marker outermost on the shoulder (= mid-top of shoulder); the piece is now measured from here! Now increase the shoulder by the neck: Increase 1 stitch by casting on 1 stitch at the end of each row by the neck. Increase like this every 2nd row a total of 4 times = 28-29-30-32-33-35 stitches. The new stitches are worked in stocking stitch and the last row is from the wrong side. Now the shoulders are joined for the back piece. BACK PIECE: Begin from the right side on the left shoulder, with the next row from the right side, work the left shoulder-stitches as before, then cast on 28-30-32-32-34-34 stitches for the neckline and work the right shoulder-stitches from the right side = 84-88-92-96-100-104 stitches. Continue back and forth with stocking stitch and the bands as before until the piece measures 21-22-23-24-25-26 cm from the marker on the shoulder. Cast on 7-8-10-12-15-19 new stitches for the armholes on each side as follows: ROW 1: Work 6 band-stitches, stocking stitch until there are 6 stitches left, work 6 garter stitches and cast on 7-8-10-12-15-19 stitches = 91-96-102-108-115-123 stitches. ROW 2: Work 6 band-stitches, work 7-8-10-12-15-19 garter stitches, stocking stitch until there are 6 stitches left, work 6 garter stitches and cast on 7-8-10-12-15-19 stitches = 98-104-112-120-130-142 stitches. Continue as follows: Work 6 band-stitches, 7-8-10-12-15-19 garter stitches, stocking stitch until there are 13-14-16-18-21-25 stitches left, work garter stitch until there are 6 stitches left, finish with 6 band-stitches. When the piece measures 23-24-25-26-27-28 cm from the marker on the shoulder, continue with stocking stitch and 6 band stitches on each side until the piece measures 48-50-52-54-56-58 cm from the marker. Change to circular needle size 3 mm and work the next row from the right side as follows: Work the 6 band-stitches, work rib (knit 1, purl 1) until there are 6 stitches left, AT THE SAME TIME increase 15-15-17-19-21-23 stitches evenly spaced, work the 6 band-stitches = 113-119-129-139-151-165 stitches. Continue this rib for 5 cm. Cast off with knit from the right side. The back piece measures 53-55-57-59-61-63 cm from the marker on the shoulder. Due to the diagonal shoulders, the length from the top of the shoulder is approx. 54-56-58-60-62-64 cm on the front piece and 56-58-60-62-64-66 cm on the back piece. NECK: Using circular needle size 3 mm and 1 strand of each quality (= 2 strands). Start from the right side on the right shoulder and knit up approx. 108 to 126 stitches around the neckline, including the stitches on the thread – the stitch count must be divisible by 2. Purl 1 round, then knit 1 round. Work rib in the round (knit 1, purl 1) for 3½ cm. Change to circular needle size 4.5 mm and cast off a little loosely. ASSEMBLY: Sew the buttons onto each side of the back piece. |
|
 |
|
Have you finished this pattern?Tag your pictures with #dropspattern #driftwoodvest or submit them to the #dropsfan gallery. Do you need help with this pattern?You'll find 27 tutorial videos, a Comments/Questions area and more by visiting the pattern on garnstudio.com. © 1982-2026 DROPS Design A/S. We reserve all rights. This document, including all its sub-sections, has copyrights. Read more about what you can do with our patterns at the bottom of each pattern on our site. |
|


With over 40 years in knitting and crochet design, DROPS Design offers one of the most extensive collections of free patterns on the internet - translated to 17 languages. As of today we count 324 catalogues and 12290 patterns translated into English (UK/cm). 12290
We work hard to bring you the best knitting and crochet have to offer, inspiration and advice as well as great quality yarns at incredible prices! Would you like to use our patterns for other than personal use? You can read what you are allowed to do in the Copyright text at the bottom of all our patterns. Happy crafting!
Post a comment to pattern DROPS 255-9
We would love to hear what you have to say about this pattern!
If you want to leave a question, please make sure you select the correct category in the form below, to speed up the answering process. Required fields are marked *.