
Popular categories
Looking for a yarn?


Comments / Questions (17)
![]() Vera wrote:
Vera wrote:
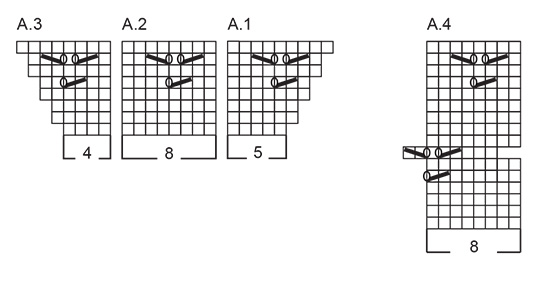
Hvad betyder: For hver gang A.1 til A.3 er strikket 1 gang i højden, strikkes der 1 rapport mere af A2 i bredden mellem A1 og A3 Hvornår strikkes A2??? Er det A1 til A3 , og i næste "hele mønster" kun A2??
01.05.2026 - 10:39
![]() Anita wrote:
Anita wrote:
Erst werden die Rapporte A1, A2 und A3 gestrickt. Später soll man auf Rapport A4 wechseln. Beim Vergleich der Charts ist mir aufgefallen: In Reihe 5 der Rapporte A1, A2 und A3 liegen zwischen den markanten Musterstellen (Umschläge/Abnahmen) jeweils fünf Maschen. Im Chart von A4 scheint es in Reihe 5 jedoch sechs Maschen zu sein, während es in Reihe 13 wieder fünf Maschen . Den Übergang von A1–A3 zu A4 bekomme ich (wie andere auch) nicht hin. Danke und Gruß Anita
15.03.2026 - 10:17DROPS Design answered:
Liebe Anita, bei der 5. Reihe in A.2 sind es 2 Maschen vor (2 M re zs, 1 Umschlag) und 4 Maschen danach, wenn Sie das Muster dann in der Breite wiederholen, haben Sie 6 Maschen glattrechts zwischen jedem Lochmuster, genauso wie im A.4 gezegit; das nächste Lochmuster wird dann nach der 2 ersten Maschen gestrickt, und immer mit 6 Maschen zwischen jedem (2 M re, 1 Umschlag) - bei der 1. Reihe vom Lochmuster. Viel Spaß beim Stricken!
16.03.2026 - 10:07
![]() Car wrote:
Car wrote:
Buenos dias, la ecplicacion de los motivos de las mangas no los veo claros para mi, empiezo el calado en la 5\ vuelta y hago seguidos A1A2yA3? si me lo puedes aclarar, muchas gracias
30.07.2025 - 13:10DROPS Design answered:
Hola Car, en la misma vuelta haces una repetición de A.1 (la 1ª fila), sigues con la 1ª fila de A.2 tantas veces como necesites según el número de puntos en las mangas y terminas con 1 repetición de la 1ª fila de A.3.
05.08.2025 - 14:57
![]() Odile wrote:
Odile wrote:
Bonjour, les deux premiers motifs en hauteur se placent correctement. pour le 3ème motifs et les suivants les augmentations sont tous les 4 rangs, le diagramme peut difficilement être conforme avec les deux rangées de motifs précédents. Pouvez-vous m'expliquer la bonne interprétation ? Merci, cordialement Odile
13.06.2025 - 10:15DROPS Design answered:
Bonjour Odile, lorsque vous avez tricoté les diagrammes 1 x en hauteur, reprenez-les au 1er rang et tricotez ainsi: A.1, 2 x A.2 et terminez par A.3, ainsi les motifs ajourés vont se placer juste comme il faut, avec 5 rangs jersey entre les points ajourés en hauteur, et chaque motif en largeur se place entre 2 motifs ajourés précédents. Bon tricot!
13.06.2025 - 16:39
![]() Anneli wrote:
Anneli wrote:
Hej! Stickar denna söta jumper men blir lite fundersam på ärmen. När man stickat första omgång med A1 , A2 och A 4 så blir det väl A4 som styr övriga varv . Annars får jag inte ihop det.
04.06.2025 - 14:19DROPS Design answered:
Hej Anneli, du börjar med A1, A2, A3 samtidigt som du ökar till raglan enligt A.1 och A.3. Först när du är färdig med ökningen stickar du enligt A4 (som ju är precis samma mönster) :)
11.06.2025 - 11:46
![]() NOTELAERS wrote:
NOTELAERS wrote:
Bonjour, Ce modèle me convient, j'aimerais le tricoter avec de la laine, quelle qualité me conseillez-vous ? Merci pour votre réponse. Cordialement Odile
24.05.2025 - 20:37DROPS Design answered:
Bonjour Mme Notelaers, tout dépend de l'effet final que vous souhaitez, retrouvez toutes les alternatives via le convertisseur (ainsi que les nouvelles quantités correspondantes); votre magasin saura vous aider, même par mail ou téléphone, et vous conseiller la meilleure alternative correspondant à ce que vous cherchez. Bon tricot!
26.05.2025 - 09:14
![]() Cinzia wrote:
Cinzia wrote:
Buongiorno sulle maglie delle maniche cisa significa fare una ripetizione in larghezza di A2?
06.04.2025 - 11:08DROPS Design answered:
Buonasera Cinzia, a quale oarte del modello sta facendo riferimento? Buon lavoro!
10.04.2025 - 16:30
![]() Lea wrote:
Lea wrote:
Liebes Drops Team, Ich komme bei der Zunahme der Ärmel nicht mehr weiter. Wenn an den Ärmeln nur noch in jeder 4. Reihe zugenommen wird, dann wird nur noch als Muster A4 verwendet? Bei mir passt dann aber das Muster überhaupt nicht mehr. Zudem verstehe ich nicht warum bei A4 die eine Reihe so eingerückt ist. Ich hoffe sie verstehen wo mein Problem liegt Liebe Grüße
31.03.2025 - 22:36DROPS Design answered:
Liebe Lea, ja richtig, das Lochmuster sollen Sie dann anpassen damit es wie zuvor gestrickt wird und nicht verschoben wird, wenn Sie dann in jeder 4. Reihe zunehmen. Bei der 7. Reihe werden die ersten 2 Maschen vom 1. Rapport nicht im Lochmuster gestrickt, am Ende vom Rapport stricken Sie die 2 ersten Maschen von der nächsten Rapport zusammen für das Lochmuster. Viel Spaß beim Stricken!
01.04.2025 - 09:15
![]() Hrefna wrote:
Hrefna wrote:
Er þetta rétt eftirfarandi úr texta St.5-6 ára (142lykkjur) Haldið áfram í sléttprjóni á framstykki / bakstykki, gatamynstri á ermum og útaukningu fyrir laskalínu hvoru megin við 4 merkiþræðina, í annarri hverri umferð alls 9-9-7-8-8-7 sinnum (ásamt fyrstu útaukningu) = 158-158-142-158-158-150 lykkjur.
01.07.2024 - 19:49DROPS Design answered:
Blessuð Hrefna. Þetta á að vera réttur lykkjufjöldi. Fitjið upp 80 lykkjur (5-6 ára), aukið út 3 lykkjur jafnt yfir á hvorri ermi + 6 lykkjur = 86 lykkjur. Útaukning fyrir laskalínu hvoru megin við 4 merkiþræði alls 7 sinnum (7 x 8lykkjur = 56 lykkjur) = 86 lykkjur + 56 lykkjur = 142 lykkjur.
02.07.2024 - 11:41
![]() Jacques Bolduc wrote:
Jacques Bolduc wrote:
Peut on enregistrer un patron gratuit pour pouvoir le tricoté.MERCI
15.06.2024 - 03:08DROPS Design answered:
Bonjour Mme Bolduc, vous pouvez le mettre en favori en cliquant sur le coeur en haut à droite de la page (laissez-vous ensuite guider) ou bien l'imprimer en cliquant sur l'icône de l'imprimante (en utilisant une imprimante virtuelle, vous pourrez l'enregistrer en .pdf). Bon tricot!
17.06.2024 - 08:08
|
|||||||||||||
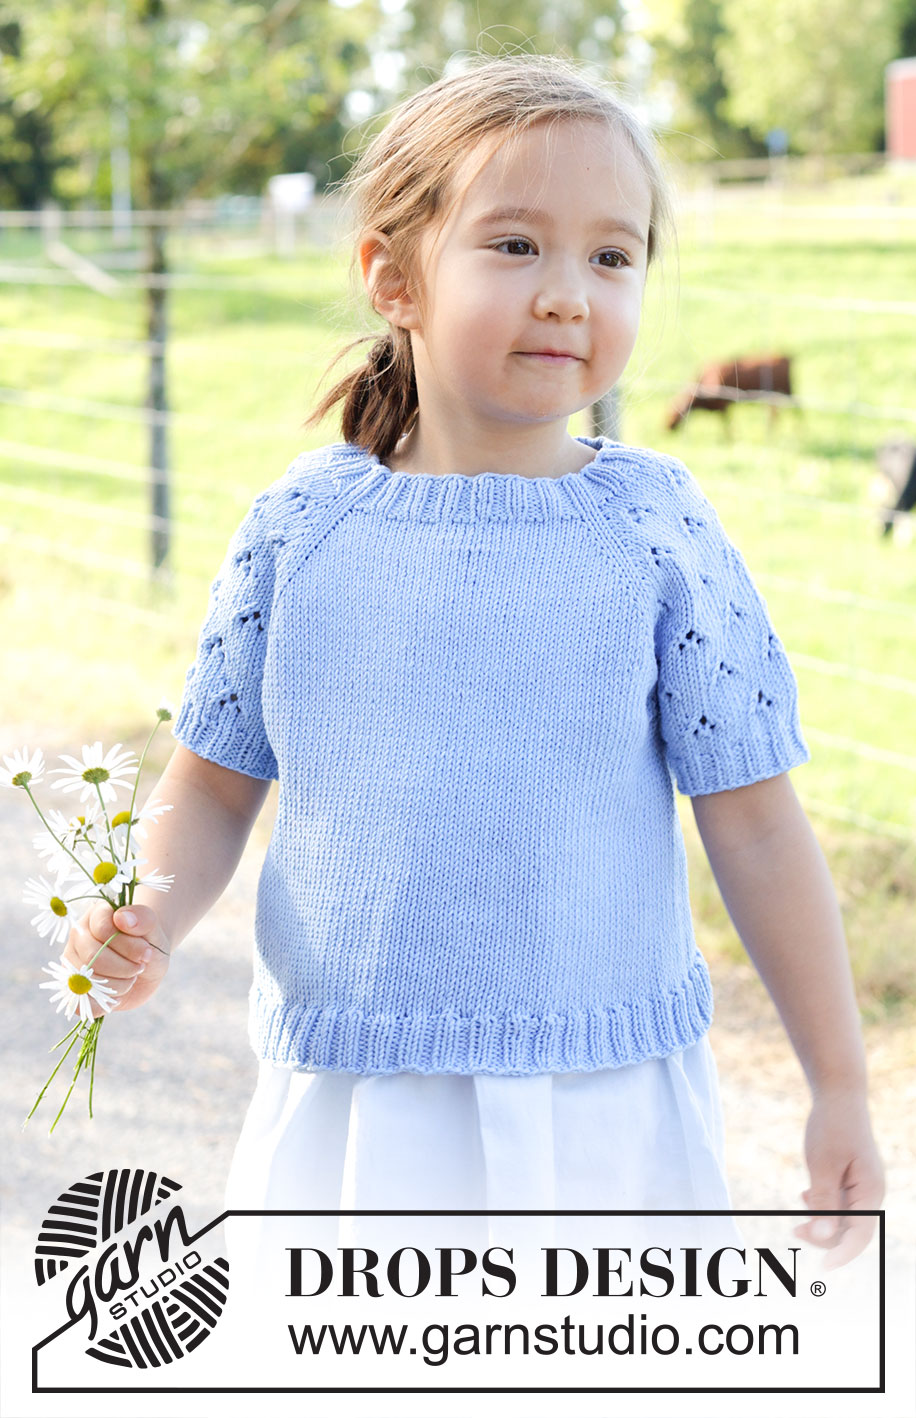
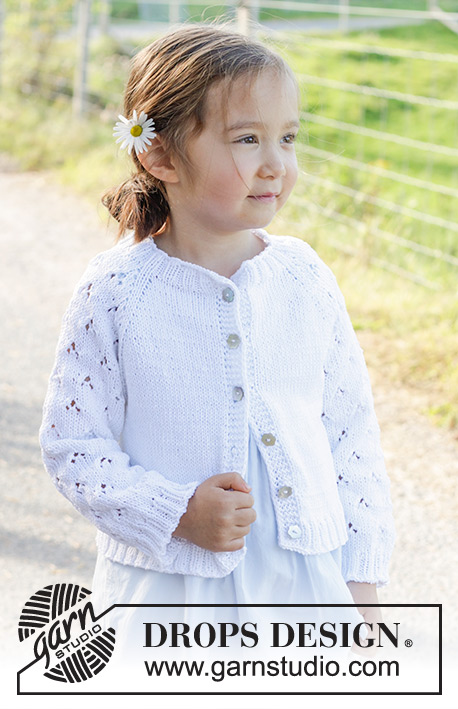
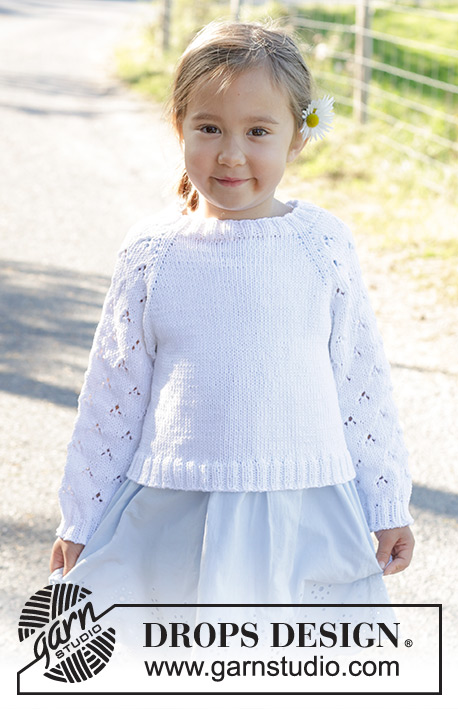
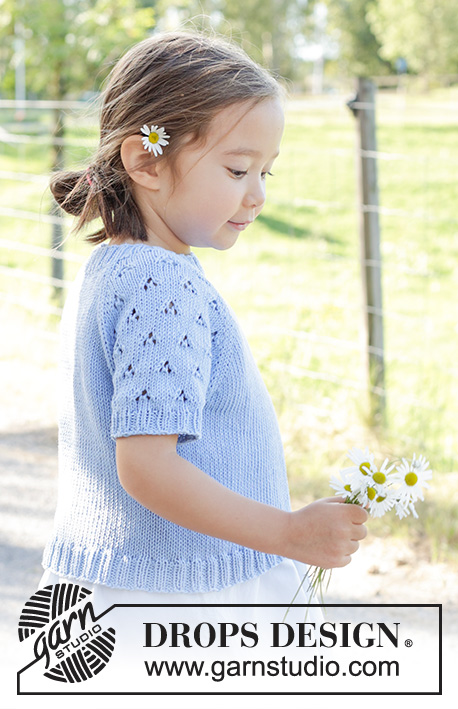
Daisy Fields Top#daisyfieldstop |
|||||||||||||
 |
 |
||||||||||||
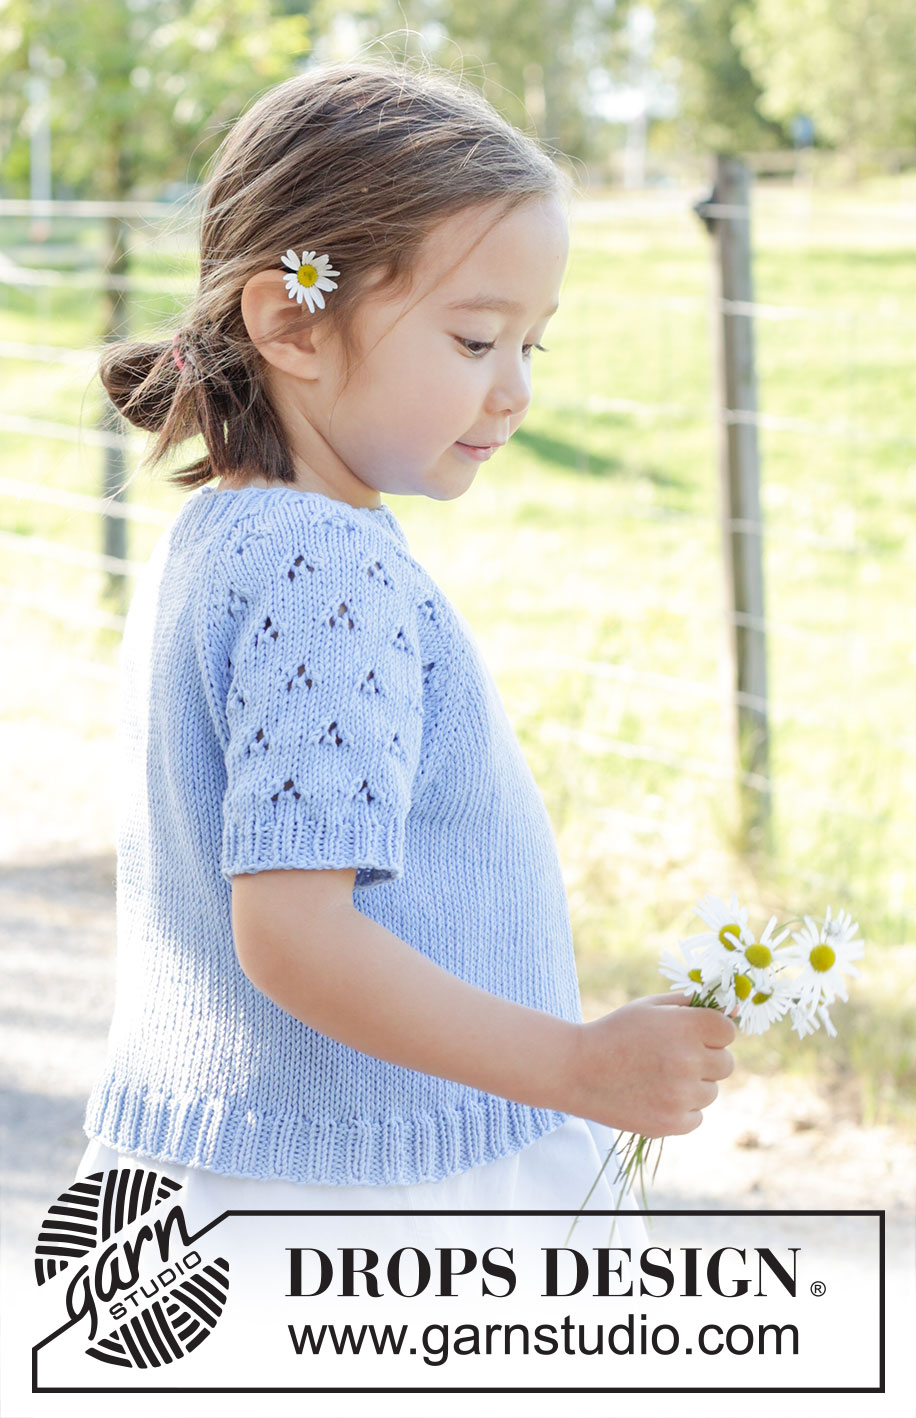
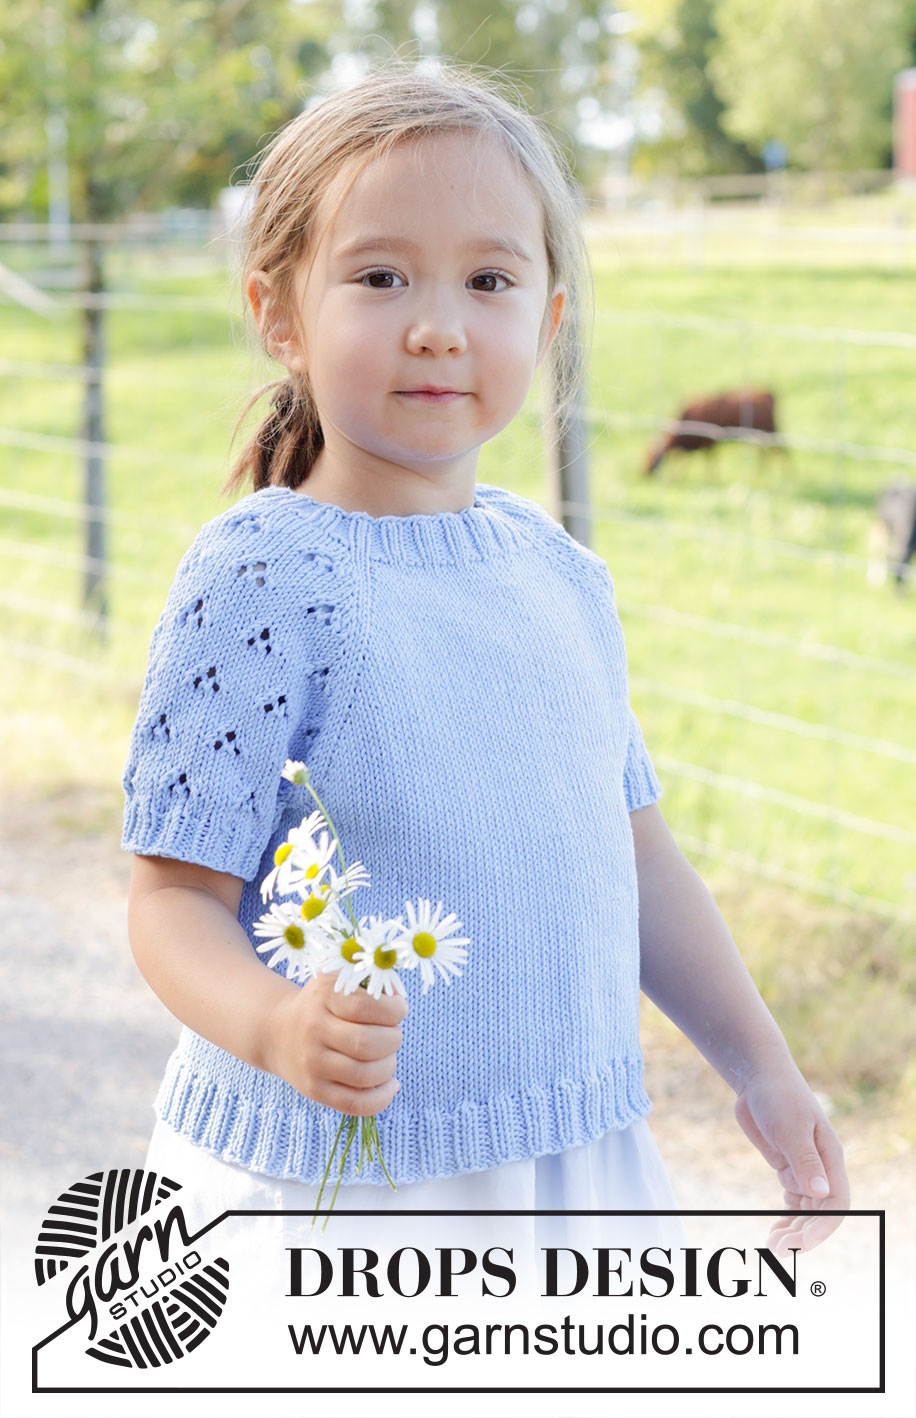
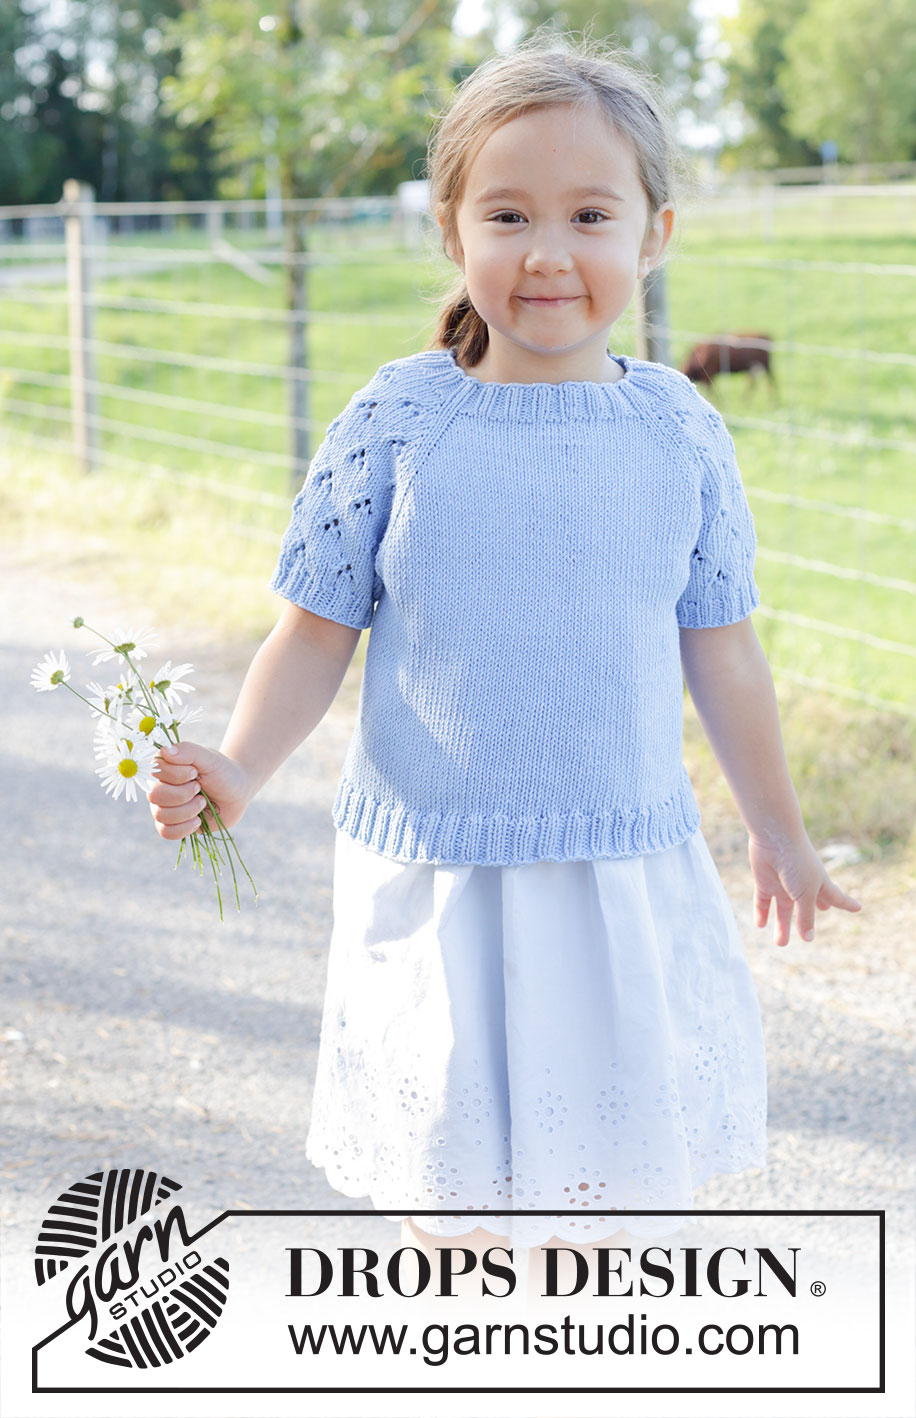
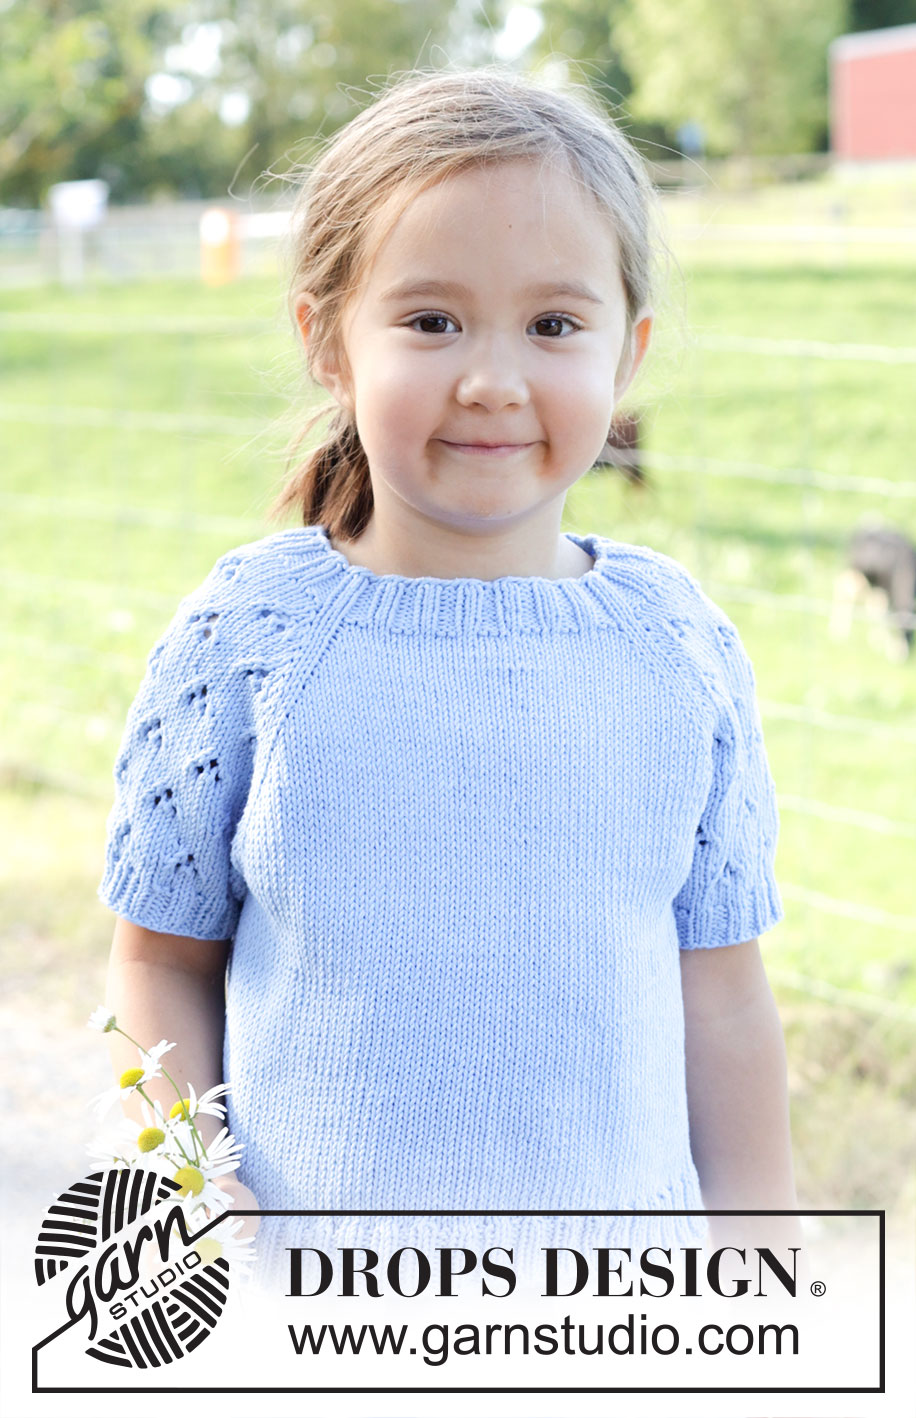
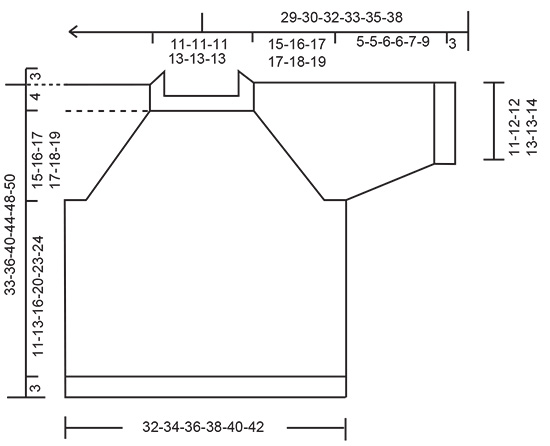
Knitted short-sleeved jumper/ top, for children in DROPS Cotton Light. The piece is worked top down with raglan and lace pattern on sleeves. Sizes 2 – 12 years.
DROPS Children 48-3 |
|||||||||||||
|
------------------------------------------------------- EXPLANATIONS FOR THE PATTERN: ------------------------------------------------------- PATTERN: See diagrams A.1 to A.4. RAGLAN: Increase 1 stitch before/after 2 knitted stitches, in each transition between body and sleeves. The marker-thread sits between these 2 stitches. Increase 1 stitch by making 1 yarn over. On the next round knit the yarn overs twisted to avoid holes. DECREASE TIP (for sleeves): Decrease 1 stitch on each side of the marker-thread as follows: Work until there are 3 stitches left before the marker-thread, knit 2 together, knit 2 (marker-thread sits between these 2 stitches), slip 1 stitch knit-wise, knit 1 and pass the slipped stitch over the knitted stitch (2 stitches decreased). ------------------------------------------------------- START THE PIECE HERE: ------------------------------------------------------- JUMPER – SHORT OVERVIEW OF THE PIECE: The neck and yoke are worked in the round with circular needle, from mid back and top down. The yoke is divided for the body and sleeves and the body continued in the round with circular needle. The sleeves are worked in the round, with double pointed needles. NECK: Cast on 80-80-80-88-88-88 stitches with double pointed needles or circular needle size 3 mm and DROPS Cotton Light. Knit 1 round, then work rib (knit 2, purl 2) in the round for 3 cm. YOKE: Change to circular needle size 4 mm. Knit 1 round, AT THE SAME TIME insert 4 marker-threads and increase as follows: Knit 13-13-13-13-13-13 (approx. half back piece), insert 1 marker-thread, knit 16 and increase 3 stitches evenly spaced (sleeve), insert 1 marker-thread, knit 24-24-24-28-28-28 (front piece), insert 1 marker-thread, knit 16 and increase 3 stitches evenly spaced (sleeve), insert 1 marker-thread, knit 11-11-11-15-15-15 (approx. half back piece) = 86-86-86-94-94-94 stitches. On the next round begin increasing for raglan and work diagrams A.1 to A.3 over the sleeves. NOTE! Each time A.1 to A.3 are finished in height, there is 1 more repeat of A.2 in width between A.1 and A.3. Knit 12-12-12-12-12-12, increase 1 stitch for RAGLAN – read description above, knit 2 (marker-thread sits between these 2 stitches), increase 1 stitch for raglan, work A.1, A.2, A.3, increase 1 stitch for raglan, knit 2 (marker-thread sits between these 2 stitches), increase 1 stitch for raglan, knit 22-22-22-26-26-26, increase 1 stitch for raglan, knit 2 (marker-thread sits between these 2 stitches), increase 1 stitch for raglan, work A.1, A.2, A.3, increase 1 stitch for raglan, knit 2 (marker-thread sits between these 2 stitches), increase 1 stitch for raglan, knit 10-10-10-14-14-14. Continue with stocking stitch on the front and back pieces, lace pattern on the sleeves and increase for raglan on each side of all 4 marker-threads every 2nd round a total of 9-9-7-8-8-7 times (including the first increase) = 158-158-142-158-158-150 stitches. Now continue increasing every 2nd round, but every other increase is only on the front and back pieces (4 increased stitches), i.e., increase on the front and back pieces every 2nd round and on the sleeves every 4th round. Increase like this 10-12-16-14-16-18 times on the front and back pieces (5-6-8-7-8-9 times on the sleeves). REMEMBER THE KNITTING TENSION! After the final increase there are 218-230-238-242-254-258 stitches. You have increased 19-21-23-22-24-25 times on the front and back pieces and 14-15-15-15-16-16 times on the sleeves. Continue with stocking stitch on the front and back pieces and lace pattern on the sleeves, without further increases, until the yoke measures 15-16-17-17-18-19 cm, measured from the neck mid-front. A.4 shows 1 repeat of the pattern; make sure A.4 matches the established pattern. Now divide for the body and sleeves on the next round as follows: Knit the first 32-34-36-35-37-38 stitches (approx. half back piece), place the next 47-49-49-49-51-51 stitches on 1 thread for the sleeve, cast on 6-6-6-8-8-10 stitches (in side under sleeve), knit 62-66-70-72-76-78 (front piece), place the next 47-49-49-49-51-51 stitches on 1 thread for the sleeve, cast on 6-6-6-8-8-10 stitches (in side under sleeve), knit the last 30-32-34-37-39-40 stitches (approx. half back piece). The body and sleeves are finished separately. The piece is now measured from here! BODY: = 136-144-152-160-168-176 stitches. Continue with stocking stitch in the round for a further 11-13-16-20-23-24 cm. Knit 1 round and increase 16-16-16-16-16-20 stitches evenly spaced = 152-160-168-176-184-196 stitches. Change to circular needle size 3 mm. Work rib (knit 2, purl 2) for 3 cm. Cast off with rib. The jumper measures approx. 33-36-40-44-48-50 cm from the shoulder. SLEEVES: Place the 47-49-49-49-51-51 sleeve-stitches from the thread on one side of the piece on short circular needle/double pointed needles size 4 mm and knit up 1 stitch in each of the 6-6-6-8-8-10 stitches cast on under the sleeve = 53-55-55-57-59-61 stitches. Insert a marker-thread in the middle of the 6-6-6-8-8-10 stitches under the sleeve and allow it to follow your work onwards; it is used when decreasing under the sleeve. Start at the marker-thread and continue the pattern according to A.4, working in the round. The stitches which do not fit into the pattern under the sleeve are worked in stocking stitch. Make sure A.4 continues the lace pattern from the yoke. AT THE SAME TIME, when the sleeve measures 2-2-2-2-3-3 cm, decrease 1 stitch on each side of the marker-thread – read DECREASE TIP. Decrease like this every 1-1-3-3-3-4 cm a total of 3-3-2-2-2-2 times = 47-49-51-53-55-57 stitches. Continue working until the sleeve measures 5-5-6-6-7-9 cm from the division (or to desired length there is 3 cm left). Knit 1 round and increase 5-7-5-7-5-7 stitches evenly spaced = 52-56-56-60-60-64 stitches. Change to double pointed needles size 3 mm. Work rib (knit 2, purl 2) for 3 cm, cast off with rib. The sleeve measures approx. 8-8-9-9-10-12 cm from the division. Work the other sleeve in the same way. |
|||||||||||||
Diagram explanations |
|||||||||||||
|
|||||||||||||
 |
|||||||||||||
 |
|||||||||||||
Have you finished this pattern?Tag your pictures with #dropspattern #daisyfieldstop or submit them to the #dropsfan gallery. Do you need help with this pattern?You'll find 26 tutorial videos, a Comments/Questions area and more by visiting the pattern on garnstudio.com. © 1982-2026 DROPS Design A/S. We reserve all rights. This document, including all its sub-sections, has copyrights. Read more about what you can do with our patterns at the bottom of each pattern on our site. |
|||||||||||||


With over 40 years in knitting and crochet design, DROPS Design offers one of the most extensive collections of free patterns on the internet - translated to 17 languages. As of today we count 324 catalogues and 12290 patterns translated into English (UK/cm). 12290
We work hard to bring you the best knitting and crochet have to offer, inspiration and advice as well as great quality yarns at incredible prices! Would you like to use our patterns for other than personal use? You can read what you are allowed to do in the Copyright text at the bottom of all our patterns. Happy crafting!
Post a comment to pattern DROPS Children 48-3
We would love to hear what you have to say about this pattern!
If you want to leave a question, please make sure you select the correct category in the form below, to speed up the answering process. Required fields are marked *.