
Popular categories
Looking for a yarn?


Comments / Questions (10)
![]() Anna wrote:
Anna wrote:
Eine wirklich sehr schön zu strickende Jacke, das einfache Muster geht sehr leicht von der Hand. Mit den Maßen musste ich allerdings basteln. Ich trage bei Oberteilen eine M, wollte hier eine L stricken, damit ich die Jacke "obendrüber" tragen kann. Damit die Ärmel passten, musste ich die aber nach den Angaben zu Größe XXXL stricken - und habe noch ein paar Maschen in der Breite dazugegeben. Seltsam, da alle anderen Maße einwandfrei hinkamen.
30.11.2025 - 18:39
![]() Toussaint Michèle wrote:
Toussaint Michèle wrote:
Bonjour, Est-il possible de me transcrire les explications pour aiguilles droites ? Merci.
27.04.2025 - 14:27DROPS Design answered:
Bonjour Mme Toussaint, le dos et les deux devants se tricotent ici (d'abord séparément puis ensemble) en allers et retours sur aiguille circulaire, vous pouvez donc le tricoter en allers et retours sur aiguilles droites sans rien modifier. Pour les manches, cette leçon pourra vous aider. Bon tricot!
28.04.2025 - 08:23
![]() Lajla wrote:
Lajla wrote:
Jeg forstår ikke hvordan maskerne skal sættes på tråd. Er det en tråd og skal man vende ? Jeg starter jo på en vrangpind.
17.03.2025 - 08:34DROPS Design answered:
Hei Lajla. Ta en titt på videoen: Hvordan strikker man hals og skrå skulder - bagstykket. DU finner den under: Tips & Hjælp / Instruktionsvideoer / Opskriftsvideoer / Strikkede / Dame / Veste / Hvordan strikker man hals og skrå skulder - bagstykket. Den viser samme teknikk, men ikke maskeantallet. Viser både fra retten og vrangen. mvh DROPS Design
24.03.2025 - 08:46
![]() Karen wrote:
Karen wrote:
Tak for info🤗
15.01.2025 - 07:26
![]() Karen wrote:
Karen wrote:
Jeg synes ikke det giver mening omkring indtagningen til ærmegabene, der står en masse tal f eks 3,7,7,11,21? Hvad menes der? MvhKaren
14.01.2025 - 17:11DROPS Design answered:
Hej Karen, Hvis du markerer din størrelse øverst i opskriften, så ringer den det tal ind som gælder i din størrelse igennem hele opskriften :)
15.01.2025 - 07:09
![]() Andrea wrote:
Andrea wrote:
Schade, dass in den Anleitungen nie erwähnt wird, dass man bei kraus rechts gestrickten Blenden verkürzte Reihen einfügen muss, da die Blende sonst die ganze Jacke unschön zusammenzieht. Ich habe hier 2 Jacken liegen, die ich komplett auftrennen muss.
04.10.2024 - 12:21
![]() Rebecka wrote:
Rebecka wrote:
"VÄNSTER FRAMSTYCKE: = 45-47-51-53-55-57 maskor. Sticka slätstickning fram och tillbaka med 7 framkantsmaskor i rätstickning mot mitt fram." (Andra gången det står vänster framstycke)
11.01.2024 - 14:32DROPS Design answered:
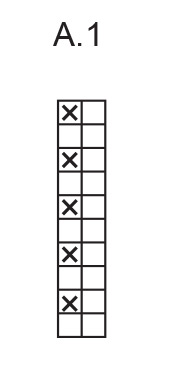
Hei Rebecka. Jo, du har riktig, skal ikke være glattstrikk, men A.1. Oppskriften er oversendt design avd. for en dobbeltsjekk og evnt en korrigering. mvh DROPS Design
15.01.2024 - 14:08
![]() Rebecka wrote:
Rebecka wrote:
Jag tror det här är fel? Det ska väl stå "sticka A.1" istället för "slätstickning"? På bilden är det A1 hela vägen upp till halsen, inte slätstickning från armhålet och upp på framsidan.
08.01.2024 - 20:51DROPS Design answered:
Hej Rebecka, hvor langt er du kommet? Hvor skriver vi at du skall sticka slätstickning?
11.01.2024 - 14:11
![]() NATHALIE LEMAIRE wrote:
NATHALIE LEMAIRE wrote:
J aime beaucoup ce modele je n arrive pas a distinguer le point
05.08.2023 - 09:21
![]() Heather Ellery wrote:
Heather Ellery wrote:
Should be called "cranberry hug"
04.08.2023 - 14:36
|
||||||||||
Rustic Berry Cardigan#rusticberrycardigan |
||||||||||
 |
 |
|||||||||
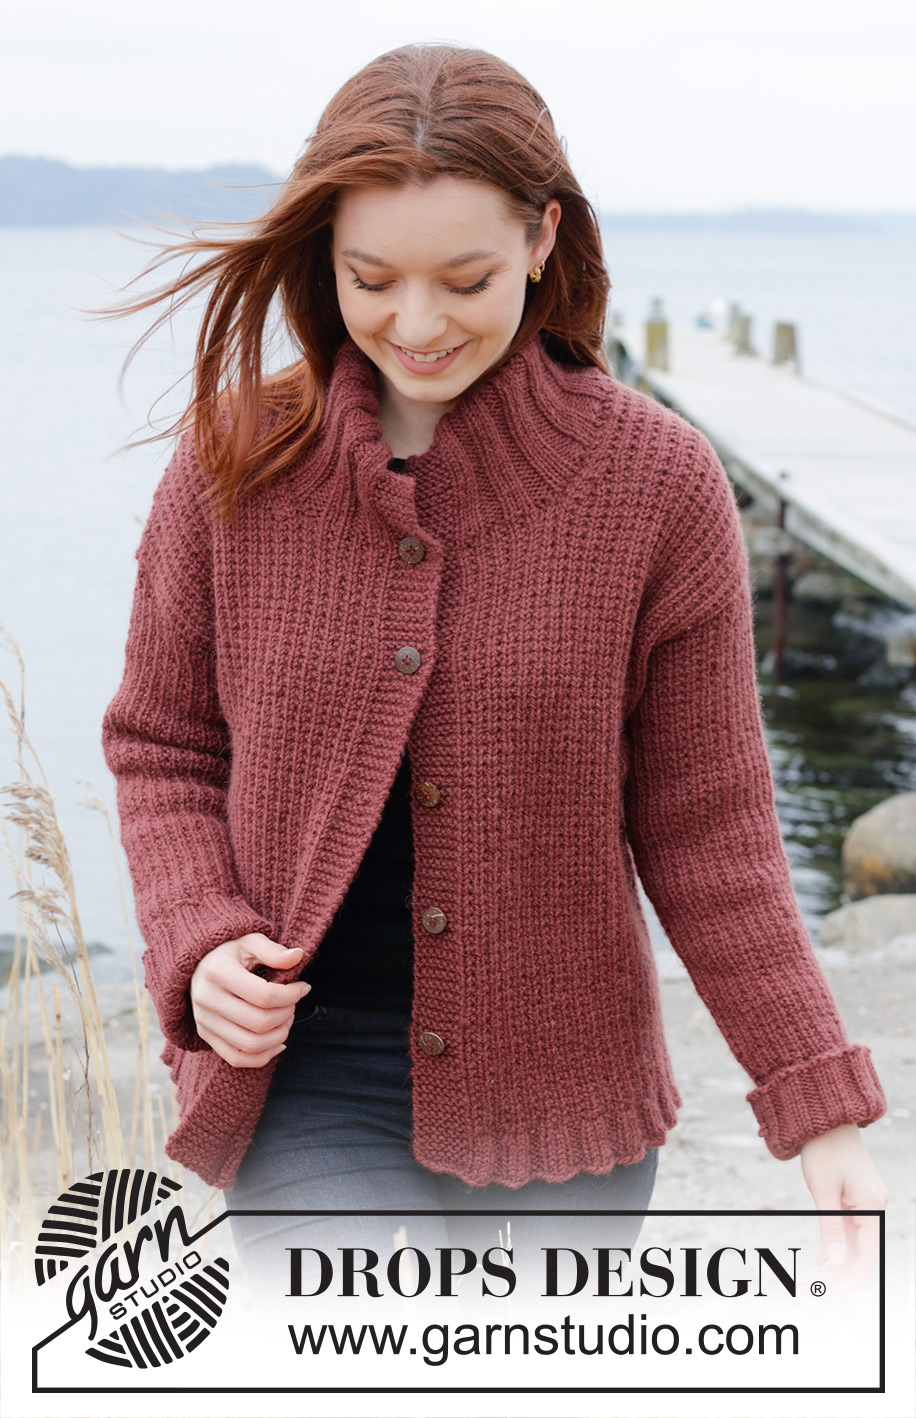
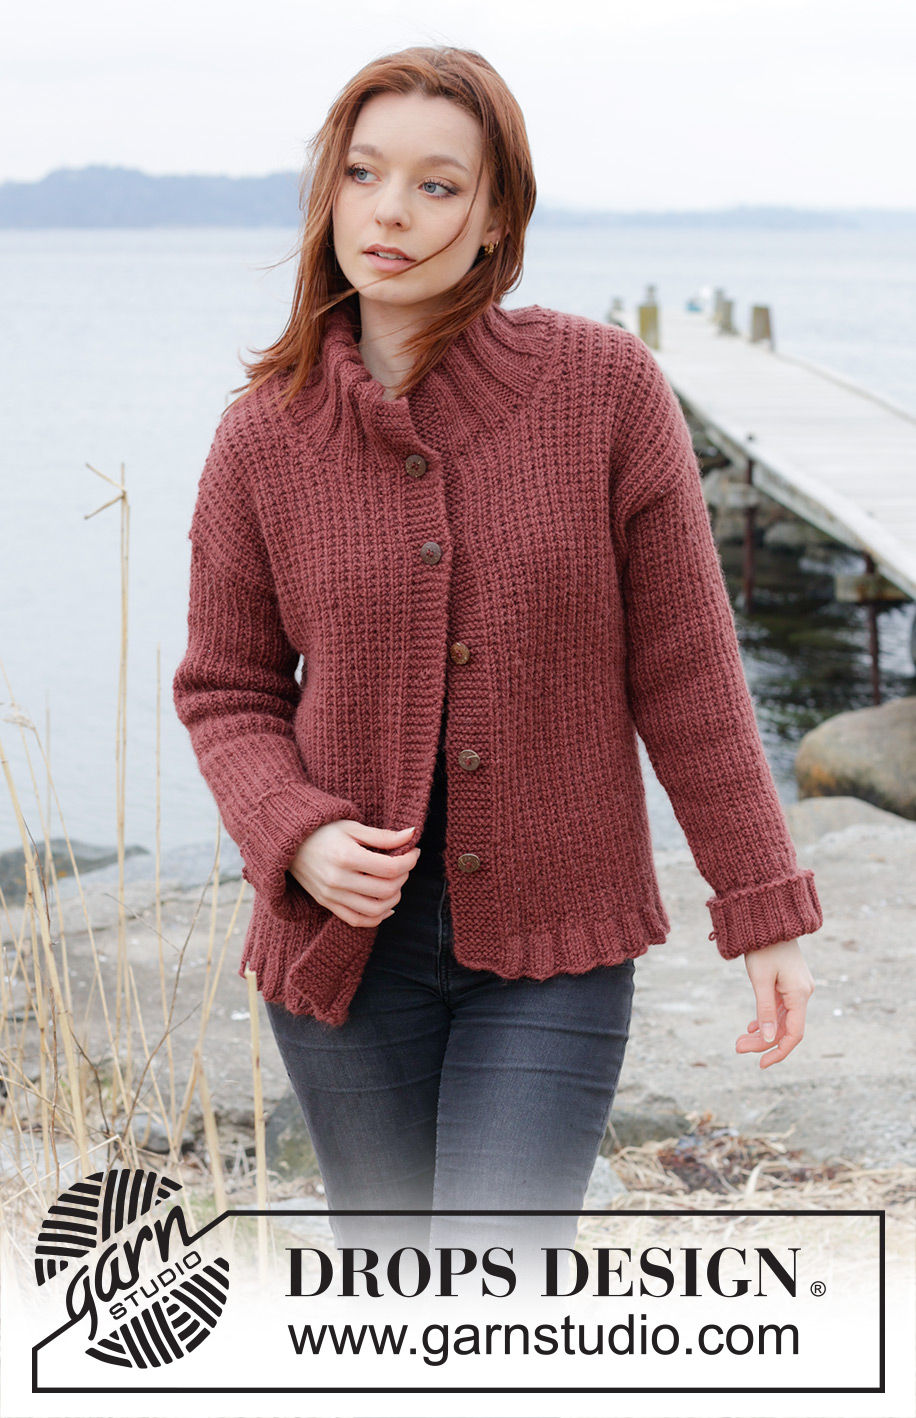
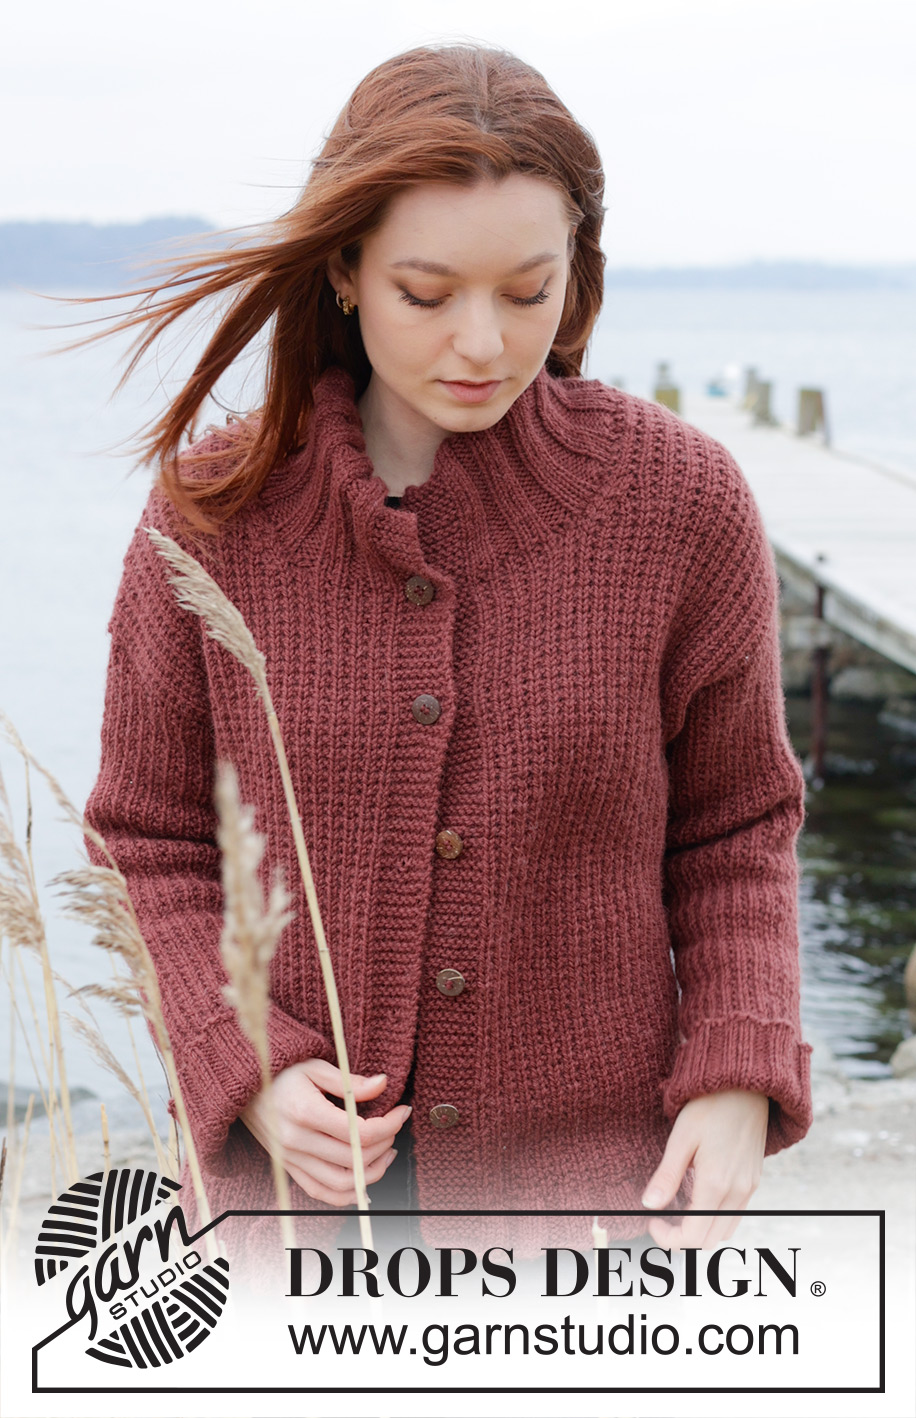
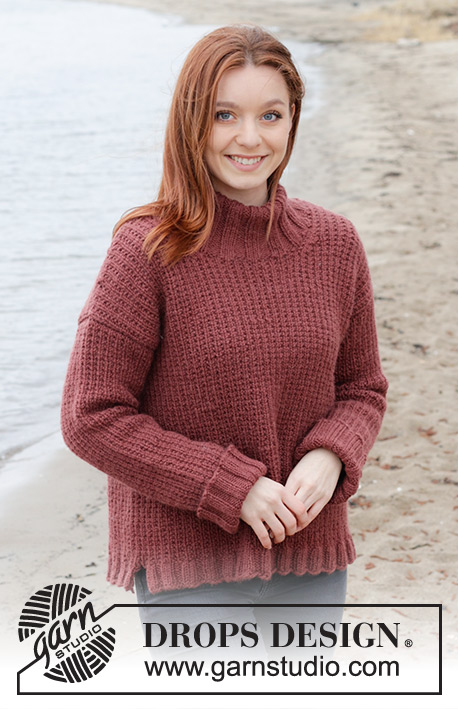
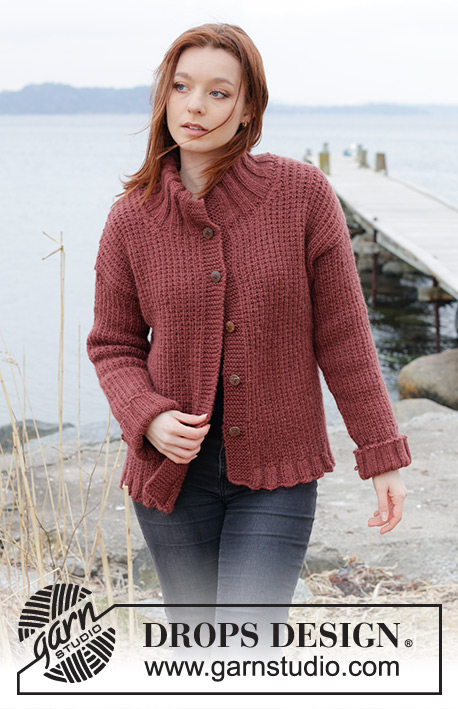
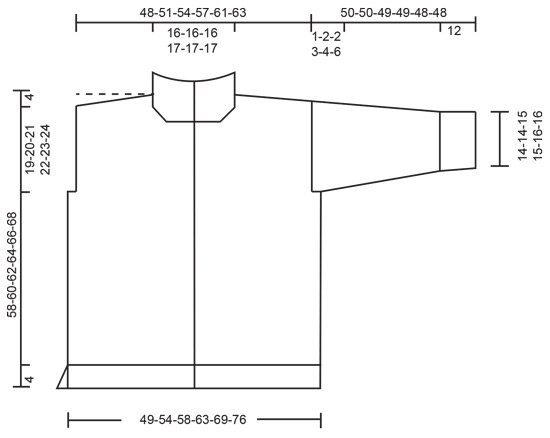
Knitted jacket in DROPS Alaska. The piece is worked bottom up with relief-pattern, diagonal shoulders and double neck. Sizes S - XXXL.
DROPS 245-27 |
||||||||||
|
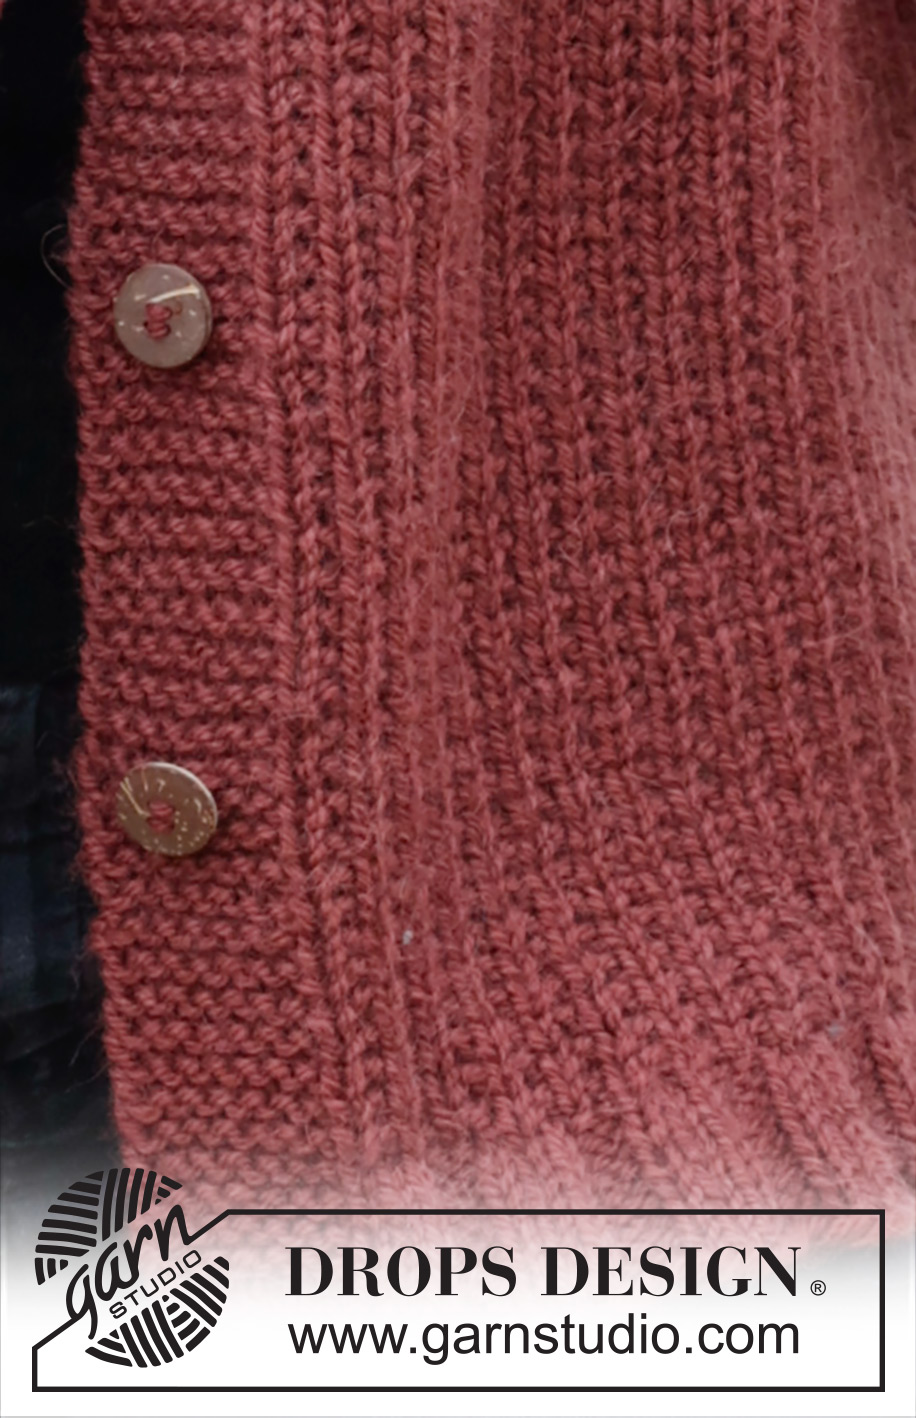
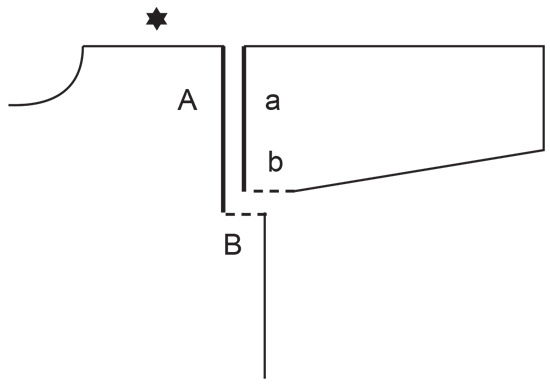
------------------------------------------------------- EXPLANATIONS FOR THE PATTERN: ------------------------------------------------------- GARTER STITCH (worked back and forth): Knit all rows. 1 ridge = knit 2 rows. PATTERN: See diagram A.1. The diagram shows all rows in the pattern from the right side. BUTTONHOLES: Work buttonholes on the right band. 1 BUTTONHOLE = knit together the 3rd and 4th stitch from the edge and make 1 yarn over. On the next row (wrong side) knit the yarn over to leave a hole. Work buttonholes when the piece measures: S: 12, 21, 30, 40 and 50 cm. M: 12, 22, 32, 42 and 52 cm. L: 12, 20, 28, 36, 45 and 54 cm. XL: 12, 20, 28, 37, 46 and 55 cm. XXL: 12, 21 30, 39, 48 and 57 cm. XXXL: 12, 21, 30, 39, 49 and 59 cm. DECREASE TIP (for neckline): All decreases are worked from the right side! Decrease inside 3 stitches by purling 2 together. INCREASE TIP (for sleeves): Start 1 stitch before the marker-thread, make 1 yarn over, knit 2 (marker thread sits between these 2 stitches), 1 yarn over. On the next round knit the yarn overs twisted to avoid holes. Then work the new stitches into the pattern. ------------------------------------------------------ START THE PIECE HERE: ------------------------------------------------------- JACKET – SHORT OVERVIEW OF THE PIECE: The back and front pieces are worked separately, back and forth with circular needle, until the split is finished. The pieces are joined and the body continued back and forth with circular needle as far as the armholes. The back and front pieces are then finished separately. The sleeves are worked in the round with double pointed needles/circular needle, bottom up. The neck is worked to finish. BACK PIECE: Cast on 95-101-113-119-131-143 stitches with circular needle size 4 mm and DROPS Alaska. Purl 1 row from the wrong side. Then work rib as follows from the right side: 1 edge stitch in GARTER STITCH – read description above, * knit 3, purl 3 *, work from *-* until there are 4 stitches left, knit 3 and 1 edge stitch in garter stitch. Work this rib for 4 cm, finishing after a row from the wrong side. Lay the piece to one side. LEFT FRONT PIECE: Cast on 53-59-59-65-71-77 stitches with circular needle size 4 mm. Purl 1 row from the wrong side. Then work next row as follows from the right side: 1 edge stitch in garter stitch, * knit 3, purl 3 *, work from *-* until there are 10 stitches left, knit 3 and 7 band stitches in garter stitch. Work this rib for 4 cm, finishing after a row from the wrong side. Lay the piece to one side. RIGHT FRONT PIECE: Cast on 53-59-59-65-71-77 stitches with circular needle size 4 mm. Purl 1 row from the wrong side. Then work next row as follows from the right side: 7 band stitches in garter stitch, * knit 3, purl 3 *, work from *-* until there are 4 stitches left, knit 3 and 1 edge stitch in garter stitch. Work this rib for 4 cm finishing after a row from the wrong side. Now join the pieces as described below. BODY: Place the right front piece, back piece and left front piece on circular needle size 5.5 mm = 201-219-231-249-273-297 stitches. Knit 1 row from the right side and decrease 28-30-28-30-36-40 stitches evenly spaced (do not decrease over the bands) = 173-189-203-219-237-257 stitches. Work A.1 back and forth with 7 band stitches in garter stitch on each side. A.1 starts and finishes with 1 stocking stitch. REMEMBER THE KNITTING TENSION! When the piece measures 12 cm, work the first BUTTONHOLE – read description above. When the piece measures 35-36-37-38-39-40 cm from the cast-on edge, cast off for the armholes as follows: Work 45-47-51-53-55-57 stitches as before (front piece), cast off 3-7-7-11-15-21 stitches, work 77-81-87-91-97-101 stitches (back piece), cast off 3-7-7-11-15-21 stitches, work 45-47-51-53-55-57 stitches (front piece). Finish the back and front pieces separately. BACK PIECE: = 77-81-87-91-97-101 stitches. Continue A.1 back and forth over all stitches until the piece measures 54-56-58-60-62-64 cm. On the next row cast off the middle 25-25-25-27-27-27 stitches for the neckline and finish each shoulder separately. DIAGONAL SHOULDERS: Continue A.1 and place the outermost stitches by the armhole on a thread for the shoulder, working them first to avoid having to cut the strand. Place 6-7-8-8-8-9 stitches on the thread 3 times, then the last 8-7-7-8-11-10 stitches. All stitches are now decreased or on the thread. Place the 26-28-31-32-35-37 stitches from the thread back on circular needle size 5.5 mm. Work 1 row of stocking stitch but, to avoid holes where you turned, pick up the strand between 2 stitches and work it together with the next stitch on the left needle. Cast off loosely. The piece measures approx. 58-60-62-64-66-68 cm from the top of the shoulder. Work the other shoulder in the same way. LEFT FRONT PIECE: = 45-47-51-53-55-57 stitches. Work A.1 back and forth with 7 band stitches in garter stitch mid-front. When the piece measures 51-53-55-56-58-60 cm, place the outermost 15-15-16-17-16-16 stitches mid-front on a thread for the neckline, working them first to avoid having to cut the strand. OVERVIEW OF NEXT SECTION: You now decrease for the neckline and place stitches on a thread for the diagonal shoulder. Read NECKLINE and DIAGONAL SHOULDER before continuing. NECKLINE: Decrease 1 stitch at the end of each row from right side 4 times – read DECREASE TIP. DIAGONAL SHOULDER: AT THE SAME TIME, when the piece measures 54-56-58-60-62-64 cm, place the outermost stitches by the armhole on a thread in the same way as on the back piece. When the decreases/placing stitches are finished, place the 26-28-31-32-35-37 stitches from the thread back on circular needle size 5.5 mm. Work 1 row of stocking stitch in the same way as on the back piece. Cast off loosely. The piece measures approx. 58-60-62-64-66-68 cm from the top of the shoulder. RIGHT FRONT PIECE: Work in the same way as the left front piece but decrease for neck at the beginning of every row from right side. SLEEVES: Cast on 66-72-78-78-78-84 stitches with double pointed needles size 4 mm. Work rib in the round (knit 3, purl 3). When the rib measures 12 cm, change to short circular needle size 5.5 mm. Knit 1 round and decrease 22-26-30-30-28-32 stitches evenly spaced = 44-46-48-48-50-52 stitches. Insert 1 marker-thread at the beginning of the round. Work A.1 over all stitches. When the sleeve measures 14 cm, increase 1 stitch on each side of the marker-thread - read INCREASE TIP. Increase like this every 4½-4-4-3-3-2½ cm a total of 8-9-9-11-11-12 times = 60-64-66-70-72-76 stitches. When the sleeve measures 49-48-47-46-44-42 cm, work the sleeve cap back and forth until the sleeve measures 50-50-49-49-48-48 cm (a split of 1-2-2-3-4-6 cm at the top of the sleeve). Work the other sleeve in the same way. ASSEMBLY: Sew the shoulder seams. Sew the sleeve cap to the armhole inside the outermost stitch on the body. Sew the split to the bottom of the armhole – see sketch. Sew the buttons onto the left band. DOUBLE NECK: Start from the right side, mid-front, and knit up 101 to 113 stitches along the neckline (including the stitches on the threads), with circular needle size 4 mm. The stitch count should be divisible by 6 + 5. Work as follows from the wrong side: 7 band stitches in garter stitch, * purl 3, knit 3 *, work from *-* until there are 10 stitches left, knit 3 and 7 band stitches in garter stitch. Work this rib for 7 cm. Cast off 6 band stitches on each side and continue the rib, with 1 garter stitch on each side, until the neck measures 14 cm. Cast off. Fold the neck double to the inside and sew down. |
||||||||||
Diagram explanations |
||||||||||
|
||||||||||
 |
||||||||||
 |
||||||||||
 |
||||||||||
Have you finished this pattern?Tag your pictures with #dropspattern #rusticberrycardigan or submit them to the #dropsfan gallery. Do you need help with this pattern?You'll find 30 tutorial videos, a Comments/Questions area and more by visiting the pattern on garnstudio.com. © 1982-2026 DROPS Design A/S. We reserve all rights. This document, including all its sub-sections, has copyrights. Read more about what you can do with our patterns at the bottom of each pattern on our site. |
||||||||||


With over 40 years in knitting and crochet design, DROPS Design offers one of the most extensive collections of free patterns on the internet - translated to 17 languages. As of today we count 324 catalogues and 12290 patterns translated into English (UK/cm). 12290
We work hard to bring you the best knitting and crochet have to offer, inspiration and advice as well as great quality yarns at incredible prices! Would you like to use our patterns for other than personal use? You can read what you are allowed to do in the Copyright text at the bottom of all our patterns. Happy crafting!
Post a comment to pattern DROPS 245-27
We would love to hear what you have to say about this pattern!
If you want to leave a question, please make sure you select the correct category in the form below, to speed up the answering process. Required fields are marked *.