
Popular categories
Looking for a yarn?


Comments / Questions (23)
![]() Petra Volkmerova wrote:
Petra Volkmerova wrote:
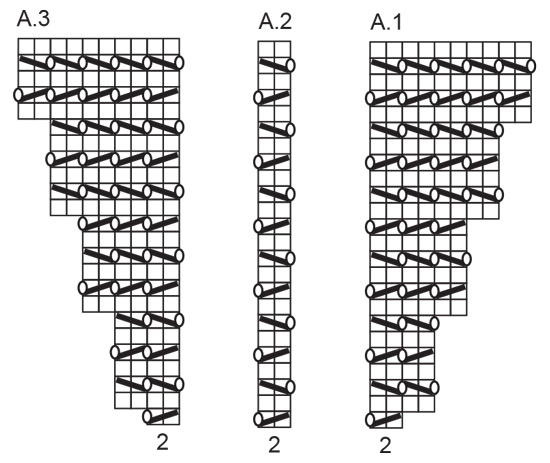
Dobry den, přijde mi že všechny 3 vzory A1 A2 A3 jsou stejné je to tak?
11.07.2024 - 00:43DROPS Design answered:
Dobrý den, Petro, v principu ano, schémata znázorňují rozšiřování a polohu nahození/spletení na začátku/konci řad u jednotlivých vzorů. Hodně zdaru! Hana
13.07.2024 - 21:28
![]() Gritta wrote:
Gritta wrote:
Hallo, ich habe den Pulli schon gestrickt, ist super geworden. Jetzt meine Frage: kann ich ihn auch ganz auf der Rundnadel stricken? Also Vorder- und Rückenteil zusammen? Nur die Ärmel extra? Danke im voraus
02.07.2024 - 15:15DROPS Design answered:
Liebe Gritta, wahrscheinlich aber beachten Sie die Seitenschlitze an beiden Seiten, dh die untersten 16-20 cm werden hier nicht zusammengenäht, so sollten Sie diese letzten cm beim Vorder und Rückenteil separat stricken. Viel Spaß beim Stricken!
02.07.2024 - 16:01
![]() Kaisa wrote:
Kaisa wrote:
Voisitteko selventää miten kohdassa ”KOKO M” lisätään silmikoita. Siinä vaiheessa on siis M-koossa 244 silmukkaa ja ohje sanoo ”Tee sitten hihojen lisäykset kuten aiemmin (työhön lisättiin 8 silmukkaa) = 252 silmukkaa.”. Miten tuo lisäys tapahtuu? Raglanlisäyksissä kun tulee 16 uutta silmukkaa.
04.01.2024 - 21:41DROPS Design answered:
Raglanlisäykset tehdään kuten aiemmin, mutta vain hihojen puolella. Eli etukappaleen ja takakappaleen lisäykset jätetään tekemättä.
08.01.2024 - 16:51
![]() Henrietta wrote:
Henrietta wrote:
Hej! Jag har en till fråga. När man stickar oket och är på de varven där man inte ska öka med raglan, ska man fortfarande, innan de två maskorna innan och efter de två maskorna efter markören, sticka två maskor tillsammans och göra ett omslag (alltså A1 eller A3)? Allt gott
25.12.2023 - 19:07DROPS Design answered:
Hej Henrietta, ja du fortsætter mönstret precis som tidiagare :)
02.01.2024 - 10:11
![]() Henrietta wrote:
Henrietta wrote:
Hej! När man stickar oket, och är på de varven man inte ska öka med raglan, ska man sticka de två maskorna före markören och de två maskorna efter markören i slätstickning? Bästa hälsningar
25.12.2023 - 17:38DROPS Design answered:
För varje gång det ökas, kommer det att bli plats för 2 rapporter mer med A.2 på bredden – det vill säga hålmönstret kommer alltid att stickas ända intill de 4 maskorna i slätstickning i varje övergång mellan framstycke/bakstycke och ärmar.
02.01.2024 - 10:09
![]() Gudrun wrote:
Gudrun wrote:
Hej, ska det verkligen vara rätstickning i de 4 maskorna i sidorna, från delningen och nedåt? Det står att man ska fortsätta som förut med rätstickning, men i raglan har det ju varit 4 masmor slätstickning.
22.09.2023 - 21:37DROPS Design answered:
Hej Gudrun, vi har strikket de 4 masker i hver side i rätstickning :)
05.10.2023 - 08:25
![]() Gudrun wrote:
Gudrun wrote:
Hej, jag lyckas inte förstå raglan-beslrivningen.. Det står att man på varv 1 i stlk S ska göra A2 7 ggr och då är det dags för raglan-ökning. Men det är då 4 maskor kvar till markören, och i raglan-beskrivningen står det att det ska vara 2 maskor kvar före markören när det är dags för raglan. Eftersom raglanfältet ska bestå av 4 maskor slätstickning totalt på varje ställe får jag inte ihop det. Vad gör jag för fel?
26.08.2023 - 18:19DROPS Design answered:
Hei Gudrun Har du glemt A.3 etter A.2? Du har 18 masker før 1. merketråd og du skal strikke A.2 (2 masker) 7 ganger = 14 masker, så skal du strikke A.3 (2 masker), du har nå strikket over 16 masker og det er 2 masker igjen før merketråden. Så strikker du raglan slik det er beskrevet i oppskriften. mvh DROPS Design
11.09.2023 - 12:18
![]() Kim wrote:
Kim wrote:
Hello. Quick question about the amount of times we’re supposed to increase. At one point(for size XL)there’s 140 st and then the it says that after 9 rounds of increasing, there should be 268 st. However 140+(9x16)=284 so should I only inc 8 times? Also, at this point in the recipe, one sleeve side has 30 st and one has 22. Is this intentional or have I made a mistake? I used a drawing to follow where we’re supposed to inc up till now and it seems like I’ve followed it accurately
22.08.2023 - 13:34DROPS Design answered:
Dear Kim, you increase for raglan 4 sts at each of the 4 marker, this means 16 sts in total - see RAGLAN at the beginning of the pattern, (on every 6th round) so that you start with 140 sts + 16 sts increased a total of 9 times = 140+144=284 sts. Happy knitting!
22.08.2023 - 14:21
![]() Lily wrote:
Lily wrote:
Hello! after finishing the yoke and ending in the middle of the back, how do i begin the back piece starting from the centre? (since there is 4 cast on stitches on both ends)
16.08.2023 - 19:21DROPS Design answered:
Dear Lily after dividing piece at the end of the yoke, cut the yarn, slip the stitches on a thread for both sleeves, slip also the stitches for front piece on a thread and continue working now back piece: cast on new stitches for armhole, work all stitches of back piec and cast on new stitches for armhole, now continue working back piece back and forth with lace pattern and 4 stitches in garter stitch on each side. Happy knitting!
17.08.2023 - 09:39
![]() Laerke wrote:
Laerke wrote:
Hi. This might be a dumb question, but I'm wondering what kind of lace pattern it is, and if there is a tutorial for it somewhere? I've been trying to find ones that look like it, but I haven't been able to. Most of the tutorials I've been able to find are for flat needles, and it doesn't seem like they can be converted to circular ones.
16.08.2023 - 15:50DROPS Design answered:
Dear Mrs Laerke, in this video we show from time code 06:26 how to work such a lace pattern (straight, ie without the increases, which is matching 2 repeats of A.2 in width in this pattern. At the same time, you will increase 2 stitches at each raglan line (before A.1 and After A.3) and these new stitches will be worked on next row from RS as shown in diagram. Happy knitting!
16.08.2023 - 16:12
|
|||||||||||||
Red Mistery#redmisterysweater |
|||||||||||||
 |
 |
||||||||||||
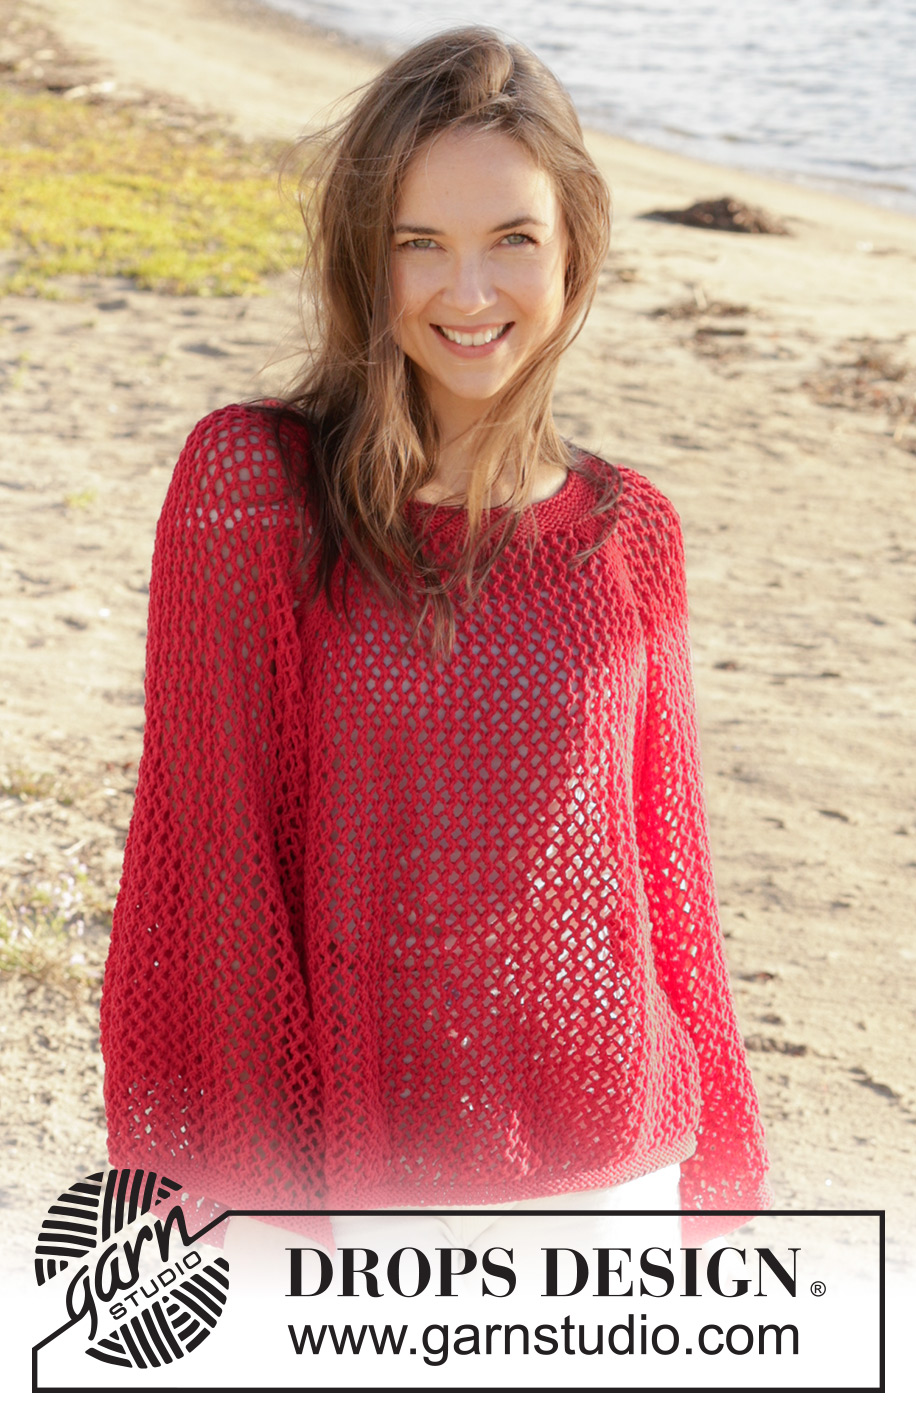
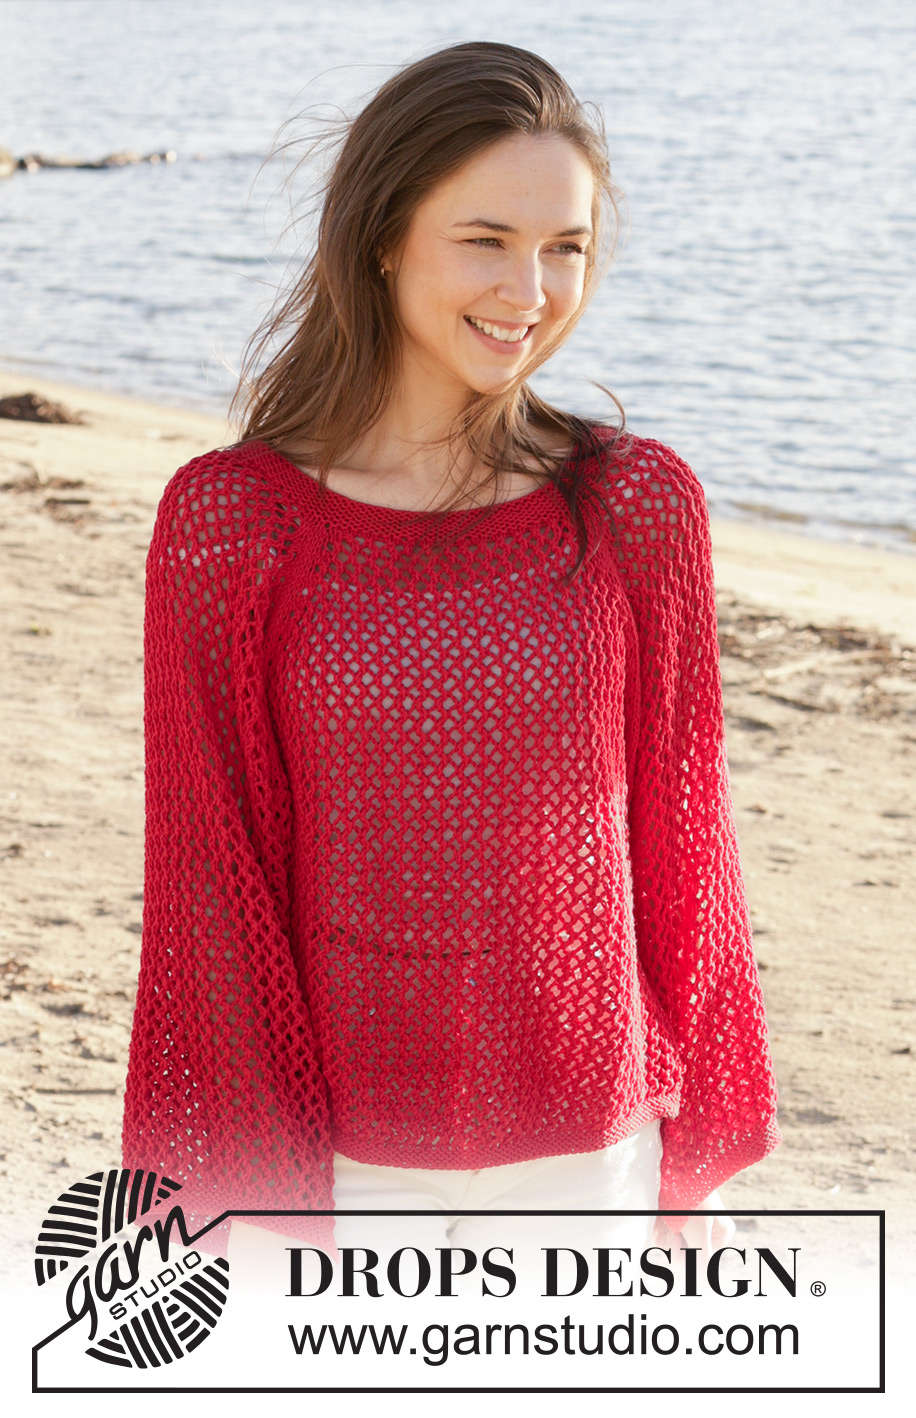
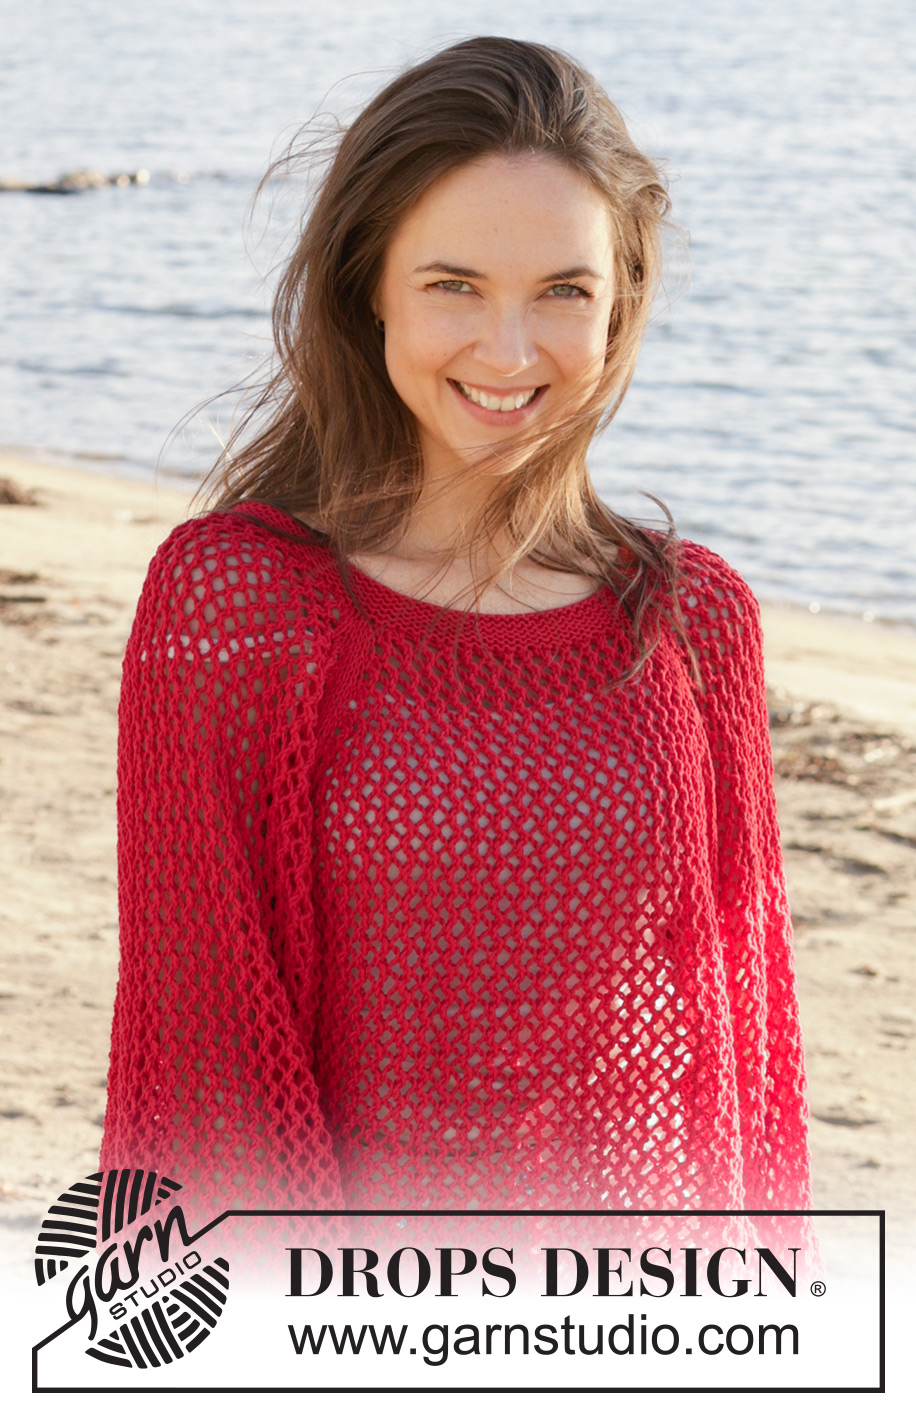
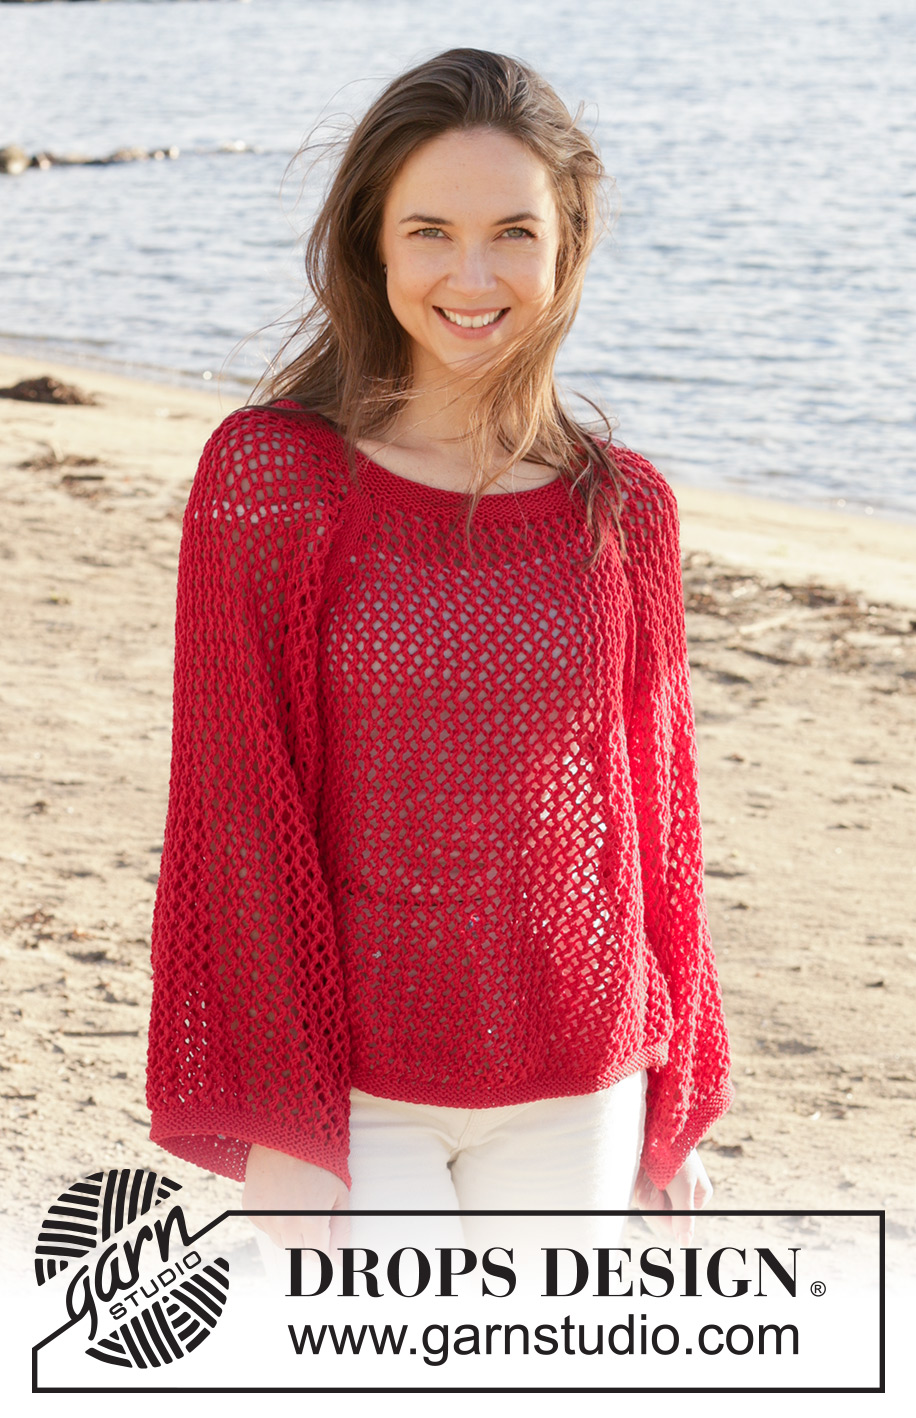
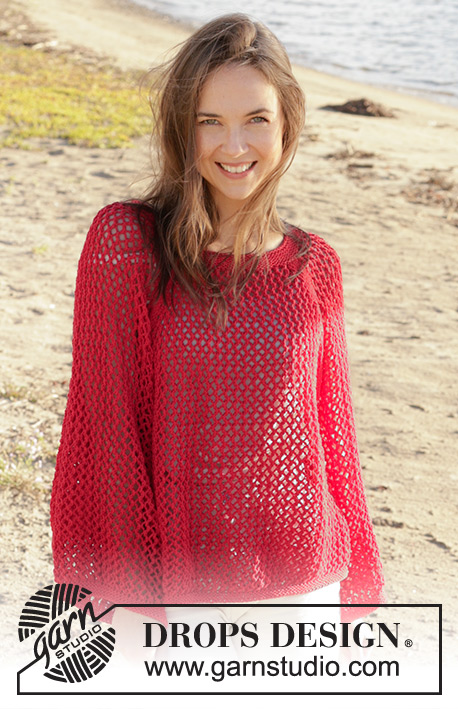
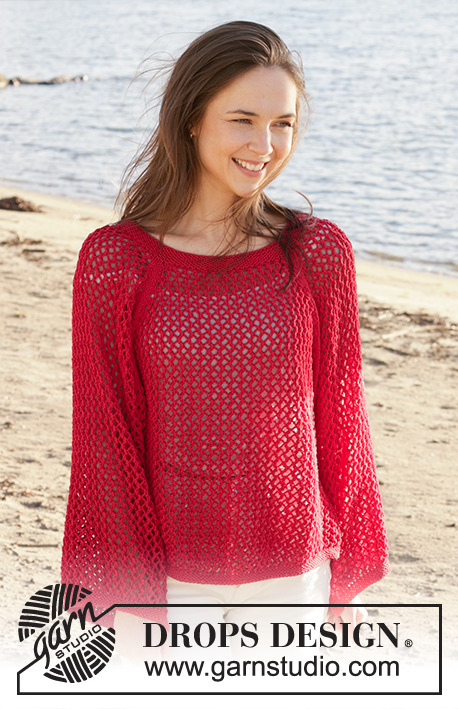
Knitted jumper in DROPS Cotton Light. Piece is knitted top down with raglan, lace pattern and vents in the sides. Size XS – XXL.
DROPS 240-26 |
|||||||||||||
|
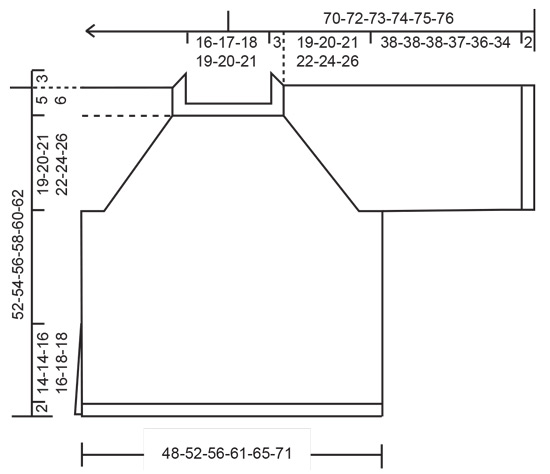
---------------------------------------------------------- EXPLANATION FOR THE PATTERN: ---------------------------------------------------------- GARTER STITCH (worked in the round): 1 ridge = 2 rounds, i.e. knit 1 round and purl 1 round. GARTER STITCH (back and forth): Knit all rows. 1 ridge vertically = knit 2 rows. PATTERN: See diagrams A.1 to A.3. RAGLAN: There are 4 stitches in stocking stitch in each raglan line. Marker threads are in the middle of these 4 stitches. Increase 4 stitches in each raglan line, i.e. Increase 2 stitches towards the right before marker thread and 2 stitches towards the left after marker thread. Increase as follows: BEFORE MARKER THREAD: Work until 2 stitches remain before marker thread, use left needle to pick up yarn between 2 stitches from the row below, pick up yarn from the back and knit stitch in front loop of stitch, knit 1, use left needle to pick up yarn between 2 stitches from row below, work the stitch the same way as earlier, knit 1. AFTER MARKER THREAD: Knit 1, use left needle to pick up yarn between 2 stitches from the row below, pick up yarn from the front and knit stitch in back loop of stitch, knit 1, use left needle to pick up yarn between 2 stitches from row below, work the stitch the same way as earlier. ---------------------------------------------------------- START THE PIECE HERE: ---------------------------------------------------------- JUMPER - SHORT OVERVIEW OF THE PIECE: Work neck edge and yoke in the round on circular needle from mid back, top down. Divide yoke for backpiece, front piece and sleeves. Work each part back and forth on circular needle separately. Then sew the piece together as explained in pattern. There are vents in each side of body. NECK EDGE: Cast on 108-112-116-120-124-132 stitches on a short circular needle size 3 mm with DROPS Cotton Light. Work 6 ridges in GARTER STITCH in the round - read explanation above. Then work yoke as explained below. YOKE: Switch to circular needle size 4 mm. Insert 1 marker in the middle round, measure yoke from this marker! Knit 1 round. Now insert 4 marker threads in the piece as explained below. This is done without working the stitches, and insert each marker thread between 2 stitches as follows: Count 16-18-18-18-20-22 stitches (half back piece), insert 1 marker thread, count 20-20-20-22-22-22 stitches (sleeve), insert 1 marker thread, count 34-36-38-38-40-44 stitches (front piece), insert 1 marker thread, count 20-20-20-22-22-22 stitches (sleeve), insert 1 marker thread. 18-18-20-20-20-22 stitches remain on round after last marker thread (half back piece). Work first round as follows: Work A.2 6-7-7-7-8-9 times in total, A.3, increase for RAGLAN before and after marker thread – read explanation above (4 stitches increased), A.1, work A.2 6-6-6-7-7-7 times in total, A.3 (sleeve), increase for raglan before and after marker thread, A.1, work A.2 13-14-15-15-16-18 times in total, A.3, increase for raglan before and after marker thread, A.1, work A.2 6-6-6-7-7-7 times in total, A.3, increase for raglan before and after marker thread, A.1, work A.2 7-7-8-8-8-9 times in total = 124-128-132-136-140-148 stitches. Continue pattern like this and increase for raglan every 6th round. On every increase there is room for 2 repetitions more of A.2 in width - i.e. lace pattern is always worked up to the 4 stitches in stocking stitch in every transition between front piece/back piece and sleeves. REMEMBER THE KNITTING TENSION! When increase for raglan has been done 7-8-8-9-9-10 times in total vertically, there are 220-240-244-264-268-292 stitches on needle. Increase is done in size XS and S. Continue to ALL SIZES in XS and S. Continue the increase in the other sizes as follows: SIZE M: Increases are now done on front pieces/back piece. Continue pattern until 5 rounds with pattern have been worked as before after last increase for raglan. Now increase 1 more time the same way as before but only on sleeves (8 stitches increased) = 252 stitches, continue to ALL SIZES. SIZE L, XL and XXL: Increases are now done on sleeves. Continue pattern until 5 rounds with pattern have been worked as before after last increase for raglan. Now increase 1 more time the same way as before but only on front piece/back piece (8 stitches increased) = 272-276-300 stitches. Continue to ALL SIZES. ALL SIZES: = 220-240-252-272-276-300 stitches. Continue lace pattern in the round over all stitches without increase until piece measures 19-20-21-22-24-26 cm from marker at the neck - finish when next round to work is a round with pattern. Now divide piece for body and sleeves as follows (this is done without working the stitches): Keep the first 32-36-36-40-42-46 stitches on circular needle size 4 mm (half back piece), slip the next 44-48-52-54-54-58 stitches on a thread for sleeve, slip the next 66-72-74-82-84-92 stitches on thread for front piece, slip the next 44-48-52-54-54-58 stitches on thread for sleeves and keep the last 34-36-38-42-42-46 stitches on needle (half back piece). Finish back piece, front piece and sleeves separately. Now measure piece from here. BACK PIECE: = 66-72-74-82-84-92 stitches. Begin from right side, cast on 4-4-6-6-8-8 stitches on circular needle size 4 mm, work pattern as before over the 66-72-74-82-84-92 stitches on needle, cast on 4-4-6-6-8-8 new stitches at the end of row = 74-80-86-94-100-108 stitches. Continue the lace pattern back and forth as before with 4 stitches in garter stitch in each side. When back piece measures 26-27-28-28-28-28 cm from division and next row is worked from right side, switch to circular needle size 3 mm. Work 4 ridges back and forth over all stitches and increase at the same time 26-30-32-34-36-42 stitches evenly on first row = 100-110-118-128-136-150 stitches. Cast off knitting from right side. Jumper measures approx. 52-54-56-58-60-62 cm, measured from shoulder and down. FRONT PIECE: Begin from right side, cast on 4-4-6-6-8-8 stitches on circular needle size 4 mm, work pattern as before over the 66-72-74-82-84-92 stitches from thread, cast on 4-4-6-6-8-8 new stitches at the end of row = 74-80-86-94-100-108 stitches. Work as back piece. SLEEVES: Begin from right side, cast on 4-4-6-6-8-8 stitches on a short circular needle size 4 short mm, work pattern as before over the 44-48-52-54-54-58 stitches from thread in one side of piece, cast on 4-4-6-6-8-8 stitches at the end of row = 52-56-64-66-70-74 stitches. Continue lace pattern back and forth with 4 stitches in garter stitch in each side - make sure that pattern is continued correctly over stitches from yoke. When sleeve measures 38-38-38-37-36-34 cm from division and next row is worked from right side, switch to circular needle size 3 mm. Work 4 ridges back and forth over all stitches and increase at the same time 22-22-26-26-28-28 stitches evenly on first row = 74-78-90-92-98-102 stitches. Cast off knitting from right side. Sleeve measures approx. 40-40-40-39-38-36 cm from division. Work the other sleeve the same way. ASSEMBLY: Sew sleeve seams in outer loops of edge stitches to avoid a chunky seam. Sew side seams the same way - begin at the top at armhole and sew until approx. 16-16-18-18-20-20 cm remain at the bottom in each side (vents). Sew the opening under both sleeves. |
|||||||||||||
Diagram explanations |
|||||||||||||
|
|||||||||||||
 |
|||||||||||||
 |
|||||||||||||
Have you finished this pattern?Tag your pictures with #dropspattern #redmisterysweater or submit them to the #dropsfan gallery. Do you need help with this pattern?You'll find 25 tutorial videos, a Comments/Questions area and more by visiting the pattern on garnstudio.com. © 1982-2026 DROPS Design A/S. We reserve all rights. This document, including all its sub-sections, has copyrights. Read more about what you can do with our patterns at the bottom of each pattern on our site. |
|||||||||||||


With over 40 years in knitting and crochet design, DROPS Design offers one of the most extensive collections of free patterns on the internet - translated to 17 languages. As of today we count 324 catalogues and 12290 patterns translated into English (UK/cm). 12290
We work hard to bring you the best knitting and crochet have to offer, inspiration and advice as well as great quality yarns at incredible prices! Would you like to use our patterns for other than personal use? You can read what you are allowed to do in the Copyright text at the bottom of all our patterns. Happy crafting!
Post a comment to pattern DROPS 240-26
We would love to hear what you have to say about this pattern!
If you want to leave a question, please make sure you select the correct category in the form below, to speed up the answering process. Required fields are marked *.