
Popular categories
Looking for a yarn?


Comments / Questions (14)
![]() Nicole wrote:
Nicole wrote:
Bonjour J'aimerai savoir quel taille choisir? Il faut choisir sa taille habituelle? Merci
26.03.2022 - 13:47DROPS Design answered:
Bonjour Nicole, tout à fait, vous trouverez dans l'en-tête les pointures et la longueur de pied correspondante. Bon tricot!
28.03.2022 - 08:41
![]() Guinha wrote:
Guinha wrote:
Thanks for the quick response, but I'm still confused. 11 rows total, starting with row wrong side and finishing with row right side? Could you please explain like this: Row 1 wrong side knit, Row 2 right side knit, Row 3 wrong side knit, Row 4 right side decrease, Row 5 wrong side knit, Row 6 right side knit, Row 7 wrong side knit, Row 8 right side decrease, and then what do I do? I'm lost... Sorry for not getting it
31.01.2022 - 07:27DROPS Design answered:
Dear Guinha, starting from WS work: R1: K from WS; R2: K from RS decreasing 1 st on each side, R3: K from WS; R4: K from RS; repeat row 1 to 4 one more time = you have cast off 4 sts in total. Knit 1 more row from WS, 1 more row from RS and cast off on next row from WS. Happy knitting!
31.01.2022 - 10:21
![]() Guinha wrote:
Guinha wrote:
Hi, could you please explain how to knit the flap. Do I start knitting on the wrong side? How many rows in total is the flap?
30.01.2022 - 04:31DROPS Design answered:
Dear Guinha, the flap is worked back and forth, starting on the wrong side. You should work 11 rows, according to the pattern. Happy knitting!
31.01.2022 - 00:25
![]() Tina wrote:
Tina wrote:
Hi, can I use straight single pointed needles for the back and forth stockinette stitch please? Or the circular needles are recommended for a specific reason... thank you :)
12.12.2021 - 20:22DROPS Design answered:
Dear Tina, of cours you can use straight, single pinted stitches, Cirs are used on the modell because they are more accesible these days, and many prefer them, but no reason not to knit with straights if they are more confortable for you. Happy Stitching!
13.12.2021 - 04:02
|
|||||||
Meadow Meanderings#meadowmeanderingsslippers |
|||||||
 |
 |
||||||
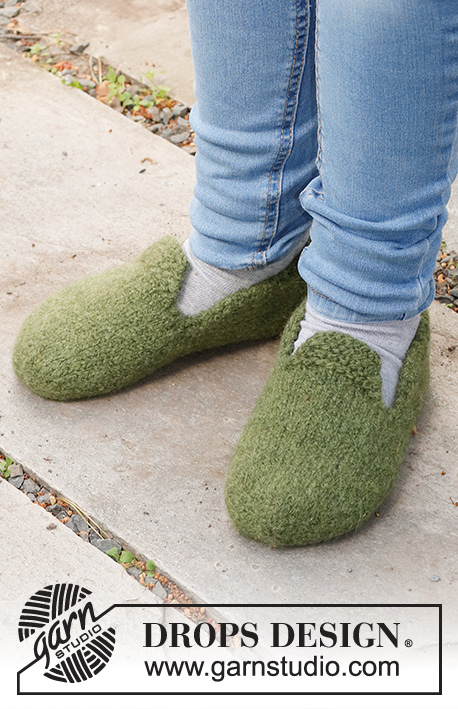
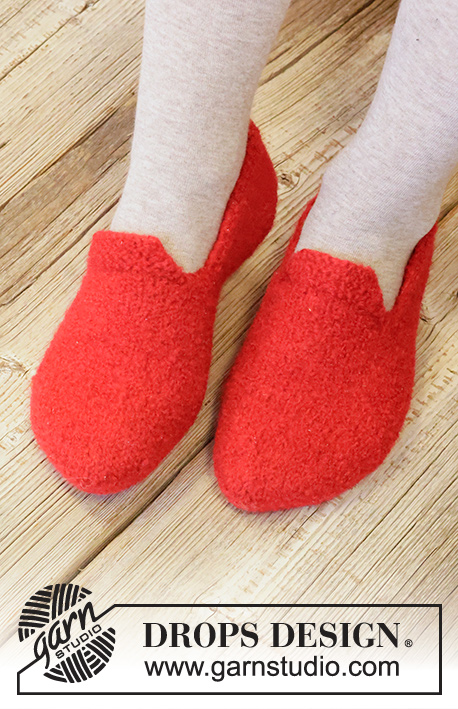
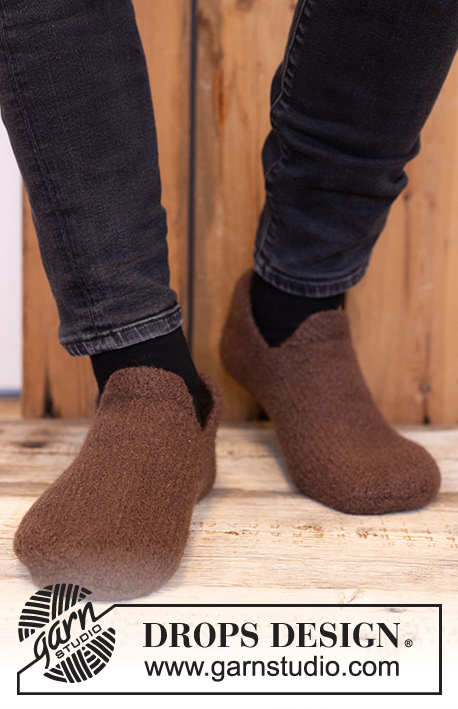
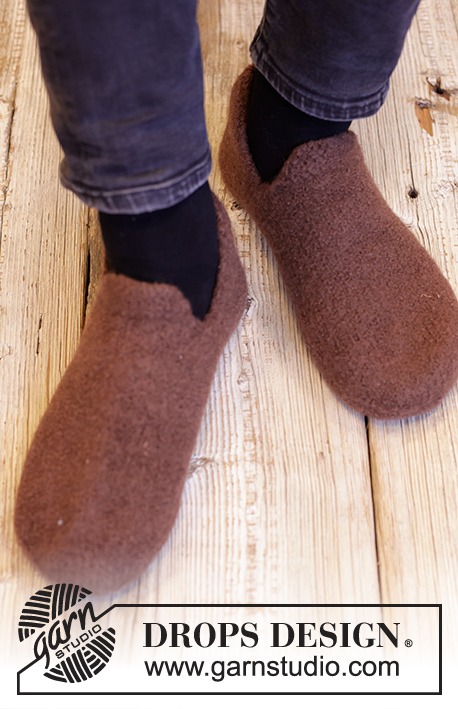
Knitted and felted slippers for men in DROPS Alaska. Size 26-46.
DROPS 224-33 |
|||||||
|
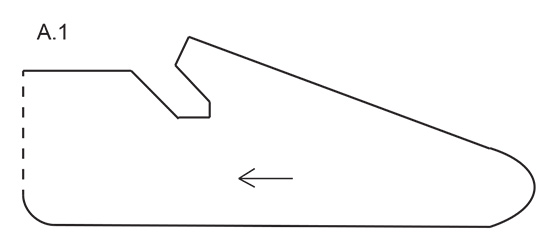
---------------------------------------------------------- EXPLANATION FOR THE PATTERN: ---------------------------------------------------------- GARTER STITCH (back and forth): Knit all rows. 1 ridge vertically = knit 2 rows. INCREASE TIP: Work 1 stitch past 1st marker, make 1 yarn over, work until 1 stitch remain before 2nd marker, make 1 yarn over, work 2 stitches (2nd marker is between these 2), make 1 yarn over, work until 1 stitch remains before 1st marker, make 1 yarn over and work 1 stitch = 4 stitches increased. On next round knit yarns over twisted to avoid holes. DIAGRAM: See diagram A.1 - the diagram shows the knitting direction and where the slipper is sewn. ---------------------------------------------------------- START THE PIECE HERE: ---------------------------------------------------------- FELTED SLIPPERS – SHORT OVERVIEW OF THE PIECE: Work slippers from the toe. Work first in the round on double pointed needles, divide the piece at the instep and work back and forth on circular needle until finished measurements. Sew heel together mid back, and felt the piece in the washing machine. FELTED SLIPPER: Cast on 8 stitches on double pointed needles size 5.5 mm with DROPS Alaska. Knit 1 round. Insert 2 markers in the piece without working, insert 1st marker at the beginning of round and insert 2nd marker after 4 stitches - move the markers when working. Now work in stocking stitch in the round and increase 4 stitches on next round - read INCREASE TIP. Increase like this every round 6-6-7-7-8-9-10 times in total = 32-32-36-36-40-44-48 stitches on round. REMEMBER THE KNITTING TENSION! Work in stocking stitch until piece measures 6-7-8-10-12½-15½-18½ cm from cast-on edge. Knit 1 round and increase 0-2-0-2-2-2-2 stitches evenly over stitch between 1st and 2nd marker (i.e. From beginning of round and until 2nd marker) = 32-34-36-38-42-46-50 stitches. Work in stocking stitch until piece measures 12-12-13½-15-18-22-26 cm from cast-on edge. Knit 3-3-2-2-3-4-4, cast off 1 stitch, knit 8-10-12-14-14-14-16 and slip these stitches on a thread (= flap), cast off 1 stitch, knit 19-19-20-20-23-26-28 and knit over the first 3-3-2-2-3-4-4 stitches one more time = 22-22-22-22-26-30-32 stitches on needle. UNDER PIECE: Work in stocking stitch with 1 edge stitch in GARTER STITCH - read explanation above - in each side of piece. On next row from right side increase 1 stitch with 1 yarn over inside edge stitch in each side. On next row purl yarn over twisted to avoid holes Increase like this on every row from right side 5-5-6-6-7-6-7 times in total in each side = 32-32-34-34-40-42-46 stitches. Work back and forth in stocking stitch with 1 edge stitch in garter stitch in each side. When piece measures 21-22-25-28-30-34-38½ cm in total, and decrease in the middle of piece on next row from right side to make a rounded heel as follows: ROW 1 (= right side): Work 14-14-15-15-18-19-21 stitches, knit 2 together 2 times and work 14-14-15-15-18-19-21 stitches = 30-30-32-32-38-40-44 stitches. ROW 2 (= wrong side): Work as before from wrong side. ROW 3 (= right side): Work 13-13-14-14-17-18-20 stitches, knit 2 together 2 times and work 13-13-14-14-17-18-20 stitches = 28-28-30-30-36-38-42 stitches. ROW 4 (= wrong side): Work as before from wrong side. Cast off all stitches by knitting on next row. Piece measures 23-24-27-30-32-36-40½ cm in total from cast-on edge. FLAP: Slip the 8- 10-12-14-14-14-16 stitches from thread back on double pointed needles size 5.5 mm. Work back and forth in garter stitch and decrease as follows on next row from right side: Knit the 2 outermost stitches in each side of piece together. Decrease like this every 4th row 2 times in total = 4-6-8-10-10-10-12 stitches. Knit 1 row from right side and cast off by knitting on next row from wrong side. Knit another slipper the same way. ASSEMBLY: Fold the piece so that cast-off edge on heel is edge to edge. See diagram A.1 that shows how the slipper is assembled. Sew together in outer loops of edge stitches to avoid a chunky seam. Baste a thread through the stitches from the cast on edge, tighten and fasten well. FEUTRAGE: On peut feutrer l'ouvrage soit au lave-linge soit au sèche-linge – voir description ci-dessous. Rappel: Par la suite, laver comme un vêtement en laine ordinaire. AU LAVE-LINGE: Les machines à laver ont des performances variables. Si le feutrage est insuffisant, il est possible de répéter l'opération. Si l'ouvrage a trop feutré, il peut être étiré à la bonne taille tant qu'il est encore humide. PROCÉDÉ : Placez l'ouvrage dans le lave-linge, utiliser un programme d'une durée d'environ 40 minutes (pas le programme laine). Laver à 40 degrés sans prélavage – la lessive est facultative. Après lavage, mettre l'ouvrage en forme tant qu'il est encore humide. AU SÈCHE-LINGE : Le feutrage au sèche-linge permet de bien contrôler le degré de feutrage. Le sèche-linge peut être ouvert en cours de cycle pour vérifier la taille de l'ouvrage. Si l'ouvrage n'est pas assez feutré, il peut être trempé et feutré une nouvelle fois. Si le travail est trop feutré, il peut être étiré à la bonne taille tant qu'il est encore humide. PROCÉDÉ : Placer l'ouvrage dans l'eau afin qu'il soit complètement trempé. Le placer ensuite dans le sèche-linge et démarrer le séchage. Sécher jusqu'à ce que l'ouvrage atteigne la taille souhaitée - vérifier régulièrement. |
|||||||
Diagram explanations |
|||||||
|
|||||||
 |
|||||||
Have you finished this pattern?Tag your pictures with #dropspattern #meadowmeanderingsslippers or submit them to the #dropsfan gallery. Do you need help with this pattern?You'll find 20 tutorial videos, a Comments/Questions area and more by visiting the pattern on garnstudio.com. © 1982-2026 DROPS Design A/S. We reserve all rights. This document, including all its sub-sections, has copyrights. Read more about what you can do with our patterns at the bottom of each pattern on our site. |
|||||||


With over 40 years in knitting and crochet design, DROPS Design offers one of the most extensive collections of free patterns on the internet - translated to 17 languages. As of today we count 324 catalogues and 12290 patterns translated into English (UK/cm). 12290
We work hard to bring you the best knitting and crochet have to offer, inspiration and advice as well as great quality yarns at incredible prices! Would you like to use our patterns for other than personal use? You can read what you are allowed to do in the Copyright text at the bottom of all our patterns. Happy crafting!
Post a comment to pattern DROPS 224-33
We would love to hear what you have to say about this pattern!
If you want to leave a question, please make sure you select the correct category in the form below, to speed up the answering process. Required fields are marked *.