
Popular categories
Looking for a yarn?


Comments / Questions (11)
![]() Petra wrote:
Petra wrote:
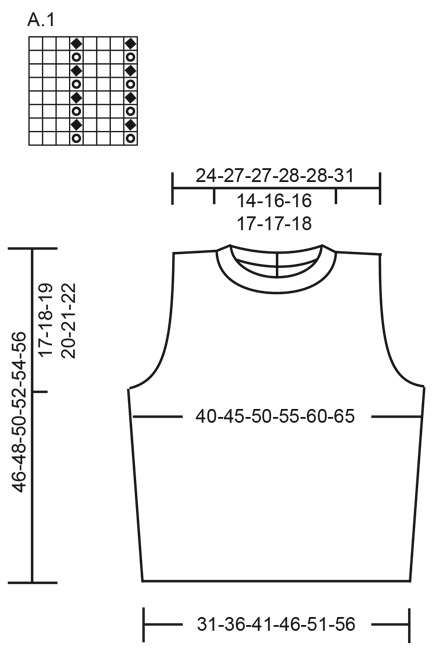
Was ist eine Patentmasche?
13.03.2026 - 20:54DROPS Design answered:
Liebe Petra, eine Patentmasche ist hier die 1. bzw die 5. Masche A.1, diese Masche ist eine rechte Maschen vom Patentmuster (siehe Video), zwischen diese rechte Masche vom Patentmuster wird man aber hier 3 Maschen glatt links stricken. Viel Spaß beim Stricken!
16.03.2026 - 07:33
![]() Inge Knudsen wrote:
Inge Knudsen wrote:
Kan jeg forlænge denne top, som desværre er blevet for kort? Hvis ja, hvordan?
09.05.2023 - 13:25DROPS Design answered:
Hej Inge, du kan altid følge længden på en af de større størrelser. Hvis du ikke vil trevle op, kan du strikke en fin kant ved at samle masker op i nederste kant og strikke nedad.
09.05.2023 - 15:08
![]() Sylvia Karlsson wrote:
Sylvia Karlsson wrote:
Hej! Enligt mönstret så ska man sticka aviga maskor på rätsidan och räta på avigsidan, så långt är jag med men sedan enligt diagrammet ska man från rätsidan: sticka omslaget och den lyfta maska räta tillsammans från avigsidan aviga maskor men var är omslaget på den aviga sidan
24.08.2022 - 17:58DROPS Design answered:
Hei Sylvia. Om du ser på diagram A.1 og ikonet med firkant med sirkel inni seg, så skal det , fra retten, lage et kast + løft neste maske løs av pinnen som om den skulle strikkes vrang. Det lages et kast annenhver omgang / rad. På neste omgang (som er fremdeles fra retten) strikkes slik: Strikk kastet og den løse masken rett sammen. Om det strikkes frem og tilbake blir denne raden fra vrangen og det strikkes da slik: Strikk kastet og den løse masken vrang sammen. mvh DROPS Design
29.08.2022 - 09:26
![]() Martine wrote:
Martine wrote:
Bonjour, je n'arrive pas à visualiser le dos de ce modèle, serait-il possible d'avoir une image ? Avec mes remerciements. Martine
09.07.2022 - 07:24DROPS Design answered:
Bonjour Martine, je suis désolée, nous n'avons pas de photos du dos, vous avez tout simplement une ouverture boutonnée au milieu dos pour pouvoir passer la tête. Divisez le dos en 2 partie (en rabattant la maille centrale), et montez 2 mailles côté milieu dos au 1er rang de l'épaule droite, puis vous mettrez en attente les mailles qui seront reprises ensuite pour le col. Tricotez l'épaule gauche de la même façon mais en vis à vis, la bordure de l'un des devants sera ensuite placée sous celle de l'autre à la fin. Bon tricot!
11.07.2022 - 08:51
![]() Sabrina Orlandi wrote:
Sabrina Orlandi wrote:
Buonasera, non ho capito questo passaggio: e finire ogni spalla in modo separato. Poi intrecciare le maglie su ogni ferro dal collo come segue: intrecciare 2 maglie 1 volta e 1 maglia 2 volte . Devo procedere anche per il davanti con i passaggi delle spalle dx e sx. intrecciare 2 maglie significa lavorare 2 insieme e poi intrecciarle grazie Sabrina
24.06.2022 - 16:44DROPS Design answered:
Buonasera Sabrina, da quando mette in sospeso le maglie per il collo, deve lavorare le spalle in modo separato, intrecciando le maglie a partire dal collo come indicato. Per intrecciare le maglie, deve lavorare 2 maglie a diritto e poi accavallare la prima maglia lavorata sulla 2°. Buon lavoro!
26.06.2022 - 21:13
![]() Helle wrote:
Helle wrote:
Hej! Jeg har nu forsøgt adskillige gange, at få mønstret til at gå op med det antal masker, der står opført i opskriften. Det passer fint på den første halvdel af omgangen, men går galt på anden halvdel, hvor antal masker ikke passer med det der står i opskriften. Hvor kan det gå galt?
16.06.2022 - 22:12
![]() Christelle R wrote:
Christelle R wrote:
Super !!! Merci beaucoup. Cdlt
29.04.2022 - 15:57
![]() Christelle R wrote:
Christelle R wrote:
Bonjour. Encore un joli modèle que je fais en taille S. Cependant je bloque dès le 2ème rang !!?? Dois je comprendre : *1 jeté 1m glissée (soit 1ere m A1)4m envers 1m anglaise A1 au dessus des 41m suivantes 1m anglaise 4m envers* ? J'ai essayé dans tous les sens et je ne tombe pas juste en fin de rang. Pouvez vous me détailler ce rang plus précisément svp ?Merci de votre aide. Cdlt
29.04.2022 - 09:03DROPS Design answered:
Bonjour Christelle, tricotez ainsi: *1ère maille de A.1 (= maille en côtes anglaises), 4 m envers, répétez 5 fois les 8 m de A.1 (= 40 m), tricotez la 1ère m de A.1 (ainsi les côtes sont symétriques), 4 m env* soit: 1+4+40+1+4=50 - répétez de *-* encore 1 fois = 50 x2=100 m. Vous avez ainsi 1 m en côtes anglaises de chaque côté du top et 4 m envers de part et d'autre de cette maille - et A.1 entre ces 2 fois 4 m envers. Bon tricot!
29.04.2022 - 13:08
![]() Françoise GALLAND wrote:
Françoise GALLAND wrote:
Bonjour, je viens de réaliser ce modèle en couleur bordeaux. J\'aime bien vos explications, vos vidéos. Merci. En revanche, je ne sais pas comment faire pour terminer avec la pose du bouton ? est-ce que les 2 côtés se chevauchent ?? auriez-vous une photo ? Merci encore ! Bonne année 2022 ! Françoise
07.01.2022 - 10:23DROPS Design answered:
Bonjour Mme Galland, merci, et tous nos voeux également! Le bouton doit être cousu face à la boutonnière ouverte en fin de rang sur le col, essayez le top si besoin pour placer le bouton au bon endroit, face à la boutonnière (faites-vous aider ce sera plus simple), le col va se chevaucher à ce niveau-là. Bonne continuation!
07.01.2022 - 16:02
![]() Emilie wrote:
Emilie wrote:
Escapade dans les champs
15.01.2021 - 13:51
|
||||||||||
White Birch#whitebirchtop |
||||||||||
 |
 |
|||||||||
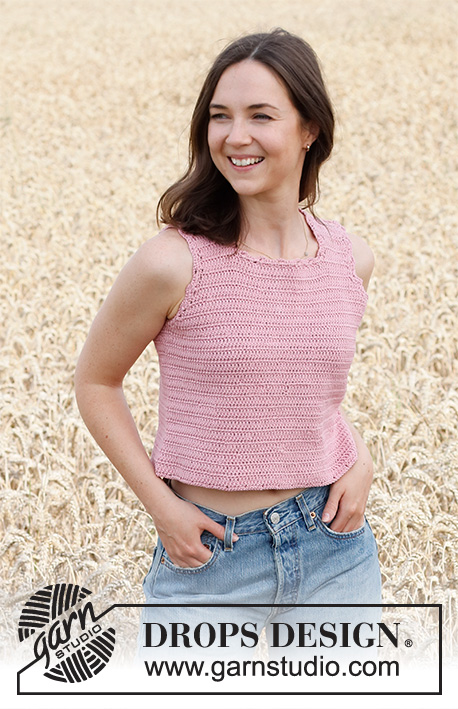
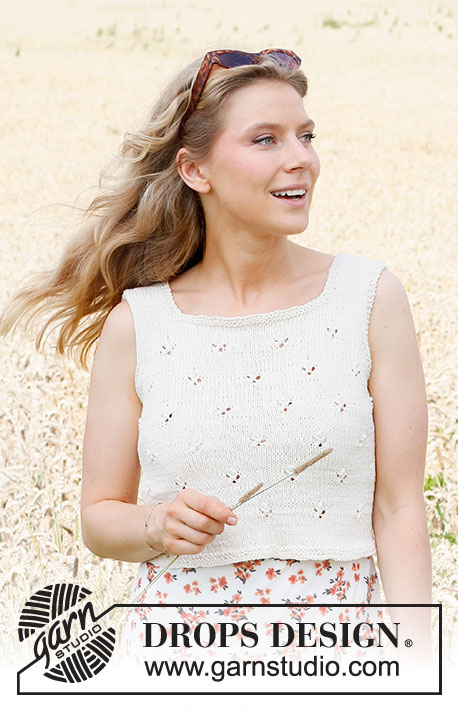
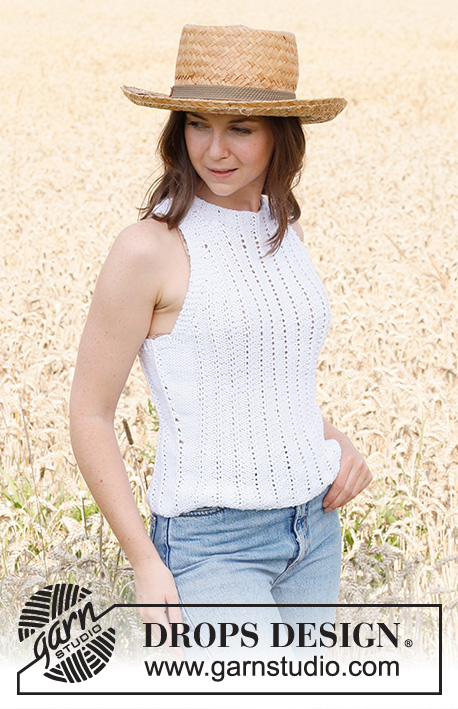
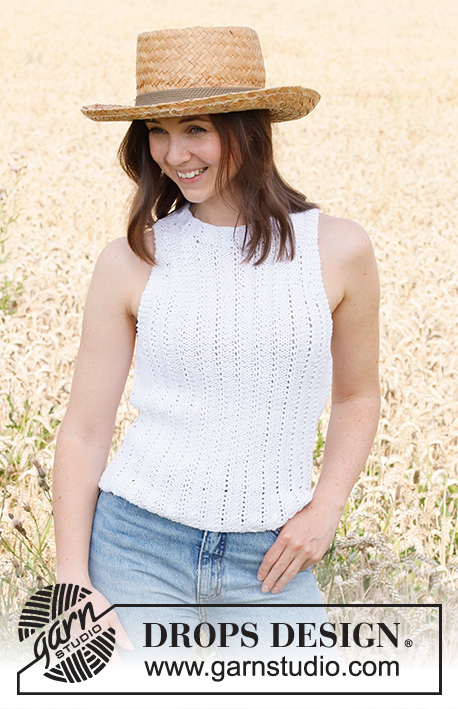
Knitted top in DROPS Paris. Piece is knitted with English rib stitches. Size: S - XXXL
DROPS 220-17 |
||||||||||
|
------------------------------------------------------- EXPLANATION FOR THE PATTERN: ------------------------------------------------------- GARTER STITCH (back and forth): Knit all rows. 1 ridge vertically = knit 2 rows. PATTERN: See diagram A.1. Diagrams show all rows in pattern seen from the right side. INCREASE TIP (applies to sides of body): Increase on each side of middle stitch as follows: Work until 1 stitch remains before middle stitch, make 1 yarn over, purl 1, work middle stitches as before, purl 1, 1 yarn over. On next round work yarn overs twisted to avoid holes. DECREASE TIP: Decrease inside 4 stitches in garter stitch in each side. Decrease as follows from right side: Work 4 stitches in garter stitch, purl 2 together, work until 6 stitches remain on row, purl 2 together, work 4 stitches in garter stitch. Decrease as follows from wrong side (applies to size XXL and XXXL): Work 4 stitches in garter stitch, knit 2 together, work until 6 stitches remain on row, knit 2 together, work 4 stitches in garter stitch. ------------------------------------------------------- START THE PIECE HERE: ------------------------------------------------------- TOP - SHORT OVERVIEW OF THE PIECE: Top is worked in the round on circular needle up to armhole. Cast off stitches in each side for armholes, and then work front and back piece separately. Make a vent in the neck on back piece. Then work an edge back and forth. BODY: Cast on 100-116-132-148-164-180 stitches on circular needle size 5.5 mm with Paris. Knit 1 round. Work next round as follows: * Work first stitch in A.1 (= middle stitch in the side on garment), purl 4 stitches, work A.1 over the next 41-49-57-65-73-81 stitches (begin and finish with a English rib stitch), purl 4 stitches *, work from *-* 1 more time. Continue pattern like this. REMEMBER THE KNITTING TENSION! When piece measures 12 cm increase 1 stitch on each side of middle stitches in each side – read INCREASE TIP! Increase every 2-2-2½-2½-2½-3 cm 7 times in total – purl the increased stitches = 128-144-160-176-192-208 stitches. When piece measures 28-29-30-31-32-33 cm, work rib (= knit 1/purl 1) over 17 stitches in each side (i.e. middle stitch + 8 stitches on each side of this – work the other stitches as before). When piece measures approx. 29-30-31-32-33-34 cm, cast off the middle 9 stitches in each side for armholes, make sure to cast off on a round where yarn over and slipped stitch are worked together – cast off with knit over knit and purl over purl. Finish each part separately. BACK PIECE: = 55-63-71-79-87-95 stitches on row. Read all of the following section before continuing, cast off for armholes, at the same time divide for vent mid back. Work first row from wrong side: Continue pattern as before, and work in GARTER STITCH over the 4 outermost stitches in each side - read explanation above. Insert 1 marker thread in the middle stitch on row (this is an English rib stitch). On next row begin decrease for armholes - read DECREASE TIP. Decrease 1 stitch in each side on every row 0-0-0-0-5-7 times, then decrease 1 stitch in each side on every other row 8-10-14-17-16-16 times in total. AT THE SAME TIME when piece measures 40-42-44-46-48-50 cm. divide the back piece to create a vent mid back. Work as follows - from right side: Work until stitch with marker thread, cast off this stitch. Slip the stitches worked on a stitch holder, now work over the last stitches on row (= right shoulder at the back). RIGHT SHOULDER: Work pattern as before but work the outermost 2 stitches towards mid back in garter stitch. Continue decreases for armhole. When decreases for armhole are done, there are 19-21-21-22-22-24 stitches on row. Work until piece measures 44-46-48-50-52-54 cm. Slip the first 11-12-12-13-13-14 stitches towards mid back on a stitch holder for neck = 8-9-9-9-9-10 stitches remain on shoulder. Cast off when piece measures 46-48-50-52-54-56 cm. LEFT SHOULDER: Slip stitches from stitch holder back on circular needle size 5.5 mm. Work pattern as before but work the outermost 2 stitches towards mid back in garter stitch. Continue decreases for armhole. When decreases for armhole are done, there are 19-21-21-22-22-24 stitches on row. Work until piece measures 44-46-48-50-52-54 cm. Slip the first 11-12-12-13-13-14 stitches towards mid back on a stitch holder for neck = 8-9-9-9-9-10 stitches remain on shoulder. Cast off when piece measures 46-48-50-52-54-56 cm. FRONT PIECE: = 55-63-71-79-87-95 stitches on row. Work first row from wrong side, continue pattern as before, now work in garter stitch over the 4 outermost stitches in each side. Decrease for armhole as on back piece. AT THE SAME TIME when piece measures 40-42-44-46-48-50 cm, slip the middle 15-17-17-19-19-21 stitches on a stitch holder for neck, and finish each shoulder separately. Then cast off stitches on every row from neck as follows: Cast off 2 stitches 1 time and 1 stitch 2 times = 8-9-9-9-9-10 stitches remain. Continue with pattern as before until piece measures 46-48-50-52-54-56 cm, cast off. Work the other shoulder the same way. ASSEMBLY: Sew the shoulder seams. NECK EDGE: Begin from right side mid back, and pick up approx. 67-75 stitches on circular needle size 5.5 mm with Paris (including stitches on stitch holders, number of stitches must be divisible by 4 + 3). Work A.1 with 2 edge stitches in garter stitch in each side towards mid back, make sure that A.1 fits stitches from front and back piece. When neck edge measures 1½ cm, decrease for a buttonhole at the end of row as follows: Work until 4 stitches remain, purl 2 together, make 1 yarn over, work the rest of row. On next row knit yarn over, it should make a hole. Continue with A.1 and in garter stitch until piece measures 3 cm, cast off with knit over knit and purl over purl. Sew a button on neck edge. |
||||||||||
Diagram explanations |
||||||||||
|
||||||||||
 |
||||||||||
Have you finished this pattern?Tag your pictures with #dropspattern #whitebirchtop or submit them to the #dropsfan gallery. Do you need help with this pattern?You'll find 27 tutorial videos, a Comments/Questions area and more by visiting the pattern on garnstudio.com. © 1982-2026 DROPS Design A/S. We reserve all rights. This document, including all its sub-sections, has copyrights. Read more about what you can do with our patterns at the bottom of each pattern on our site. |
||||||||||


With over 40 years in knitting and crochet design, DROPS Design offers one of the most extensive collections of free patterns on the internet - translated to 17 languages. As of today we count 324 catalogues and 12290 patterns translated into English (UK/cm). 12290
We work hard to bring you the best knitting and crochet have to offer, inspiration and advice as well as great quality yarns at incredible prices! Would you like to use our patterns for other than personal use? You can read what you are allowed to do in the Copyright text at the bottom of all our patterns. Happy crafting!
Post a comment to pattern DROPS 220-17
We would love to hear what you have to say about this pattern!
If you want to leave a question, please make sure you select the correct category in the form below, to speed up the answering process. Required fields are marked *.