
Popular categories
Looking for a yarn?


Comments / Questions (10)
![]() Elżbieta wrote:
Elżbieta wrote:
Czy wzór fantazyjny można robic na drutach pończoszniczych? Jak wtedy wyglada lewa strona robótki - pytam jak przerabiać
27.01.2024 - 13:13DROPS Design answered:
Witaj Elu, wzór fantazyjny jak i cały sweter będzie przerabiany na okrągło, czyli zawsze na prawej stronie robótki - możesz przerabiać na drutach pończoszniczych, a gdy będzie więcej oczek zmienić na druty z żyłką. W nieparzystych rzędach schematu będą oczka prawe i narzuty (patrz legenda), a w parzystych przerabiasz tak jak na filmie video poniżej pt. Jak wykonać szeroki luźny warkocz. Pozdrawiamy!
29.01.2024 - 15:14
![]() Susanne wrote:
Susanne wrote:
Hallo, bei der Strickschrift A1 habe ich in der ersten Reihe 8 rechte Maschen und 4 Umschläge, somit insgesammt 12 Maschen. In Reihe zwei habe ich eine rechte Masche, 2 Umschläge, 8 rechte Maschen, 2 Umschläge und eine rechte Masche. Das sind aber nur 10 gestrickte Maschen. Was mache ich falsch oder wo liegt mein Denkfehler.
15.10.2023 - 17:18DROPS Design answered:
Liebe Susanne, bei der 2. Reihe stricken Sie 2 Umschläge + 1 Masche rechts, nicht nur 2 Umschläge - siehe 3. Symbolerklärung. Viel Spaß beim stricken!
16.10.2023 - 10:01
![]() Sig-Britt Larsson wrote:
Sig-Britt Larsson wrote:
Hej! Är det omslagen i flätan som är ökningen av maskorna. Mvh Sig-Britt Larsson
11.11.2022 - 15:36DROPS Design answered:
Hei Sig-Britt. Du strikker bare 1. rad av A.1 på 1. omgang. Da viser O at det gjøres et kast = 1 økning. Når du strikker 1. omgang strikkes A.1 4 ganger, slik at du øker med 16 masker på denne omgangen. Nå du så strikker videre etter diagram A.1 er det ingen flere økninger i diagrammet. Da økes det etter forklaringen under RAGLAN i oppskriften. mvh DROPS Design
14.11.2022 - 12:01
![]() Sig-Britt Larsson wrote:
Sig-Britt Larsson wrote:
Hej! Har en fråga angående mönster 222-29.Jag undrar hur man stickar mönstret på den tröjan.Vore bra med en video på det. Mvh Sig-Britt Larsson
17.10.2022 - 12:11DROPS Design answered:
Hei Sig-Britt. Takk for din tilbakemelding. Vi setter opp ditt ønske på vår liste. mvh DROPS Design
17.10.2022 - 13:23
![]() Véronique Lille wrote:
Véronique Lille wrote:
Bonjour, je ne trouve pas où je dois faire les augmentations entre les A.1 de chaque épaule. Je suis rendu à mon 15 ième tour et je n’ai que 4 mailles entre mes deux motifs. Pourriez vous m’indiquer ce que j’ai oublié? Je vous remercie. Ps: La laine drop wish est super agréable à tricoter et le modèle est tellement beau!
05.01.2022 - 04:12DROPS Design answered:
Bonjour Mme Lille, vous devez augmenter de chaque côté de chaque A.1 comme indiqué sous RAGLAN tous les 2 tours, autrement dit, tricotez jusqu'au premier A.1, faites 1 jeté, tricotez les 12 mailles de A.1, faites 1 jeté et répétez aux 3 autres A.1, vous allez ainsi augmenter 8 mailles au total; tricotez les jetés torse au tour suivant pour éviter les trous et augmentez ainsi tous les 2 tours 13 à 18 fois selon la taille. Bon tricot!
05.01.2022 - 08:06
![]() Natacha wrote:
Natacha wrote:
Toutes mes excuses ,pas de problème avec A1 et le schéma de l'ouvrage. Merci.
27.02.2021 - 09:11
![]() Natacha wrote:
Natacha wrote:
Bonjour , il semble que A1 n'apparait pas dans les explications, ainsi que le schéma de l'ouvrage.Merci .
27.02.2021 - 09:03DROPS Design answered:
Bonjour, le diagramme A.1 se trouve a la la fin du modele, a droite du schema des mesures. Bon tricot!
28.02.2021 - 22:09
![]() Arndt wrote:
Arndt wrote:
Evening stroll
09.01.2021 - 10:47
![]() Marta wrote:
Marta wrote:
Airy baloon
07.01.2021 - 21:51
![]() Anna wrote:
Anna wrote:
This sleeves are just asome
07.01.2021 - 19:36
|
|||||||||||||||||||
Just Right#justrightsweater |
|||||||||||||||||||
 |
 |
||||||||||||||||||
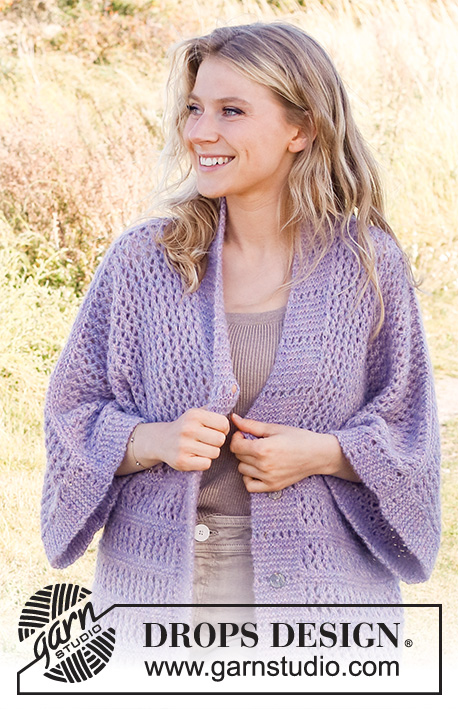
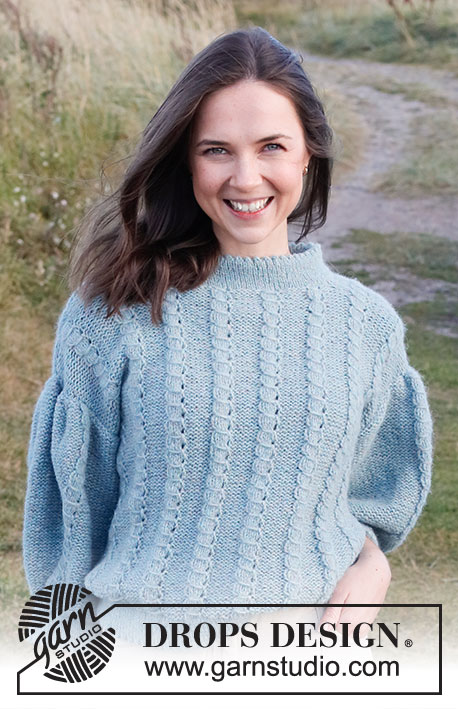
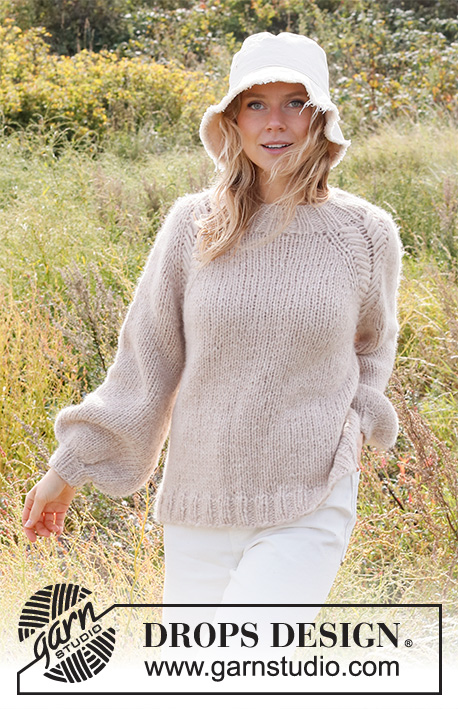
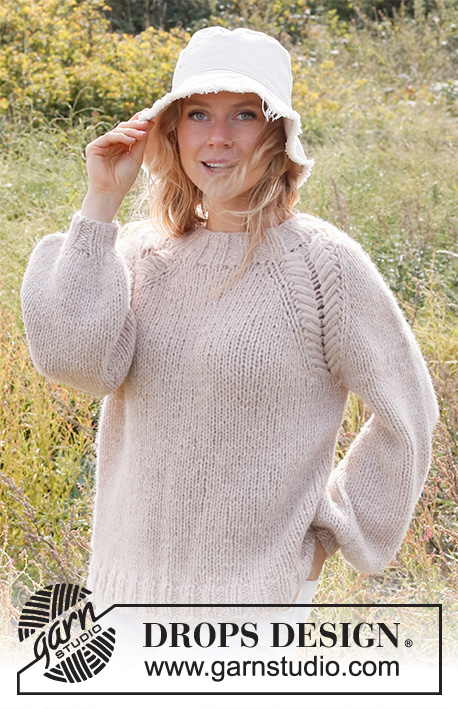
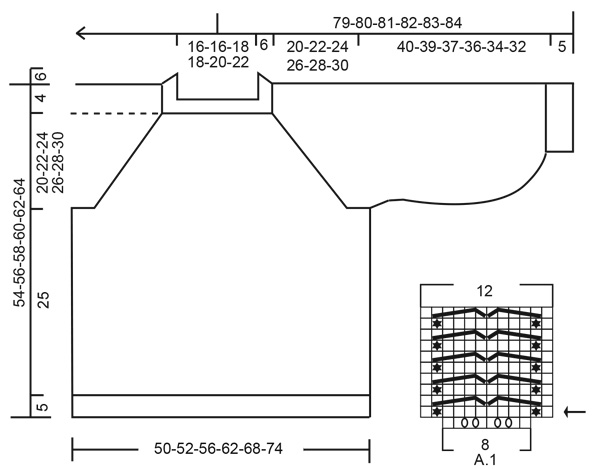
Knitted jumper in 2 strands DROPS Air or 1 strand DROPS Wish. The piece is worked top down, with raglan and cables. Sizes S - XXXL.
DROPS 222-29 |
|||||||||||||||||||
|
------------------------------------------------------- EXPLANATIONS FOR THE PATTERN: ------------------------------------------------------- PATTERN: See diagram A.1. INCREASE/DECREASE TIP (evenly spaced): To work out how to increase/decrease evenly, count the total number of stitches on needle (e.g. 48 stitches), and divide by the number of increases/decreases to be made (e.g. 8) = 6. In this example, increase by making 1 yarn over after each 6th stitch. On the next round work the yarn overs twisted to avoid holes. When decreasing, knit together each 5th and 6th stitch. RAGLAN: Increase 1 stitch on both sides of A.1, in each transition between body and sleeves (= 8 stitches increased). Increase by making 1 yarn over. On the next round work the yarn overs twisted to avoid holes. DECREASE TIP (for sleeves): Decrease 1 stitch on either side of the marker thread as follows: Work until there are 3 stitches left before the marker thread, knit 2 together, knit 2 (marker thread sits between these 2 stitches), slip 1 stitch as if to knit, knit 1 and pass the slipped stitch over the knitted stitch (2 stitches decreased). INCREASE TIP (for sleeves): Work until there are 2 stitches left before the marker thread, 1 yarn over, knit 2 (marker thread sits between these 2 stitches), 1 yarn over (2 stitches increased). On the next round knit the yarn overs twisted to avoid holes. CASTING-OFF TIP: To avoid the cast-off edge being tight you can cast off with a larger size needle. If the edge is still tight, make 1 yarn over after approx. each 4th stitch at the same time as casting off; the yarn overs are cast off as normal stitches. ------------------------------------------------------- START THE PIECE HERE: ------------------------------------------------------- JUMPER – SHORT OVERVIEW OF THE PIECE: The neck and yoke are worked in the round with circular needle, top down from mid back. The yoke is divided for body and sleeves and the body continued in the round with circular needle. The sleeves are worked in the round with short circular needle/double pointed needles, top down. NECK: Cast on 48-48-52-52-56-60 stitches with short circular needle size 8 mm and 2 strands Air or 1 strand Wish. Knit 1 round, then work rib (knit 2, purl 2) in the round for 6 cm. When the rib is finished, knit 1 round where you increase 8-12-12-12-8-8 stitches evenly spaced – read INCREASE/DECREASE TIP = 56-60-64-64-64-68 stitches. Knit 1 round (yarn overs knitted twisted). Change to circular needle size 9 mm. Insert 1 marker at the beginning of the round (= mid-back); the yoke is measured from this marker! YOKE: Now work pattern as follows: Knit 5-6-7-7-7-8 (= ½ back piece), A.1 over the next 8 stitches (= 4 stitches increased), knit 2 (= sleeve), A.1 over the next 8 stitches (= 4 stitches increased), knit 10-12-14-14-14-16 (= front piece), A.1 over the next 8 stitches (= 4 stitches increased), knit 2 (= sleeve), A.1 over the next 8 stitches (= 4 stitches increased), knit 5-6-7-7-7-8 (= ½ back piece) = 72-76-80-80-80-84 stitches. REMEMBER THE KNITTING TENSION! Continue this pattern, AT THE SAME TIME, on the next round start to increase for RAGLAN – read description above. Increase like this every 2nd round a total of 13-14-14-16-17-18 times = 176-188-192-208-216-228 stitches. Continue working without further increases until the piece measures 19-21-23-25-27-29 cm from the marker. Knit 1 round where you decrease 4 stitches evenly over each A.1 (= 16 stitches decreased) = 160-172-176-192-200-212 stitches. Now divide the yoke for the body and sleeves on the next round as follows: Work the first 23-24-25-28-30-33 stitches (= ½ back piece), place the next 34-38-38-40-40-40 stitches on a thread for the sleeve, cast on 4-4-6-6-8-8 new stitches (= in side under the sleeve), work the next 46-48-50-56-60-66 stitches (= front piece), place the next 34-38-38-40-40-40 stitches on a thread for the sleeve, cast on 4-4-6-6-8-8 new stitches (= in side under the sleeve), work the last 23-24-25-28-30-33 stitches. Body and sleeves are finished separately. THE PIECE IS NOW MEASURED FROM HERE. BODY: = 100-104-112-124-136-148 stitches. Work stocking stitch in the round. When the piece measures 25 cm from the division, increase 16-16-16-20-20-24 stitches evenly spaced = 116-120-128-144-156-172 stitches. Change to circular needle size 8 mm and work rib (knit 2, purl 2) for 5 cm. Cast off with knit over knit and purl over purl – read CASTING-OFF TIP. The jumper measures approx. 54-56-58-60-62-64 cm from the shoulder down. SLEEVES: Place the 34-38-38-40-40-40 stitches from the thread on the one side of the piece on short circular needle size 9 mm and knit up 1 stitch in each of the 4-4-6-6-8-8 new stitches under the sleeve = 38-42-44-46-48-48 stitches. Insert a marker thread in the middle of the new stitches (= 2-2-3-3-4-4 new stitches on each side of the marker thread). Start in the middle of the new stitches and work stocking stitch in the round. When the sleeve measures 2 cm, decrease 1 stitch on each side of the marker thread – read DECREASE TIP. Decrease like this every 2nd round a total of 2-2-2-2-2-1 times = 34-38-40-42-44-46 stitches. Continue working until the sleeve measures 11-12-12-12-10-8 cm. Now increase 1 stitch on each side of the marker thread - read INCREASE TIP. Increase like this every 3-3½-3½-4-4-4 cm a total of 8-6-6-5-5-5 times = 50-50-52-52-54-56 stitches. Continue working until the sleeve measures 39-38-36-35-33-31 cm (shorter measurements in larger sizes due to wider neck and longer yoke). Knit 1 round where you decrease 10-10-4-4-6-0 stitches evenly spaced = 40-40-48-48-48-56 stitches. Then knit 1 round where all stitches are knitted together 2 and 2 = 20-20-24-24-24-28 stitches. Change to double pointed needles size 8 mm and work rib (knit 2, purl 2) for 5 cm. Cast off with knit over knit and purl over purl. The sleeve measures approx. 45-44-42-41-39-37 cm from the division. Work the other sleeve in the same way. |
|||||||||||||||||||
Diagram explanations |
|||||||||||||||||||
|
|||||||||||||||||||
 |
|||||||||||||||||||
Have you finished this pattern?Tag your pictures with #dropspattern #justrightsweater or submit them to the #dropsfan gallery. Do you need help with this pattern?You'll find 28 tutorial videos, a Comments/Questions area and more by visiting the pattern on garnstudio.com. © 1982-2026 DROPS Design A/S. We reserve all rights. This document, including all its sub-sections, has copyrights. Read more about what you can do with our patterns at the bottom of each pattern on our site. |
|||||||||||||||||||


With over 40 years in knitting and crochet design, DROPS Design offers one of the most extensive collections of free patterns on the internet - translated to 17 languages. As of today we count 324 catalogues and 12290 patterns translated into English (UK/cm). 12290
We work hard to bring you the best knitting and crochet have to offer, inspiration and advice as well as great quality yarns at incredible prices! Would you like to use our patterns for other than personal use? You can read what you are allowed to do in the Copyright text at the bottom of all our patterns. Happy crafting!
Post a comment to pattern DROPS 222-29
We would love to hear what you have to say about this pattern!
If you want to leave a question, please make sure you select the correct category in the form below, to speed up the answering process. Required fields are marked *.