Comments / Questions (29)
![]() Michèle Tremblay wrote:
Michèle Tremblay wrote:
Bonjour, Je suis rendue au devant gauche. Ils disent de tricoter le motif A2 au dessus des 8 mailles du milieu si je tricote comme cela je n’arrive pas à couvrir le A1 car il reste d’eux maille sur le motif A1. Merci de me répondre
12.03.2023 - 22:51DROPS Design answered:
Bonjour Mme Tremblay, quand on divise le devant, on divise au milieu de A.1 = on a pour le devant gauche les 10 premières mailles de A.1 ( puis 1 m en attente (= la m centrale de A.1) et les 10 dernières mailles de A.1 pour le devant droit), mais on ne va plus tricoter la torsade (= les 2 premières mailles de A.1), on va donc tricoter A.2 sur les 8 premières mailles sur l'envers/dernières mailles sur l'endroit (devant gauche). Bon tricot!
13.03.2023 - 10:35
![]() Michèle Tremblay wrote:
Michèle Tremblay wrote:
Bonjour, J’ai un problème avec la grille A1. Pour le premier rang pas de problème je suis très bien. Au deuxième rang je me trouve toujours à tricoter en endroit. Alors que faire pour le jeté. Pourriez vous m’expliquer comment le faire ce deuxième rang en tricotant en rond
03.03.2023 - 12:45DROPS Design answered:
Bonjour Mme Tremblay, avez-vous vu la réponse précédente? Le 2ème et le 4ème rang de A.1 ont été décrits et devraient pouvoir vous aider. Bon tricot!
03.03.2023 - 13:15
![]() Michèle Tremblay wrote:
Michèle Tremblay wrote:
Bonjour, J’aimerais savoir en tricotant en rond je me trouve toujours à tricoter toujours en endroit. Sauf quand je tricote la grille 21 les jetés sont en endroits je ne peux pas les tricoter dans dans le rang suivant car je suis toujours en endroit. Que faire? Merci de me repondre
02.03.2023 - 21:45DROPS Design answered:
Bonjour Mme Tremblay, aux rangs impairs de A.1 tricotez ainsi: 2 m end, 3 m env, 2 m end (rang 2: le jeté du rang précédent + la diminution/ rang 4: la diminution + le jeté), 7 m env, 2 m end (rang 2: le jeté du rang précédent + la diminution/ rang 4: la diminution + le jeté), 3 m env, 2 m end. Quand vous tricoterez ensuite A.2 sur l'envers les 2 m du milieu (la diminution+ le jeté ou bien le jeté + la diminution) se tricoteront à l'envers sur l'envers. Bon tricot!
03.03.2023 - 09:10
![]() Michèle Tremblay wrote:
Michèle Tremblay wrote:
Bonjour. Ce gilet se tricote sur des aiguilles circulaires. Alors je suis toujours sur l’endroit comment faire l’allee Retour pour le diagramme parce que je suis toujours à l’endroit. Merci de m’en repondre
29.12.2022 - 18:54DROPS Design answered:
Bonjour Mme Tremblay, on tricote le pull en rond sur circulaire jusqu'aux emmanchures, puis on tricote chaque partie séparément en allers et retours, ainsi, en rond, on tricote toujours sur l'endroit en lisant le diagramme de droite à gauche, puis on lira les rangs sur l'envers de gauche à droite après la division de l'ouvrage. Bon tricot!
02.01.2023 - 12:54
![]() Candra wrote:
Candra wrote:
I'm extremely inspired with your writing talents and also with the layout for your blog. Is thaat this a paid topic or did you customize it yourself? Either way keep up the excellent quality writing, it's rare to look a nice weblog like this one today.. Médecine du sport webpage pharmacologie du sport
29.12.2022 - 00:11
![]() Lara wrote:
Lara wrote:
Thanks for every other informative blog. The placde else may just I get that kind oof info written in such an ideal way? I have a cchallenge that I am just now running on, and I've been on the look out for such info. Hoow tto pump the press webssite how to pump the press
28.12.2022 - 11:57
![]() Hansson wrote:
Hansson wrote:
När jag ska börja på framstycket, kan jag då inte börja från rätsida högra sidan istället? Förstår inte hur jag ska börja på avigsidan och om jag ska läsa mönstret från Vänster till Höger som det står i beskrivningen så blir det väl den högra delen jag i så fall börjar på o gör klart? Puh 😅
28.03.2022 - 19:50DROPS Design answered:
Hei Hansson. For at det skal bli symmetrisk rikitg må du strikke 1. pinne fra vrangen. Når du leser diagrammet fra venstre mot høyre når det strikkes fra vrangen, vil du også merke at når du skal strikke masker sammen er det lettere å gjøre dette fra retten (2. pinne i diagrammet). mvh DROPS Design
04.04.2022 - 11:44
![]() Hansson wrote:
Hansson wrote:
Varför kan jag inte skriva ut mönstret så att själva diagrammet för mönsterstickningen kommer med?
19.03.2022 - 11:11DROPS Design answered:
Hei Hansson. Klikk på skriv ut ikonet (ikke brukt ctrl+P) eller sjekk skriver innstillingenen på din PC. mvh DROPS Design
21.03.2022 - 13:37
![]() Silvia Van Der Windt wrote:
Silvia Van Der Windt wrote:
Leuk om na lange tijd weer met breien te starten. Nog niet eerder met rondbreinaalden gewerkt, maar beviel prima. Patroon was goed te volgen. Alleen bij het linker voorpand staat dat je vanuit het midden moet werken, terwijl alle steken nog op de naald staan. Heb dit opgelost door steken van het re. voorpand op een andere naald te zetten. Wellicht handig om dit erbij te vermelden? Mijn dochter is tevreden met deze spencer in naturel kleur.
16.03.2022 - 19:59
![]() Christine Michel wrote:
Christine Michel wrote:
Diese Beschreibung ist wunderbar. Man kann sehr gut danach arbeiten.
16.01.2022 - 13:37
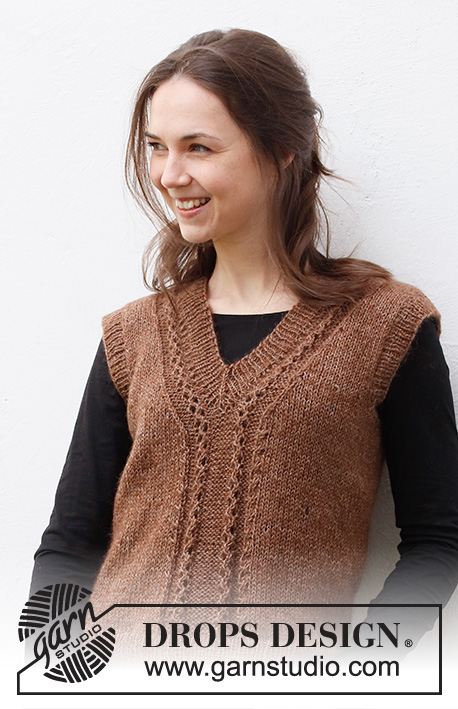
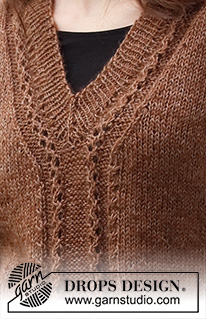
Cooler Days Ahead#coolerdaysaheadvest |
||||||||||||||||||||||
 |
 |
|||||||||||||||||||||
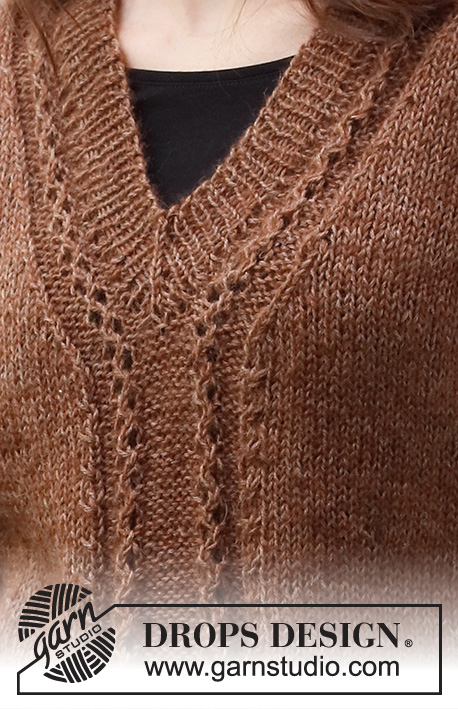
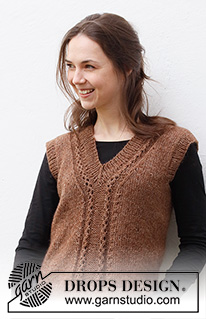
Knitted vest / slipover with V-neck in DROPS Flora and DROPS Kid-Silk. Sizes S - XXXL.
DROPS 216-35 |
||||||||||||||||||||||
|
------------------------------------------------------- EXPLANATIONS FOR THE PATTERN: ------------------------------------------------------- PATTERN: See diagrams A.1 and A.2. The diagrams show all rows from the right side. DECREASE TIP-1 (evenly spaced): To work out how to decrease evenly, count the total number of stitches on needle (e.g. 170 stitches) and divide by number of decreases to be made (e.g. 28) = 6.1. In this example decrease by knitting each 5th and 6th stitch together. DECREASE TIP-2 (for V-neck): All decreases are worked from the right side! DECREASE AS FOLLOWS AFTER A.2: Slip 1 stitch as if to knit, knit 1 and pass the slipped stitch over the knitted stitch (= 1 stitch decreased). DECREASE AS FOLLOWS BEFORE A.2: Start 2 stitches before A.2 and knit 2 together (= 1 stitch decreased). INCREASE TIP (for sides of body): Work until there are 2 stitches left before the marker thread, make 1 yarn over, knit 4 (marker thread sits between these 4 stitches) make 1 yarn over (= 2 stitches increased). On the next round knit the yarn overs twisted to avoid holes. Then work the new stitches in stocking stitch. CASTING-OFF TIP: To avoid the cast-off edge being tight you can cast off with a larger size needle. If the edge is still tight, make 1 yarn over after approx. each 4th stitch at the same time as casting off; the yarn overs are cast off as normal stitches. ------------------------------------------------------- START THE PIECE HERE: ------------------------------------------------------- VEST – SHORT OVERVIEW OF THE PIECE: The piece is worked in the round with circular needle bottom up, as far as the beginning of the V-neck. Then the piece is worked back and forth as far as the armholes, after which the front and back pieces are finished separately. Ribbed edges are worked around the neck and armholes. BODY: Cast on 170-184-204-224-248-272 stitches with circular needle size 5 mm and 1 strand Flora and 1 strand Kid-Silk (= 2 strands). Change to circular needle size 4 mm and knit 1 round. Then work rib in the round (= knit 1, purl 1) for 4 cm. Change back to circular needle size 5 mm and knit 1 round where you decrease 28-30-34-38-42-46 stitches evenly spaced – read DECREASE TIP-1 = 142-154-170-186-206-226 stitches. Insert 1 marker thread at the beginning of the round and 1 marker thread after 71-77-85-93-103-113 stitches (= sides of body). Allow the threads to follow your work onwards; they will be used when increasing in the sides. Work 25-28-32-36-41-46 stitches in stocking stitch, A.1 (= 21 stitches mid front) and stocking stitch to the end of the round. Continue this pattern. REMEMBER THE KNITTING TENSION! When the piece measures 9-9-10-10-11-11 cm, increase 1 stitch on each side of both marker threads – read INCREASE TIP (= 4 stitches increased). Repeat this increase when the piece measures 18-18-20-20-22-22 cm = 150-162-178-194-214-234 stitches. When the piece measures 25-26-27-28-29-30 cm, start to decrease for V-neck and armholes. Adjust so that next round is 1st or 3rd round in A.1 and work next round as follows: Begin 3 stitches before the marker thread on the beginning of the round, cast off 6 stitches for armhole, work 34-37-41-45-50-55 stitches as before, place next stitch on a strand of yarn or a stitch holder (= mid front and middle of A.1), work 34-37-41-45-50-55 stitches as before, cast off 6 stitches for armhole (i.e. cast off 3 stitches on each side of the marker thread), and knit the remaining 69-75-83-91-101-111 stitches in stocking stitch. BACK PIECE: = 69-75-83-91-101-111 stitches. Begin from the wrong side, and work stocking stitch back and forth as before. AT THE SAME TIME cast off for armhole on the beginning of each row in each side as follows: Cast off 3 stitches 0-0-0-0-1-1 time, 2 stitches 1-2-3-4-4-5 times and 1 stitch 4-3-3-3-4-5 times on each side = 57-61-65-69-71-75 stitches. Continue working until the piece measures 45-47-49-51-53-55 cm. On the next row cast off the middle 19-19-21-21-23-23 stitches for the neck and each shoulder is finished separately. Continue with stocking stitch and cast off 2 stitches on the next row from the neck = 17-19-20-22-22-24 stitches on the shoulder. Continue working until the piece measures 48-50-52-54-56-58 cm. Cast off a little loosely. Work the other shoulder in the same way. LEFT FRONT PIECE (when garment is worn): Begin from the wrong side from mid front, work A.2 over the first 8 stitches (A.2 is read from left to right when working from wrong side), and work stocking stitch over the remaining stitches. Continue the pattern as this – A.2 should now fit nicely above A.1. AT THE SAME TIME cast off for armhole and v-neck as described below. ARMHOLE: Cast off for armhole on the beginning of the row from the armhole as follows: Cast off 3 stitches 0-0-0-0-1-1 times, 2 stitches 1-2-3-4-4-5 times and 1 stitch 4-3-3-3-4-5 times. V-NECK: AT THE SAME TIME on first row from right side, decrease 1 stitch for v-neck before A.2 on the mid front (seen from right side) – read DECREASETIP-2. Decrease as this every 2nd row (i.e. every row from the right side) a total of 5 times in all sizes, and then on every 4th row (i.e. every other row from right side) a total of 6-6-7-7-8-8 times. After all decreases for v-neck and cast off for armhole is done, there is 17-19-20-22-22-24 stitches on shoulder. Work until the piece measures 48-50-52-54-56-58 cm. Cast off a little loosely. RIGHT FRONT PIECE: Begin from the wrong side in the armhole side, work in stocking stitch as before until 8 stitches remains towards mid front, work A.2 over the last 8 stitches. Continue the pattern as this. AT THE SAME TIME decrease for v-neck and cast off for armhole in the same way as left front piece but the in the opposite side. I.e. decrease for v-neck as described above, after A.2 mid front (seen from right side) and cast off for armhole on the beginning of each row from the armhole as described above. ASSEMBLY: Sew the shoulder seams inside the cast-off edge. SLEEVE EDGE: Starting from the right side at the bottom of the armhole, knit up approx. 92 to 114 stitches inside the 1 edge stitch around the armhole, using short circular needle size 4 mm and 1 strand of each quality (the number of stitches should be divisible by 2). Work rib in the round (= knit 1, purl 1) for 3 cm. Loosely cast off with knit over knit and purl over purl – read CASTING-OFF TIP! Work the other sleeve edge in the same way. NECK: Start from the right side, at one of the shoulder seams, and knit up approx. 114 to 140 stitches around the neck (including the 1 stitch on the thread mid front), using short circular needle size 4 mm and 1 strand of each quality (the number of stitches should be divisible by 2). Work rib in the round (= knit 1, purl 1), making sure 1 knitted stitch is mid front over the stitch on the thread. AT THE SAME TIME every 2nd round decrease 2 stitches mid front as follows: Work until there is 1 stitch left before the knitted stitch mid front, slip 2 stitches as if to knit together, knit 1 and pass the 2 slipped stitch over the knitted stitch (= 2 stitches decreased). This will allow the V-neck to lie neatly and the knitted stitch will create a line mid front. Cast off with knit over knit and purl over purl when the edge measures 3 cm – remember CASTING-OFF TIP! |
||||||||||||||||||||||
Diagram explanations |
||||||||||||||||||||||
|
||||||||||||||||||||||
 |
||||||||||||||||||||||
Have you finished this pattern?Tag your pictures with #dropspattern #coolerdaysaheadvest or submit them to the #dropsfan gallery. Do you need help with this pattern?You'll find 22 tutorial videos, a Comments/Questions area and more by visiting the pattern on garnstudio.com. © 1982-2025 DROPS Design A/S. We reserve all rights. This document, including all its sub-sections, has copyrights. Read more about what you can do with our patterns at the bottom of each pattern on our site. |
||||||||||||||||||||||





Post a comment to pattern DROPS 216-35
We would love to hear what you have to say about this pattern!
If you want to leave a question, please make sure you select the correct category in the form below, to speed up the answering process. Required fields are marked *.