
Popular categories
Looking for a yarn?




































Comments / Questions (22)
 Nicole wrote:
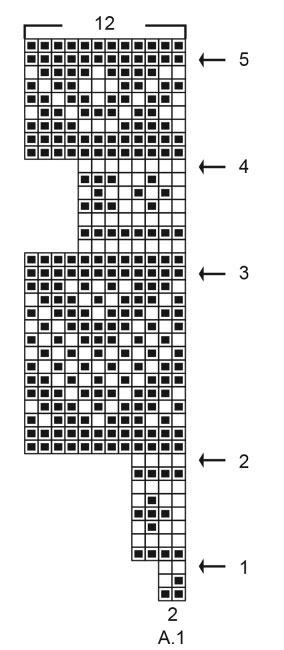
I am struggling to read diagram. Is first round of diagram old rose or two stitches old rose then two stitches off-white. The diagram only shows two cells. The second round is clearly one stitch old rose one stitch off-white. Would be helpful if all twelve cells were shown.
10.03.2023 - 02:10DROPS Design answered:
Hi Nicole, The first round is old rose all the way round, the second round is alternate old rose, off white, the 3rd round just off white, fourth round old rose, etc. The diagrams are drawn in this way because the number of stitches in each repeat increases as the number of stitches on the round increases (same number of repeats in width on each round). Happy knitting!
10.03.2023 - 06:55
 Mc wrote:
Bonjour, J'ai terminé ce pull et je trouve que l'encolure est trop étroite, je dois la refaire ou du moins trouver un moyen de l'élargir ? Comment faire, peut on défaire le col si oui, je veux bien des explications Merci
17.02.2023 - 17:12DROPS Design answered:
Bonjour Mc, vous pouvez peut-être défaire le col en utilisant cette technique pour défaire les côtes et les refaire, ou bien votre magasin aura peut-être une autre idée ou astuce à partager avec vous - même par mail ou téléphone. Bon tricot!
20.02.2023 - 08:50
 Kasia wrote:
Jak dodać oczka we wzorze A.1. w oznaczeniu -->2 dla wzrostu 92. (przejście ze 104 oczek na 144) Wychodzi mi, że powinnam dodawać za każdym 2 i 6 oczkiem ale ostatecznie nie wychodzi mi 144
26.10.2022 - 23:27
 Hetty wrote:
I have just begun this and I am wondering if it will fit over my 2year old’s head. 72 stitches on 3mm needles does not seem enough. A hat in the same yarn has 90 stitches on 3.5mm needles. Please assure me that I will be able to pull the jumper over her head?
18.04.2022 - 14:36DROPS Design answered:
Dear Hetty, the sweater needs to adjust to the neck, not the head, so it may have less stitches than a hat. It's important that the cast on edge is elastic, you can use bigger needles if this is difficult to achieve with 3mm needles. If you want a wider neck, you could use a larger size for the neck and then adjust the number of stitches for the correct size. Happy knitting!
18.04.2022 - 19:38
 Martine Vervaet wrote:
Hallo, ik heb dit truitje gebreid voor mijn kleinzoontje van 7. Het truitje is heel mooi, maar is naar het schijnt ongemakkelijk, achter in de hals. Voelt raar aan zegt hij, net of het te kort is... . Kan ik de hals uithalen?Alvast dank. Martine Vervaet
16.02.2022 - 10:15
 Lucia Battisti wrote:
Buonasera vorrei sapere a che punto devo lavorare con i ferri circolari di 80 cm. Grazie
05.01.2022 - 22:21DROPS Design answered:
Buonasera Lucia, può lavorare con il cavo da 80 cm quando il numero di maglie lo permette. Buon lavoro!
08.01.2022 - 13:18
 Britta Rasmussen wrote:
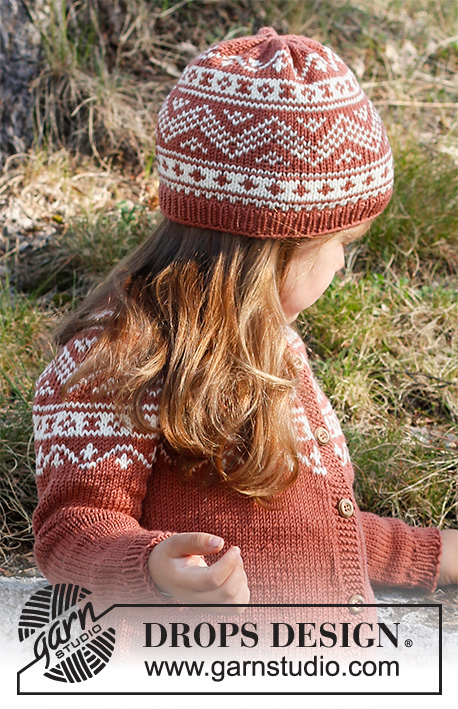
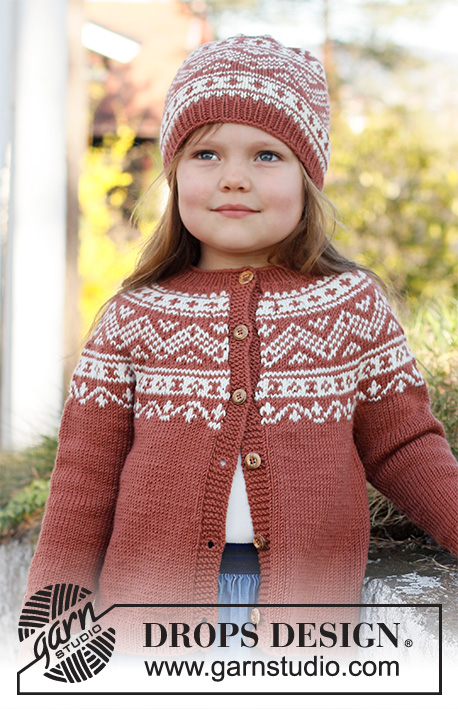
Jeg har garn til overs efter at have strikket tre små trøjer Lillesand....er der en opskrift på huer med samme mønster?
25.09.2021 - 19:03DROPS Design answered:
Hej Britta. Ja det finns det, du hittar den här. Mvh DROPS Design
27.09.2021 - 09:31
 Kerstin wrote:
Ska jag börja medaljen, sedan oket, därefter framstycket och sist ärmarna?
28.08.2021 - 17:19DROPS Design answered:
Hei Kerstin. Halskant och ok stickas runt på rundsticka från mitt bak, uppifrån och ner. Oket delas till fram- och bakstycke och ärmar. Fram- och bakstycket stickas runt på rundsticka från mitt bak, uppifrån och ner. Ärmarna stickas runt på strumpstickor, uppifrån och ner. mvh DROPS design
30.08.2021 - 13:30
 Susan C Shelly wrote:
I am enjoying knitting this pattern, but I have torn it out two times already because I cannot eliminate the "jog" in the pattern when I switch to a new row. It is especially challenging since these are not stripes and sometimes the color changes are every row. I have searched several knitting sites for suggestions, but none actually deals with this type of pattern. What do you suggest?
27.08.2021 - 18:01DROPS Design answered:
Dear Susan, we did not find this a problem because this is a pattern where the colors following each other realtively often(there are only a few stitches between), jogs between rows are not as visible as with bigger patterns. Happy Stitching!
28.08.2021 - 00:17
Annika wrote:
Hej! Har just köpt garn o mönster till denna. Ni rekommenderar både stickor 3 och stickor 4. Gäller stickfastheten stickor 3 eller 4? Och ska man verkligen sticka mönsterstickning när man kollar stickfastheten?
25.05.2021 - 20:05DROPS Design answered:
Hei Annika. Strikkefastheten gjelder pinne 4 (den pinnen du strikker plagget med, pinne 3 er kun til vrangbord). I denne oppskriften er den oppgitt strikkefastheten i glattstrikk og nordisk mønster, men les også Strikketips til denne oppskriften. mvh DROPS design
26.05.2021 - 10:43
|
||||||||||
Lillesand Jumper#lillesandjumper |
||||||||||
 |
 |
|||||||||
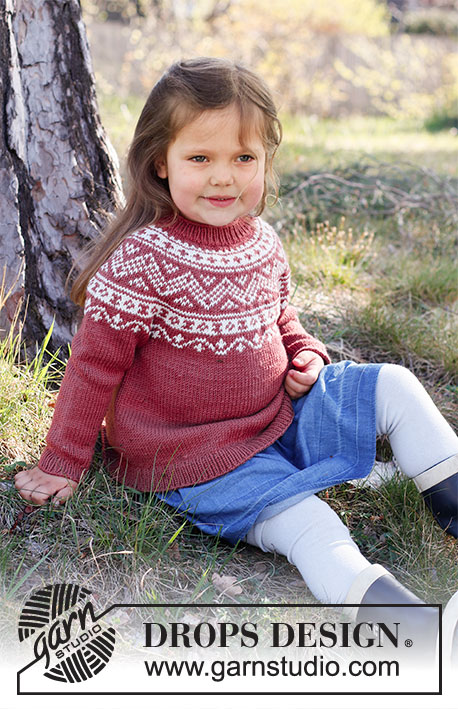
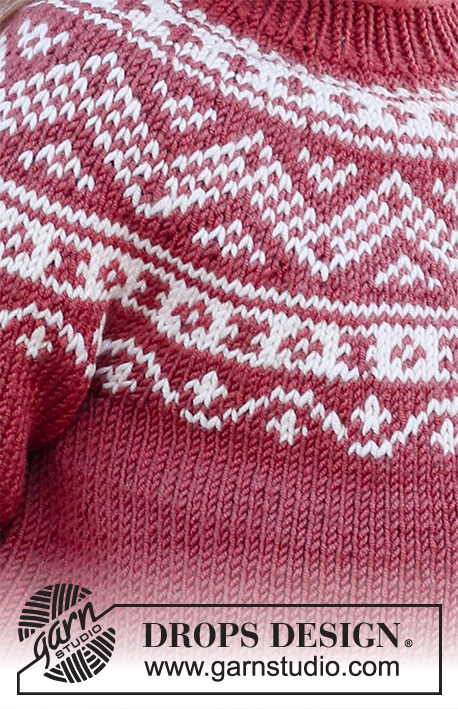
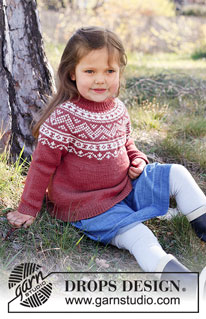
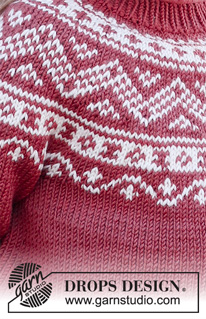
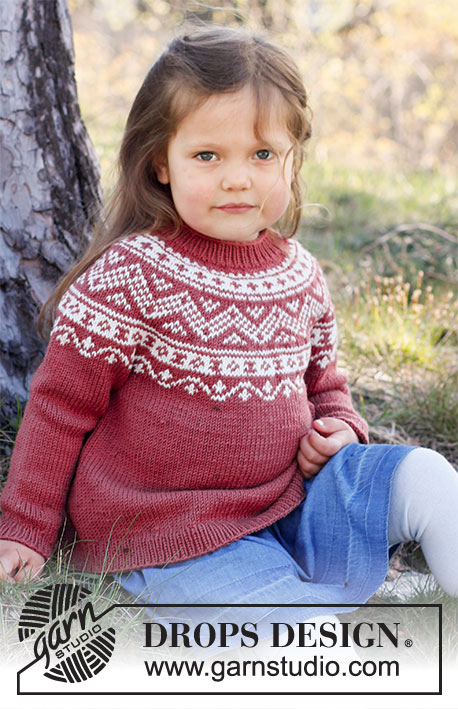
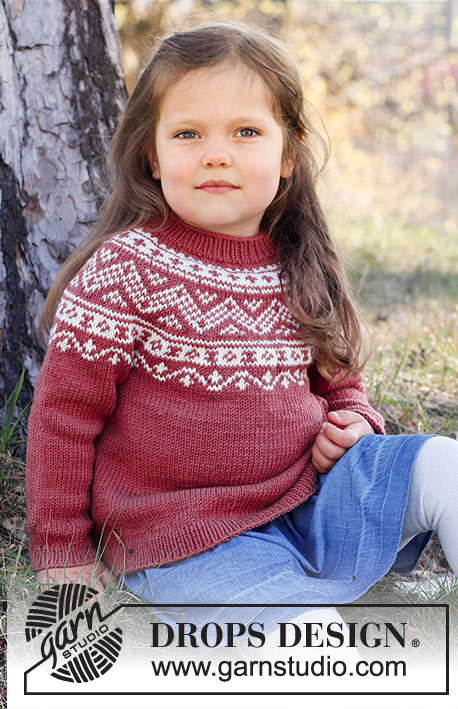
Knitted jumper for children in DROPS Karisma. The piece is worked top down, with round yoke and Nordic pattern. Sizes 2 – 12 years.
DROPS Children 37-5 |
||||||||||
|
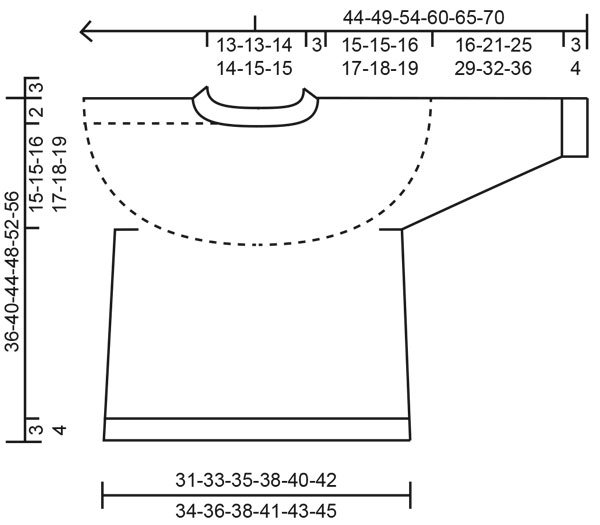
------------------------------------------------------- EXPLANATIONS FOR THE PATTERN: ------------------------------------------------------- PATTERN: See diagram A.1. The whole pattern is worked in stocking stitch. INCREASE TIP-1 (evenly spaced): To work out how to increase evenly, count the total number of stitches on the needle (e.g. 72 stitches) and divide by the number of increases to be made (e.g. 16) = 4.5. In this example, increase by making 1 yarn over after alternately each 4th and 5th stitch. On the next round knit the yarn overs twisted to avoid holes. INCREASE TIP-2 (for sides of body): Increase 1 stitch on each side of both marker threads as follows. Work until there are 4 stitches left before the marker thread, make 1 yarn over, knit 8 (marker thread sits between these 8 stitches) make 1 yarn over (= 2 stitches increased at each marker thread; 4 stitches increased on round). On the next round knit the yarn overs twisted to avoid holes. Then work the new stitches in stocking stitch. KNITTING TIP: To avoid the garment losing its elasticity when working the pattern, it is important the strands at the back are not tight. Increase a needle size when working pattern if this is a problem. DECREASE TIP (for mid under sleeves): Decrease 1 stitch on each side of the marker thread as follows: Work until there are 3 stitches left before the marker thread, knit 2 together, knit 2 (marker thread sits between these 2 stitches), slip 1 stitch as if to knit, knit 1 and pass the slipped stitch over the knitted stitch (= 2 stitches decreased). CASTING-OFF TIP: To avoid the cast-off edge being tight you can cast off with a larger size needle. If the edge is still tight, make 1 yarn over after approx. each 4th stitch at the same time as casting off and the yarn overs are cast off as normal stitches. ------------------------------------------------------- START THE PIECE HERE: ------------------------------------------------------- JUMPER – SHORT OVERVIEW OF THE PIECE: The neck and yoke are worked in the round with circular needle, top down and from mid back. The yoke is divided for the body and sleeves. The body is continued in the round with circular needle, from mid back. The sleeves are worked in the round and top down with double pointed needles. NECK: Cast on 72-74-76-78-80-82 stitches with short circular needle size 3 mm and old rose. Knit 1 round, then work rib (= knit 1 / purl 1) for 3 cm. Change to short circular needle size 4 mm. Knit 1 round and increase 16-16-16-18-18-18 stitches evenly spaced – read INCREASE TIP-1 = 88-90-92-96-98-100 stitches. Insert 1 marker at the beginning of the round; the yoke will be measured from this marker! YOKE: Knit 1-1-3-6-8-11 rounds with old rose. On the next round work A.1 over all stitches (= 44-45-46-48-49-50 repeats of 2 stitches) - read KNITTING TIP! Continue this pattern. REMEMBER THE KNITTING TENSION! AT THE SAME TIME on each row marked with an arrow in A.1, increase stitches evenly spaced as follows – remember INCREASE TIP-1: Arrow-1: Increase 16-18-20-20-22-24 stitches evenly spaced = 104-108-112-116-120-124 stitches (there is now room for 26-27-28-29-30-31 repeats of A.1 with 4 stitches). Arrow-2: Increase 40-36-44-40-48-44 stitches evenly spaced = 144-144-156-156-168-168 stitches (there is now room for 12-12-13-13-14-14 repeats of A.1 with 12 stitches) Arrow-3: Increase 32-40-36-44-40-48 stitches evenly spaced = 176-184-192-200-208-216 stitches (there is now room for 22-23-24-25-26-27 repeats of A.1 with 8 stitches). Arrow-4: Increase 28-32-36-40-44-48 stitches evenly spaced = 204-216-228-240-252-264 stitches (there is now room for 17-18-19-20-21-22 repeats of A.1 with 12 stitches). Arrow-5: Increase 4-4-4-0-0-0 stitches evenly spaced = 208-220-232-240-252-264 stitches. If your knitting tension is correct, the piece now measures approx. 15-15-16-17-18-19 cm from the marker on the neck. If the piece is shorter than this, continue working with old rose and stocking stitch to the correct length. On the next round divide the piece for the body and sleeves as follows: Work 30-32-34-36-38-40 stitches as before (= half the back piece), place the next 44-46-48-48-50-52 stitches on 1 thread for the sleeve, cast on 6-6-6-8-8-8 new stitches (= in the side under the sleeve), work 60-64-68-72-76-80 stitches as before (= front piece), place the next 44-46-48-48-50-52 stitches on 1 thread for the sleeve, cast on 6-6-6-8-8-8 new stitches (= in the side under the sleeve) and work the remaining 30-32-34-36-38-40 stitches as before (= half the back piece). Body and sleeves are finished separately. THE PIECE IS NOW MEASURED FROM HERE! BODY: = 132-140-148-160-168-176 stitches. Insert 1 marker thread in the middle of the 6-6-6-8-8-8 new stitches under each sleeve (= 66-70-74-80-84-88 stitches between the marker threads on both the front and back pieces). Allow the marker threads to follow your work onwards; they will be used when increasing in the sides. Work stocking stitch in the round with old rose. When the piece measures 4-4-5-5-6-6 cm from the division, increase 1 stitch on each side of both marker threads – read INCREASE TIP-2 (= 4 stitches increased). Increase like this every 4-5-6-6-7-8 cm a total of 3 times = 144-152-160-172-180-188 stitches. Continue working until the piece measures 16-20-23-25-28-31 cm from the division. There is now approx. 3-3-3-4-4-4 cm left to finished length; you can try the jumper on and continue working to desired length. Knit 1 round where you increase 46-48-50-54-58-60 stitches evenly spaced = 190-200-210-226-238-248 stitches. NOTE: The number of stitches is increased so the rib is not tight. Change to circular needle size 3 mm. Work rib (= knit 1 / purl 1) for 3-3-3-4-4-4 cm. Cast off with knit over knit and purl over purl – read CASTING-OFF TIP! The jumper measures approx. 36-40-44-48-52-56 cm from the shoulder down. SLEEVE: Place the 44-46-48-48-50-52 stitches from the thread on the one side of the piece on double pointed needles size 4 mm and knit up 1 stitch in each of the 6-6-6-8-8-8 stitches cast on under the sleeve = 50-52-54-56-58-60 stitches. Insert 1 marker thread at the beginning of the round, in the middle of the 6-6-6-8-8-8 stitches under the sleeve. Allow the marker thread to follow your work onwards; it will be used when decreasing mid under the sleeve. Start the round at the marker thread and work stocking stitch in the round with old pink. When the sleeve measures 3 cm from the division decrease 2 stitches mid under the sleeve – read DECREASE TIP. Decrease like this every 2-3-3-3½-3½-4 cm a total of 6-6-7-7-8-8 times = 38-40-40-42-42-44 stitches. Continue working until the sleeve measures 16-21-25-29-32-36 cm from the division. There is now approx. 3-3-3-4-4-4 cm left to finished length; you can try the jumper on and continue to desired length. Knit 1 round where you increase 6-6-8-8-8-8 stitches evenly spaced = 44-46-48-50-50-52 stitches. Change to double pointed needles size 3 mm. Work rib (= knit 1 / purl 1) for 3-3-3-4-4-4 cm. Cast off with knit over knit and purl over purl– remember CASTING-OFF TIP. The sleeve measures approx. 19-24-28-33-36-40 cm from the division. Work the other sleeve in the same way. |
||||||||||
Diagram explanations |
||||||||||
|
||||||||||
 |
||||||||||
 |
||||||||||
Have you finished this pattern?Tag your pictures with #dropspattern #lillesandjumper or submit them to the #dropsfan gallery. Do you need help with this pattern?You'll find 20 tutorial videos, a Comments/Questions area and more by visiting the pattern on garnstudio.com. © 1982-2026 DROPS Design A/S. We reserve all rights. This document, including all its sub-sections, has copyrights. Read more about what you can do with our patterns at the bottom of each pattern on our site. |
||||||||||






With over 40 years in knitting and crochet design, DROPS Design offers one of the most extensive collections of free patterns on the internet - translated to 17 languages. As of today we count 333 catalogues and 12525 patterns translated into English (UK/cm). 12525
We work hard to bring you the best knitting and crochet have to offer, inspiration and advice as well as great quality yarns at incredible prices! Would you like to use our patterns for other than personal use? You can read what you are allowed to do in the Copyright text at the bottom of all our patterns. Happy crafting!
Post a comment to pattern DROPS Children 37-5
We would love to hear what you have to say about this pattern!
If you want to leave a question, please make sure you select the correct category in the form below, to speed up the answering process. Required fields are marked *.