
Popular categories
Looking for a yarn?


Comments / Questions (46)
![]() Sylvie Braud wrote:
Sylvie Braud wrote:
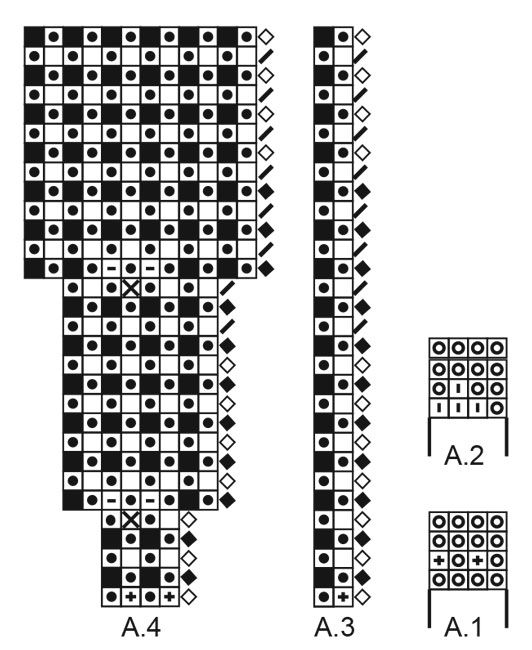
Je ne comprends pas très bien le diagramme a3 et a4 Je tricote a3 et a4 simultanément ? Sue le diagramme a3 je ne vois que 3 mailles alors qu il faut 4 mailles Vous remerciant pour votre aide
08.11.2023 - 22:09DROPS Design answered:
Bonjour Mme Braud, vous allez effectivement tricoter (au tour 3) alternativement les diagrammes A.3 et A.4 en commençant par les 4 mailles de A.4 puis vous répétez 4 ou 3 fois (cf taille) les 2 mailles de A.3, ainsi, vous répétez ces (4+8 ou 6 m = 12-10 mailles 14 à 23 fois tout le tour. Augmentez en même temps comme indiqué dans A.4. Bon tricot!
09.11.2023 - 08:30
![]() Anita Roos wrote:
Anita Roos wrote:
Oerhört svårt att fatta beskrivningen. Efter lång tid tror jag att tecknen till höger i diagrammen enbart visar vilken färg man ska använda på den raden, eller?? Har sett alla videor ni rekommenderar men själva beskrivningen är väldigt snårig. Jag är absolut ingen nybörjare och har stickat många mönstertröjor men här får jag ge upp och hitta på ett eget mönster till oket
09.02.2023 - 14:07
![]() Anita Roos wrote:
Anita Roos wrote:
Förstår inte diagrammet. När man ska börja på A3 visar första symbolen "stickas med ljus jeansblå " och nästa maska/symbol "rätmaska med ljus jeansblå". Fattar inte skillnaden. Det är ju samma färg.
09.02.2023 - 09:40DROPS Design answered:
Hej Anita, du starter diagrammet nederst i højre hjørne og første pind strikker du med ljus jeansblå, så både retmasken og omslaget gør du med ljus jeansblå :)
10.02.2023 - 11:18
![]() Sue wrote:
Sue wrote:
I'm about to start row 10 of A4, the previous row is now all one colour and I'm struggling to know which stitch needs slipping as opposed to brioche-purling. The help video only shows what to do with the basic rib, not with the additional stitches (the 'work 5 stitches' section). Is there a further support video?
26.07.2022 - 18:54DROPS Design answered:
Dear Sue, note that the diagrams are showing all the rows, ie the row with the increase is worked on 5th row in A.4 (not on 10th row). On 6th row, work all stitches with curry - this video also shows how to increase 4 sts in 2-colours-English rib and might help you to understand how to work the new stitches on next round. Happy knitting!
01.08.2022 - 11:23
![]() Berbett wrote:
Berbett wrote:
Bonjour, J'utilise le fil Nepal pour ce modèle. L'échantillon de 10X10 en jersey aiguille n° 4 correspond au nombre de mailles en largeur et en hauteur. Le problème est pour l'échantillon en côtes anglaises, je l'ai fait avec une taille d'aiguilles plus petites (n°2,5 au lieu du 3) malgré cela l'échantillon est encore trop grand 12X12 et tricoter avec une d'aiguilles plus petites seraient inesthétique. Comment faire ? Merci pour votre aide. Pia.
15.12.2021 - 23:02DROPS Design answered:
Bonjour Pia, ce modèle se tricote en DROPS Sky qui est un flil du groupe B alors que Nepal est un fil du groupe C et n'est pas ici une alternative; découvrez ici les pulls du groupe de fils C que vous pourrez réaliser en Nepal (utilisez le convertisseur pour calculer la quantité si nécessaire). Ou bien choisissez une autre laine du groupe B pour réaliser ce modèle (à l'aide du convertisseur). Bon tricot!
16.12.2021 - 07:27
![]() Outi wrote:
Outi wrote:
Thanks a lot! Now the instructions are perfect also in Finnish.
02.12.2021 - 11:56
![]() Outi wrote:
Outi wrote:
Hello again! Couple of weeks ago I askel if it could be possible to have the diagrams with Finnish instructions as well. Now, under the head line ” Piirros” (diagram in Finnish) has appeared two link-like boxes with the text ”diagram measurements”, but nothing opens. Dear Drops design, could you still help me and other Finnish knitters (at least two have asked the same before me)?🙏
01.12.2021 - 19:05DROPS Design answered:
Dear Outi. It should be ok now. Happy knitting!
02.12.2021 - 11:12
![]() Anne wrote:
Anne wrote:
Når jeg begynner på diagram a4 og a3 har jeg 180 masker på pinnen, etter å ha strikket første rad med a4 og a3,dobler antall masker seg til 360 fordi annenhver maske er kast og ta av…. hvordan kan jeg ende på 324 til slutt da?
20.11.2021 - 18:05DROPS Design answered:
Hei Anne. Kastet du gjør er ikke en økning, men tilhører patentmasken. På neste omgang strikkes kastet og patentmasken sammen = ingen økning. Om du ser på diagramikonet X, så er dette en økning (= 4 økte masker hver gang du strikker et X). I str. L strikker du A.4 18 ganger i bredden (= 1. omgang med X, så økes det med 72 masker og i A.4 er det 2 omganger med X , altså det økes 2 omganger med 72 masker = 180 + 72+72 = 324 masker når A.4 er strikket 1 gang i høyden). mvh DROPS Design
23.11.2021 - 11:03
![]() Outi wrote:
Outi wrote:
Is it possible to have the diagrams also with Finnish instructions? Thank you!
15.11.2021 - 17:57DROPS Design answered:
Dear Outi, please check back in a couple of days, we will do our best to correct the technical error. Happy Stitching!
15.11.2021 - 18:19
![]() Mary wrote:
Mary wrote:
Bonjour, super modèle! Je tricote depuis 60 ans ( j'en ai 65) Je n'avais jamais fait de tresse letone, c'est joli mais punaise que c'est long quand il faut tricoter sur 350 mailles durant 2 rangs!! Pas prête de la refaire ;-)
15.08.2021 - 15:37
|
||||||||||||||||||||||||||||||||||
Mikado#mikadosweater |
||||||||||||||||||||||||||||||||||
 |
 |
|||||||||||||||||||||||||||||||||
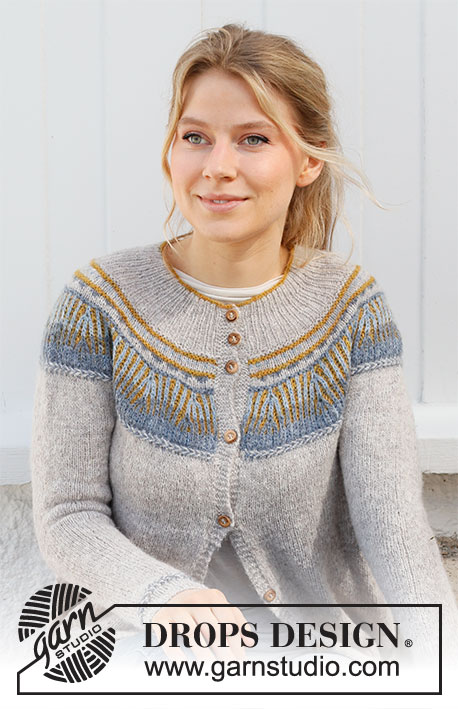
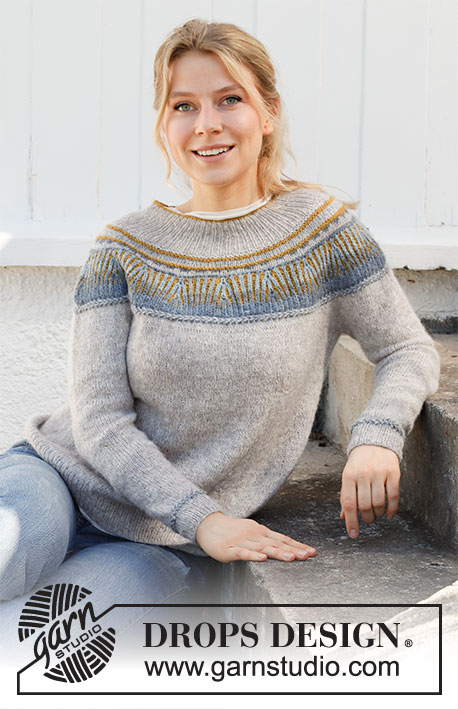
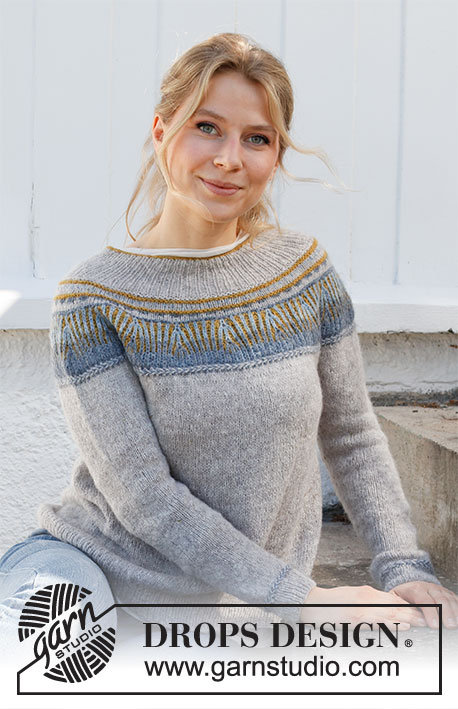
Knitted jumper in DROPS Sky. The piece is worked top down with round yoke, 2-coloured English rib and Latvian cables. Sizes S - XXXL.
DROPS 216-7 |
||||||||||||||||||||||||||||||||||
|
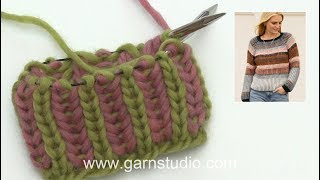
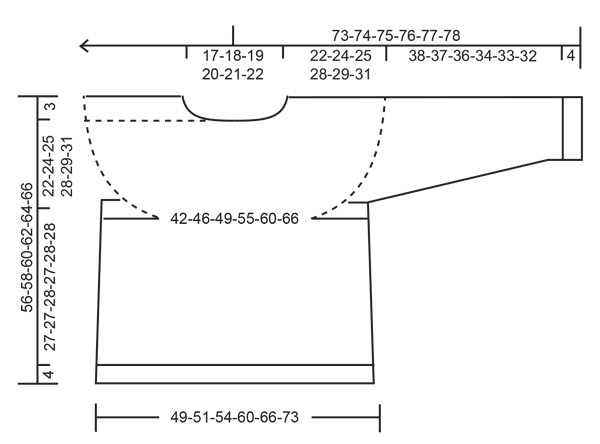
------------------------------------------------------- EXPLANATIONS FOR THE PATTERN: ------------------------------------------------------- PATTERN: See diagrams A.1 to A.4. Diagrams A.1 and A.2 are worked in stocking stitch with 2-coloured pattern. Diagrams A.3 and A.4 are worked in 2-coloured English rib. INCREASE TIP-1 (evenly spaced): To work out how to increase evenly, count the total number of stitches on the needle (e.g. 122 stitches) and divide by the number of increases to be made (e.g. 14) = 8.7. In this example, increase by making 1 yarn over after approx. each 9th stitch. On the next round work the yarn overs twisted to avoid holes. LATVIAN CABLE: ROUND 1: * Knit 1 with jeans blue, knit 1 with light beige *, work from *-* to end of round. ROUND 2: Bring both strands to the front of the piece (towards you). Take the jeans blue strand to the back, purl 1 and bring the strand to the front. Take the light beige strand under the jeans blue strand and then to the back of the piece, purl 1 and bring the strand to the front. Continue like this, purling alternately with jeans blue and light beige, but always take the strand UNDER the strand from the last stitch worked. ROUND 3: Work as round 2, but now always take the strand OVER the strand from the last stitch worked. INCREASE TIP-2 (for sides of body): Work until there are 2 stitches left before the marker thread, make 1 yarn over, knit 4 (marker thread sits between these 4 stitches) make 1 yarn over. On the next round work the yarn overs twisted to avoid holes. Then work the new stitches in stocking stitch DECREASE TIP (for sleeves): Decrease 1 stitch on either side of the marker thread as follows: Work until there are 3 stitches left before the marker thread, knit 2 together, knit 2 (marker thread sits between these 2 stitches), slip 1 stitch as if to knit, knit 1 and pass the slipped stitch over the knitted stitch (2 stitches decreased). CASTING-OFF TIP: To avoid the cast-off edge being tight you can cast off with a larger size needle. If the edge is still tight, make 1 yarn over after approx. each 4th stitch at the same time as casting off; the yarn overs are cast off as normal stitches. ------------------------------------------------------- START THE PIECE HERE: ------------------------------------------------------- JUMPER – SHORT OVERVIEW OF THE PIECE: The neck and yoke are worked in the round with circular needle, from mid back and top down. The yoke is divided for body and sleeves and the body is continued in the round with circular needle. The sleeves are worked with double pointed needles, top down. NECK: Cast on 118-122-126-134-140-146 stitches with circular needle size 3 mm and curry. Knit 1 round. Change to light beige (cut the curry strand). Work rib (= knit 1, purl 1) for 7-8-8-9-9-10 cm, from cast on edge. Change to circular needle size 4 mm. YOKE: ROUND 1: Knit and increase 14-14-18-18-22-26 stitches evenly spaced – read INCREASE TIP-1 = 132-136-144-152-162-172 stitches. ROUND 2: Purl. Change to curry, cut the light beige strand. ROUND 3: Knit and increase 20-20-20-20-26-28 stitches evenly spaced = 152-156-164-172-188-200 stitches. ROUND 4: Purl. ROUND 5: Work A.1 (= 4 stitches = 38-39-41-43-47-50 times in width). REMEMBER THE KNITTING TENSION! When A.1 has been worked 1 time in height continue as follows: Change to curry (you do not need to cut the light beige strand as it will soon be used again). ROUND 1: Knit and increase 12-12-12-16-20-28 stitches evenly spaced = 164-168-176-188-208-228 stitches. ROUND 2: Purl. ROUND 3: Work A.2 (= 4 stitches = 41-42-44-47-52-57 times in width). When A.2 has been worked 1 time in height, the piece measures approx. 12-13-13-14-14-15 cm. Work stocking stitch with light beige until the piece measures 12-13-13-14-15-17 cm. Continue as follows: Change to jeans blue (cut the light beige strand) and change to circular needle size 3 mm. ROUND 1: Knit and increase 4-2-4-2-2-2 stitches evenly spaced = 168-170-180-190-210-230 stitches. ROUND 2: Purl. ROUND 3: Work * A.4 (= 4 stitches), A.3 over 8-6-6-6-6-6 stitches (= 4-3-3-3-3-3 times in width) *, work from *-* over all stitches (= 14-17-18-19-21-23 times in width). When A.3 and A.4 have been worked 1 time in height there are 280-306-324-342-378-414 stitches. Knit 1 round with jeans blue. Change to circular needle size 4 mm and work LATVIAN CABLE – read description above. The piece measures approx. 21-22-22-23-24-26 cm. Continue with light beige and stocking stitch. The increases are finished in sizes S-M-L, but continue as follows in sizes XL-XXL-XXXL. SIZES XL-XXL-XXXL: On the next round increase 12-14-12 stitches evenly spaced = 354-392-426 stitches. Repeat this increase after 2 cm = 366-406-438 stitches. ALL SIZES: = 280-306-324-366-406-438 stitches. Continue with stocking stitch until the piece measures 22-24-25-28-29-31 cm from the cast-on edge. Now divide the yoke for the body and sleeves on the next round as follows: Work 40-44-47-53-59-65 stitches in stocking stitch (= half back piece), place the next 60-64-68-76-84-88 stitches on a thread for the sleeve, cast on 8 stitches under the sleeve, work 80-90-94-108-120-132 stitches in stocking stitch (= front piece), place the next 60-64-68-76-84-88 stitches on a thread for the sleeve, cast on 8 stitches under the sleeve and work 40-44-47-53-59-65 stitches in stocking stitch (= half back piece). BODY: = 176-194-204-230-254-278 stitches. Insert 1 marker thread in the middle of the 8 stitches under each sleeve (= in the sides). Allow the threads to follow your work onwards; they will be used when increasing in the sides. Work stocking stitch in the round. When the piece measures 3 cm from the division, increase 1 stitch on each side of both marker threads (= 4 stitches increased) – read INCREASE TIP-2. Increase like this every 3-5-4-4-4-3 cm a total of 7-5-6-6-6-7 times = 204-214-228-254-278-306 stitches. When the piece measures 27-27-28-27-28-28 cm from the division, change to circular needle size 3 mm and work rib (= knit 1, purl 1) for 4 cm. Cast off with knit – read CASTING-OFF TIP. The jumper measures approx. 56-58-60-62-64-66 cm from the shoulder down. SLEEVE: The sleeve is worked in the round with stocking stitch and light beige. Place the 60-64-68-76-84-88 stitches from the thread on the one side of the piece on double pointed needles size 4 mm and knit up 1 stitch in each of the 8 stitches cast on under the sleeve = 68-72-76-84-92-96 stitches. Insert a marker thread in the middle of the 8 stitches under the sleeve. Work stocking stitch in the round. When the piece measures 2 cm from the division, decrease 1 stitch on each side of the marker thread (= 2 stitches decreased) – read DECREASE TIP! Decrease like this every 2½-2½-2-1½-1½-1 cm a total of 12-13-14-17-20-21 times = 44-46-48-50-52-54 stitches. When the sleeve measures 37-36-35-33-32-31 cm from the division, work Latvian cable. Work 2 rounds of stocking stitch. Change to double pointed needles size 3 mm and work rib (knit 1, purl 1) over all stitches. Cast off with knit when the rib measures 4 cm. The sleeve measures approx. 42-41-40-38-37-36 cm from the division. Work the other sleeve in the same way. |
||||||||||||||||||||||||||||||||||
Diagram explanations |
||||||||||||||||||||||||||||||||||
|
||||||||||||||||||||||||||||||||||
 |
||||||||||||||||||||||||||||||||||
 |
||||||||||||||||||||||||||||||||||
Have you finished this pattern?Tag your pictures with #dropspattern #mikadosweater or submit them to the #dropsfan gallery. Do you need help with this pattern?You'll find 27 tutorial videos, a Comments/Questions area and more by visiting the pattern on garnstudio.com. © 1982-2026 DROPS Design A/S. We reserve all rights. This document, including all its sub-sections, has copyrights. Read more about what you can do with our patterns at the bottom of each pattern on our site. |
||||||||||||||||||||||||||||||||||


With over 40 years in knitting and crochet design, DROPS Design offers one of the most extensive collections of free patterns on the internet - translated to 17 languages. As of today we count 324 catalogues and 12290 patterns translated into English (UK/cm). 12290
We work hard to bring you the best knitting and crochet have to offer, inspiration and advice as well as great quality yarns at incredible prices! Would you like to use our patterns for other than personal use? You can read what you are allowed to do in the Copyright text at the bottom of all our patterns. Happy crafting!
Post a comment to pattern DROPS 216-7
We would love to hear what you have to say about this pattern!
If you want to leave a question, please make sure you select the correct category in the form below, to speed up the answering process. Required fields are marked *.