
Popular categories
Looking for a yarn?


Comments / Questions (14)
![]() Susanne wrote:
Susanne wrote:
Buonasera volevo annullare la mia domanda fatta in precedenza poiché ho risolto il problema. Grazie comunque.
23.10.2022 - 17:35
![]() Susanne wrote:
Susanne wrote:
Buongiorno vorrei capire il passaggio dopo la sezione traforata. Finita la riga traforata non ho gettati, perché si lavora a dritto . Poi si inizia il ferro 5 delle maglie inglesi e nel pattern è scritto di lavorare insieme maglia e gettato. Devo lavorare singolarmente le maglie? Perché se lavoro insieme una maglia si è una no, non si diminuiscono le maglie? Grazie
23.10.2022 - 08:17
![]() Zeline wrote:
Zeline wrote:
Bonjour. J'ai commencé à tricoter ce châle et je m'interroge sur la forme qu'il prend. Je pensais que l'on commençait par la pointe mais en fait je me rends compte que plus les augmentations avancent plus le châle se courbe en formant une pointe vers le haut (la partie sur les aiguilles). donc je me dis que peut être en réalité, l'icord du début fait en fait partie de la plus grande longueur du triangle ? pouvez vous me préciser ce point svp ? Merci
17.04.2022 - 12:31DROPS Design answered:
Bonjour Zeline, ce châle se tricote de haut en bas (en commençant côté encolure jusqu'à la pointe du bas du châle). Cette vidéo montre comment le commencer sur la base du I-cord et celle-ci comment tricoter et répéter les rangs 1-4 du châle; elles devraient toutes deux vous aider à visualiser comment on tricote le châle. Bon tricot!
19.04.2022 - 11:10
![]() María wrote:
María wrote:
He hecho el patrón repetidas veces y creo que hay un error ,creo en la hilera 5 ,podría ser revisado? gracias
16.01.2022 - 18:31
![]() Jane Higginbottom wrote:
Jane Higginbottom wrote:
I don’t think this pattern is correct for example in row 2 I had to rewrite the pattern out. This pattern does not make sense and I am giving up. Have spent too long trying to work it out. I am an experienced knitter who has done brioche knitting before and I am very disappointed with this pattern. Now need to find another use for this wool.
01.01.2021 - 15:21
![]() Jane Higginbottom wrote:
Jane Higginbottom wrote:
I think there is an error in line 2 of the pattern as the written instructions are not the same as the video. One stitch is different. In line 5 if I follow the instructions I have an extra stitch after the first increase stitch which needs to be slipped?
11.12.2020 - 10:00
![]() Jane H wrote:
Jane H wrote:
I am having trouble with this pattern - for example in line 2 and 5. Are there errors? Can anyone advise. It doesn’t make sense. In line 2 the written instructions are not the same as the video.
10.12.2020 - 19:04DROPS Design answered:
Dear Jane H, which kind of errors do you have? Rows 2 and 5 are following the description in the pattern. Can you maybe explain where you are stuck?
11.12.2020 - 07:06
![]() Lagan Sieglinde wrote:
Lagan Sieglinde wrote:
Sie sollten diese deutsche Anleitung überarbeiten. Es sind da einige Fehler drin. Zum Beispiel müssen in der3.und 4. ICordreihe die letzten drei Maschen links gestrickt werden. Ein Anfänger kann mit dieser Anleitung nichts anfangen. Da hilft auch das Video nicht, das ist viel zu schnell erklärt worden. MfG Lagan S.
10.10.2020 - 11:01DROPS Design answered:
Liebe Frau Lagan, die Maschen für die I-Cord werden am Ende jeder Reihe, also auch in Rück-Reihen, rechts gestrickt und am Anfang jeder Reihe abgehoben. Zum Video: Die Geschwindigkeit der Videos lässt sich in den Einstellungen anpassen. Wenn Sie das Video abspielen, haben Sie unten rechts in der Leiste ein Symbol für "Einstellungen". Wenn Sie dieses Symbol (Rädchen) anklicken, lässt sich das Video langsamer abspielen.
12.10.2020 - 13:17
![]() Lagan Sieglinde wrote:
Lagan Sieglinde wrote:
Ich denke in der 1.Reihe muss es nicht 3 Maschen wie zum linksstricken heißen sondern nur 1Masche. L.G Lagan S.
09.10.2020 - 16:07
![]() Farideh wrote:
Farideh wrote:
Himap crochet
22.04.2020 - 18:10
|
|
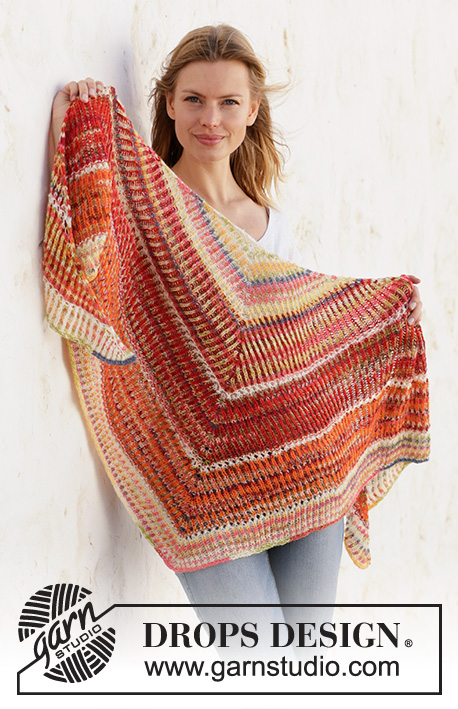
Phoenix Wrap#phoenixwrap |
|
 |
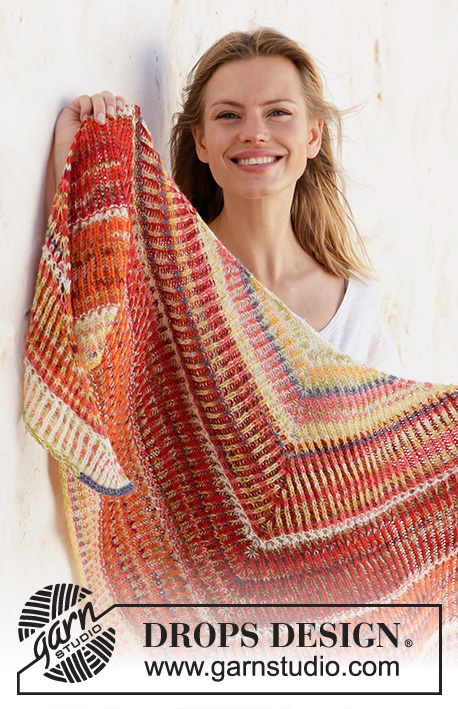 |
Knitted shawl with 2 coloured English rib in DROPS Fabel. Piece is knitted top down , with stripes and eyelet rows.
DROPS 212-21 |
|
|
---------------------------------------------------------- EXPLANATION FOR THE PATTERN: ---------------------------------------------------------- I-CORD EDGE: Work the first and last 3 stitches on shawl as an i-cord. It is important not to work too tight but to make sure to tighten the yarn a bit before continuing on row after stitches have been slipped. At the beginning of row from right side slip stitches on to right needle without working with yarn on right side of piece/towards you. At the end of rows from right side knit stitches. At the beginning of row from wrong side slip stitches on to right needle without working with yarn on wrong side of piece/towards you. At the end of rows from wrong side knit stitches. STRIPES: STRIPE 1: Colour 1 = off white. Colour 2 = yellow/ pink STRIPE 2: Colour 1 = red chilli Colour 2 = yellow/ pink STRIPE 3: Colour 1 = yellow/pink. Colour 2 = red chilli STRIPE 4: Colour 1 = yellow/pink. Colour 2 = texmex STRIPE 5: Colour 1= off white. Colour 2 = yellow/ pink INCREASE 2 STITCHES: Increase is done in a knit stitch from right side. Knit stitch and yarn over together, but do not slip them off left needle, make 1 yarn over and work stitch and yarn over together again. Then slip stitch and yarn over off left needle = 3 stitches on right needle = 2 stitches increased. On next row work stitches in pattern. INCREASE 4 STITCHES: Increase is done in a knit stitch from right side. * Knit stitch and yarn over together, but do not slip them off left needle, make 1 yarn over *, work from *-* 2 times in total and work stitch and yarn over together 1 more time. Then slip stitch and yarn over off left needle = 5 stitches on right needle = 4 stitches increased. On next row work stitches in pattern. EYELET ROW: Work with off white as follows: ROW 1 (= right side): Make i-cord edge as before over the 3 first stitches, * knit next stitch and yarn over together, knit next stitch *, work from *-* until 3 stitches remain and work i-cord edge as before over the last 3 stitches. ROW 2 (= wrong side): Make i-cord edge as before over the 3 first stitches, knit until 3 stitches remain and work i-cord edge as before over the last 3 stitches. ROW 3 (= right side): Make an i-cord edge as before over the 3 first stitches, * knit 2 together and make 1 yarn over *, work from *-* until 2 stitches remains before middle stitch - it is important to finish with 1 yarn over. Now work as follows over the next 5 stitches: Knit 1, make 1 yarn over, knit 1, make 1 yarn over, knit 1 (= middle stitch), make 1 yarn over, knit 1, make 1 yarn over, knit 1, make 1 yarn over, work from *-* until 5 stitches remain. Knit 2 stitches together and work i-cord edge as before over the last 3 stitches. (= 4 stitches increased). ROW 4 (= wrong side): Make i-cord edge as before over the 3 first stitches, knit until 3 stitches remain and work i-cord edge as before over the last 3 stitches. ---------------------------------------------------------- START THE PIECE HERE: ---------------------------------------------------------- SHAWL - SHORT OVERVIEW OF THE PIECE: Piece is worked top down, work 2 coloured English rib back and forth on circular needle to make room for all the stitches. The shawl begins with working 1 small i-cord, to pick up stitches. Shawl is then worked with i-cord edge in each side. Then work stripes with different colours and make eyelet rows. SHAWL: Cast on 4 stitches on circular needle size 4 mm with off white. * Knit 1 row, do not turn piece! Then move the stitches to the other end of needle so that next row is worked from the same side again *, work from *-* until 9 rows have been worked. Turn the piece to pick up stitches in i-cord. Begin to pick up 7 stitches along the side of i-cord - pick up through both stitch loops and make sure to pick up downwards in the same row with stitches. Then pick up 4 stitches in the end of i-cord = cast-on edge. There are now 15 stitches on needle. Turn piece and work 3 rows as follows: From wrong side: With yarn towards you (= wrong side of piece), slip the first 3 stitches over on to right needle purlwise (= I-CORD EDGE - read explanation above). Knit all stitches. Turn piece. From right side: With yarn towards you (= right side of piece), slip the first 3 stitches over on to right needle purlwise (= i-cord edge). Knit all stitches. Turn piece. From wrong side: With yarn towards you (= wrong side of piece), slip the first 3 stitches over on to right needle purlwise (= i-cord edge). Knit all stitches. Turn piece. Now continue in 2 coloured English rib and use colours from STRIPE 1. ROW 1 (= right side): Worked with colour 1: Pass 3 stitches from left to right needle purlwise with yarn on right side of piece (= i-cord edge), INCREASE 2 STITCHES in next stitch, make 1 yarn over and slip next stitch on to right needle purlwise, knit 1, make 1 yarn over and slip next stitch on to right needle purlwise, INCREASE 4 STITCHES in next stitch (= middle stitch), make 1 yarn over and slip next stitch on to right needle purlwise, knit 1, make 1 yarn over and slip next stitch on to right needle purlwise, INCREASE 2 STITCHES in next stitch. Knit 3 (= i-cord edge). 8 stitches in total have been increased on needle. Push stitches back to the other side of circular needle (without turning the piece), to work from the same side as previous row. ROW 2 (= right side): Worked with colour 2: Slip 3 stitches from left to right needle purlwise with yarn on wrong side of piece (= i-cord edge), make 1 yarn over and slip next stitch on to right needle purlwise, purl 1, make 1 yarn over and slip next stitch on to right needle purlwise, purl next stitch and yarn over together, make 1 yarn over and slip next stitch on to right needle purlwise, purl next stitch and yarn over together, make 1 yarn over and slip next stitch on to right needle purlwise, purl next stitch and yarn over together, * make 1 yarn over and slip next stitch on to right needle purlwise, purl 1 *, work from *-* 1 more time and make 1 yarn over and slip next stitch on to right needle purlwise, purl next stitch and yarn over together, make 1 yarn over and slip next stitch on to right needle purlwise, purl 1, make 1 yarn over and slip next stitch on to right needle purlwise. Knit 3 (= i-cord edge). NOTE! Insert 1 marker in middle stitch to make it easier to see where to increase later, move the marker in middle stitch upwards when working. Turn piece. ROW 3 (= wrong side): Worked with colour 1: Slip 3 stitches from left to right needle purlwise with yarn on wrong side of piece (= i-cord edge), * purl yarn over and slipped stitch together, make 1 yarn over, slip 1 stitch purlwise, work from *-* until 4 stitches remain, purl yarn over and slipped stitch together. Knit 3 (= i-cord edge). Push stitches back to the other side of circular needle (without turning the piece), to work from the same side as previous row. ROW 4 (= wrong side): Worked with colour 2: Slip 3 stitches from left to right needle purlwise with yarn on wrong side of piece (= i-cord), *make 1 yarn over, slip 1 stitch purlwise, knit yarn over and slipped stitch together *, work from *-* until 4 stitches remain, make 1 yarn over, slip 1 stitch purlwise. Knit 3 (= i-cord edge). Turn piece. REMEMBER THE KNITTING TENSION! ROW 5 (= right side): Worked with colour 1: Slip 3 stitches from left to right needle purlwise with yarn on wrong side of piece (= i-cord edge), INCREASE 2 STITCHES in next stitch, * make 1 yarn over and slip next stitch on to right needle purlwise, knit next stitch and yarn over together *, work from *-* until 4 stitches remain, INCREASE 2 stitches in next stitch. Knit 3 (= i-cord edge). 4 stitches in total have been increased on needle. Push stitches back to the other side of circular needle (without turning the piece), to work from the same side as previous row. ROW 6 (= right side): Worked with colour 2: Slip 3 stitches from left to right needle purlwise with yarn on wrong side of piece (= i-cord edge), make 1 yarn over and slip next stitch on to right needle purlwise, purl 1, * make 1 yarn over and slip next stitch on to right needle purlwise, purl next stitch and yarn over together *, work from *-* until 6 stitches remain. Make 1 yarn over and slip next stitch on to right needle purlwise, purl next stitch, make 1 yarn over and slip next stitch on to right needle purlwise. Knit 3 (= i-cord edge). Turn piece. ROW 7 (= wrong side): Worked with colour 1: Slip 3 stitches from left to right needle purlwise with yarn on wrong side of piece (= i-cord edge), * purl yarn over and slipped stitch together, make 1 yarn over, slip 1 stitch purlwise, work from *-* until 4 stitches remain, purl yarn over and slipped stitch together. Knit 3 (= i-cord edge). Push stitches back to the other side of circular needle (without turning the piece), to work from the same side as previous row. ROW 8 (= wrong side): Worked with colour 2: Slip 3 stitches from left to right needle purlwise with yarn on wrong side of piece (= i-cord), *make 1 yarn over, slip 1 stitch purlwise, knit yarn over and slipped stitch together *, work from *-* until 4 stitches remain, make 1 yarn over, slip 1 stitch purlwise. Knit 3 (= i-cord edge). Turn piece. ROW 9 (= right side): Worked with colour 1: Slip 3 stitches from left to right needle purlwise with yarn on wrong side of piece (= i-cord edge), INCREASE 2 STITCHES in next stitch, * make 1 yarn over and slip next stitch on to right needle purlwise, knit next stitch and yarn over together *, work from *-* until middle stitch. INCREASE 4 STITCHES in middle stitch, work from *-* until 4 stitches remain, INCREASE 2 stitches in next stitch. Knit 3 (= i-cord edge). 8 stitches in total have been increased on needle. Push stitches back to the other side of circular needle (without turning the piece), to work from the same side as previous row. ROW 10 (= right side): Worked with colour 2: Slip 3 stitches from left to right needle purlwise with yarn on wrong side of piece (= i-cord edge), make 1 yarn over and slip next stitch on to right needle purlwise, purl 1, * make 1 yarn over and slip next stitch on to right needle purlwise, purl next stitch and yarn over together *, work from *-* until 6 stitches remain. Make 1 yarn over and slip next stitch on to right needle purlwise, purl next stitch, make 1 yarn over and slip next stitch on to right needle purlwise. Knit 3 (= i-cord edge). Turn piece. ROW 11 (= wrong side): Worked with colour 1: Slip 3 stitches from left to right needle purlwise with yarn on wrong side of piece (= i-cord edge), * purl yarn over and slipped stitch together, make 1 yarn over, slip 1 stitch purlwise, work from *-* until 4 stitches remain, purl yarn over and slipped stitch together. Knit 3 (= i-cord edge). Push stitches back to the other side of circular needle (without turning the piece), to work from the same side as previous row. ROW 12 (= wrong side): Worked with colour 2: Slip 3 stitches from left to right needle purlwise with yarn on wrong side of piece (= i-cord), *make 1 yarn over, slip 1 stitch purlwise, knit yarn over and slipped stitch together *, work from *-* until 4 stitches remain, make 1 yarn over, slip 1 stitch purlwise. Knit 3 (= i-cord edge). Turn piece. Repeat rows 5-12 6 times in total vertically. Switch colours on STRIPE 2 and repeat ROWS 5-12 6 times in total vertically. Switch to off white and work 1 EYELET ROW as explained above. Switch colours on STRIPE 3 and repeat rows 5-12 6 times in total vertically. Switch to off white and work 1 EYELET ROW as explained above. Switch colours on STRIPE 4 and repeat rows 5-12 6 times in total vertically. Switch to off white and work 1 EYELET ROW as explained above. Switch colours on STRIPE 5 and repeat rows 5-12 3 times in total vertically and adjust so that next row is worked from right side with colour 2 - i.e. yellow/pink. CAST-OFF: On next row cast off with an i-cord cast-off. It is important that the edge is loosely cast off to get a nice shape on the shawl. Use a larger needle size to cast off if needed, and make sure to work loose, even stitches. Work and decrease as follows: * Knit 2, knit the next 2 stitches twisted together. Then slide the 3 stitches from right needle back on left needle (in same order they are in) *, work from *-* until all stitches on left needle are cast off and 3 stitches remain on right needle. Slide the 3 stitches on to left needle and cast off these stitches by knitting. Cut and fasten the yarn. |
|
Have you finished this pattern?Tag your pictures with #dropspattern #phoenixwrap or submit them to the #dropsfan gallery. Do you need help with this pattern?You'll find 12 tutorial videos, a Comments/Questions area and more by visiting the pattern on garnstudio.com. © 1982-2026 DROPS Design A/S. We reserve all rights. This document, including all its sub-sections, has copyrights. Read more about what you can do with our patterns at the bottom of each pattern on our site. |
|


With over 40 years in knitting and crochet design, DROPS Design offers one of the most extensive collections of free patterns on the internet - translated to 17 languages. As of today we count 324 catalogues and 12290 patterns translated into English (UK/cm). 12290
We work hard to bring you the best knitting and crochet have to offer, inspiration and advice as well as great quality yarns at incredible prices! Would you like to use our patterns for other than personal use? You can read what you are allowed to do in the Copyright text at the bottom of all our patterns. Happy crafting!
Post a comment to pattern DROPS 212-21
We would love to hear what you have to say about this pattern!
If you want to leave a question, please make sure you select the correct category in the form below, to speed up the answering process. Required fields are marked *.