
Popular categories
Looking for a yarn?


Comments / Questions (36)
![]() Katleen wrote:
Katleen wrote:
As many, I have troubles to make the ears of the fox. No answer gives me a good explenations. It looks not being sewed but crocheted … Please more info.
25.12.2025 - 19:24DROPS Design answered:
Hello Kathleen, yes you sew not crochet in this case. As you can find in text, you sew the top of the hat neatly together then you sew a triangle in each corner at the top - sewing through both layers, from approx. 3 cm down the side to approx. 3 cm across the top of the hat (= fox-ears). Happy knitting!
23.02.2026 - 13:20
![]() Martine wrote:
Martine wrote:
Bonjour Mesdames. ce modèle peut-il être tricoté avec des aiguilles doubles pointes ou cela changerait la forme ? Merci pour votre réponse.
19.03.2025 - 19:20DROPS Design answered:
Bonjour Martine, on tricote le bonnet en allers et retours à cause du jacquard, il va falloir utiliser différentes couleurs sur un même rang avec trop de mailles pour tricoter en rond; il est donc plutôt recommandé de le tricoter en allers et retours pour un plus beau rendu. Bon tricot!
20.03.2025 - 09:47
![]() Therese wrote:
Therese wrote:
Hej Det står att vanten ska sys ihop innanför 1 kantmaska rätstickning, är det från rät eller avigsidan den ska sys ihop? Om det är från rätsidan hur syr jag ihop den utan att det syns när det är två olika färger som ska sys ihop? Vilken av färgerna blir i så fall bäst att sy ihop med?
09.12.2023 - 21:30DROPS Design answered:
Hei Therese. Sy fra rettsiden. Ta en titt på hjelpevideoene du finner under diagrammene hvordan man kan sy kantmaskene sammen. Siden det er mest av den orangemelerad fargen som skal sys sammen ville jeg nok ha gått for den, men du kan fint velge det du syns blir penest. mvh DROPS Design
11.12.2023 - 11:51
![]() Therese wrote:
Therese wrote:
Stickar vantarna 6-9 månader. Det står hur lång resåren ska vara (4cm) och hur långt resår plus rätstickning ska vara (6,5 cm) innan man påbörjar mönstret A2. Men hur brett ska arbetet vara och hur långt totalt när det är klart? Skulle vara bra att veta om jag håller rätt storlek.
27.11.2023 - 18:32DROPS Design answered:
Hej Therese, det ser du på din strikkefasthed. Du skal have 26 masker i bredden på 10 cm og 34 pinde i højden i glatstrik :)
28.11.2023 - 10:47
![]() Dehant Nicole wrote:
Dehant Nicole wrote:
Bonjour Il n y a pas les explications pour les oreilles est ce une omission ? Par avance merci
27.09.2023 - 17:50DROPS Design answered:
Bonjour, Les oreilles se forment avec en cousant des trinagles lorsque l'on assemble le bonnet: ASSEMBLAGE: Coudre le bonnet à 1 maille lisière du bord de chaque côté. Assembler le haut du bonnet. Coudre un triangle en haut, dans chaque coin, en piquant dans les deux épaisseurs, à environ 3 cm du bas le long du côté et environ 3 cm le long du haut du bonnet (= oreilles du renard). Bon tricot!
28.09.2023 - 11:24
![]() Dehant Nicole wrote:
Dehant Nicole wrote:
Bonjour Il n y a pas les explications pour les oreilles est ce une omission ? Par avance merci
27.09.2023 - 17:48DROPS Design answered:
Bonjour, Voici les explications pour former les oreilees du bonet. ASSEMBLAGE: Coudre le bonnet à 1 maille lisière du bord de chaque côté. Assembler le haut du bonnet. Coudre un triangle en haut, dans chaque coin, en piquant dans les deux épaisseurs, à environ 3 cm du bas le long du côté et environ 3 cm le long du haut du bonnet (= oreilles du renard). Bon tricot!
28.09.2023 - 11:25
![]() Lisa M Grenier wrote:
Lisa M Grenier wrote:
Hi thank you for your response, but what you sent me was already in the pattern . I was looking for more specific information ie... how many stitches do I cast on for the triangles, are they worked in the round so they are 3d? what are the decreases? 1 at each end every other row? Thank you
13.11.2022 - 01:13DROPS Design answered:
Dear Lisa, you don't need to work extra rows for a triangle. After finishing the uni-color part, in the upper side of the hat, you need to shape the edges to form triangles, with the dimensions indicated in the instructions (3 cm down and 3cm towards the middle). The second photo, with the whole set lying flat, may help you visualize the triangles better. Happy knitting!
13.11.2022 - 23:13
![]() Emma wrote:
Emma wrote:
Hej, Finns det inte mönster för vantarna i större storlek än 9 månader? Håller på att sticka mössan för 2 år, så det känns ju tråkigt att inte kunna sticka matchande vantar?
09.11.2022 - 12:09DROPS Design answered:
Hei Emma. Disse vottene har ikke tommel, og en 2-åring vil nok bruke tommelene, men ta en titt på vottene i DROPS Extra 0-1217. Det er noen lignende reve votter med tommel. Evnt så kan du bruke diagrammet til 36-1 og prøve å tilpasse det til 0-1217. mvh DROPS Design
14.11.2022 - 10:07
![]() Lisa M Grenier wrote:
Lisa M Grenier wrote:
Please advice on the triangles form the ears, I am not that advanced, thank you
08.11.2022 - 00:00DROPS Design answered:
Dear Mrs Grenier, sew hat together and lay it flat to sew the top. Then sew a triangle on each corner at the top on each side, starting approx. 3 cm down the side and 3 cm towards middle. Happy finishing!
08.11.2022 - 09:04
![]() Alisa wrote:
Alisa wrote:
Hallo, wie berechne ich denn den Wollbedarf für die Mütze für ein 3-jähriges Kind? Vielen Dank im Vorraus für die Hilfe
21.10.2022 - 23:29DROPS Design answered:
Liebe Alisa, benötige Garnmenge für die Mütze finden Sie oben bei dem Kopfzeil; 3/4 Jahre ist die letzte Größe, so brauchen Sie insgesamt 2 Knäuel DROPS Alpaca, 1 x Farbe 2925 + 1 x Farbe 9020 + ein Rest Farbe 506 für die Nase und die Augen. Viel Spaß beim stricken!
24.10.2022 - 07:48
|
||||||||||||||||||||||
Baby Fox#babyfoxhat |
||||||||||||||||||||||
 |
 |
|||||||||||||||||||||
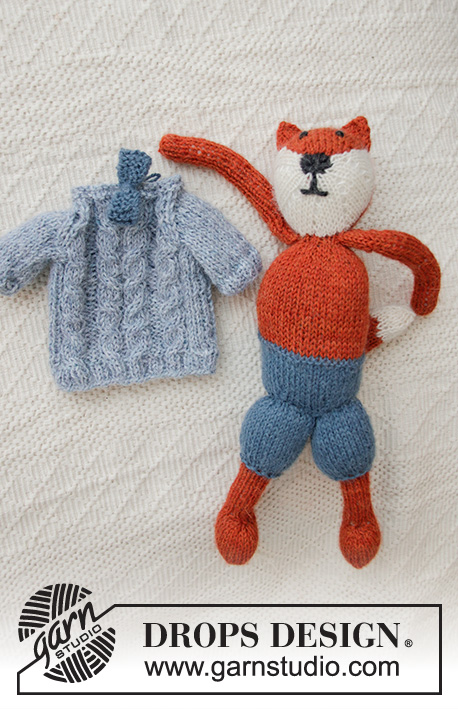
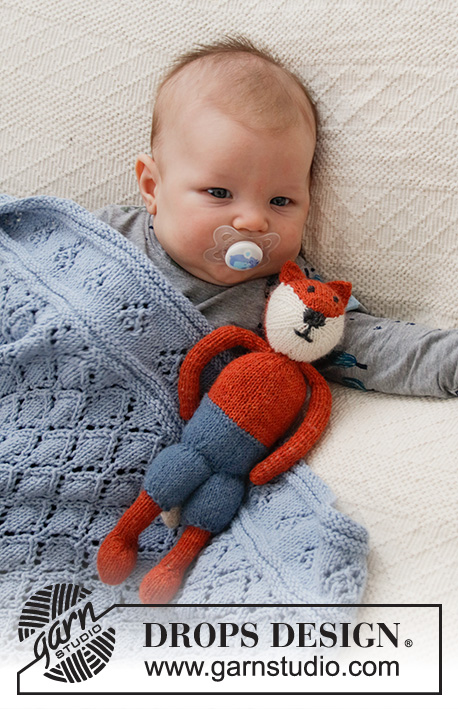
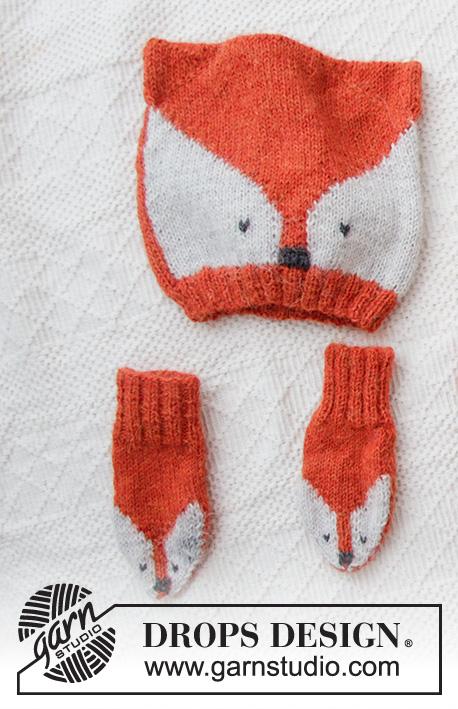
Knitted hat and mittens for babies with fox-pattern in DROPS Alpaca. Sizes Premature – 4 years.
DROPS Baby 36-1 |
||||||||||||||||||||||
|
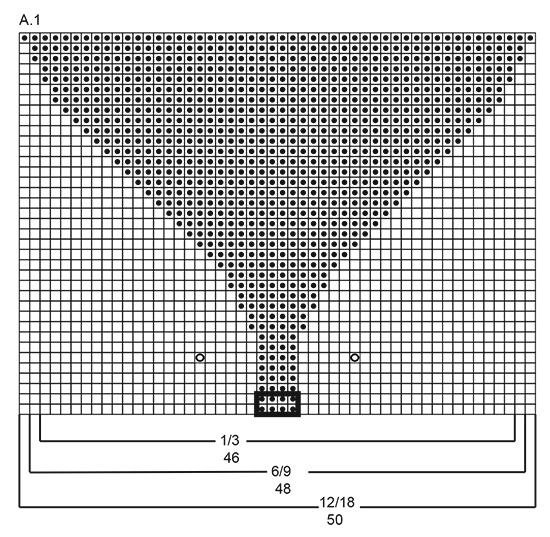
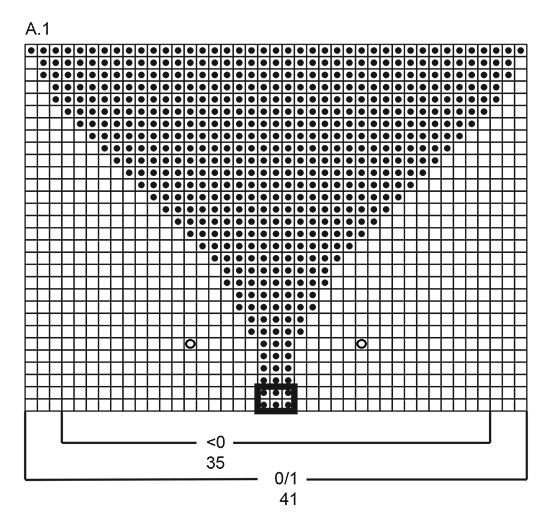
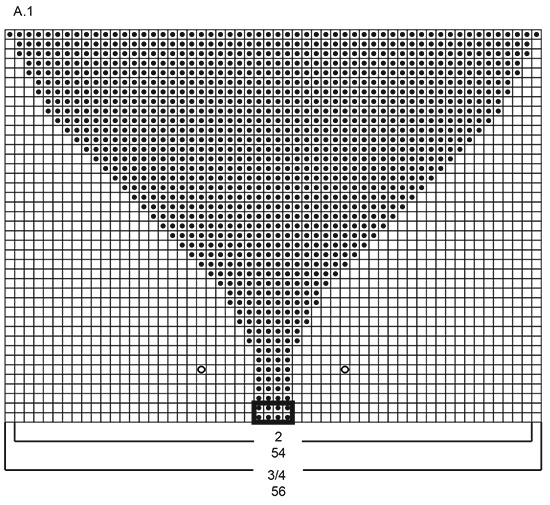
------------------------------------------------------- EXPLANATIONS FOR THE PATTERN: ------------------------------------------------------- RIDGE/GARTER STITCH (worked back and forth): Knit all rows. 1 ridge in height = Knit 2 rows. PATTERN: Hat: See diagram A.1 – choose diagram for your size. Mittens: See diagram A.2 – choose diagram for your size. The diagrams are worked in stocking stitch. NOTE: To avoid holes when changing colour, twist the 2 strands together. The thick square around the stitches marks where you work duplicate stitches for the fox’s nose. The diagram shows all rows in the pattern from the right side. DECREASE TIP (for hat): Decrease evenly spaced from the wrong side by purling 2 together (= 1 stitch decreased). ------------------------------------------------------- START THE PIECE HERE: ------------------------------------------------------- HAT – SHORT OVERVIEW OF THE PIECE: The piece is worked back and forth with circular needle in 2 sections which are sewn together to finish. Section 1 is worked with fox-pattern and section 2 is worked with one colour. SECTION 1 (with fox-pattern): Cast on (40) 44-48-52-52 (56-60) stitches (including 1 edge stitch on each side) with circular needle size 2.5 mm and rust. Purl 1 row from the wrong side. Then work as follows from the right side: Work 1 edge stitch in GARTER STITCH – read description above, * knit 2, purl 2 *, work from *-* until there are 3 stitches left, knit 2 and 1 edge stitch in garter stitch. When the rib measures (2) 2-2-2-3 (3-3) cm, change to circular needle size 3 mm. Purl 1 row from the wrong side and decrease (3) 1-0-2-0 (0-2) stitches evenly spaced – read DECREASE TIP = (37) 43-48-50-52 (56-58) stitches. Then work pattern as follows: 1 edge stitch in garter stitch (edge stitch worked in same colour as the first stitch in A.1), A.1 (= (35) 41-46-48-50 (54-56) stitches) and finish with 1 edge stitch in garter stitch (edge stitch worked in same colour as the last stitch in A.1). When working with 2 colours, work the first part with light pearl grey using the strand from the outside of the ball, the part with rust using the strand from the outside of the ball and the second part with light pearl grey using the strand from the inside of the ball (i.e. you are using 3 strands, 2 strands light pearl grey and 1 strand rust on the same row). Continue this pattern. REMEMBER THE KNITTING TENSION! When all stitches have been worked with rust (the piece measures approx. (10) 11-12-13-15 (15-16) cm), continue with rust until the piece measures (16) 16-17-18-19 (20-21) cm. Cast off with knit from the right side. SECTION 2 (one-coloured): Cast on (40) 44-48-52-52 (56-60) stitches (including 1 edge stitch on each side) with circular needle size 2.5 mm and rust. Purl 1 row from the wrong side. Then work as follows from the right side: 1 edge stitch in garter stitch, * purl 2, knit 2 *, work from *-* until there are 3 stitches left, purl 2 and 1 edge stitch in garter stitch. When the rib measures (2) 2-2-2-3 (3-3) cm, change to circular needle size 3 mm. Purl 1 row from the wrong side and decrease (3) 1-0-2-0 (0-2) stitches evenly spaced = (37) 43-48-50-52 (56-58) stitches. Work stocking stitch with 1 edge stitch in garter stitch on each side, using rust until the piece measures (16) 16-17-18-19 (20-21) cm; adjust to match section 1. Cast off with knit from the right side. ASSEMBLY: Sew the hat together inside the 1 edge stitch on each side. Sew the top of the hat neatly together. Sew a triangle in each corner at the top, sewing through both layers, from approx. 3 cm down the side to approx. 3 cm across the top of the hat (= fox-ears). Sew the nose and eyes with duplicate stitches using dark grey – see markings in the diagram. ------------------------------------------------------- MITTENS - SHORT OVERVIEW OF THE PIECE: The piece is worked back and forth with circular needle. MITTEN: Cast on 42-46 stitches (including 1 edge stitch on each side) with circular needle size 2.5 mm and rust. Purl 1 row from the wrong side then work rib (= knit 2, purl 2) starting from the right side and with 1 edge stitch in GARTER STITCH – read description above, on each side. When the piece measures 4-4 cm, work stocking stitch with 1 edge stitch in garter stitch on each side until the piece measures 5-6½ cm. REMEMBER THE KNITTING TENSION! Work 1 edge stitch in garter stitch, A.2 (= 40-44 stitches) and 1 edge stitch in garter stitch. When working with 2 colours, work the first part with light pearl grey using the strand from the outside of the ball, the first part with rust using the strand from the outside of the ball, the second part with light pearl grey using the strand from the inside of the ball and the second part with rust using the strand from the inside of the ball (i.e. you are using 4 strands, 2 strands light pearl grey and 2 strands rust on the same row). When A.2 has been worked 1 time in height there are 10 stitches left on the needle. Cut the strand and pull it through the remaining stitches and fasten well. The mitten measures approx. 12-14 cm. Work 1 more mitten in the same way. ASSEMBLY: Sew nose and eyes with duplicate stitches and dark grey – see markings in the diagram. Sew the mitten together inside the 1 edge stitch. |
||||||||||||||||||||||
Diagram explanations |
||||||||||||||||||||||
|
||||||||||||||||||||||
 |
||||||||||||||||||||||
 |
||||||||||||||||||||||
 |
||||||||||||||||||||||
 |
||||||||||||||||||||||
Have you finished this pattern?Tag your pictures with #dropspattern #babyfoxhat or submit them to the #dropsfan gallery. Do you need help with this pattern?You'll find 21 tutorial videos, a Comments/Questions area and more by visiting the pattern on garnstudio.com. © 1982-2026 DROPS Design A/S. We reserve all rights. This document, including all its sub-sections, has copyrights. Read more about what you can do with our patterns at the bottom of each pattern on our site. |
||||||||||||||||||||||


With over 40 years in knitting and crochet design, DROPS Design offers one of the most extensive collections of free patterns on the internet - translated to 17 languages. As of today we count 325 catalogues and 12298 patterns translated into English (UK/cm). 12298
We work hard to bring you the best knitting and crochet have to offer, inspiration and advice as well as great quality yarns at incredible prices! Would you like to use our patterns for other than personal use? You can read what you are allowed to do in the Copyright text at the bottom of all our patterns. Happy crafting!
Post a comment to pattern DROPS Baby 36-1
We would love to hear what you have to say about this pattern!
If you want to leave a question, please make sure you select the correct category in the form below, to speed up the answering process. Required fields are marked *.