
Popular categories
Looking for a yarn?


Comments / Questions (41)
![]() Tineke Van Der Veer wrote:
Tineke Van Der Veer wrote:
In de teltekening A1/A2 zit bij de pijl een fout tussen de meerderingen zit 1 steek en geen twee zoals het patroon aangeeft, je eindigt voor de 5 rechte steken van de bais wel met twee steken.
01.04.2020 - 09:56
![]() Selma Van Tartwijk wrote:
Selma Van Tartwijk wrote:
Vielen Dank Birgit. De oplossing van mijn probleem is re vinden in het commentaar bij het patroon van de vergelijkbare trui. De beschrijving van het meerderen in dit patroon is onvolledig. Voor en na de knoop van drie steken moet je nl. Anders meerderen. Dit is te zien in de video bij het patroon voor de trui.
23.03.2020 - 16:01DROPS Design answered:
Dag Selma,
Fijn om te horen dat je er nu uit bent gekomen en bedankt voor de terugkoppeling.
27.03.2020 - 13:41
![]() Selma Van Tartwijk wrote:
Selma Van Tartwijk wrote:
Sorry, maar ik zie de oplossing niet. Als ik begin met 111 steken, dan meerder tot 143 vervolgens A1 en A2 brei heb ik na de eerste nld waarin meerderingen staan toch 26keer een steek gemeerderd waardoor ik op 169 steken kom? Ik kom nog steeds niet verder. Het klopt toch dat ik 26 keer A2 per nld brei en een keer A1 om de nld te beginnen?
23.03.2020 - 10:12
![]() Selma Van Tartwijk wrote:
Selma Van Tartwijk wrote:
Heeft u enig idee hoe lang het nog duurt voor ik antwoord krijg? Ik wacht nu al 15 werkdagen.
13.03.2020 - 14:43
![]() Selma Van Tartwijk wrote:
Selma Van Tartwijk wrote:
Ik loop vast in het patroon voor maat medium. Aan het eind van de naald patroon A.2 waar het pijltje voor staat houd ik na het patroon en dus voor de vijf steken van de bies drie steken over. Voordat ik de meerderingen van die naald toepas heb ik 169 steken op de naald. Heb ik een fout gemaakt? Hoe moet ik verder?
23.02.2020 - 14:39DROPS Design answered:
Dag Selma,
Op de naald met de pijl in A.1/A.2 zitten er 2 steken in A.1, dan herhaal je steeds A.2 steeds waarbij je in de steken met de ruitjes meerderingen maakt. tussen de laatste en de eerstevolgende meerdering zitten dus steeds 2 steken. Als je het op die manier doet zou je uit moeten komen. Op het moment dat je de naald met de pijl breit, zou je, als ik het goed berekend heb 157 steken op de naald moeten hebben, dus er is mogelijk ergens anders iets mis gegaan.
22.03.2020 - 18:16
![]() Birgit wrote:
Birgit wrote:
Ich habe das gleiche Problem wie Sylvie. Bei dem Pfeil stricke ich in A 1 nur 2 M. Dann stricke ich A2. Bei dem 1. Rapport ist der Knoten über dem darunterliegenden. Bei jedem weiteren Rapport ist doch eine Masche zuviel? Der Knoten versetzt sich immer um 1M weiter, da man immer auf 6M nun 7M strickt.
21.02.2020 - 11:23Birgit answered:
Hallo. Ich habe die Lösung in den Kommentaren zu Drops 213-9 gefunden. In dem Video ist es prima zu sehen. In der Anleitung beschreibt ihr die Zunahmen (3. Symbol )aber anders.
21.02.2020 - 11:42
![]() Ylva wrote:
Ylva wrote:
Jag undrar också över varvet med pil. Stickar i storlek M. Gör jag en ökning efter knuten blir hela mönstret förskjutet. Hur ska det vara?
26.01.2020 - 11:29DROPS Design answered:
Hei Ylva. Om du ser på diagrammene er ikke knutene rett over hverandre hele veien, men litt forskyvet og husk ved 2. gangs økning (i A.2) strikkes det bare 2 masker av A.1. God Fornøyelse!
10.02.2020 - 13:14
![]() Thomas Sylvie wrote:
Thomas Sylvie wrote:
Bonjour je ne comprends pas comment suivre la charte des augmentations de ce joli gilet Taille M je suis A1 et ensuite A2 sur le même rang ça ça va mais la flèche noir ? Je pense 2 mailles une augm le point sur 3 mailles une augm 2 mailles ? C'est celà ? D'avance merci Mm Thomas
19.01.2020 - 10:05DROPS Design answered:
Bonjour Mme Thomas, au rang avec la flèche, les augmentations se font avec le symbole losange: vous augmentez dans la 3ème de A.1 = l a 1ère m tricotée = la dernière m de A.1, la 2ème m tricotée = la 1ère m de A.2 et on augmente ensuite 1 m dans A.2 après la diminution. Bon tricot!
06.03.2020 - 10:07
![]() Cristina wrote:
Cristina wrote:
Se avessi lo schema lo farei sicuramente. Particolare e molto bello.
07.01.2020 - 20:34
![]() Maria wrote:
Maria wrote:
Går att bära till allt 😍
29.12.2019 - 18:04
|
|||||||||||||
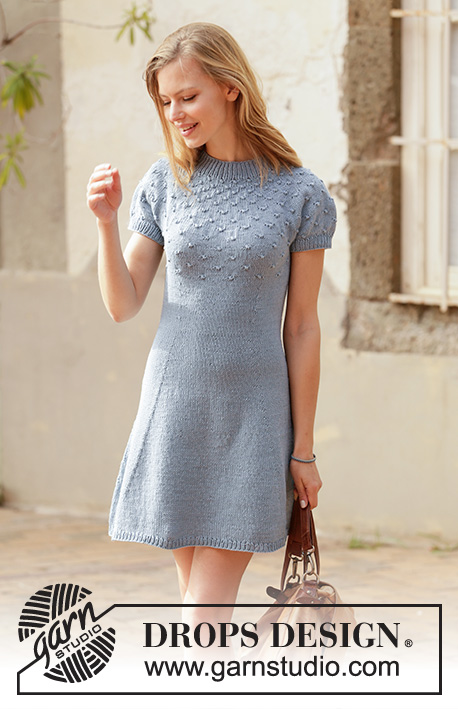
Dots and Drops Jacket#dotsanddropsjacket |
|||||||||||||
 |
 |
||||||||||||
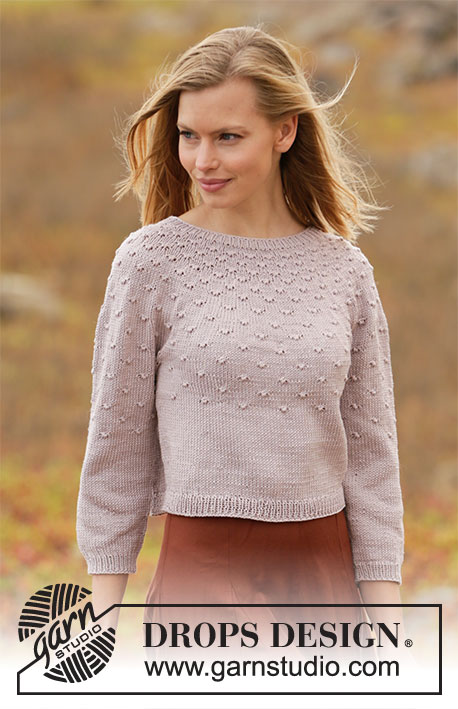
Knitted jacket in DROPS Muskat. The piece is worked top down with round yoke, knotted pattern and ¾-length sleeves. Sizes XS - XXL.
DROPS 213-10 |
|||||||||||||
|
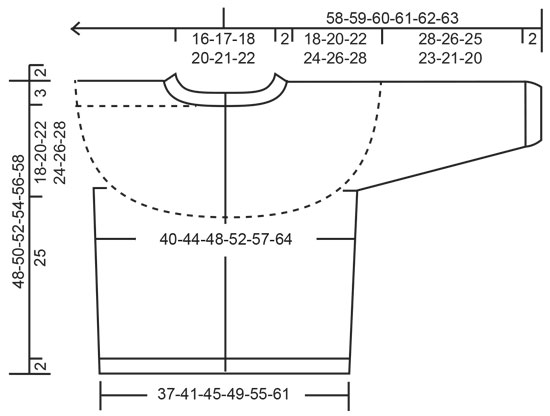
------------------------------------------------------- EXPLANATIONS FOR THE PATTERN: ------------------------------------------------------- RIDGE/GARTER STITCH (worked back and forth): Knit all rows. 1 ridge in height = Knit 2 rows. PATTERN: See diagrams A.1 to A.4. Choose diagram for your size (applies to A.1 and A.2). The diagrams show all the rows in the pattern seen from the right side. INCREASE TIP (evenly spaced): To work out how to increase evenly, count the total number of stitches on the needle (e.g. 103 stitches) minus the bands (i.e. 10 stitches) and divide the remaining stitches by the number of increases to be made (e.g. 20) = 4.7. In this example, increase from the right side by making 1 yarn over after alternatively each 4th and 5th stitch (approx.). Do not increase over the bands. On the next row (wrong side) purl the yarn overs twisted to avoid holes. DECREASE TIP (for sides of body and mid under sleeves): Decrease 1 stitch on each side of the marker thread as follows: Work until there are 3 stitches left before the marker thread, knit 2 together, knit 2 (marker thread sits between these 2 stitches) slip 1 stitch as if to knit, knit 1 and pass the slipped stitch over the knitted stitch (= 2 stitches decreased). BUTTONHOLES: Work buttonholes on right band (when garment is worn). Work from the right side when there are 3 stitches left on row as follows: Make 1 yarn over, knit 2 together and knit the last stitch. On the next row (wrong side) knit the yarn over to leave a hole. The first buttonhole is worked when the neck measures approx. 2 cm. Then work the other 5-5-6-6-6-6 buttonholes with approx. 8½-9-8-8½-8½-9 cm between each one. CASTING-OFF TIP: To avoid the cast-off edge being tight you can cast off with a larger size needle. If the edge is still tight, make 1 yarn over after approx. each 8th stitch at the same time as casting off and the yarn overs are cast off as normal stitches. ------------------------------------------------------- START THE PIECE HERE: ------------------------------------------------------- JACKET – SHORT OVERVIEW OF THE PIECE: The neck and yoke are worked back and forth with circular needle from mid front and top down. The yoke is divided for body and sleeves and the body continue back and forth with circular needle. The sleeves are worked in the round with double pointed needles/short circular needle, top down. NECK: Cast on 103-107-111-119-123-127 stitches (including 5 band stitches on each side towards mid front) with circular needle size 3mm and Muskat. Purl 1 row (= wrong side). The next row is worked as follows from the right side: 5 band stitches in GARTER STITCH – read description above, * knit 1, purl 1 *, work from *-* until there are 6 stitches left on the row, knit 1 and finish with 5 band stitches in garter stitch. Continue this rib for 2 cm – remember BUTTONHOLES on right band – read description above. When the rib is finished, knit 1 row from the right side where you increase 20-26-32-34-45-56 stitches evenly spaced – read INCREASE TIP = 123-133-143-153-168-183 stitches. Purl 1 row from the wrong side (yarn overs purled twisted and bands worked in garter stitch). Insert 1 marker after the band at the beginning of the next row; the yoke will be measured from this marker! Then work the yoke as described below. YOKE: Change to circular needle size 4 mm and work the first row from the right side as follows: 5 band stitches in garter stitch, work A.1 (= 3 stitches), A.2 until there are 5 stitches left on the row (= 22-24-26-28-31-34 repeats of 5 stitches) and finish with 5 band stitches in garter stitch. Continue this pattern and increase as shown in A.2. REMEMBER THE KNITTING TENSION! When A.1 and A.2 have been completed there are 233-253-273-293-323-353 stitches on the needle. The next row is worked as follows from the right side: 5 band stitches in garter stitch, work A.3 (= 3 stitches), A.4 until there are 5 stitches left on the row (= 22-24-26-28-31-34 repeats of 10 stitches) and finish with 5 band stitches in garter stitch. Continue this pattern and increase as shown in A.4. After the last increase in A.4 there are 277-301-325-349-385-421 stitches on the needle. Continue working until the piece measures 18-20-22-24-26-28 cm from the marker on the neck – NOTE: In the smallest size, A.3 and A.4 are not finished at this point and in the other sizes, A.x and A.y need to be repeated to the correct length (the patterns will continue on the body and sleeves). Now divide the piece for the body and sleeves on the next row as follows: Work 43-47-52-55-61-68 stitches in garter stitch and pattern as before (= front piece), place the next 57-61-64-70-77-81 stitches on 1 thread for sleeve, cast on 8-8-8-10-10-10 new stitches on the needle (= in side under the sleeve), work 77-85-93-99-109-123 stitches in pattern as before (= back piece), place the next 57-61-64-70-77-81 stitches on 1 thread for sleeve, cast on 8-8-8-10-10-10 new stitches on the needle (= in side under the sleeve) and work the remaining 43-47-52-55-61-68 stitches in pattern and garter stitch as before (= front piece). Body and sleeves are finished separately. THE PIECE IS NOW MEASURED FROM HERE! BODY: = 179-195-213-229-251-279 stitches. Insert 1 marker thread 47-51-56-60-65-72 stitches in from each side (= 85-93-101-109-121-135 stitches between marker threads on the back piece). Allow the threads to follow your work onwards; they will be used when decreasing on each side of the body. Now continue the pattern AT THE SAME TIME as decreasing in the sides of the body as described below: Work A.x and A.y back and forth as before with 5 band stitches in garter stitch on each side towards mid front making sure you continue on the right row in the diagram after the yoke and make sure the knots are worked above the knots on the yoke. The 8-8-8-10-10-10 stitches cast on under each sleeve are worked in stocking stitch. When the piece measures approx. 6 cm from the division in all sizes, finish A.x and A.y after 1 row of knots. Then continue with stocking stitch with 5 band stitches in garter stitch on each side. AT THE SAME TIME when the piece measures 6 cm from the division in all sizes decrease 1 stitch on each side of both marker threads – read DECREASE TIP (= 4 stitches decreased). Decrease like this every 6 cm a total of 3 times on each side = 167-183-201-217-239-267 stitches. Continue working until the piece measures 25 cm from the division in all sizes (there are 2 cm left to finished length; you can try the jacket on and work to desired length). Knit 1 row from the right side where you increase 16-18-20-20-24-26 stitches evenly spaced – remember INCREASE TIP = 183-201-221-237-263-293 stitches (this increase prevents the rib being tight). Change to circular needle size 3 mm. The next row is worked as follows from the wrong side: 5 band stitches in garter stitch, * purl 1, knit 1 *, work from *-* until there are 6 stitches left on the row, purl 1 and finish with 5 band stitches in garter stitch. Continue this rib for 2 cm. Cast off with garter stitch over garter stitch, knit over knit and purl over purl – read CASTING-OFF TIP! The jacket measures approx. 48-50-52-54-56-58 cm from the shoulder down. SLEEVE: Place the 57-61-64-70-77-81 stitches from the thread on the one side of the piece on double pointed needles/short circular needle size 4 mm and knit up 1 stitch in each of the 8-8-8-10-10-10 stitches cast on under the sleeve = 65-69-72-80-87-91 stitches. Insert a marker thread in the middle of the 8-8-8-10-10-10 stitches under the sleeve and allow the thread to follow your work onwards; it will be used when decreasing mid under sleeve. Now continue with pattern AT THE SAME TIME as you decrease mid under sleeve as follows: Start the round at the marker thread and work A.y in the round making sure you continue on the right row in the diagram after the yoke and that the knots are worked above the knots on the yoke. The 8-8-8-10-10-10 stitches cast on under the sleeve are worked in stocking stitch. When the sleeve measures 12 cm from the division in all sizes, finish A.y after a round of knots. Continue with stocking stitch in the round over all stitches. AT THE SAME TIME when the piece measures 2-2-2-2-3-3 cm from the division decrease 2 stitches mid under the sleeve – read DECREASE TIP. Decrease like this every 3½-3-2½-1½-1-1 cm a total of 7-8-9-12-14-15 times = 51-53-54-56-59-61 stitches. Continue working until the piece measures 28-26-25-23-21-20 cm from the division (there are 2 cm left to finished length; you can try the jacket on and work to desired length). NOTE: Shorter measurements in larger sizes due to wider neck and longer yoke. Change to double pointed needles size 3 mm and knit 1 round where you decrease 1-1-0-0-1-1 stitches = 50-52-54-56-58-60 stitches. Then work rib in the round (= knit 1 / purl 1) for 2 cm. Cast off with knit over knit and purl over purl – remember CASTING-OFF TIP. The sleeve measures approx. 30-28-27-25-23-22 cm from the division. Work the other sleeve in the same way. ASSEMBLY: Sew the buttons onto the left band. |
|||||||||||||
Diagram explanations |
|||||||||||||
|
|||||||||||||
 |
|||||||||||||
 |
|||||||||||||
Have you finished this pattern?Tag your pictures with #dropspattern #dotsanddropsjacket or submit them to the #dropsfan gallery. Do you need help with this pattern?You'll find 29 tutorial videos, a Comments/Questions area and more by visiting the pattern on garnstudio.com. © 1982-2026 DROPS Design A/S. We reserve all rights. This document, including all its sub-sections, has copyrights. Read more about what you can do with our patterns at the bottom of each pattern on our site. |
|||||||||||||


With over 40 years in knitting and crochet design, DROPS Design offers one of the most extensive collections of free patterns on the internet - translated to 17 languages. As of today we count 324 catalogues and 12290 patterns translated into English (UK/cm). 12290
We work hard to bring you the best knitting and crochet have to offer, inspiration and advice as well as great quality yarns at incredible prices! Would you like to use our patterns for other than personal use? You can read what you are allowed to do in the Copyright text at the bottom of all our patterns. Happy crafting!
Post a comment to pattern DROPS 213-10
We would love to hear what you have to say about this pattern!
If you want to leave a question, please make sure you select the correct category in the form below, to speed up the answering process. Required fields are marked *.