
Popular categories
Looking for a yarn?


Comments / Questions (23)
![]() Nikki wrote:
Nikki wrote:
In het patroon staat: "Als het werk ongeveer 2 cm meet vanaf waar het werk was samengevoegd, minder dan op de voor- en achterkant als volgt: 2 recht samen aan elke kant van beide steken met de markeerdraden (= 4 steken geminderd). Ga verder met ribbelsteek en minder tegelijkertijd zo iedere naald aan de goede kant tot het werk ongeveer 5-5-6 cm meet vanaf waar het werk was samengevoegd." Moet ik alleen aan de goede kant (de voorkant) minderen of aan de voor- en achterkant?
17.11.2025 - 22:08DROPS Design answered:
Dag Nikki,
Inderdaad, je mindert alleen aan de goede kant. Aan de verkeerde kant minder je niet.
24.11.2025 - 22:02
![]() Williamkar wrote:
Williamkar wrote:
Приборка в Питере! Жилые помещения, Загородные резиденции, Кабинеты. Опытный уход по лояльным расценкам. Избавьтесь от хлопот! Оформите заказ клининг немедленно! Двигайтесь к Генеральная Уборка Кухни
13.10.2025 - 06:02
![]() Caroline Brent wrote:
Caroline Brent wrote:
I've re-read and now realise the two sets of markers indicate the sizes, so sorry, all sorted now, lovely pattern, thank you
20.02.2025 - 10:51
![]() Caroline Brent wrote:
Caroline Brent wrote:
I don't understand the decrease Knit 2 together on each side of both stitches with markers (= 4 stitches decreased). Continue with garter stitch and at the same time decrease like this every row from the right side until the piece measures approx. 5-5-6 cm from where the piece was put together. there are 2 sets of 3 markers, what does both refer to stuck with how many stitches i'm decreasing and where. thank you
17.02.2025 - 17:33DROPS Design answered:
Dear Mrs Brent, there are 2 markers: 1 on mid front (22nd-24th-27th stitch) and one on mid back (52nd-57th-63rd stitch), so you will decrease 1 stitch on each side of these both markers: K2 tog, K1 with the marker, K2 tog = you decrease 4 stitches on every decrease row. Happy knitting!
20.02.2025 - 12:29
![]() Mijo wrote:
Mijo wrote:
Comment avoir les explications en français ? Merci de me répondre
15.03.2024 - 08:10DROPS Design answered:
Bonjour Mme Mijo, cliquez sur le menu déroulant à côté de l'icône de l'imprimante pour changer de langue et basculer les explications en français. Bon tricot!
15.03.2024 - 09:34
![]() Sabrina Pfeifer-Schmidt wrote:
Sabrina Pfeifer-Schmidt wrote:
Schlag ich für den Fußrücken "nur" 36 Maschen an?
05.11.2023 - 19:33DROPS Design answered:
Liebe Frau Pfeifer-Schmidt, ich finde leider keine "36" Maschen in diese Anleitung, Fussrücken wird über 9 oder 11 Maschen + 2 neuen Maschen gestrickt. Was meinen Sie hier? können Sie uns mehr sagen? Danke im voraus für Ihr Verständnis.
06.11.2023 - 08:56
![]() Maria wrote:
Maria wrote:
Je ne comprends pas ce que "Continuer ainsi jusqu'à ce que l'ouvrage mesure 4 cm depuis les 3 mailles rabattues – ajuster pour que le dernier rang soit tricoté sur l'envers" veut dire. Est-ce qu'il faut faire des mailles endroits là où il y a les mailles endroits et cotes là où il y a des cotes ?
22.03.2023 - 16:28DROPS Design answered:
Bonjour Maria, tricotez jusqu'à ce que l'ouvrage mesure 4 cm, mais vous devez arrêter après un rang sur l'envers, autrement dit, tricotez un rang de plus / de moins (en fonction de votre tension en hauteur), de sorte que votre dernier rang sera tricoté sur l'envers, ainsi, le rang suivant pourra être tricoté sur l'endroit de l'ouvrage. Mais les mailles se tricoteront exactement comme avant. Bon tricot!
23.03.2023 - 09:23
![]() Pam Matuszewski wrote:
Pam Matuszewski wrote:
Hi - Can you please explain the foot section on the right side? I think it didn’t translate well and I’m having trouble understanding everything before ‘THE PIECE IS NOW MEASURED FROM HERE’ Thanks!
29.11.2022 - 04:37DROPS Design answered:
Dear Mrs Matuszewski, this video shows how to work a similar slipper (with another number of stitches) - ie how to slip sts aside and how to work the middle stitches for uppper part, then how to pick up sts (just before the section "measure from here"). Hope it can help. Happy kniting!
29.11.2022 - 10:21
![]() Piera wrote:
Piera wrote:
Buongiorno, sto eseguendo questo modello e mi sembra un po' fuorviante la dicitura del posizionamento dei segnaposti alla 22/24/27 e 52/57/63 esimo punto perchè io inizilmente li ho inseriti nel ferro a rovescio del lavoro in quanto era il ferro che si stava lavorando. Però così facendo i punti non corrispondono al centro davanti e dietro. Li ho poi inseriti nel ferro davanti e finalmente mi sono risultati giusti. Grazie Piera
25.10.2022 - 18:07DROPS Design answered:
Buonasera Piera, i segnapunti vanno inseriti dopo il ferro a rovescio. Buon lavoro!
25.10.2022 - 20:13
![]() Alessandra wrote:
Alessandra wrote:
Semplice e scorrevole come lavoro, si realizza velocemente, tuttavia non riesco ad individurare dove sbaglio visto che quando la confeziono vien fuori un quadrato e nn un ovale.... Ho provato sia con la spiegazione fornita, sia con la chiusura invisibile.... ma il risultato è lo stesso.
26.02.2022 - 23:00
|
|
Beyond Boots#beyondboots |
|
|
|
|
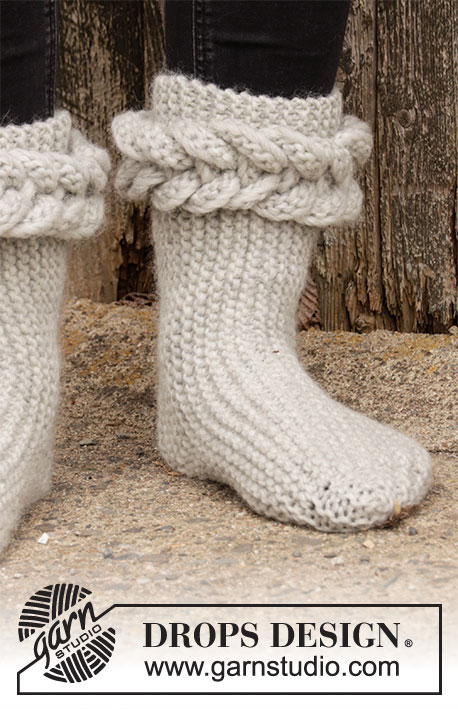
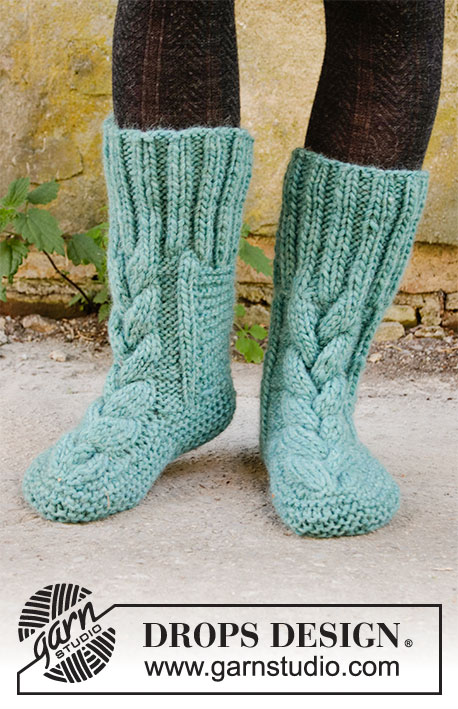
Knitted slippers in DROPS Snow. The piece is worked top down with garter stitch and Fisherman`s rib. Sizes 35-42.
DROPS 203-27 |
|
|
------------------------------------------------------- EXPLANATIONS FOR THE PATTERN: ------------------------------------------------------- RIDGE/GARTER STITCH (worked back and forth): Knit all rows. 1 ridge in height = Knit 2 rows. FISHERMAN`S RIB (back and forth): ROW 1 (= wrong side): Knit all stitches ROW 2 (= right side): * Purl 1, knit 1 in stitch under the next stitch *, work from *-* og finish with purl 1. ROW 3 (= wrong side): * Knit 1 in stitch under the next stitch, purl 1 *, work from *-* and finish with knit 1 in stitch under the next stitch. Repeat row 2 and 3. ------------------------------------------------------- START THE PIECE HERE: ------------------------------------------------------- SLIPPERS – SHORT OVERVIEW OF THE PIECE: The piece is worked back and forth with circular needle, top down. The slipper is sewn together to finish. RIGHT SLIPPER: LEG: Cast on 39-41-43 stitches with circular needle size 6 mm and Snow. Knit 3 rows. Then work as follows: 3 stitches in GARTER STITCH – read description above, work FISHERMAN`S RIB – read description above, until there are 3 stitches left and finally 3 stitches in garter stitch. Continue with Fisherman`s rib and 3 stitches in garter stitch on each side (= bands) until the piece measures 12 cm. REMEMBER THE KNITTING TENSION! On the next row from the right side cast off the 3 stitches in garter stitch, knit the next 5-4-5 stitches, work Fisherman`s rib over the next 9-11-11 stitches as before and garter stitch over the last 22-23-24 stitches. Continue like this until the piece measures 4 cm from where the 3 stitches were cast off – adjust so the last row is from the wrong side. Cut the strand. UPPER: Start from the right side (= on the side where the 3 stitches were cast off), place the first 5-4-5 stitches on a strand, keep the next 9-11-11 stitches on the needle and place the last 22-23-24 stitches on a thread. Now work Fisherman`s rib over the 9-11-11 stitches as follows: Start from the right side and cast on 1 new stitch, work Fisherman`s rib over the 9-11-11 stitches as before and cast on 1 new stitch at the end of the row (make a loop which is placed twisted on the needle) = 11-13-13 stitches. Continue with 1 edge stitch in garter stitch on each side of the 9-11-11 stitches in Fisherman`s rib until the upper measures approx. 7-8½-10 cm. On the next row from the wrong side decrease the edge stitches by working them together with the stitch beside them = 9-11-11 stitches. Place all the stitches on a thread. Cut the strand. FOOT: Start from the right side (= on the side where the 3 stitches were cast off), place the first 5-4-5 stitches from the thread back on the needle and knit these stitches, knit up 12-14-16 stitches inside the 1 edge stitch on the upper. Place the 9-11-11 stitches from the upper back on the needle and knit them. Knit up 12-14-16 stitches inside the 1 edge stitch along the other side of the upper. Place the 22-23-24 stitches from the last thread back on the needle and knit them. There are now 60-66-72 stitches on the needle. THE PIECE IS NOW MEASURED FROM HERE. Knit 1 row from the wrong side. Insert 1 marker in the 22nd-24th-27th stitch (mid front) and 1 marker in the 52nd-57th-63rd stitch (mid back). Work garter stitch. When the piece measures approx. 2 cm from where the piece was put together, decrease front and back as follows: Knit 2 together on each side of both stitches with markers (= 4 stitches decreased). Continue with garter stitch and at the same time decrease like this every row from the right side until the piece measures approx. 5-5-6 cm from where the piece was put together. Cast off with knit from the right side. ASSEMBLY: Fold the slipper so the 3 cast-off stitches (band) are over the band on the other side of the slipper. The cast-off edge is together and the long-sides meet. Sew in the outermost loop of the outermost ridge from the cast-off edge and up along the side of the slipper as far as the bands. Cut and fasten the strand. Then sew the cast-off edge together, sewing in the outermost loop of the outermost stitch so the seam is flat. Cut and fasten the strand. Place 3 buttons evenly spaced on the outermost band and sew them on, through both layers. LEFT SLIPPER: LEG: Cast on 39-41-43 stitches with circular needle size 6 mm and Snow. Knit 3 rows. Then work as follows: 3 stitches in GARTER STITCH – read description above, work FISHERMAN`S RIB – read description above, until there are 3 stitches left and 3 stitches in garter stitch. Continue with Fisherman`s rib and 3 stitches in garter stitch on each side (= bands) until the piece measures 12 cm. On the next row from the wrong side cast off the 3 stitches in garter stitch, knit the next 5-4-5 stitches, work Fisherman`s rib over the next 9-11-11 stitches as before and knit over the last 22-23-24 stitches. Continue like this until the piece measures 4 cm from where the 3 stitches were cast off – adjust so the last row is from the wrong side. Cut the strand. UPPER: Start from the right side (= on the opposite side from where the 3 stitches were cast off), place the first 22-23-24 stitches on a strand, keep the next 9-11-11 stitches on the needle and place the last 5-4-5 stitches on a thread. Now work Fisherman`s rib over the 9-11-11 stitches as follows: Start from the right side and cast on 1 new stitch, work Fisherman`s rib over the 9-11-11 stitches as before and cast on 1 new stitch at the end of the row (make a loop which is placed twisted on the needle) = 11-13-13 stitches. Continue with 1 edge stitch in garter stitch on each side of the 9-11-11 stitches in Fisherman`s rib until the upper measures approx. 7-8½-10 cm. On the next row from the wrong side decrease the edge stitches by working them together with the stitch beside them = 9-11-11 stitches. Place these stitches on a thread. Cut the strand. FOOT: Start from the right side (= on the opposite side from where the 3 stitches were cast off), place the first 22-23-24 stitches from the thread back on the needle and knit these stitches, knit up 12-14-16 stitches inside the 1 edge stitch on the upper. Place the 9-11-11 stitches from the upper back on the needle and knit them. Knit up 12-14-16 stitches inside the 1 edge stitch along the other side of the upper. Place the 5-4-5 stitches from the last thread back on the needle and knit them. There are now 60-66-72 stitches on the needle. THE PIECE IS NOW MEASURED FROM HERE. Knit 1 row from the wrong side. Insert 1 marker in the 9th-10th-10th stitch (mid back) and 1 marker in the 39th-43rd-46th stitch (mid front). Work garter stitch. When the piece measures approx. 2 cm from where the piece was put together, decrease front and back as follows: Knit 2 together on each side of both stitches with markers (= 4 stitches decreased). Continue with garter stitch and at the same time decrease like this every row from the right side until the piece measures approx. 5-5-6 cm from where the piece was put together. Cast off with knit from the right side ASSEMBLY: The slipper is assembled in the same way as the right slipper. |
|
Have you finished this pattern?Tag your pictures with #dropspattern #beyondboots or submit them to the #dropsfan gallery. Do you need help with this pattern?You'll find 22 tutorial videos, a Comments/Questions area and more by visiting the pattern on garnstudio.com. © 1982-2026 DROPS Design A/S. We reserve all rights. This document, including all its sub-sections, has copyrights. Read more about what you can do with our patterns at the bottom of each pattern on our site. |


With over 40 years in knitting and crochet design, DROPS Design offers one of the most extensive collections of free patterns on the internet - translated to 17 languages. As of today we count 324 catalogues and 12290 patterns translated into English (UK/cm). 12290
We work hard to bring you the best knitting and crochet have to offer, inspiration and advice as well as great quality yarns at incredible prices! Would you like to use our patterns for other than personal use? You can read what you are allowed to do in the Copyright text at the bottom of all our patterns. Happy crafting!
Post a comment to pattern DROPS 203-27
We would love to hear what you have to say about this pattern!
If you want to leave a question, please make sure you select the correct category in the form below, to speed up the answering process. Required fields are marked *.