
Popular categories
Looking for a yarn?


Comments / Questions (37)
![]() Anna wrote:
Anna wrote:
Ciao. ancora un dubbio; cosa significa " Continuare questo motivo fino a quando le maglie indicate con una stella in A.6 sono state lavorate su tutte le maglie sul ferro"? grazie
11.06.2025 - 14:49DROPS Design answered:
Buonasera Anna, alla fine di A.6 deve ripetere solo la parte centrale di A.6, quella con la stella, tralasciando le parti laterali. Buon lavoro!
24.06.2025 - 22:06
![]() Anna wrote:
Anna wrote:
Ciao. ancora un dubbio; cosa significa " Continuare questo motivo fino a quando le maglie indicate con una stella in A.6 sono state lavorate su tutte le maglie sul ferro"? quindi le maglie prima e dopo le maglie indicate con la stella non devono essere lavorate? grazie
06.06.2025 - 15:50DROPS Design answered:
Buonasera Anna, esatto, deve lavorare solo sulle maglie indicate dalla stella. Buon lavoro!
24.06.2025 - 22:09
![]() Anna wrote:
Anna wrote:
Grazie della risposta alla mia precedente Ma ho bisogno di un ulteriore chiarimento Quando scrivete “ incorporare gli aumenti quando possibile in A.2/A.4”, significa che li devo lavorare seguendo i 2 motivi quando diventano 8? Visto che A2 e A 4 sono multipli di 8 Grazie ancora
02.06.2025 - 20:36DROPS Design answered:
Buonasera Anna, si, li deve lavorare in A.2/A.4. Buon lavoro!
03.06.2025 - 19:57
![]() Anna wrote:
Anna wrote:
Ciao SUGGERIMENTO PER GLI AUMENTI Non capisco “Aumentare a ogni lato della manica facendo 1 gettato all’interno delle 2 maglie del bordo a maglia legaccio a ogni lato.” Quindi si lavora tra la prima e la seconda maglia del vivagno? Poi non capisco “Poi lavorare le nuove maglie a maglia rasata fino a quando rientrano in A.2/A.4.” Cosa vuol dire rientrano? Grazie
01.06.2025 - 14:37DROPS Design answered:
Buonasera Anna, deve aumentare prima/dopo le 2 maglie di vivagno (all'interno delle 2 maglie di vivagno), e incorporare gli aumenti quando possibile in A.2/A.4. Buon lavoro!
01.06.2025 - 15:17
![]() Ly wrote:
Ly wrote:
Merci pour les informations reçu le 24.04.2025 L’étapes à A6 j’ai vraiment terminé la première étape mais la suite je suis encore bloqué parce que je n’ai pas compris de votre explications je suis vraiment désolé Je ne peux plus continuer le projet j’ai fait plusieurs tentative mais défait plusieurs vois , vous pouvez m’inscrire en anglais si c’est plus facile pour vous . Merci beaucoup
25.04.2025 - 02:46DROPS Design answered:
Bonjour Ly, lorsque A.6 est terminé comme indiqué, vous allez maintenant tricoter les diagrammes suivants ainsi; 2 m point mousse comme avant, puis vous tricotez A.7, vous répétez ensuite les 2 mailles de A.8 jusqu'à ce qu'il reste 3 maille avant le fil marqueur (milieu du rang), vous tricotez A.9 (= c'est le même motif que les 6 m précédentes au milieu de A.6), vous répétez ensuite les 2 m de A.10 jusqu'à ce qu'il reste 13 m et vous terminez par les 11 m de A.11 et 2 m point mousse. Continuez ainsi jusqu'à la hauteur indiquée pour votre taille. Bon tricot!
25.04.2025 - 07:52
![]() Ly wrote:
Ly wrote:
Bonjour, encore moi le motif central du A6 * est basé sur combien mailles je suis vraiment mélangé pour cette section la incluant A7, A8, A9 , A10, A11 Merci de votre aide
21.04.2025 - 17:55DROPS Design answered:
Bonjour Ly, on arrête A.6 lorsqu'il est tricoté sur toutes les mailles (sauf les 2 m point mousse de chaque côté), autrement dit, avant de passer aux diagrammes suivants, on va continuer le point ajouré en diagonale (cf réponse précédente) jusqu'à ce que vous ayez: 2 m point mousse, les 2 premières mailles = la diminution au début de l'étoile, puis les mailles suivantes et le point ajouré avant la torsade centrale, et en symétrie de l'autre côté, on va terminer par la diminution avant les 2 dernières mailles point mousse. Bon tricot!
22.04.2025 - 16:31
![]() Ly wrote:
Ly wrote:
Bonjour , j’ai besoin d’explication, j’ai terminé A6 en hauteur .Après je crois qu’ont continué le central du A6 * une autre fois en incluant A7 et A11 de chaque côté et terminant 2 mailles de chaque côté en cote je devrais avoir combien mailles présentement j’ai 82mailles je crois j’ai 2 mailles de trop . Mais le motif ne suis pas il est décalé Merci à l’avance
21.04.2025 - 16:26DROPS Design answered:
Bonjour Ly, quand le diagramme A.6 est terminé en hauteur, continuez à tricoter le point ajouré comme dans A.6, autrement dit, le point ajouré doit partir en diagonale comme dans l'espace indiqué par l'étoile, vous avez de moins en moins de mailles avant la diminution au début de l'étoile et après la diminution après l'étoile, et de plus en plus de mailles au point ajouré de part et d'autre de la torsade au milieu de A.6. Le nombre de mailles ne change pas à ce niveau-là, pensez à bien vérifier que vous avez toujours autant de mailles diminuées que de jeté - notez jusque qu'au milieu de A.6 vous aurez soit 2 m soit 3 mailles en fonction du rang de A.6. Bon tricot!
22.04.2025 - 16:25
![]() Anne Sofie wrote:
Anne Sofie wrote:
Hei! Jeg strikker stramt og må ha 6mm for å få riktig strikkefasthet i bredden. Tenkte ikke på å sjekke i høyden, og etter å ha fullført siste del før forkortede pinner er arbeidet mitt 14cm (!!) for langt (63cm). Hva gjør jeg?
16.03.2025 - 21:26DROPS Design answered:
Hei Anne Sofie. Strikkefastheten må stemme for at målene på plagget skal bli riktig. Du må neste gå ned i pinne størrelse og strikke løsere. mvh DROPS Design
24.03.2025 - 08:52
![]() Pernille Scheuer wrote:
Pernille Scheuer wrote:
Jeg har 92 masker - og fra midt og ud 46 masker. I skriver: Strik 2 kantmasker retstrik, fortsæt A.2 som før til der er 23 masker tilbage før mærketråden midt i arbejdet, strik A.5 (= 46 masker – mærketråden sidder nu midt i A.5), fortsæt A.4 som før til der er 2 masker tilbage på pinden og afslut med 2 kantmasker retstrik mod siden. 2kantmasker + A2(8 masker)+A2(8 masker)=18 --- hvad så med de sidste 5 masker???
14.03.2025 - 13:19DROPS Design answered:
Hei Pernille. I str. XXL/XXXL skal du skal ha 92 masker når økningene i sidene er ferdig (arbeidet måler da ca 31 cm), men når hullmønstret i A.3 vokser (arbeidet måler da ca 25 cm) skal du ha færre masker enn 92. Se vårt forrige svart til deg og se om du kan finne hvor det har blitt feil hos deg. mvh DROPS Design
17.03.2025 - 11:29
![]() Pernille Scheuer wrote:
Pernille Scheuer wrote:
Hej. I skriver: Tag ud således på hver 2½.-2½.-2.cm totalt 11-11-13 gange i hver side =80-84-92 masker (når sidste udtagning i hver side er afsluttet, måler arbejdet ca 31 cm fra opslåningskanten). Længere nede skriver I: Arbejdet måler nu ca 25 cm fra opslåningskanten. Hvor måler i de 31 cm?????? Mit måler 25 cm fra opslåningskanten
14.03.2025 - 00:19DROPS Design answered:
Hei Pernille. Husk å lese og forstå hele avsnittet før det strikkes. Først forklares økningene og hvor langt arbeidet måler etter alle økningene slik: Når arbeidet måler 6-6-7 cm skal det økes 1 masker i hver side på hver 2½.-2½.-2.cm totalt 11-11-13 ganger i hver side = 80-84-92 masker og da skal arbeidet måle fra oppleggskanten ca 31 cm. Så forklares det hvordan A.2 til A.4 strikkes og hvordan siste rapport i høyden avsluttes, og da skal arbeidet måle ca 25 cm fra oppleggskanten (husk økningene er ikke ferdig da). mvh DROPS Design
17.03.2025 - 10:15
|
|||||||||||||||||||||||||||||||
Alas de Libelula#alasdelibelulacardigan |
|||||||||||||||||||||||||||||||
 |
 |
||||||||||||||||||||||||||||||
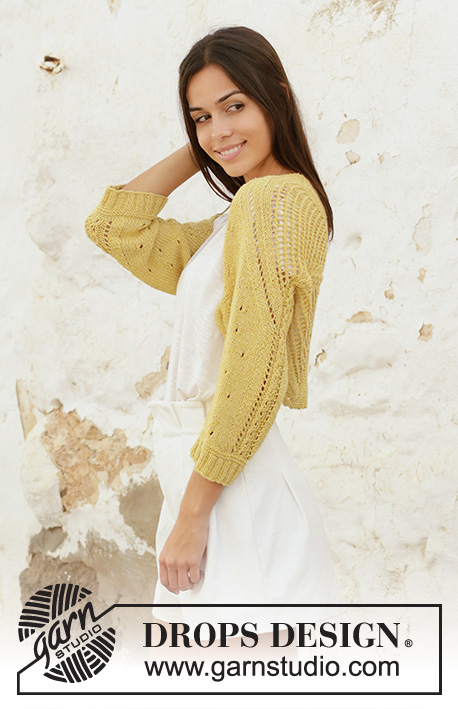
Knitted bolero in DROPS Belle. The piece is worked from the sleeve to mid-back in lace pattern. Sizes S - XXXL.
DROPS 200-25 |
|||||||||||||||||||||||||||||||
|
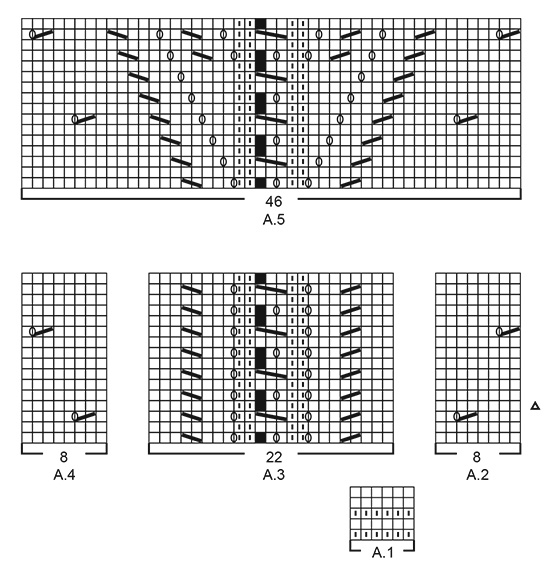
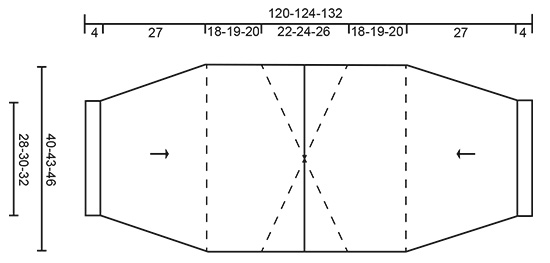
------------------------------------------------------- EXPLANATIONS FOR THE PATTERN: ------------------------------------------------------- RIDGE/GARTER STITCH (worked back and forth): Knit all rows. 1 ridge in height = Knit 2 rows. DECREASE TIP (evenly spaced): To work out how to decrease evenly, count the total number of stitches on needle (e.g. 70 stitches) minus the edge stitches (e.g. 4 stitches) and divide the remaining 66 stitches by number of decreases to be made (e.g. 12) = 5.5. In this example decrease by knitting together alternately each 4th and 5th stitch and each 5th and 6th stitch. Do not decrease over the edge stitches PATTERN: See diagrams A.1 to A.11. The diagrams show all rows in pattern seen from the right side. INCREASE TIP (for each side of sleeve): All increases are worked from the right side! Increase on each side of sleeve by making 1 yarn over inside the 2 edge stitches in garter stitch on each side. On the next row (wrong side) purl the yarn overs twisted to avoid holes. Then work the new stitches in stocking stitch until they fit into A.2/A.4. TURNING TIP: When turning in the middle of the piece on short rows slip the first stitch as if to knit, tighten the strand and knit the next stitch (a bit tightly). This is to avoid a hole when turning. ------------------------------------------------------ START THE PIECE HERE: ------------------------------------------------------- BOLERO - SHORT OVERVIEW OF THE PIECE: The piece is worked back and forth with circular needle in 2 sections from each sleeve to mid-back. Then the piece is sewn together mid-back and under the sleeves. SLEEVE AND HALF BACK PIECE (read the whole section before working): Cast on 70-74-78 stitches with circular needle size 3.5 mm and Belle. Purl 1 row (= wrong side). The next row is worked as follows from the right side: 2 edge stitches in GARTER STITCH – read description above, * Knit 2, purl 2 *, work from *-* until there are 4 stitches left on row, knit 2 and finish with 2 edge stitches in garter stitch. Continue this rib for 4 cm. Knit 1 row from the right side where you decrease 12 stitches evenly spaced in all sizes – read DECREASE TIP = 58-62-66 stitches. Work A.1 with 2 edge stitches in garter stitch on each side (row 1 in A.1 is worked from the wrong side). When A.1 has been completed change to circular needle size 4.5 mm. The next row is worked as follows from the right side: 2 edge stitches in garter stitch, 0-2-4 stitches in stocking stitch, work A.2 over the next 16 stitches (= 2 repeats of 8 stitches), work A.3 (= 22 stitches), A.4 over the next 16 stitches (= 2 repeats of 8 stitches), work 0-2-4 stitches in stocking stitch and finish with 2 edge stitches in garter stitch. Continue this pattern. REMEMBER THE KNITTING TENSION! AT THE SAME TIME when the piece measures 6-6-7 cm, increase 1 stitch on each side – read INCREASE TIP (= 2 stitches increased). Increase like this every 2½-2½-2 cm a total of 11-11-13 times on each side = 80-84-92 stitches (when the last increase on each side has been worked the piece measures approx. 31 cm from the cast-on edge. Insert 1 marker on each side of this row; they show where the sleeve-seam stops. NOTE: The lace pattern described below is worked well before the last increase). AT THE SAME TIME when A.2 to A.4 have been worked a total of 3 times in height, work them 1 more time in height but finish the repeats after row 4 (i.e. after the row marked with a triangle in A.2). The piece now measures approx. 25 cm from the cast-on edge. Insert 1 marker thread in the middle of the row (i.e. middle of A.3). Allow the thread to follow your work onwards. Now the lace pattern in A.3 will «grow» out towards the sides; i.e. on the next row work as follows from the right side: 2 edge stitches in garter stitch, continue A.2 as before until there are 23 stitches left before the marker thread in the middle, work A.5 (= 46 stitches – marker thread now sits in the middle of A.5), continue A.4 as before until there are 2 stitches left on row and finish with 2 edge stitches in garter stitch. Continue this pattern. When A.5 has been completed, work the next row from the right side as follows: 2 edge stitches in garter stitch, continue A.2 as before until there are 31 stitches left before the marker thread, work A.6 (= 62 stitches), continue A.4 as before until there are 2 stitches left on row and finish with 2 edge stitches in garter stitch. Continue this pattern until the stitches marked with a star in A.6 are worked over all stitches on the row as far as the 2 edge stitches in garter stitch on each side. The next row is worked as follows from the right side: 2 edge stitches in garter stitch, work A.7 (= 11 stitches), A.8 until there are 3 stitches left before the marker thread (= 12-13-15 repeats of 2 stitches), work A.9 (= 6 stitches), A.10 until there are 13 stitches left on row (= 12-13-15 repeats of 2 stitches), work A.11 (= 11 stitches) and finish with 2 edge stitches in garter stitch. Continue this pattern until the piece measures 49-49-51 cm from the cast-on edge (Due to the pattern the piece will measure longer along the middle than on the sides - measure along the side where the piece is shortest). Then work short rows in garter stitch as described below. SHORT ROWS: Change to circular needle size 3.5 mm. Start from the right side and work garter stitch with short rows back and forth over the stitches as far as the marker thread; i.e. work the first ridge back and forth over 40-42-46 stitches, then 1 ridge back and forth over 38-40-44 stitches, etc. Work 1 ridge over 2 fewer stitches each time – read TURNING TIP. AT THE SAME TIME on every 2nd ridge (i.e. every 4th row) decrease 1 stitch at the beginning of the row from the right side by knitting together the first 2 stitches. This avoids a point mid-back. Continue with short rows and decreases every 4th row until you have worked back and forth over the last 2 stitches on this side. Knit 1 row from the right side over all stitches. Turn the piece, start from the wrong side and work short rows back and forth over the stitches as far as the marker thread in the same way as on the first side of the piece; i.e. the first ridge is worked over 40-42-46 stitches, then 1 ridge over 38-40-44 stitches, etc. AT THE SAME TIME on every 2nd ridge (i.e. every 4th row) decrease 1 stitch at the beginning of the row from the wrong side by knitting together the first 2 stitches. Continue with short rows and decreases every 4th row until you have worked back and forth over the last 2 stitches on this side. Knit 1 row from the wrong side, knit 1 row from the right side and knit 1 row from the wrong side over all stitches. Place the stitches on 1 thread or change to circular needle size 4.5 mm and loosely cast off with knit from the right side. Work the other sleeve and half back piece in the same way. ASSEMBLY: Sew the 2 sections together mid-back with grafting stitches, or sew inside the cast-off edge if the stitches have been cast off. Sew sleeve seams – start at bottom of sleeve and sew edge to edge in the outermost loop of the outermost stitch as far as the markers. |
|||||||||||||||||||||||||||||||
Diagram explanations |
|||||||||||||||||||||||||||||||
|
|||||||||||||||||||||||||||||||
 |
|||||||||||||||||||||||||||||||
 |
|||||||||||||||||||||||||||||||
 |
|||||||||||||||||||||||||||||||
Have you finished this pattern?Tag your pictures with #dropspattern #alasdelibelulacardigan or submit them to the #dropsfan gallery. Do you need help with this pattern?You'll find 23 tutorial videos, a Comments/Questions area and more by visiting the pattern on garnstudio.com. © 1982-2026 DROPS Design A/S. We reserve all rights. This document, including all its sub-sections, has copyrights. Read more about what you can do with our patterns at the bottom of each pattern on our site. |
|||||||||||||||||||||||||||||||


With over 40 years in knitting and crochet design, DROPS Design offers one of the most extensive collections of free patterns on the internet - translated to 17 languages. As of today we count 324 catalogues and 12290 patterns translated into English (UK/cm). 12290
We work hard to bring you the best knitting and crochet have to offer, inspiration and advice as well as great quality yarns at incredible prices! Would you like to use our patterns for other than personal use? You can read what you are allowed to do in the Copyright text at the bottom of all our patterns. Happy crafting!
Post a comment to pattern DROPS 200-25
We would love to hear what you have to say about this pattern!
If you want to leave a question, please make sure you select the correct category in the form below, to speed up the answering process. Required fields are marked *.