
Popular categories
Looking for a yarn?


Comments / Questions (11)
![]() Petra Hamann wrote:
Petra Hamann wrote:
Hallo, können Sie mir bitte auch die Farb-Nrn. für das Modell Nr. 3 aufgeben ? Vielen Dank
29.08.2024 - 09:55DROPS Design answered:
Liebe Frau Hamann, Die Farbkombinationen auf den Fotos zeigen folgende Farbnummern: A) DROPS Nepal 0206, 8910, 3720, 1477. B) DROPS Nepal 0500, 0300, 0100, 0517. Auf den 3. Foto sind es die Farben wie bei unter Material beschrieben. Viel Spaß Beim Stricken!
30.08.2024 - 07:41
![]() Therese wrote:
Therese wrote:
Beau modele Je vais le tricoter
11.03.2024 - 22:52
![]() Věra Džemaili wrote:
Věra Džemaili wrote:
Dobrý den, chtěla bych se zeptat: při pletení průkrčníku mi vznikají ( i po utahování) dírky, které se mi nelíbí, lze to něčím vyřešit? Už jsem několikrát práci párala..🤔😔 Děkuji a hezký večer. Věra
03.11.2022 - 19:23
![]() Sabine Koch wrote:
Sabine Koch wrote:
Wo steht wieviele Maschen in welcher Reihe der Passe ich in Größe M zunehmen muß ? Ais dem Diagramm ist das nicht zu sehen und in der Anleitung nicht beschrieben nur Beginn Passe 88 Maschen Ende 260.
06.03.2021 - 19:12DROPS Design answered:
Liebe Frau Koch, es wird zuerst 4 Maschen abgenommen (= 84 M), dann stricken Sie A.1 (= 14 x 6 Maschen) - es wird zugenommen wie im Diagram gezeigt, dh nach A.1 fertig ist haben Sie 18 Maschen x 14 = 252 Maschen dann nehmen Sie 8 Maschen regelmäßig verteilt zu = 260 Maschen. Viel Spaß beim Stricken!
08.03.2021 - 08:11
![]() Alicia Esquinas Muñoz wrote:
Alicia Esquinas Muñoz wrote:
Hola! No entiendo cómo hacer los aumentos q se requieren para realizar el gráfico A.1... Estoy realizando una talla L y tengo en el canesú 90 puntos y tengo q terminar teniendo 270..cuando se realizan esos aumentos y en q vueltas del gráfico? Solo veo especificados los aumentos/ disminuciones en los graficos A2 y A3...gracias anticipadas
29.02.2020 - 23:17DROPS Design answered:
Hola Alicia. Los aumentos están incluidos en el diagrama. Es el símbolo del óvalo blanco ( 1 hebra con el color base en el patrón de rayas, en la siguiente vuelta trabajar las hebras de derecho retorcido para evitar los agujeros.)
10.03.2020 - 23:42
![]() Synnøve Jacobsen wrote:
Synnøve Jacobsen wrote:
Jeg kan ikke få stilt mitt spørsmål, da jeg bare får beskjed om at mitt innlegg inneholder link eller forbudte ord! Og det gjør det ikke!!!
06.02.2020 - 21:23
![]() María Luisa wrote:
María Luisa wrote:
Las agujas que se necesitan son AGUJAS DE DOBLE PUNTA Y AGUJA CIRCULAR DROPS (40 y 80 cm) . Mi pregunta es: ¿40 y 80 cm son para dos agujas circulares diferentes? En el patrón solo dice que se utilice aguja circular corta, es decir, de 40 cm, pero no sé cuándo se utiliza la circular de 80cm.
10.11.2019 - 20:05DROPS Design answered:
Hola Maria Luisa. En este modelo utilizan agujas circulares cortas de 4 mm (40 cm de largo) para la cenefa del escote y cenefas de las mangas y agujas circulares (80 cm de largo ) para cenefa inferior del cuerpo. En el resto de la labor utilizan las agujas circulares de 5 mm.
10.11.2019 - 23:53
![]() Oda Mathilde wrote:
Oda Mathilde wrote:
Det er feil i oppskriften. Noe jeg regner med de tidligere kommentarene også nevner.
05.05.2019 - 16:01DROPS Design answered:
Hei Oda. Kan du være litt mer presis med hva du mener er feil? Vi vil gjerne korrigere dersom det er en feil. Hilsen DROPS
07.05.2019 - 14:01
![]() Věra wrote:
Věra wrote:
Dobrý den,ráda bych si upletla tuto čepici....ještě jsem toho moc nenapletla,ale v návodu je určitě chyba....asi bych ji dala dohromady i s tiskovou chybou,-zdá se,že je tam jen vložen kus textu který tam nepatří,ale přeci jen......děkuji Věra
07.02.2019 - 23:45DROPS Design answered:
Dobrý den, Věro, děkuji za upozornění - opravdu tam byla jedna věta navíc :-) Teď už je návod v pořádku a nic by vás nemělo mást. Hodně zdaru! Hana
11.02.2019 - 17:55
![]() DROPS Design wrote:
DROPS Design wrote:
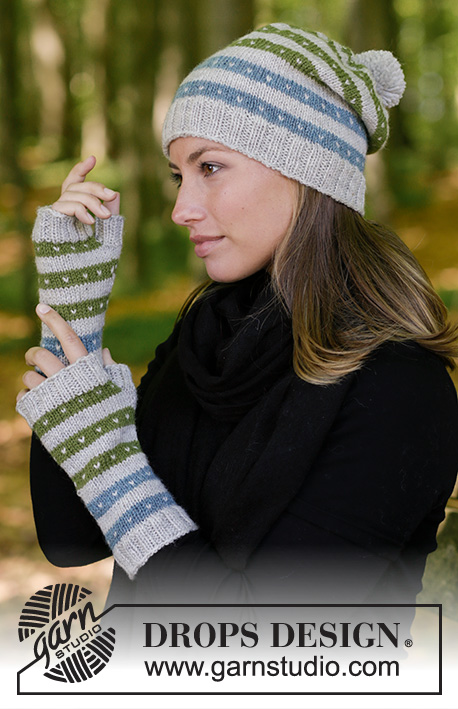
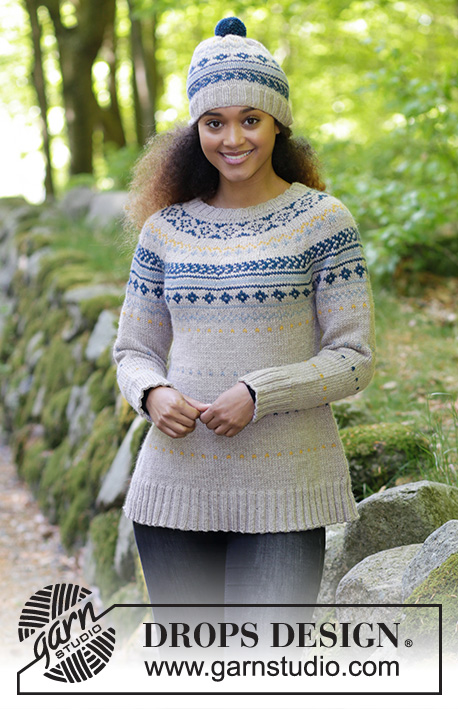
Colour combinations shown are: A) DROPS Nepal 0206, 8910, 3720, 1477. B) DROPS Nepal 0500, 0300, 0100, 0517.
18.10.2017 - 14:12
|
|||||||||||||||||||
Lillehammer#lillehammersweater |
|||||||||||||||||||
 |
 |
||||||||||||||||||
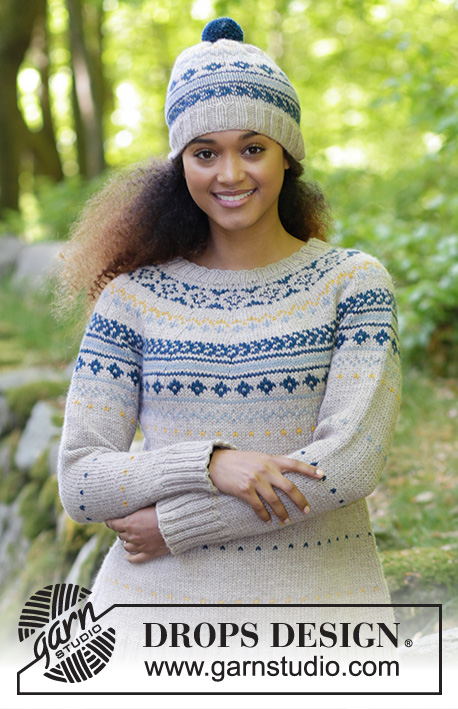
The set consists of: Knitted hat with multi-coloured Norwegian pattern and pom pom. Jumper with round yoke and multi-coloured pattern, worked top down. Sizes S - XXXL. The piece is worked in DROPS Nepal.
DROPS 180-18 |
|||||||||||||||||||
|
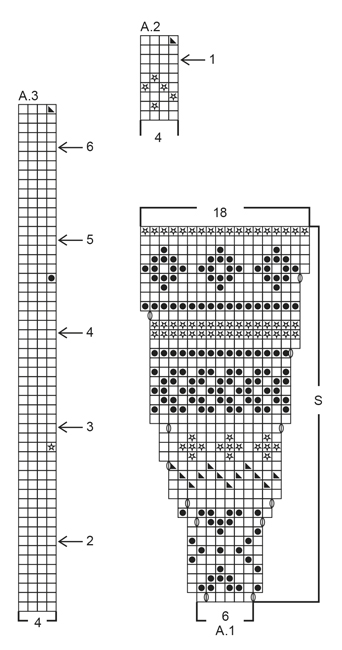
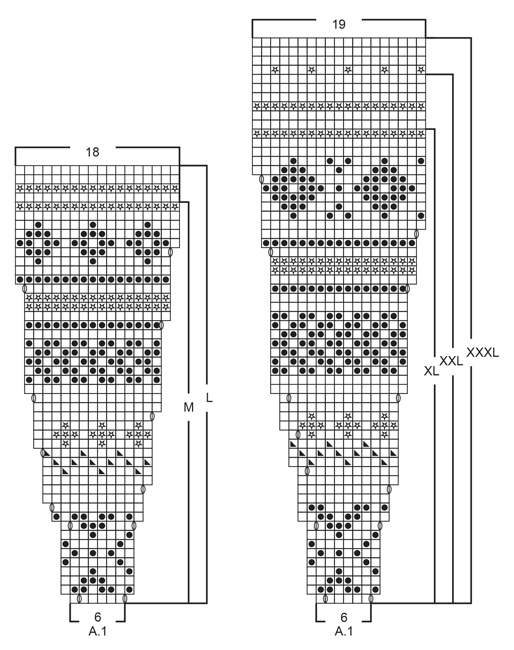
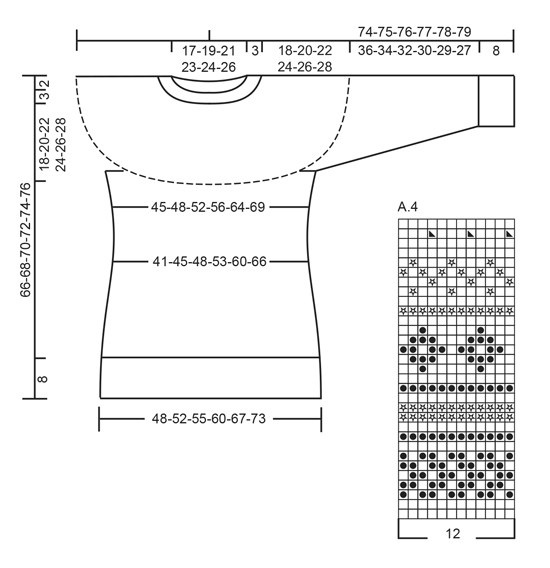
INFORMATION FOR THE PATTERN: DECREASE/ INCREASE TIP (for the jumper): To work out how to decrease/increase evenly, count the total number of stitches on the round (e.g. 88 stitches) and divide by the number of decreases/increases to be made (e.g. 10) = 8.8. In other words, in this example, you knit every 8th and 9th stitch together. If you are increasing, this is done after approx. every 9th stitch. PATTERN: Jumper: See diagrams A.1 to A.3. The whole pattern is worked in stocking stitch. Choose diagram for your size. Hat: See diagram A.4. The whole pattern is worked in stocking stitch. The diagrams show all the rows in the pattern seen from the right side. DECREASE TIP-1 (for the jumper - mid under the sleeve): Start 3 stitches before the marker thread, knit 2 together, knit 2 (marker thread sits in the middle of these 2 stitches), slip 1 stitch as if to knit, knit 1, pass the slipped stitch over (= 2 stitches decreased). DECREASE TIP-2 (for the hat): Slip 1 stitch as if to knit, knit 1, pass the slipped stitch over. INCREASE TIP (for the jumper - rib): Increase 1 stitch in each purl section as follows: Purl 2, pick up the loop before the next stitch and purl the loop twisted to prevent holes. ELEVATION (for the jumper): Insert 1 marker thread mid back. Start from the right side and knit until you have worked 7-8-8-9-9-10 stitches past the marker thread, turn, tighten the strand and purl 14-16-16-18-18-20 stitches back. Turn, tighten the strand and knit 21-24-24-27-27-30 stitches, turn, tighten the strand and purl 28-32-32-36-36-40 stitches back. Turn, tighten the strand and knit 35-40-40-45-45-50 stitches, turn, tighten the strand and purl 42-48-48-54-54-60 stitches back. Turn and knit back to mid back. ---------------------------------------------------------- JUMPER: The jumper is worked in the round with circular needle and from top down. YOKE: Cast on 88-88-96-96-104-112 stitches with short circular needle size 4 mm and beige. The round begins mid back. Work rib (knit 2/ purl 2) the whole round. When the rib measures 3 cm knit 1 round where you decrease 10-4-6-0-2-4 stitches evenly on round – read DECREASE/INCREASE TIP = 78-84-90-96-102-108 stitches. Change to circular needle size 5 mm. For a better fit you can now work an ELEVATION – see description above, at the back of the neck with beige. Continue by working PATTERN – see description above, in the round according to diagram A.1 (choose diagram for your size = 13-14-15-16-17-18 repeats of 6 stitches). REMEMBER THE KNITTING TENSION! When A.1 has been completed, there are 234-252-270-304-323-342 stitches on the round and the piece measures approx. 21-23-25-27-29-31 cm mid front from where A.1 started. If the piece is shorter than this, continue working with beige (without increases) until the right length. Knit 1 round where you increase 2-8-6-0-9-14 stitches evenly on round = 236-260-276-304-332-356 stitches. The next round is worked as follows from mid back: 35-38-40-44-49-53 stitches stocking stitch (= half the back piece), place the next 48-54-58-64-68-72 stitches on a thread (= right sleeve), cast on 6-6-8-8-10-12 new stitches (= in the side under the sleeve), work stocking stitch over the next 70-76-80-88-98-106 stitches (= front piece), place the next 48-54-58-64-68-72 stitches on a thread (= left sleeve), cast on 6-6-8-8-10-12 new stitches (= in the side under the sleeve) and work stocking stitch over the remaining 35-38-40-44-49-53 stitches (= half the back piece). Body and sleeves are now finished separately. BODY: = 152-164-176-192-216-236 stitches. Insert 1 marker thread – THE PIECE IS NOW MEASURED FROM HERE! Continue by working pattern in the round according to diagram A.2. On the round marked with arrow 1 in the diagram, decrease 4 stitches evenly on round = 148-160-172-188-212-232 stitches. When A.2 has been completed, continue according to diagram A.3 in the same way (A.3 is repeated to finished length). AT THE SAME TIME on the round marked with arrow 2 in the diagram, decrease 8 stitches evenly on the round = 140-152-164-180-204-224 stitches. Continue by increasing 6 stitches evenly on rounds marked with arrow 3, arrow 4, arrow 5 and arrow 6 = 164-176-188-204-228-248 stitches. When the piece measures 35 cm from the marker thread, knit 1 round where you increase 52-56-60-68-76-80 stitches evenly = 216-232-248-272-304-328 stitches on the round. Change to circular needle size 4 mm and work rib in the round (= knit 2 / purl 2). When the rib measures 4 cm increase all purl 2 to purl 3 – read INCREASE TIP = 270-290-310-340-380-410 stitches. When the rib measures 8 cm (the whole jumper now measures approx. 66-68-70-72-74-76 cm from the shoulder) cast off with knit over knit and purl over purl. To prevent getting a tight cast-off edge, you can use a larger needle or make a yarn over which is cast off after approx. every 4th stitch. SLEEVE: The sleeve is worked in the round with short circular needle. Change to double pointed needles when required. Insert 1 marker thread – THE PIECE IS NOW MEASURED FROM HERE! Place the stitches from the thread back on short circular needle size 5 mm and in addition knit up 1 stitch in each of the 6-6-8-8-10-12 stitches mid under the sleeve = 54-60-66-72-78-84 stitches on the round. Insert 1 marker thread at the beginning of the round = mid under the sleeve. Allow the marker thread to follow your work. Work pattern in the round according to diagram A.2. When A.2 has been completed, work pattern in the round according to diagram A.3 (when A.3 has been completed 1 time in height, work with beige to finished length). AT THE SAME TIME when the sleeve measures 3 cm decrease 2 stitches mid under the sleeve – read DECREASE TIP-1. Decrease in this way a total of 8-11-13-16-18-20 times in the different sizes as described below: Size S: Every 10th round, Size M: Every 6th round, Size L: Every 5th round, Size XL: Alternately every 3rd and 4th round, Size XXL: Every 3rd round, Size XXXL: Alternately every 2nd and 3rd round When all the decreases have been completed there are 38-38-40-40-42-44 stitches left – NOTE: Whilst you decrease, the pattern will not fir mid under the sleeve, but make sure that the ‘spots’ in A.3 are above each other on the rest of the sleeve). When the piece measures 36-34-32-30-29-27 cm from the marker thread (NOTE: Shorter lengths in larger sizes because of longer yoke) knit 1 round where you increase 10-10-12-12-14-16 stitches evenly on round = 48-48-52-52-56-60 stitches. Change to double pointed needles size 4 mm and work rib in the round (= knit 2 /purl 2) for 8 cm. On the next round increase all purl 2 to purl 3 = 60-60-65-65-70-75 stitches (this is done so that the sleeve is not tight at the bottom). Cast off with knit over knit and purl over purl. The sleeve now measures approx. 44-42-40-38-37-35 cm from the marker thread. Work another sleeve in the same way. ---------------------------------------------------------- HAT: The piece is worked in the round with short circular needle. Change to double pointed needles when you have decreased enough stitches. Cast on 96 stitches with short circular needle size 4 mm and beige. Work rib (= knit 2 / purl 2) for 4 cm. Knit 1 round where you decrease 12 stitches evenly on the round (knit every 7th and 8th stitch together) = 84 stitches. Change to circular needle size 4.5 mm and work PATTERN – see description above, in the round according to diagram A.4 (= 7 repeats of 12 stitches). REMEMBER THE KNITTING TENSION! When A.4 has been completed (the piece now measures approx. 18 cm), continue working in stocking stitch with beige. When the piece measures 19 cm insert 6 marker threads in the piece with 14 stitches between each marker thread. Continue with stocking stitch and decrease 1 stitch after each marker thread – read DECREASE TIP-2 (= 6 stitches decreased). Decrease in this way every 2nd round a total of 3 times, then every round a total of 3 times = 48 stitches left on the round. * On the next round, knit all stitches twisted together 2 and 2, knit 1 round without decreasing *, work from *-* one more time = 12 stitches left on the round. Cut the strand, pull it through the remaining stitches, pull tight and fasten well. The hat measures approx. 24 cm from the top down. POM POM: Make one pom pom with colour deep ocean and a diameter of approx. 6 cm. Sew the pom pom to the top of the hat. |
|||||||||||||||||||
Diagram explanations |
|||||||||||||||||||
|
|||||||||||||||||||
 |
|||||||||||||||||||
 |
|||||||||||||||||||
 |
|||||||||||||||||||
Have you finished this pattern?Tag your pictures with #dropspattern #lillehammersweater or submit them to the #dropsfan gallery. Do you need help with this pattern?You'll find 33 tutorial videos, a Comments/Questions area and more by visiting the pattern on garnstudio.com. © 1982-2026 DROPS Design A/S. We reserve all rights. This document, including all its sub-sections, has copyrights. Read more about what you can do with our patterns at the bottom of each pattern on our site. |
|||||||||||||||||||


With over 40 years in knitting and crochet design, DROPS Design offers one of the most extensive collections of free patterns on the internet - translated to 17 languages. As of today we count 324 catalogues and 12290 patterns translated into English (UK/cm). 12290
We work hard to bring you the best knitting and crochet have to offer, inspiration and advice as well as great quality yarns at incredible prices! Would you like to use our patterns for other than personal use? You can read what you are allowed to do in the Copyright text at the bottom of all our patterns. Happy crafting!
Post a comment to pattern DROPS 180-18
We would love to hear what you have to say about this pattern!
If you want to leave a question, please make sure you select the correct category in the form below, to speed up the answering process. Required fields are marked *.