
Popular categories
Looking for a yarn?


Comments / Questions (62)
![]() Sharon Drown wrote:
Sharon Drown wrote:
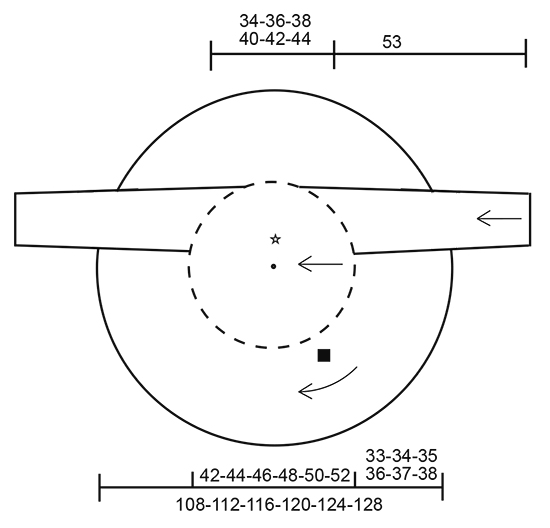
What is the 20 parts of the circle in this pattern
24.02.2020 - 23:32DROPS Design answered:
Dear Sharon, the 20 parts are 20 units knitted with the short-rows, described in the pattern. Happy Knitting!
25.02.2020 - 06:57
![]() Lucrece Vuez wrote:
Lucrece Vuez wrote:
Je viens de finir la cercle exterieur mais c'est trop grand peut etre que j'ai mal compris mais j'aimerais savoir qu'est ce la partie 1? car pour moi la partie 1 c'est du début jusqu'au dernière 76 mailles est avoir 37 rangs en hauteur et cela 20 fois est ce juste? j'espère que je me fais bien comprendre merci pour votre reponse
30.12.2019 - 10:07DROPS Design answered:
Bonjour Mme Vuez, en taille XL, la partie 1 commence par les 7 côtes mousse (rang 1 sur l'endroit) jusqu'à 37 côtes mousse du côté le plus large (= environ 18 cm) et 15 du côté le plus court (= environ 7 cm). Vous répétez 21 fois cette partie au total (donc encore 20 fois une fois que vous l'avez fait 1 fois). Vous avez ainsi tricoté le cercle extérieur - cf carré noir dans le schéma. Bon tricot!
02.01.2020 - 13:35
![]() Sjani De Ruiter wrote:
Sjani De Ruiter wrote:
Ik heb een vraag over het opzetten van de binnenste cirkel. Waarom moet je bij het opzetten 4 steken meerderen ( 304 steken op 300 ribbels, maat L ) en moet je diezelfde steken bij de 1e tour weer minderen?
03.04.2019 - 13:39DROPS Design answered:
Dag Sjani,
Het minderen wordt gedaan omdat je anders te veel steken op de naald hebt voor de juiste afmetingen van de binnenste cirkel en het wordt niet gelijk gedaan bij het opnemen van de steken, omdat je dan hiaten kunt krijgen tussen de rand van de buitenste en binnenste cirkel.
04.04.2019 - 08:14
![]() Joan Towell wrote:
Joan Towell wrote:
Just finished this in Rainbow. It looks stunning but was so easy to do. I may have to make another one...
13.03.2019 - 16:32
![]() Margret Popall wrote:
Margret Popall wrote:
Bei der Maschenaufnahme zum inneren Kreis komme ich laut Anleitung auf 430 Maschen statt 340.Wo liegt da der Fehler?
10.02.2019 - 20:28DROPS Design answered:
Siehe Antwort unten :)
11.02.2019 - 11:11
![]() Margret Popall wrote:
Margret Popall wrote:
Ich habe da ein Problem mit der Maschenaufnahme des inneren Kreises. In der Anleitung steht folgende Maschenanzahl aufnehmen: 90 Maschen aufnehmen,46 Maschen neu anschlagen,158 Maschen aufnehmen,46 Maschen neu anschlagen,90 Maschen aufnehmen.Dabei komme ich aber auf 430 Maschen insgesamt anstatt 340 Maschen.Wo liegt da bei mir der Fehler??
10.02.2019 - 20:10DROPS Design answered:
Liebe Frau Popall, so sollen Sie die Maschen auffasssen: 45 M (aus den ersten 45 Krausrippen = 90 Reihen) + 46 M anschlagen + 158 M (aus den nächsten 156 Krausrippen) + 46 M anschlagen + 45 M (aus den letzten 45 Krausrippen): 45+46+158+46+45= 340M. Viel Spaß beim stricken!
11.02.2019 - 11:11
![]() Rita Kragh wrote:
Rita Kragh wrote:
Jeg er næsten færdi med yderste cirkel og skal til midterste cirkel som jeg næsten er med på men de ærmer er jeg ikke helt med på skal man lukke lige af men efter diagramt ser det ud til de skal have en spis på. Så det er det jeg ikke forstår ? Hilsen Rita Kragh
31.01.2019 - 19:10DROPS Design answered:
Hei Rita. Ja ermene strikkes nedenfra og opp, og du feller av alle masker når hele ermet måler 53 cm. Ermet er altså like langt hele vein rundt, det er ikke noen ermkuppel. Om du ser på bildet av genseren ser du at ermet sitter rett på ytterst på skulderen når genseren er i bruk. Så dette stemmer. God fornøyelse
01.02.2019 - 07:54
![]() LIBORIA DI MARTINO wrote:
LIBORIA DI MARTINO wrote:
NON RIESCO A CAPIRE BENE LE SPIEGAZIONI DEL CERCHIO ESTERNO. C'è LA POSSIBILITà DI PARLARE CON QUALCUNO PER AVERE DELLE INFORMAZIONI?
21.01.2019 - 10:56DROPS Design answered:
Buongiorno Liboria. Per un aiuto personalizzato può contattare il suo rivenditore Drops di fiducia. Buon lavoro!
21.01.2019 - 11:23
![]() Anke Linde wrote:
Anke Linde wrote:
Hallo liebes DROPS Design-Team. ich bin gerade an Stricken dieser Jacke. Noch bin ich am äußeren Kreis. Doch ich habe ein Problem mit der Berechnung des Inneren Kreises. Nach der Aufnahme der Maschen (Größe L - 304M) und der ersten Runde 4M Abnahmen bleiben noch 300M, soll 5 Markierer alle 50 M setzen. Nach meiner Rechnung müssten da entweder 6 Markierer gesetzt werden oder alle 60M ein Markierer. Wo ist da mein Denkfehler? Oder bleibt von M250 bis M50 der nächsten Runde ohne Markierer? LG
19.01.2019 - 01:30DROPS Design answered:
Liebe Anke, 5 Markierer werden bei dieser Runde eingesetzt + der Markierer am Anfang der Reihe haben Sie die 6 Markierer. Viel Spaß beim stricken!
21.01.2019 - 09:44
![]() Kerstin Kanis wrote:
Kerstin Kanis wrote:
Die Jacke sieht richtig toll aus. Hab auch schon angefangen zu stricken und bin begeistert. Habe allerdings eine Frage zu den Ärmeln. Muss ich nicht am Ende des Ärmels einzeln Maschen abketten, damit ich eine Armkugel bekomme? Bei den anderen Strickschriften von Kreisjacke wird auch immer einzeln abgekettet. LG Kerstin
25.11.2018 - 19:57DROPS Design answered:
Liebe Kerstin, bei dieser Jacke gibt es kein Armkugel, vielleicht braucht man auch keine dann die Ärmel am Kreis genäht sind. Viel Spaß beim stricken!
26.11.2018 - 10:16
|
||||||||||
Spectre#spectrecardigan |
||||||||||
 |
 |
|||||||||
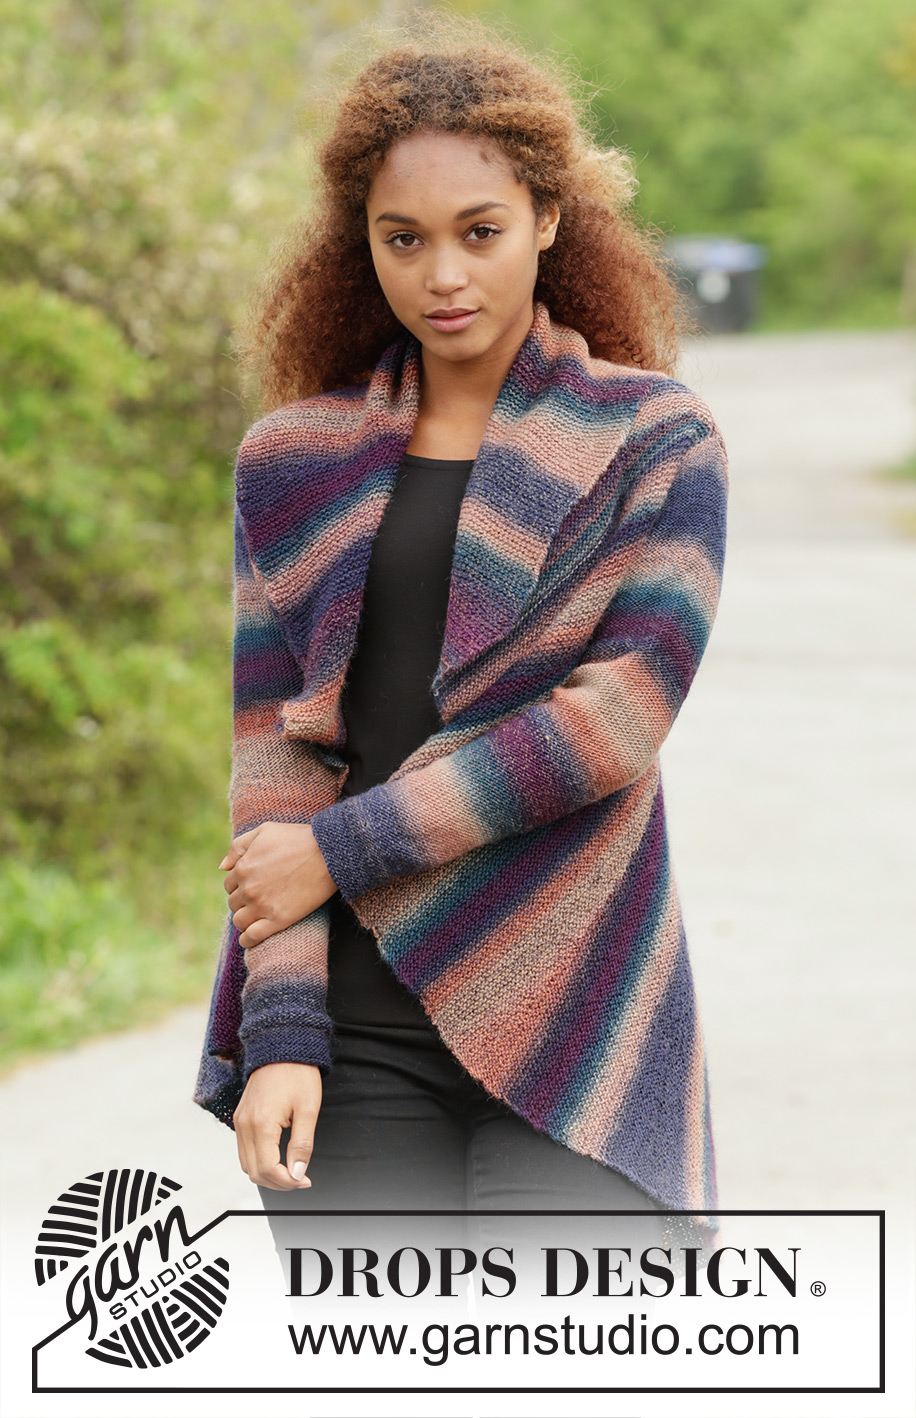
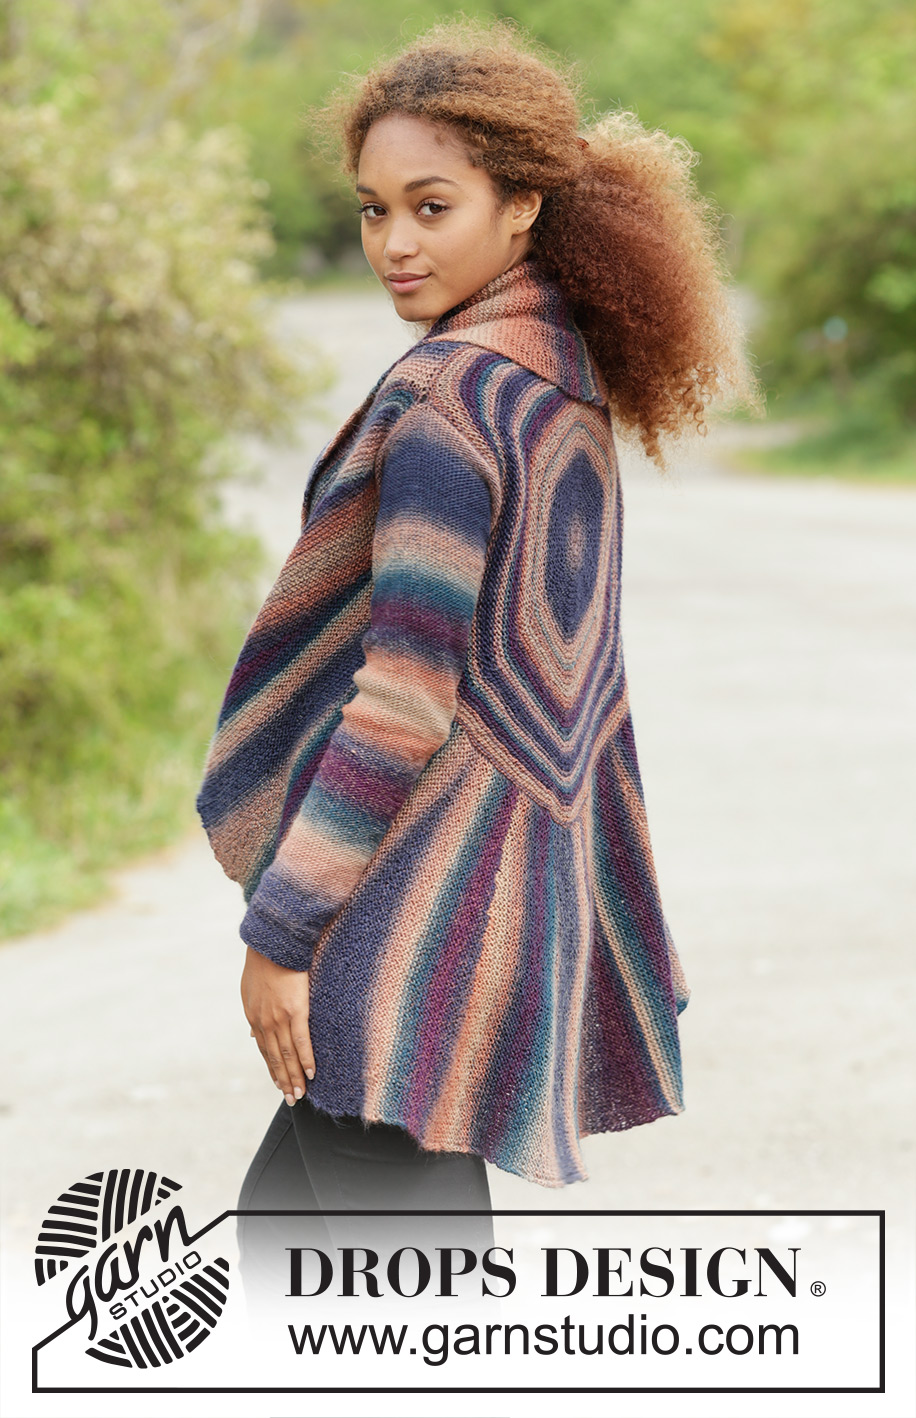
Knitted DROPS jacket worked in a circle in garter st with short rows in ”Delight”. Size: S - XXXL.
DROPS 171-25 |
||||||||||
|
GARTER ST (back and forth): K all rows. 1 ridge = 2 rows K. GARTER ST (worked in the round): 1 ridge = 2 rounds. * K 1 round and P 1 round *, repeat from *-*. SHORT ROWS IN GARTER ST - WITH YOS: When turning and making a YO avoid holes in piece. Short rows in garter st: Work no of sts described in pattern, slip 1 st as if to P, place strand on the front of piece, move the slipped st back on left needle. Turn piece. On next row when getting to the slipped st, work st and strand around it (YO) tog as one st and work the rest of row. INCREASE TIP: When picking up more sts than there are ridges (e.g. when picking up 140 sts evenly over the next 132 ridges), pick up 1 st in every ridge and make the remaining sts with 1 YO distributed evenly between sts. I.e. in this example pick up 132 sts in the 132 ridges and make YOs 8 times evenly = 140 sts. Work YO twisted on next row. ---------------------------------------------------------- CIRCLE: Work first the outer circle, then pick up sts on the shortest curve on this and work circles in the centre. OUTER CIRCLE: Work piece back and forth in GARTER ST - see explanation above, until finished measurements. Cast on 70-72-74-76-78-80 sts on circular needle size 4 mm with Delight. PART 1: Work 7-7-7-7-8-8 ridges (= 14-14-14-14-16-16 rows). REMEMBER THE KNITTING TENSION On next row from RS work short rows as follows: Row 1 (= RS): K the first 60-66-66-66-66-66 – READ SHORT ROWS IN GARTER ST – WITH YOS, turn piece. Row 2 (= WS): K all sts, turn piece. Row 3: K the first 54-60-60-60-60-60, turn. Row 4: K all sts, turn piece. Row 5: K the first 48-54-54-54-54-54, turn. Row 6: Turn and K all sts, turn piece. Continue to work short rows in garter st like this. I.e. work 6 sts less on every row from RS until 1 ridge has been worked (= 2 rows) over the last 6 sts (= 10-11-11-11-11-11 ridges, 17-18-18-18-19-19 ridges have been worked in total on the widest). Last row is from WS. Then work short rows as follows: Row 1 (= RS): K the first 8 sts, turn piece. Row 2 (= WS): K all sts, turn piece. Row 3: K the first 14 sts, turn piece. Row 4: K all sts, turn piece. Row 5: K the first 20 sts, turn piece. Row 6: Turn and K all sts, turn piece. Continue to work short rows in garter st like this. I.e. work 6 sts more on every row from RS until 2-4-6-8-10-6 sts remain on row (= 11-11-11-11-11-12 ridges). Last row is from WS. Work 7-7-8-8-8-8 ridges over all sts. 14-14-15-15-16-16 ridges have been worked on the shortest and 35-36-37-37-38-39 ridges have been worked on the widest. Piece measures approx. 7-7-7-7-8-8 cm on the shortest and approx. 17-18-18-18-19-19 cm on the widest. Work 20-20-20-21-21-21 parts in total. Piece measures approx. 137-137-146-154-164-164 cm on the shortest and approx. 341-351-361-379-389-400 cm on the widest. Cast off. ASSEMBLY: Sew cast-off edge tog with cast-on edge, in outer loop of edge sts. CIRCLE IN THE CENTRE: Work piece in the round on circular needle (switch to double pointed needles when needed) from the shortest side on the outer circle and in towards centre. Pick up from RS on circular needle size 4 mm as follows: Adjust so that seam is mid back. Pick up 1 st in each of the first 35-37-40-41-43-45 ridges (i.e. over the next 70-74-80-82-86-90 rows), cast on 36-38-40-42-44-46 sts (for armhole), skip the next 35-37-39-41-43-45 ridges (= 70-74-78-82-86-90 rows in total), pick up 134-140-144-150-154-158 sts evenly over the next 140-132-142-151-164-156 ridges (= 280-264-284-302-328-312 rows in total) – READ INCREASE TIP, cast on 36-38-40-42-44-46 sts (for armhole), skip the next 35-37-39-41-43-45 ridges (= 70-74-78-82-86-90 rows in total), pick up 1 st in each of the first 35-37-40-41-43-45 ridges (i.e. over the next 70-74-80-82-86-90 rows) = 276-290-304-316-328-340 sts. Now work in the round in GARTER ST - see explanation above, until finished measurements. P 1 round, insert 5 markers and dec evenly as follows: Dec 0-2-4-4-4-4 sts evenly on entire round and work as follows: * P 46-48-50-52-54-56, insert 1 marker *, repeat from *-* 5 times in total, P the last 46-48-50-52-54-56 sts = 276-288-300-312-324-336 sts. On next round, dec as follows: K 1, K the next 2 tog (= 1 st dec), * work until 3 sts remain before next marker, K 2 tog (= 1 st dec), K 2 (marker is in the middle of these 2 sts), K 2 tog (= 1 st dec) *, repeat from *-* 5 times in total, work until 3 sts remain, K 2 tog (= 1 st dec), K 1 (= 12 sts dec in total). Dec like this every 4th round until 24 sts remain. Work all sts tog 2 by 2 = 12 sts. Cut the yarn and pull it through the remaining sts, tighten tog and fasten. Circle in the centre measures approx. 42-44-46-48-50-52 cm in diameter. SLEEVE: Worked in the round from bottom up. Cast on 46-48-50-52-56-58 sts on double pointed needles size 3.5 mm with Delight. Work in garter st for 3 cm. Then work in stocking st but assemble sleeves with WS outwards. Insert 1 marker at beg of round (= mid under sleeve). When piece measures 6-10-6-10-10-8 cm, inc 1 st on each side of marker. Inc like this every 3-2½-2½-2-2-2 cm 16-17-19-20-20-22 times in total = 78-82-88-92-96-102 sts. Cast off when sleeve measures 53 cm in total. Knit another sleeve the same way. ASSEMBLY: Turn the sleeves and fasten them with WS outwards. |
||||||||||
Diagram explanations |
||||||||||
|
||||||||||
 |
||||||||||
Have you finished this pattern?Tag your pictures with #dropspattern #spectrecardigan or submit them to the #dropsfan gallery. Do you need help with this pattern?You'll find 23 tutorial videos, a Comments/Questions area and more by visiting the pattern on garnstudio.com. © 1982-2026 DROPS Design A/S. We reserve all rights. This document, including all its sub-sections, has copyrights. Read more about what you can do with our patterns at the bottom of each pattern on our site. |
||||||||||


With over 40 years in knitting and crochet design, DROPS Design offers one of the most extensive collections of free patterns on the internet - translated to 17 languages. As of today we count 324 catalogues and 12245 patterns translated into English (UK/cm). 12245
We work hard to bring you the best knitting and crochet have to offer, inspiration and advice as well as great quality yarns at incredible prices! Would you like to use our patterns for other than personal use? You can read what you are allowed to do in the Copyright text at the bottom of all our patterns. Happy crafting!
Post a comment to pattern DROPS 171-25
We would love to hear what you have to say about this pattern!
If you want to leave a question, please make sure you select the correct category in the form below, to speed up the answering process. Required fields are marked *.