
Popular categories
Looking for a yarn?




























Comments / Questions (94)
 Sándor Veronika wrote:
Üdv! Az S/M-es méretet készítem, és a karöltő kialakítás előtt 228 szemem van a körben. Elkezdem a kört, 34 szemen horgolom a mintát a 8. körben, majd 36 lszt horgolok, és kihagyom a 36 lszt, majd leszúrok, és folytatom a horgolást tovább 70 szemen. Utána ismét 36 lszt horgolok, kihagyok 36 szemet, majd leszúrok, és a leírás szerint a maradék 34 szemen folytatom a horgolást. Viszont nekem nem 34, hanem 51 szemem maradt a kör végéig. Hol ronthattam el?
24.11.2020 - 20:41
 Sylvia wrote:
En el frente dice que debo continuar con aumentos y disminuciones en cada hilera hasta que la pieza mida 15 cm a partir del marcapuntos. Eso significa que en cada hilera, al dejar de trabajar 2 arcos de cad (disminución), y aumentar 1 p.a. + 3 pts en el arco de cad central en cada hilera, tendré un arco menos? De ser asi no llegaré a los 15 cm porque la pieza en lugar de quedar como en el dibujo está quedando con punta en el centro y mas plana en al inicio y final ... ¿es correcto?
24.10.2020 - 13:00DROPS Design answered:
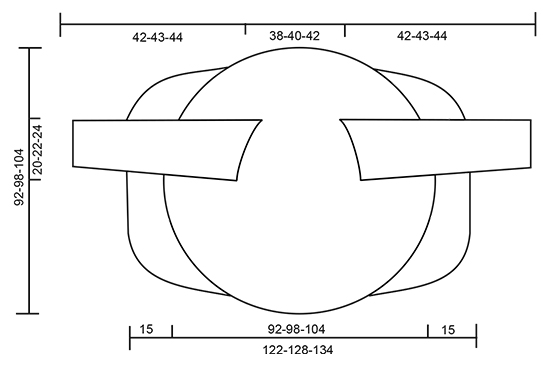
Hola Sylvia. El patrón es correcto. En cada fila disminuimos 4 arcos, pero dos arcos están compensados con los aumentos en el centro ( 1 p.a + 3 cadenetas + 1 p.a.), por lo que realmente hay 2 arcos menos en cada fila. En este caso la labor tiene que tener una forma como la del diagrama bajo el patrón. Es importante mantener la misma tensión del tejido durante toda la labor.
13.12.2020 - 12:35
Lorena wrote:
No entiendo las instrucciones del FRENTE. Ayúdenme por favor, cuáles son 13 p.a. (talla s) que debo saltar? Y cuáles son los 49 p.a. que debo trabajar .... desde donde se cuentan? Que tramo del frente es el que se debe tejer?
18.10.2020 - 04:40DROPS Design answered:
Hola Lorena, al trabajar la espalda en redondo, has colocado 1 MP al inicio de la vuelta. Este marcapuntos lo tienes que ir subiendo cada vuelta según se avanza la labor. Para trabajar el delantero, tienes que saltar los 13 primeros p.a desde el MP y trabajar los siguientes 49.
20.11.2020 - 23:58
 Lorena wrote:
Hola, estoy tejiendo talla S, y llegue a las sisas pero no entiendo con que punto se trabaja esa hilera: "... trabajar sobre los primeros 34 pts, trabajar 36 cad, y saltar los 36 pts siguientes (= sisa), trabajar hasta que resten 70 pts, trabajar 36 cad y saltar los 36 pts siguientes (= sisa), continuar a trabajar sobre los últimos 34 pts.".
07.10.2020 - 20:40DROPS Design answered:
Hola Lorena. Estos puntos se trabajan como puntos altos.
21.11.2020 - 18:40
 Silvi wrote:
Hallo liebe Häklerinnen, es hakt bei mir an zwei Stellen. 1. Im Rückenteil fehlen mir 48 Maschen. Wenn ich A.2 und A.3 fertig habe, sind es nur 264 statt der gewünschten 312. Woher sollten die Maschen kommen? 2. Wo setze ich die Vorderteile an? Vielen Dank und noch einen wunderschönen Tag. LG Sivi
10.07.2020 - 05:32DROPS Design answered:
Liebe Silvi, Sie häkeln 6 Mal in der Runde (A.2, A.3), bei der ersten Runde haben Sie (A.2 = 11 M, A.3 = 11 M ) x 6 = 132 M. Wenn die Diagramme fertig sind haben Sie(A.2 = 16 M, A.3 = 36)x6= 312 Maschen. Vorderteil werden wie unter VORDERTEIL verteilt und gehäkelt (wenn Sie die Jacke doppelt falten, dann sollen die Armlöcher übereinander sein). Siehe auch die Maßskizze. Viel Spaß beim häkeln!
10.07.2020 - 08:12
 Agnes Pinard wrote:
Comment effacer un ou des modèles parmi mes favoris ? Merci Agnes Pinard
25.02.2020 - 17:15DROPS Design answered:
Bonjour Mme Pinard, rendez-vous dans vos favoris dans un premier temps et dans la liste de vos favoris, cliquez sur la petite croix en haut à droite de la photo. Bonne continuation!
26.02.2020 - 09:12Lilian Jacoby wrote:
I continue on the diagrams until no. 3 where I had to count the 38 stitches and crochet 44 stitches for the arms. According to the pattern I must continue with diagram. What concerns me however is the stitches does not increase and what must be crochet in the 44 stiches of the arm holes.
18.12.2018 - 14:53DROPS Design answered:
Dear Mrs Jacoby, you skip 38 sts for the armhole and replace these 38 sts with 44 chains. On next row, crochet in the 44 chains as if you wouldn't have skip a row there, ie crochet next row as all around the circle = same row in A.2 and A.3 as all around the circle increasing on same places around . Happy crocheting!
19.12.2018 - 08:45
Melanie Coleman wrote:
Bonjour. Je suis rendu à la partie rangs de raccourcis je ne comprends pas comment le faire et combien de rangs. Merci
18.12.2018 - 01:50DROPS Design answered:
Bonjour Mme Coleman, les rangs raccourcis se crochètent comme décrit: vous commencez par 2 arceaux (qui ne seront pas crochetés à la fin du rang suivant), continuez comme avant juqu'à ce qu'il reste 2 arceaux, tournez et répétez ce rang, en même temps, vous augmentez au milieu de chaque rang. Le nombre de rangs va dépendre de votre tension, vous devez continuer ainsi pendant 15 cm depuis le marqueur. Bon crochet!
18.12.2018 - 08:43
Ana M. wrote:
Estoy intentando trabajar el frente (tallas/m). Si salto 13 puntos altos, trabajo 49, salto 26 , trabajo de nuevo 49...al final me quedan 26 puntos altos entre los dos frentes. ¿es eso correcto? En el patrón dice que son 13 , pero entonces la suma de puntos altos no hace 150. ¿no debería haber menos puntos entre delanteros en la parte superior que en la inferior?
06.12.2018 - 01:19DROPS Design answered:
Hola Ana. El patrón es correcto. Para la talla S : 150 pts - 13 - 49 - 26 - 49 = 13 pts.
30.12.2018 - 20:06
Ana wrote:
Estoy intentando trabajar el frente pero no entiendo nada de las explicaciones, y llevo días intentándolo. ¿No hay ningún vídeo?
04.12.2018 - 13:02DROPS Design answered:
Hola Ana. Todos los vídeos sobre este patrón los puedes encontrar en la parte izquierda de la pantalla al lado del patrón.
30.12.2018 - 16:12
|
||||||||||||||||||||||||||||
Endless Love#endlesslovecardigan |
||||||||||||||||||||||||||||
 |
 |
|||||||||||||||||||||||||||
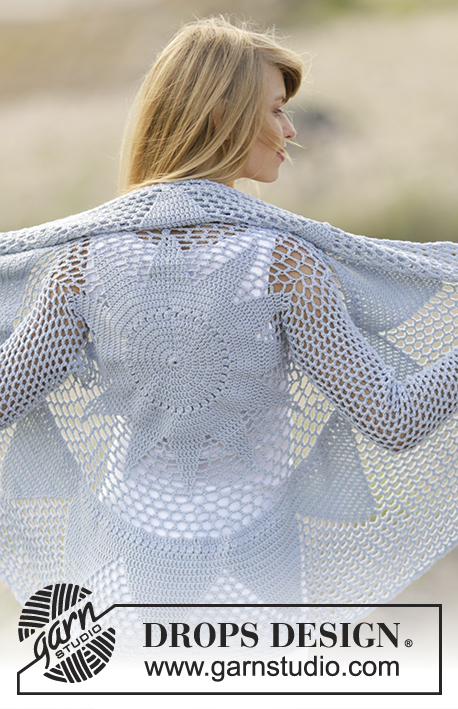
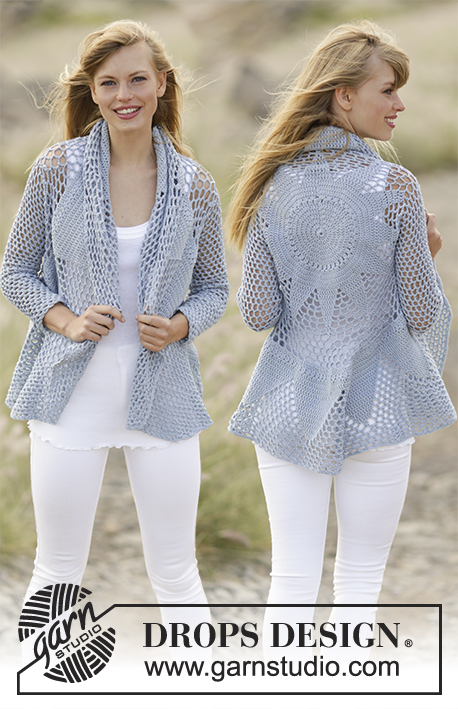
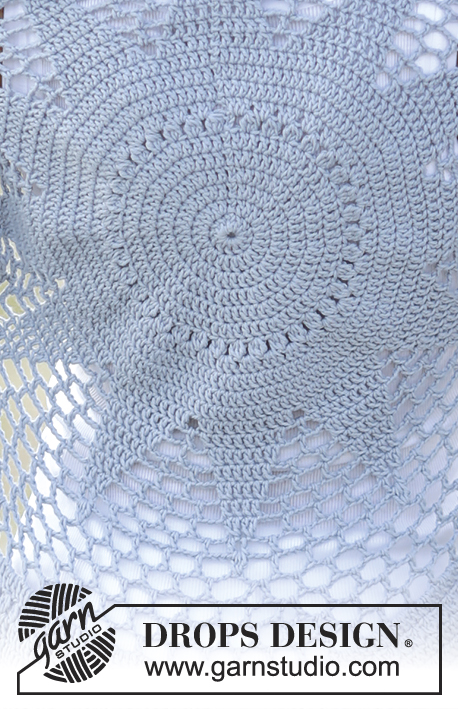
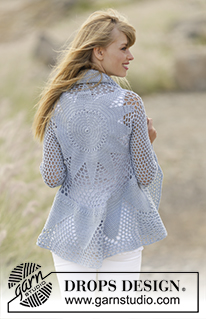
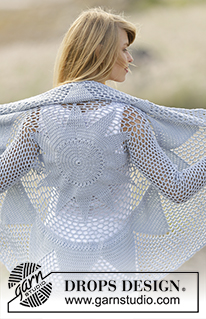
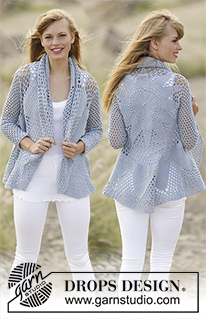
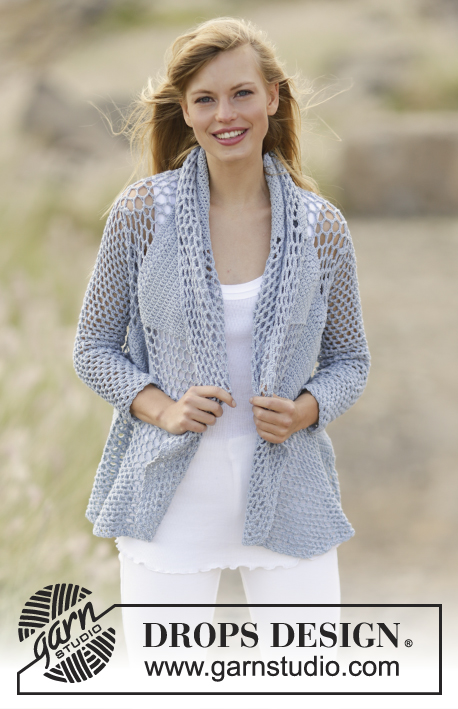
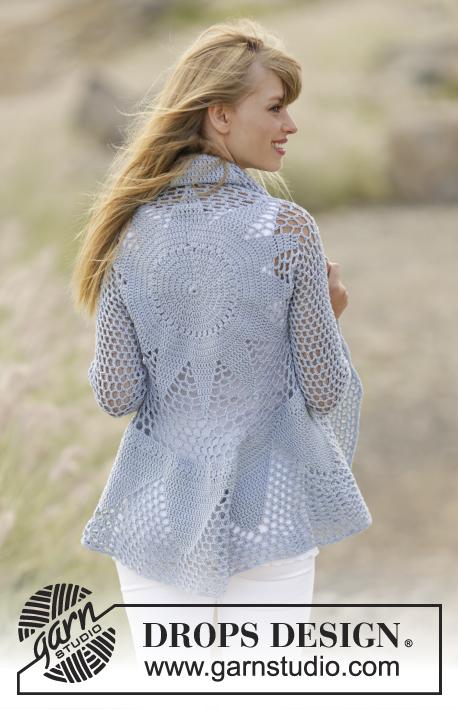
Crochet DROPS jacket worked in a circle with trebles and lace pattern in ”Cotton Merino”. Size S - XXXL.
DROPS 168-12 |
||||||||||||||||||||||||||||
|
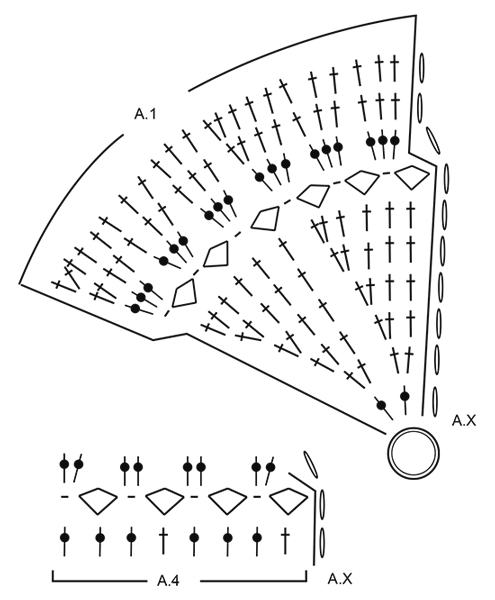
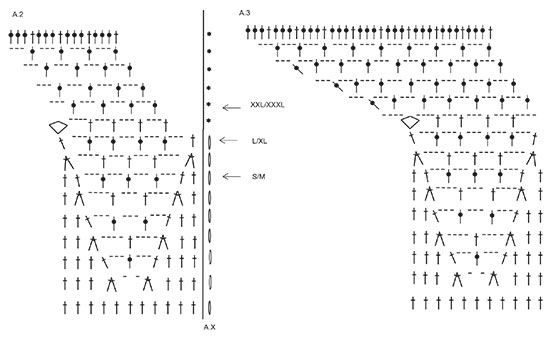
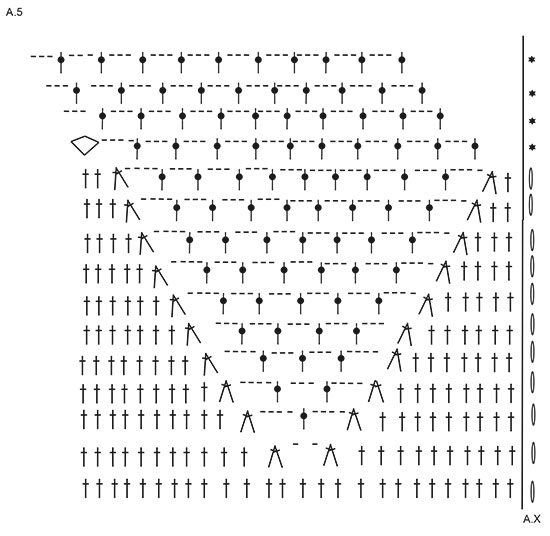
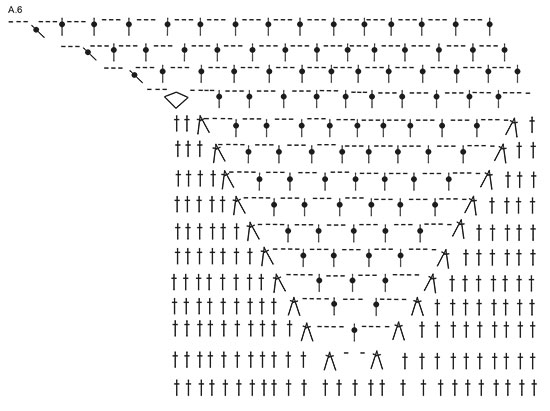
PATTERN: See diagrams A.1 to A.6. DECREASE TIP: Work 1 tr around next ch-space but wait with last pull through, work next tr around next ch-space (do not work 3 ch between tr), on last pull through, pull yarn through all 3 loops on hook. CROCHET TIP (applies to sleeve): After last tr on the round, continue to next round with 1 tr in next ch-space (= first ch-space on next round). NOTE: Insert 1 marker at the beg of round between last ch and first tr on the next round, move the marker upwards. NOTE: MAKE SURE NOT TO DISPLACE THE MARKER. ---------------------------------------------------------- JACKET WORKED IN A CIRCLE: Worked in the round from the centre and outwards. Work 4 ch with Cotton Merino on hook size 4 mm and form a ring with 1 sl st. Then work pattern according to diagram A.1 (= 6 repetitions in width) NOTE: A.x shows how every round beg and end, and is in addition to pattern. REMEMBER THE CROCHET TENSION! When entire A.1 has been worked vertically (= 132 tr), continue as follows: Work * A.2 (= 11 tr), A.3 (= 11 tr) *, repeat from *-* 6 times in total. Work up to and with arrow in diagram - see arrow for your size, there are now 228-252-264 sts on round. Work next round as follows: Continue to work over the first 34-36-38 sts, work 36-40-44 ch, and skip the next 36-40-44 sts (= armhole), work until 70-76-82 sts remain, work 36-40-44 ch and skip the next 36-40-44 sts (= armhole), continue to work over the last 34-36-38 sts. On next round continue according to pattern, work pattern as in diagram around ch-spaces in each side. When A.2 and A.3 have been worked, there are 312 tr on round. Continue with A.4 (= 39 repetitions on round). First round in A.4 shows last round in A.2/A.3, do not work this round. Continue to work as follows: Work * A.5 (= 26 tr), A.6 (= 26 tr) *, repeat from *-* 6 times in total. When A.5/A.6 have been worked, there are 600 sts on round (150 tr with 3 ch between each). Finish size S/M here. Size M/L -XXL/XXXL: Work 2-4 more rounds as last round in A.5/A.6 = 162-174 tr with 3 ch between. ALL SIZES: Piece measures approx. 46-49-52 cm from centre (92-98-104 cm in total). FRONT PIECES: Work back and forth in the one side with short rows. Cut the yarn, skip the first 13-16-19 tr on round, then work over the next 49 tr + ch-spaces as follows (insert a marker here): Work 3 ch, skip 1 ch-space, 1 dc around next ch-space, 3 ch (these 2 ch-spaces are no longer worked), 1 tr around next ch-space, work pattern as before until 2 ch-spaces remain (i.e. ch-spaces between tr, do not work around these 2 ch-spaces anymore), turn piece. Continue the short rows like this, AT THE SAME TIME inc 1 tr + 3 sts in the middle ch-space on every row (work 1 tr + 3 ch + 1 tr in this space). Continue with inc and dec on every row until piece measures 15 cm from marker. Skip 26-32-38 tr, then work short rows over the next 49 tr (13-16-19 tr remain on round). Work the same way as in the other side. CROCHET EDGE: Work an edge around the entire circle as follows: 1 dc around first ch-space, * 3 ch, 1 dc around next ch-space *, repeat from *-* and finish with 1 sl st in first dc. Fasten off. SLEEVES: Worked in the round, top down. Beg mid under one armhole, work 1 dc around first ch-space, 6 ch (= 1 tr + 3 ch), skip first tr and work 1 tr around next ch-space, * 3 ch, 1 tr around next ch-space *, repeat from *-* the entire round (work 1 tr + 3 ch around tr in corners), finish round with 1 tr around first 6 ch, then continue to work in the round without finishing it – READ CROCHET TIP = 21-23-25 tr + 21-23-25 ch-spaces. Continue with 1 tr + 3 ch around every space. When piece measures 4 cm, dec 1 ch-space before marker - READ DECREASE TIP! Repeat dec every 4½ cm 7 more times, dec alternately before and after marker = 13-15-17 tr + 13-15-17 ch-spaces. Continue until piece measures 42-43-44 cm. CROCHET EDGE SLEEVES: Crochet an edge around the sleeves as follows: 1 dc around first ch-space, * 3 ch, 1 dc around next ch-space *, repeat from *-* and finish with 1 sl st in first dc. Fasten off. Work the other sleeve the same way. |
||||||||||||||||||||||||||||
Diagram explanations |
||||||||||||||||||||||||||||
|
||||||||||||||||||||||||||||
 |
||||||||||||||||||||||||||||
 |
||||||||||||||||||||||||||||
 |
||||||||||||||||||||||||||||
 |
||||||||||||||||||||||||||||
 |
||||||||||||||||||||||||||||
Have you finished this pattern?Tag your pictures with #dropspattern #endlesslovecardigan or submit them to the #dropsfan gallery. Do you need help with this pattern?You'll find 7 tutorial videos, a Comments/Questions area and more by visiting the pattern on garnstudio.com. © 1982-2026 DROPS Design A/S. We reserve all rights. This document, including all its sub-sections, has copyrights. Read more about what you can do with our patterns at the bottom of each pattern on our site. |
||||||||||||||||||||||||||||






With over 40 years in knitting and crochet design, DROPS Design offers one of the most extensive collections of free patterns on the internet - translated to 17 languages. As of today we count 333 catalogues and 12525 patterns translated into English (UK/cm). 12525
We work hard to bring you the best knitting and crochet have to offer, inspiration and advice as well as great quality yarns at incredible prices! Would you like to use our patterns for other than personal use? You can read what you are allowed to do in the Copyright text at the bottom of all our patterns. Happy crafting!
Post a comment to pattern DROPS 168-12
We would love to hear what you have to say about this pattern!
If you want to leave a question, please make sure you select the correct category in the form below, to speed up the answering process. Required fields are marked *.