
Popular categories
Looking for a yarn?


Comments / Questions (65)
![]() Sarah wrote:
Sarah wrote:
5) Do you have any blocking instructions in terms of final blocked measurements? I can't seem to find them anywhere.
11.05.2018 - 22:05DROPS Design answered:
Dear Sarah, the final measurments, to which the piece should be blocked to can be found at the bottom of the page, below the diagrams/charts. As for blocking, you should soak the piece thoroughly, then press the water out as much as possible, and pin the piece to size and let it dry. Happy crafting!
12.05.2018 - 00:37
![]() Sarah wrote:
Sarah wrote:
3) In Round 2 I am utterly confused by the A.4 chart. What in the world does that mean? It appears to be showing 3 rows but only one or two stitches in a row. Help! 4) I understand the color changes but are all the stripe rows just a repeat of round 2 (and maybe the answer to question 3 will help with this issue).
11.05.2018 - 22:04DROPS Design answered:
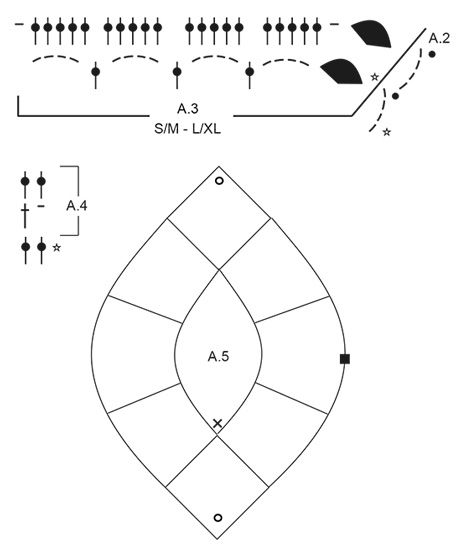
Dear Sarah, in A.4 you will just repeat row 2 and 3, the first row (the one with a star) is showing previous row (= row 1) to show you how to crochet next row. Stripes are (2 rows with off-white, 4 rows with light beige), ie you will work A.4 1 time in height (= 2 rows ) with off-white, A.4 2 times in height (= 4 rows) with light beige) repeat from (to) a total of 3 times while increasing at each tip on every row. Happy crocheting!
14.05.2018 - 09:04
![]() Sarah wrote:
Sarah wrote:
I have had no problem following the charts for the squares and my square assembly is going well. I was reading ahead and have a few questions. 1) In Round 1 am I correct there is NOT an increase? 2) How many total stitches should I have at the end of round 1 (including the square ch-sp stitches I put dc\'s into)?
11.05.2018 - 22:03DROPS Design answered:
Dear Sarah, you increase on round 1 working around the chain-spaces at each tip: 2 dc, 3 ch, 2 dc so that you get 276-276-326-376 dc + 2 3-ch-spaces at the end of round 1. Happy crocheting!
14.05.2018 - 08:56
![]() Ginger wrote:
Ginger wrote:
Very disappointed that are no written instructions for this poncho. I have trouble trying to understand and follow the diagram instructions.
03.04.2018 - 15:39DROPS Design answered:
Dear Ginger, please feel free to ask your question here, or for any further individual assistance, do not hesitate to contact the store where you bought your yarn. Happy crocheting!
03.04.2018 - 17:14Betty wrote:
Buenas noches estoy haciendo la capa pero me esta quedando com mucha punta y no he entendido lo de los aumentos, me podria explicar lo estoy haciendo en talla m. Me gustaria enviarle la foto pero no me da la opcion como hago ? gracias betty
26.02.2018 - 02:00DROPS Design answered:
Hola Betty. No hay opción de enviar fotos. Te recomiendo acercarte a la tienda de Drops para obtener ayuda. También puedes preguntar en el foro del Workshop de Drops adjuntando la foto. Aquí tienes el link: https://www.facebook.com/groups/DROPSWorkshop/?fref=nf
04.03.2018 - 17:08
![]() Andrea Wisniewski wrote:
Andrea Wisniewski wrote:
In the stripes part what does work 0-4-4-4 mean? Also it says to inc each round with 8 dc. Does this mean the rounds with the dc and then ch round? I tried to look for increase in the photo and do not see one for those rounds. If so do I just do 2 dc in one dc, 4 times in the round ( before shoulder and after shoulder area)?
11.10.2017 - 04:14DROPS Design answered:
Dear Mrs Wisniewski, in the stripes each number refers to the size, 0 for first size and 4 for each other sizes. You will increase as stated under INCREASE-TIP = 8 dc inc on each round (= 4 dc inc on each tip). Happy crocheting!
11.10.2017 - 09:13Kats wrote:
Hi, on the 8 increase stitches on each row, it states mid front and mid back, should these 2 increase stitches be next to each other or spread out. Thanks
02.10.2017 - 21:58DROPS Design answered:
Dear Kats, the increase are done in mid ch-space on both mid front and mid back, see INCREASE. Happy crocheting!
03.10.2017 - 09:07
![]() Marie wrote:
Marie wrote:
Bonjour, est-ce qu'on augmente de 8 brides a chaque tour de A.4 ou on augmente vraiment a chaque fois qu'on fait le tour. merci
18.09.2017 - 19:52DROPS Design answered:
Bonjour Marie, on augmente 8 brides par tour (cf AUGMENTATION): dans l'arceau du milieu devant et du milieu dos, on crochète 2 brides, 3 ml, 2 brides. Bon crochet!
19.09.2017 - 08:43
![]() Erin wrote:
Erin wrote:
We're instructed to "repeat stripes & A.4 until finished measurements" .. but there are no measurements included for each size ? help !! Thanks :)
25.07.2017 - 03:53DROPS Design answered:
Dear Erin, work stripes and A.4 as explained under "STRIPES", ie: Work 0-4-4-4 rounds with light beige, then work * 2 rounds with off white, work 4 round with light beige *, repeat from *-* 3 times in total. - After stripes have been worked, piece should measure approx. 36-40-42-44 cm / 14 1/4"-15 3/4"-16½"-17 1/4" from the neck. Then work "EDGE AT THE BOTTOM" with light beige. Happy crocheting!
25.07.2017 - 09:44
![]() Tamara Bower wrote:
Tamara Bower wrote:
How many yards total of yarn is required for the largest size? Thanks!
18.07.2017 - 22:24DROPS Design answered:
Dear Tamara, fot the largest size you will need 500g of Cotton Light DROPS yarn (colour light beige)=10 balls. You will also need 150g of Cotton Light DROPS yarn (colour off white)= 3 balls. Weight/yardage of this yarn: 1.8 oz (50 g/1 ball) = approx 115 yds (105 m). HAPPY KNITTING!
19.07.2017 - 08:51
|
|||||||||||||||||||||||||||||||||||||||||||
Sweet Martine#sweetmartineponcho |
|||||||||||||||||||||||||||||||||||||||||||
 |
 |
||||||||||||||||||||||||||||||||||||||||||
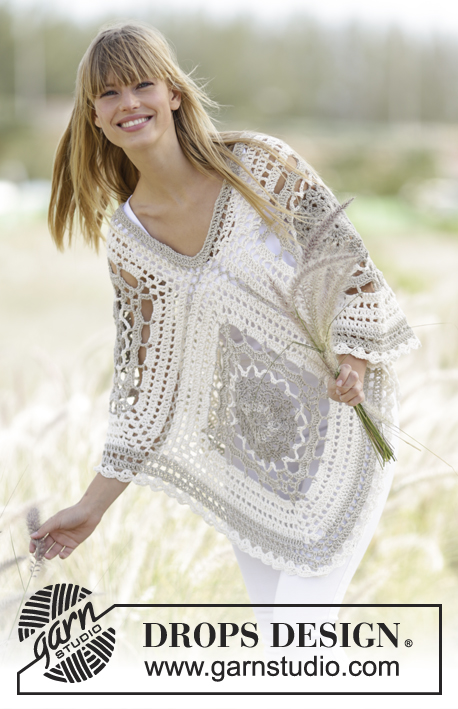
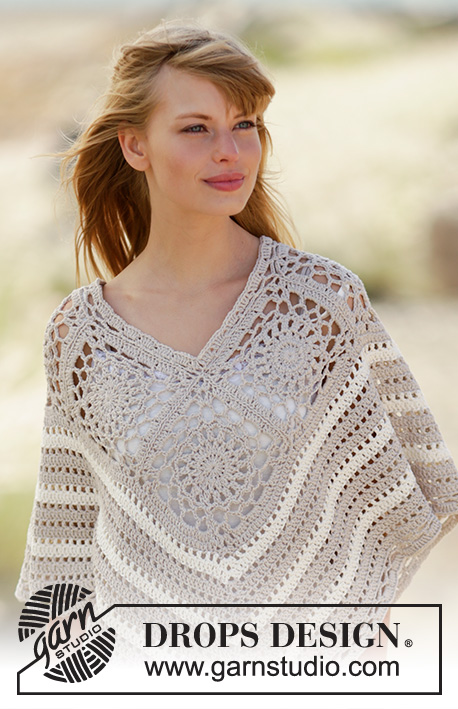
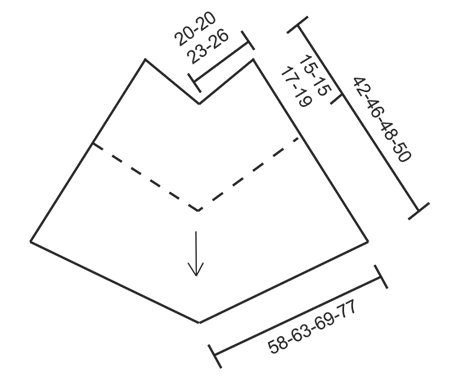
Crochet DROPS poncho with squares and lace pattern in ”Cotton Light”. The piece is worked top down. Size: S - XXXL.
DROPS 167-21 |
|||||||||||||||||||||||||||||||||||||||||||
|
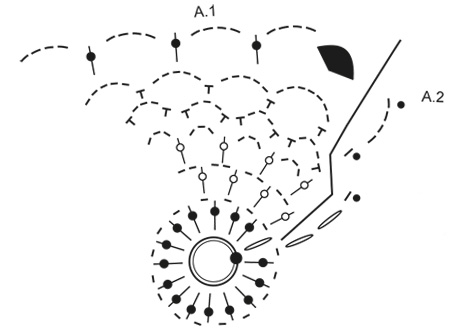
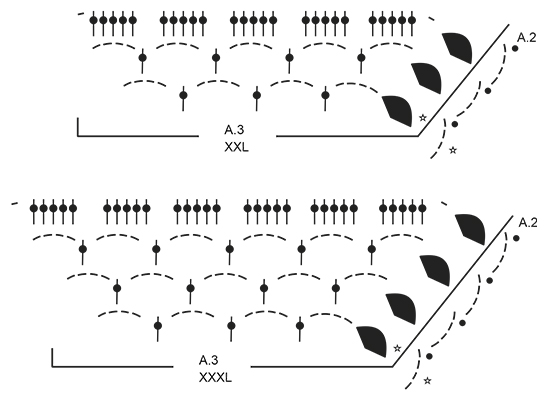
PATTERN: See diagrams A.1 to A.5. On diagram A.1 work first round in the entire round, then repeat A.1 and A.3 4 times in total on round. Diagram A.2 shows how every round beg and ends. A.5 shows how squares are assembled. CROCHET INFO: Beg every round with tr with 3 ch and finish with 1 sl st in 3rd ch. STRIPES: Work 0-4-4-4 rounds with light beige, then work * 2 rounds with off white, work 4 round with light beige *, repeat from *-* 3 times in total. INCREASE: On 1st round in A.4 (i.e. round with tr and ch) inc as follows: Work 1 ch, around ch-space at the tip work as follows: 2 tr around ch-space, 3 ch, 2 tr around same ch-space. On 2nd round in A.4 (i.e. round with tr) inc as follows: Work 1 tr around ch, around ch-space at the tip work as follows: 2 tr around ch-space, 3 ch, 2 tr around same ch-space. ---------------------------------------------------------- PONCHO: The piece is worked from the neck down. First work squares as follows: SQUARE: Work 4 ch on hook size 4 mm with light beige and form a ring with 1 sl st in first ch. Work A.1. Diagram A.2 shows how every round beg and ends. When first round of A.1 is worked, repeat A.1 4 times in total on round. When A.1 has been worked 1 time vertically, there are 16 ch-spaces and 4 corners. Work A.3 over A.1, i.e. repeat A.3 4 times in total on round (see diagram for correct size). NOTE: First round in A.3 is not worked, it only shows how next round is worked around sts. Diagram A.2 shows how every round beg and ends. When A.3 has been worked 1 time vertically, there are 80-80-100-120 tr and 4 corners. Fasten off. Square measures approx. 15-15-17-19 x 15-15-17-19 cm. REMEMBER THE CROCHET TENSION! Work 8 squares. ASSEMBLY: Sew squares tog edge to edge (see A.5) i.e. sew in outer loops of edge sts. These make up the upper part of poncho. Now work in the round from bottom edge of squares as follows: FROM SQUARES AND DOWN: ROUND 1: Beg in the side of square (see A.5), in the middle of the 1st square (i.e. 10-10-12-15 tr before corner). Work 3 ch – READ CROCHET INFO, work 1 tr in each of the first 10-10-12-15 tr, * over the 2 corners sewn tog work as follows: 1 tr in each of the next 2 tr, 2 tr around each of the next 2 corners, 1 tr in each of the next 2 tr *, then work 1 tr in every tr until next corner sewn tog (= over the next 20-20-25-30 tr), repeat from *-* over the next 2 corners sewn tog, 1 tr in each of the next 20-20-25-30 tr, over the next corner inc (see A.5) as follows: Work 1 tr around ch, around ch-space at the tip work as follows: 2 tr around ch-space, 3 ch, 2 tr around same ch-space, 1 tr around next ch. Work 1 tr in every tr and from *-* over the next 8 corners sewn tog and the next 100-100-125-150 tr (i.e. 20-20-25-30 tr between each of the 2 corners sewn tog). Around next corner inc as follows: Work 1 tr around ch, around ch-space at the tip work as follows: 2 tr around ch-space, 3 ch, 2 tr around same ch-space. Work 1 tr in every tr and from *-* the entire round, finish with 1 sl st in 3rd ch = 276-276-326-376 tr. ROUND 2: Work with off white - READ STRIPES. Work A.4 until 3 tr remain before ch-space in the tip, adjust to finish with 1 tr in last tr, work INCREASE – see explanation above. Repeat A.4 until next tip, work increase, work A.4 the rest of round. On every round inc 8 tr, i.e. inc 2 tr on each side of mid front/back. Repeat stripes and A.4 until finished measurements. When stripes have been worked, piece measures approx. 36-40-42-44 cm from the neck. EDGE AT THE BOTTOM: ROUND 1: Work with light beige. Work 1 ch, work 1 dc in first tr, work * 5 ch, skip 4 tr, 1 dc in next tr *, repeat from *-* until mid front/back, ** adjust so that last dc is worked around ch-space mid front/back, 5 ch, 1 dc around same ch-space **, repeat from *-* until mid front/back, repeat from **-** around ch-space mid front/back, repeat from *-* the rest of round, finish with 1 sl st in first ch at beg of round. ROUND 2: Work 3 ch, 1 sl st around first ch-space, 2 ch (= 1 htr), work * 4 ch, 1 htr around next ch-space *, repeat from *-* until ch-space mid front/back, ** 4 ch, around ch-space mid front/back work 1 htr + 4 ch + 1 htr **, repeat from *-* until mid front/back, repeat from **-** around ch-space mid front/back, repeat from *-* the rest of round, finish with 1 sl st in 2nd ch (= htr) at beg of round. ROUND 3: Work 3 ch (= 1 tr), work 5 tr around every ch-space, around ch-space mid front/back work: 1 ch, 2 tr around ch-space, 3 ch, 2 tr around same ch-space, 1 ch, finish round with 1 sl st in 3rd ch at beg of round. Fasten off. NECK EDGE: Beg mid front - see diagram and work with light beige on hook size 4 mm. Work as follows from RS: ROUND 1: Work 1 dc around ch-space in the middle (tip for the middle square), ** work 5 ch, skip corner (i.e. 3 ch + 2 tr), 1 dc around ch, * 5 ch, skip 5 tr, 1 dc between 2 tr *, repeat from *-* 2-2-3-4 more times, 5 ch, skip 5 tr, 1 dc around ch, 5 ch, 1 dc in seam between squares **, repeat from **-** around the entire neck, finish with 1 sl st in first dc. ROUND 2: Work 2 ch, 1 sl st around first ch-space, 2 ch (= 1 htr), * 4 ch, 1 htr around next ch-space *, repeat from *-* until 1 ch-space remains before mid back, work 1 htr around the next 2 ch-spaces, repeat from *-* until 1 ch-space remains, work 1 htr around last ch-space, finish with 1 sl st in 2nd ch (= 1 htr) at beg of round. ROUND 3: Work 3 ch (= 1 tr), work 2 tr around first ch-space, work 5 tr around every ch-space until 1 ch-space remains before mid back, work 3 tr around each of the next 2 ch-spaces, work 5 tr around every ch-space until 1 ch-space remains, work 3 tr around last ch-space, finish with 1 sl st in first tr. Fasten off. |
|||||||||||||||||||||||||||||||||||||||||||
Diagram explanations |
|||||||||||||||||||||||||||||||||||||||||||
|
|||||||||||||||||||||||||||||||||||||||||||
 |
|||||||||||||||||||||||||||||||||||||||||||
 |
|||||||||||||||||||||||||||||||||||||||||||
 |
|||||||||||||||||||||||||||||||||||||||||||
 |
|||||||||||||||||||||||||||||||||||||||||||
Have you finished this pattern?Tag your pictures with #dropspattern #sweetmartineponcho or submit them to the #dropsfan gallery. Do you need help with this pattern?You'll find 11 tutorial videos, a Comments/Questions area and more by visiting the pattern on garnstudio.com. © 1982-2026 DROPS Design A/S. We reserve all rights. This document, including all its sub-sections, has copyrights. Read more about what you can do with our patterns at the bottom of each pattern on our site. |
|||||||||||||||||||||||||||||||||||||||||||


With over 40 years in knitting and crochet design, DROPS Design offers one of the most extensive collections of free patterns on the internet - translated to 17 languages. As of today we count 324 catalogues and 12290 patterns translated into English (UK/cm). 12290
We work hard to bring you the best knitting and crochet have to offer, inspiration and advice as well as great quality yarns at incredible prices! Would you like to use our patterns for other than personal use? You can read what you are allowed to do in the Copyright text at the bottom of all our patterns. Happy crafting!
Post a comment to pattern DROPS 167-21
We would love to hear what you have to say about this pattern!
If you want to leave a question, please make sure you select the correct category in the form below, to speed up the answering process. Required fields are marked *.