
Popular categories
Looking for a yarn?


Comments / Questions (45)
![]() Bente Nielsen wrote:
Bente Nielsen wrote:
Hej. Du skriver at jeg skal strikke A1 10 gange i bredden i størrelse M og man øger med 12 m, det kan ikke lade sig gøre når man kun strikker A1 10 gange i bredden. Jeg kan kun øge med 10 m. Hilsen Bente
29.08.2019 - 08:45DROPS Design answered:
Hej. Jag ser att det fattades 1 omslag i diagrammet på storlek S-M på pinne 21. Mönstret har nu rättats, men det är därför du fått 141 m istället för 151. Beklagar detta!
30.08.2019 - 11:20
![]() Bente Nielsen wrote:
Bente Nielsen wrote:
Hej. I opskriften står der at når A.1 er strikket 1 gang i højden er der 251 m på p, men jeg har kun 241 m, hvorfor, jeg har taget ud alle de steder opskriften viser. Hilsen Bente
25.08.2019 - 09:02DROPS Design answered:
Hej. Du ska sticka A.1 10 gånger på bredden i storlek M och det ökas 12 m på varje A.1 totalt. 10 x 12 m = 120 m ökade. 131+120= 251 m. Lycka till!
26.08.2019 - 07:56
![]() Darchy wrote:
Darchy wrote:
Bonjour, je voulais savoir si les jete entre deux mailles qui se font en debut de diagramme doit etre effectué apres le dernier diagramme réalisé soit en fin de rang . Je vous remercie de votre réponse.
05.05.2019 - 11:56DROPS Design answered:
Bonjour Mme Darchy, les jetés (augmentations) à faire au début du diagramme se font soit juste après les 5 m de bordure devant (1er motif du rang) soit juste au début du motif suivant. Ceux de la f in du diagramme se font à la fin du motif, et en fin de rang, juste avant les 5 m de la bordure devant. Tricotez ces jetés torse au rang suivant pour qu'ils ne forment pas de trous (ceux du point ajouré se tricotent normalement pour former les jours). Bon tricot!
06.05.2019 - 11:02
![]() Ricci wrote:
Ricci wrote:
Bonjour, je duis en train de tricoter ce modèle. Auriez vous une astuce pour reperer sur l envers le jeter entre deux mailles afin de le tricoter en torse pour ne pas former de jour et ainsi eviter de se tromper avec un jeter qui doit faire un jour. Je vous remercie de votre aide
27.04.2019 - 14:29DROPS Design answered:
Bonjour Mme Ricci, vous pouvez mettre un marqueur entre chaque diagramme à répéter pour repérer plus facilement les jetés des augmentations et ceux du point ajouré en suivant ensuite les diagrammes sur l'envers. Bon tricot!
29.04.2019 - 11:38
![]() Marcia wrote:
Marcia wrote:
I'm trying to figure out the right size. How much ease is there in the bust?
13.04.2019 - 19:57DROPS Design answered:
Dear Marcia, if you're in doubt, you should always choose the largest size. You can also take as a reference the measurements in the diagram.
14.04.2019 - 11:06
![]() Dolinda Wienese wrote:
Dolinda Wienese wrote:
Eigenlijk een algemene vraag, soms zie ik dat er verbeteringen zijn in een patroon, als ik nu naar een patroon kijk zijn die verbeteringen dan al in het patroon gezet of niet? Dus is in het geval van dit patroon: is Nieuw telpatroon A.1 maat XXL-XXXL al vervangen door de gecorrigeerde?
30.01.2019 - 10:17DROPS Design answered:
Dag Dolinda,
Dat klopt, de correcties zijn al doorgevoerd in het patroon op het moment dat aangegeven is dat er een correctie is. In de gedrukte collectie brochures kan de fout nog wel zitten, vandaar dat hij als correctie op de site staat.
30.01.2019 - 16:14
![]() Laurence wrote:
Laurence wrote:
Bonjour, J'en suis à la fin du dos. Pouvez-vous me dire sur combien de rangs il faut tricoter les 8 mailles au point mousse autour des marqueurs avant la séparation du dos et du devant? Je lis "Quand 1 côte mousse a été tricoté au-dessus des 4 m de chaque côté de chaque marqueur, terminer le dos et les devants séparément (c'est-à-dire diviser l'ouvrage aux marqueurs). " Est-ce un seul rang ou plusieurs? Merci de votre aide
12.01.2019 - 17:43DROPS Design answered:
Bonjour Laurence, on doit tricoter 2 rangs endroit pour obtenir une côte mousse (cf POINT MOUSSE au début des explications). Avant de diviser l'ouvrage pour terminer le dos et chaque devant séparément, vous tricotez 2 rangs avec les 8 m des côtés au point mousse. Bon tricot!
14.01.2019 - 10:20
![]() BORSOTTO wrote:
BORSOTTO wrote:
Bonjour vous notez " = glisser 1 m à l'end, 1 m end, passer la m glissée par-dessus la m tricotée - NOTE: ne pas faire cette diminution dans le 1er ni dans le dernier motif " pour les diminutions du haut du diagramme A1.... ma question, dois je faire quand même le jeté d'avant.... merci pour votre réponse
15.11.2018 - 11:04DROPS Design answered:
Bonjour Mme Borsotto, cette diminution se fait au début de chaque A.1 comme le montre le diagramme, sauf pour le 1er A.1 au début du rang ni pour le dernier A.1 en fin de rang, quand vous tricotez la 1ère m de A.1, tricotez la simplement en jersey, sans diminuer (ni augmenter - cf dernier symbole). Vous n'allez faire le jeté et la diminution que dans les autres A.1 du rang. Ainsi, les 2 côtés sont symétriques. Bon tricot!
15.11.2018 - 13:45
![]() BORSOTTO wrote:
BORSOTTO wrote:
Bonjour vous notez " = glisser 1 m à l'end, 1 m end, passer la m glissée par-dessus la m tricotée - NOTE: ne pas faire cette diminution dans le 1er ni dans le dernier motif " pour les diminutions du haut du diagramme A1.... ma question, dois je faire quand même le jeté d'avant.... merci pour votre réponse
15.11.2018 - 11:03
![]() Caroline wrote:
Caroline wrote:
Bonjour, le 5ème et le 7ème symbole dans la légende du diagramme A1 n'apparaissent pas sur mon écran (à la place j'ai un point d'interrogation). Pouvez-vous me dire à quel symbole cela correspond dans le diagramme svp? Merci d'avance
08.10.2018 - 18:44DROPS Design answered:
Bonjour Caroline! La legende (symboles et leur desciptions) a ete envoyee a votre adresse mail. Bon tricot!
08.10.2018 - 19:56
|
|||||||||||||||||||||||||||||||
Pink Connection Cardigan#pinkconnectioncardigan |
|||||||||||||||||||||||||||||||
|
|
|||||||||||||||||||||||||||||||
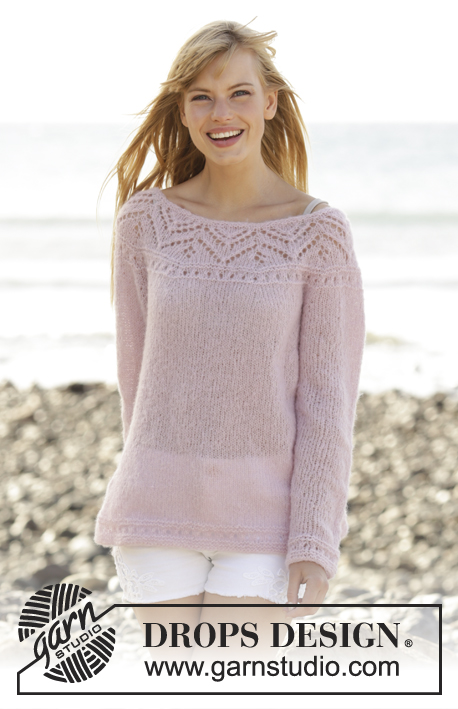
Knitted DROPS jacket with lace pattern, round yoke and vents in the side ”Brushed Alpaca Silk”. Worked top down. Size: S - XXXL.
DROPS 167-12 |
|||||||||||||||||||||||||||||||
|
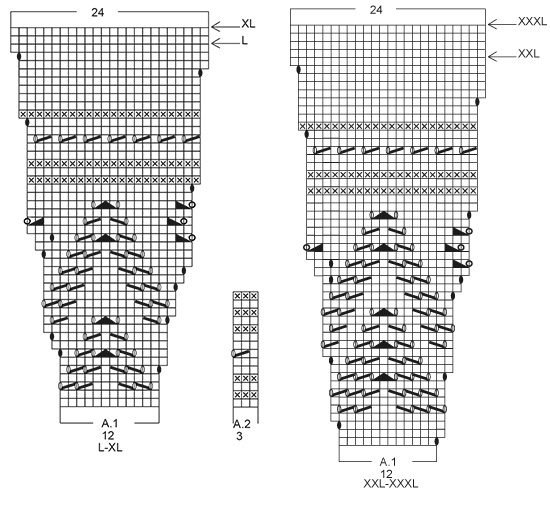
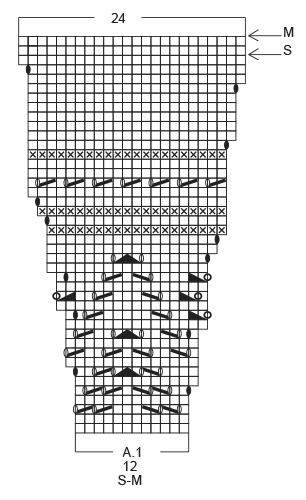
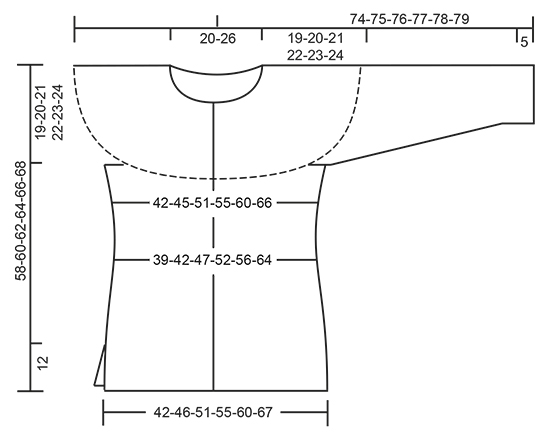
PATTERN: See diagram A.1 and A.2 (choose diagram for correct size). The diagrams show all rows in pattern seen from RS. GARTER ST (back and forth): K all rows. 1 ridge = 2 rows K. INCREASE TIP: Inc 1 st by making 1 YO, on next row work YO twisted to avoid holes. DECREASE TIP: Always dec from RS. Dec as follows before marker: Work until 4 sts remain before marker, K 2 tog, K 2. Dec as follows after marker: K 2, slip 1 st as if to K, K 1, psso BUTTONHOLES: Dec for buttonholes on right band. 1 buttonhole = K tog third and fourth st from edge and make 1 YO. Dec for buttonholes when piece measures: SIZE S: 2, 10, 18, 26, 34 and 42 cm SIZE M: 2, 10, 18, 27, 36 and 45 cm SIZE L: 2, 11, 20, 29, 38 and 47 cm SIZE XL: 2, 11, 20, 29, 38 and 48 cm SIZE XXL: 2, 10, 18, 26, 34, 42 and 50 cm SIZE XXXL: 2, 10, 18, 26, 34, 42 and 51 cm ---------------------------------------------------------- YOKE: Worked top down, back and forth. Cast on 103-115-119-131-137-149 sts (incl 5 band sts in each side of piece) on circular needle size 4 mm with Brushed Alpaca Silk. Work 2 ridges in GARTER ST - see explanation above and inc 16-16-24-24-30-30 sts evenly on last row - READ INCREASE TIP = 119-131-143-155-167-179 sts. Switch to circular needle size 5 mm. Work as follows from RS: 5 band sts in garter st, repeat A.1 (= 12 sts) over the next 108-120-132-144-156-168 sts (= 9-10-11-12-13-14 times in width), work first st in A.1 (this is done to make the pattern the same in both sides of piece), finish with 5 band sts in garter st. REMEMBER THE KNITTING TENSION Dec for BUTTONHOLES - see explanation above. When A.1 has been worked 1 time vertically, there are 227-251-275-299-323-347 sts on needle. Piece measures approx. 19-20-21-22-23-24 cm. K 1 row from RS with 5 band sts in garter st in each side and inc 12-4-4-4-4-4 sts evenly (NOTE: Do not inc over band sts) = 239-255-279-303-327-351 sts. Work next row as follows from WS: Work 5 band sts in garter st, 33-35-40-44-48-53 sts in stocking st, slip the next 50-54-56-60-64-66 sts on a stitch holder for sleeve, cast on 8 new sts under sleeve (insert 1 marker in the middle of these 8 sts), work 64-68-78-86-94-104 sts in stocking st (= back piece), slip the next 50-54-56-60-64-66 sts on a stitch holder for sleeve, cast on 8 new sts under sleeve (insert 1 marker in the middle of these 8 sts), work 32-34-39-43-47-52 sts in stocking st, finish with 5 band sts in garter st = 155-163-183-199-215-235 sts. BODY: Insert 1 marker in piece, NOW MEASURE PIECE FROM HERE. Now work piece in stocking st. When piece measures 4 cm, dec 1 st on each side of each marker in the sides (= 4 sts dec) - READ DECREASE TIP, repeat dec every 6-12-6-7-7-18 cm 2-1-2-2-2-1 more time = 143-155-171-187-203-227 sts. When piece measures 20-21-22-23-24-25 cm, inc 1 st on each side of each marker in the sides (= 4 sts inc), repeat inc every 3 cm 2 more times = 155-167-183-199-215-239 sts. When piece measures 27-28-29-30-31-32 cm from marker, work as follows from RS: 5 band sts in garter st, stocking st until 4 sts remain before marker, 8 sts in garter st, stocking st until 4 sts remain before next marker, 8 sts in garter st, stocking st until 5 sts remain, finish with 5 band sts in garter st. When 1 ridge has been worked over the 4 sts on each side of each marker, finish back and front pieces separately (i.e. divide piece at the markers). LEFT FRONT PIECE: = 41-44-48-52-56-62 sts. Work as follows from RS: 5 band sts in garter st, stocking st until 4 sts remain, finish with 4 sts in garter st. When piece measures 34-35-36-37-38-40 cm (approx. 5 cm remain) from marker, work as follows from RS: Work 5 band sts in garter st, repeat A.2 (= 3 sts) until 5 sts remain AT THE SAME TIME inc 2-2-1-0-2-2 sts evenly on first row, finish with 1 st in stocking st and 4 sts in garter st = 43-46-49-52-58-64 sts. Cast off when A.2 has been worked 1 time vertically. Piece measures approx. 58-60-62-64-66-68 cm in total. BACK PIECE: = 72-78-86-94-102-114 sts. Work in stocking st with 4 sts in garter st in each side. When piece measures 34-35-36-37-38-40 cm from marker, work as follows from RS: 4 sts in garter st, repeat A.2 until 5 sts remain AT THE SAME TIME inc 0-0-1-2-0-0 sts evenly on first row, finish with 1 st in stocking st and 4 sts in garter st = 72-78-87-96-102-114 sts. Cast off when A.2 has been worked 1 time vertically. Piece measures approx. 58-60-62-64-66-68 cm in total. RIGHT FRONT PIECE: = 42-45-49-53-57-63 sts. Work as follows from RS: 4 sts in garter st, stocking st until 5 sts remain, finish with 5 band sts in garter st. When piece measures 34-35-36-37-38-40 cm from marker, work as follows from RS: 4 sts in garter st, work A.2 until 6 sts remain AT THE SAME TIME adjust no of sts to 43-46-49-52-58-64 in total, finish with 1 st in stocking st and 5 band sts in garter st = 43-46-49-52-58-64 sts. Cast off when A.2 has been worked 1 time vertically. Piece measures approx. 58-60-62-64-66-68 cm in total. SLEEVE: Work sleeves in the round on double pointed needles. Slip the 50-54-56-60-64-66 sts from stitch holder back on double pointed needles size 5 mm. Cast on 8 new sts under sleeve, insert a marker in the middle of these 8 sts = 58-62-64-68-72-74 sts. Insert 1 marker in piece, NOW MEASURE PIECE FROM HERE. Work in stocking st. When piece measures 3 cm from marker, dec 1 st on each side of marker, repeat dec every 3-3-3-2½-2-2 cm 10-10-10-12-13-14 more times = 36-40-42-42-44-44 sts on needle. When piece measures 41-41-40-39-39-38 cm (NOTE: Shorter measurements in the larger sizes because of longer yoke), adjust no of sts to 36-39-42-42-45-45 in total on next round. Then work A.2 12-13-14-14-15-15 times in total on round. Cast off when A.2 has been worked 1 time vertically. Work the other sleeve the same way. ASSEMBLY: Sew the opening under the sleeve. Sew the buttons on to the left band. |
|||||||||||||||||||||||||||||||
Diagram explanations |
|||||||||||||||||||||||||||||||
|
|||||||||||||||||||||||||||||||
 |
|||||||||||||||||||||||||||||||
 |
|||||||||||||||||||||||||||||||
 |
|||||||||||||||||||||||||||||||
Have you finished this pattern?Tag your pictures with #dropspattern #pinkconnectioncardigan or submit them to the #dropsfan gallery. Do you need help with this pattern?You'll find 23 tutorial videos, a Comments/Questions area and more by visiting the pattern on garnstudio.com. © 1982-2026 DROPS Design A/S. We reserve all rights. This document, including all its sub-sections, has copyrights. Read more about what you can do with our patterns at the bottom of each pattern on our site. |
|||||||||||||||||||||||||||||||


With over 40 years in knitting and crochet design, DROPS Design offers one of the most extensive collections of free patterns on the internet - translated to 17 languages. As of today we count 324 catalogues and 12290 patterns translated into English (UK/cm). 12290
We work hard to bring you the best knitting and crochet have to offer, inspiration and advice as well as great quality yarns at incredible prices! Would you like to use our patterns for other than personal use? You can read what you are allowed to do in the Copyright text at the bottom of all our patterns. Happy crafting!
Post a comment to pattern DROPS 167-12
We would love to hear what you have to say about this pattern!
If you want to leave a question, please make sure you select the correct category in the form below, to speed up the answering process. Required fields are marked *.