
Popular categories
Looking for a yarn?


Comments / Questions (23)
![]() Pascale wrote:
Pascale wrote:
Sur la vidéo, le crochetage se fait toujours sur le même côté (face avant) alors que dans les explications, il est bien écrit qu'il faut tourner l'ouvrage à chaque rang et donc travailler alternativement sur la face avant et la face arrière... Que de temps perdu sur ce modèle ! 🙄
14.07.2025 - 14:27
![]() DUVERT Anne-Lise wrote:
DUVERT Anne-Lise wrote:
1 ----Dans la première partie empiècement , je fais la taille M A la fin du paragraphe . il est dit : au rang suivant crocheter sur l'envers en ms 27ms 8ml A1 26ms A1 54ms 8ml A1 26ms A1 27ms 16ml = 108 ms y compri A1 Pour moi 27+26+54+26+27= 160 ms et non 108 `2----- comment peux t on passer de 188ms à 108 ??? Je ne comprend pas , je suis perdue pouvez vous m'expliquer, ? merci Cordialement Anne-Lise
09.05.2022 - 09:46DROPS Design answered:
Bonjour Mme Duvert, vous en êtes à la séparation de l'empiècement pour le dos/le devant et les manches; pour les manches, vous devez sauter: A.1 + 26 brides + A.1, autrement dit, vous crochetez: 27 ms (1/2 dos) + 8 ml (sous la manche) + 54 ms (devant) + 8 ml (sous l'autre manche) + 27 ms (demi-dos) = 27+54+27= 108 mailles serrées + 2 fois 8 mailles en l'air, au 1er tour du DOS & DEVAN, vous crochèterez 1 ms dans chaque maille = 108+16=124 ms (en taille L = 3ème série de chiffres, en taille M = 2ème taille, vous avez un nombre de mailles différent). Bon crochet!
09.05.2022 - 12:48
![]() Giulia wrote:
Giulia wrote:
Buongiorno, anche nella realizzazione delle maniche va sostituita la maglia di inizio giro con delle catenelle? Inoltre, man mano che procedo, il centro del sotto manica, contrassegnato dal segnapunti, si sposta via via.. alla fine i punti di inizio tra i giri si trovano su una diagonale e non su una linea retta, cosa sbaglio? Grazie
22.02.2020 - 13:55DROPS Design answered:
Buongiorno Giulia. Sì, anche sulle maniche la prima maglia viene sostituita da catenelle. L’inizio del giro rimane sempre nella stessa posizione, al centro, sotto manica. Buon lavoro!
23.02.2020 - 20:52
![]() Rosemary Lee wrote:
Rosemary Lee wrote:
On the second row, the sleeve has 8 stitches in between the 2 A1s. The next row asks us to miss the A1s at the top of the sleeve and the 22 d.trebles in between. Where do these 22 come from please? I have been over and over the pattern and the video but have found no explanation.
15.01.2019 - 13:37DROPS Design answered:
Dear Mrs Lee, on first round you start with 7 dtr between A.1 on sleeve, then you increase 3 dtr in each of the 2 dtr = there are 6 dtr on each sleeve between both A.1. This video shows how to increase the 3 dtr, then how to increase 2 dtr on each side of A.1. Happy crocheting!
15.01.2019 - 16:43
![]() Sheryl wrote:
Sheryl wrote:
Two questions. 1st- In Yoke where it says Inc 2 tr on each side of A.1 (5) times total. I am presuming that means on each of the next 5 rows? 2nd- after the chain 8 it says skip: A.1 + 22-24-26-28-30-32 tr + A.1 what is the 30? I have the 68 on the front and the two 34 half's for the back 68. If I hook the chain 8 to the other side of the A.1 it makes the hole for the arm way to small. This is for a XXL sweater. Thank you!
03.01.2019 - 20:20DROPS Design answered:
Dear Sheryl, you increase on each side of A.1 every row from right side, this means every other row, not every row worked = 5 times require then 10 rows. On 2nd question, you crochet 8 chain (mid under sleeve) and skip the next stitches for sleeve, ie: the sts for A.1 + the next 30 sts + the sts for next A.1) then continue round with 1 sc in each of the next 68 tr (front piece). Happy crocheting!
04.01.2019 - 12:14
![]() Anna Larsen wrote:
Anna Larsen wrote:
Man kan IKKE bare hækle rundt i stedet for frem og tilbage på ærmerne. Eller rettere: det kan man godt, men så kommer ærmerne til at se anderledes ud end kroppen. Det har noget at gøre med, hvordan maskerne vender på fastmaske-omgangen. Hvis man er pernittengrynet - hvad jeg er - må man hækle frem og tilbage, evt med et par ekstra kantmasker og sy sammen bagefter. Det er i det hele taget en MEGET dårligt gennemarbejdet opskrift.......
25.03.2018 - 13:42
![]() Ida-Maria Skavhaug wrote:
Ida-Maria Skavhaug wrote:
Dere sier at dere har rettet paa moenesteret og avklart hvordan oekningen skal skje mellom hver A1, men jeg forstaar fremdeles ikke hva jeg skal goere... Skal det eller skal det ikke oekes i de to stavene mellom A1? Man faar jo det inntrykket av aa se paa bildet, men i saa fall lurer jeg paa hvordan det skal oekes tre staver over to staver :-)
12.05.2017 - 19:59DROPS Design answered:
Hei Ida-Maria. Har du tatt en en titt på videoen til denne oppskriften? Her viser vi hvordan vi hekler A.1 og raglan fellinger. Se: Hvordan hekle A.1 og raglan fellinger i DROPS Extra 0-1183 God Fornøyelse!
15.05.2017 - 08:51
![]() Talkina wrote:
Talkina wrote:
Bonjour, je suis au 2e rang de A.1 et je ne comprends pas le raglan... Votre vidée était-elle basée sur les augmentations de la taille S ? Je crochète une taille M. Merci
09.03.2017 - 13:49DROPS Design answered:
Bonjour Talkina, en taille M, vous devez augmenter pour le raglan tous les rangs sur l'endroit (= tous les 2 rangs): 1 x 3 DB de chaque côté de A.1 (= comme dans la vidéo), puis 4 x 2 DB de chaque côté de A.1 = 176 DB au total. Bon crochet!
09.03.2017 - 14:08
![]() Paula Warren wrote:
Paula Warren wrote:
Hi. pattern 0-1183. On the yoke and on the second sentence that starts NOTE: ..... Am I turning piece or am I turning the piece so I am working from the wrong side. Also it states 'repeat pattern 1 and A1 - is this both row 1 and 2 of each pattern 1 and 1A and 'to finished measurements ' - which measurements does this mean. Please state for me. Many thanks in advance.
25.01.2017 - 19:18DROPS Design answered:
Dear Mrs Warren, you are working in rows, ie alternately from RS and from WS but at the end of each row, join with a sl st in 1st st at beg of row. You are then working in pattern-1 with A.1 at each raglan line until end of piece = end of yoke. Happy crocheting!
26.01.2017 - 09:08
![]() Tine wrote:
Tine wrote:
Hej Drops, Jeg kan se at jeg er løbet ind i de samme problemer som andre hæklede; nemlig, at maskerne ikke kommer til, at passe med de angivet udtagninger. Hvis man gør som der står i opskiften når man aldrig op på det angivet maske antal efter 5. Udtagning. I skriver d. 27/6-16, at I afventer en afklaring på dette spørgsmål. Hvordan går det med det? På forhånd tak
04.08.2016 - 22:44DROPS Design answered:
Hej Tine. Vi har rettet mönstret saa RAGLAN nu stemmer. Det samme gaelder for den tilhörende jakke (0-1182). Undskyld ventetiden :)
05.10.2016 - 10:50
|
|||||||||||||
Priscilla |
|||||||||||||
|
|
|||||||||||||
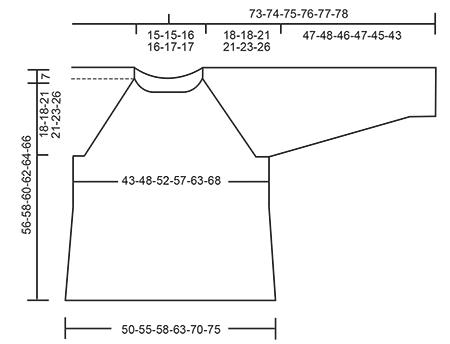
Crochet DROPS jumper with raglan and lace pattern in ”Air”. The piece is worked top down. Size: S - XXXL.
DROPS Extra 0-1183 |
|||||||||||||
|
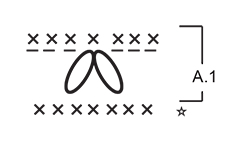
CROCHET INFO: At beg of every dc row, replace first dc with 1 ch, work row tog at the end by working 1 sl st in first ch. At beg of every dtr row, replace first dtr with 4 ch, work row tog at the end by working 1 sl st in 4th ch. At beg of every triple tr row, replace first triple tr with 5 ch, work row tog at the end by working 1 sl st in 5th ch. CROCHET TIP: If the crochet tension vertically is not high enough switch all dtr with triple tr. INCREASE TIP-2: Inc 1 dtr by working 2 dtr in same st. PATTERN-1: ROW 1 (= WS): Work 1 dc in front loop of every dtr. ROW 2 (= RS): Work 1 dtr in back loop of every dc. Repeat rows 1 to 2 until finished measurements. PATTERN-2: ROUND 1: Work 1 dtr in back loop of every dc. ROUND 2: Work 1 dc in back loop of every dtr. Repeat rounds 1 to 2 until finished measurements. INCREASE TIP-1: Inc 3 dtr before A.1 on BODY as follows: Work as before until 3 dc remain before A.1, work 2 dtr in each of the next 3 dc. Inc 3 dtr after A.1 on BODY as follows: Work 2 dtr in each of the next 3 dc after A.1. Inc 3 dtr before A.1 on SLEEVE as follows: Work 4 dtr in 1 dc before A.1. Inc 3 dtr after A.1 on SLEEVE as follows: Work 4 dtr in 1st dc after A.1 Inc 2 dtr before A.1 as follows: Work as before until 2 dc remain before A.1, work 2 dtr in each of the next 2 dc. Inc 2 dtr after A.1 as follows: Work 2 dtr in each of the next 2 dc after A.1. Inc 1 dtr before A.1 as follows: Work as before until 1 dc remain before A.1, work 2 dtr in dc. Inc 1 dtr after A.1 as follows: Work 2 dtr in first dc after A.1. DECREASE TIP: Work 1 dtr/dc but wait with last pull through (= 2 sts on hook), then work next dtr/dc but on last pull through, pull yarn through all sts on hook = 1 dc/dtr dec. PATTERN: See diagram A.1. Work A.1 as follows: ROW 1: Work 3 ch, skip 1 dc, * work 1 dtr in back loop of next dc but wait with last pull through (= 2 sts on hook), work 2 dtr in same st the same way *, skip 3 dc, repeat from *-* 1 time, pull yarn through all 7 sts on hook, 3 ch, skip 1 dc. ROW 2: Work 1 dc in each of the first 3 ch, 1 dc in next st, 1 dc in each of the next 3 ch. ---------------------------------------------------------- JUMPER: Worked top down, back and forth from mid back. YOKE: Work 76-76-80-80-84-84 ch on hook size 6 mm with Air and form 1 ring with 1 sl st in first ch. NOTE: Work every row tog at the end of row before turning piece. Work next row as follows: Work 1 dc in every ch - READ CROCHET INFO = 76-76-80-80-84-84 dc. Then work as follows from RS: Work all dtr in back loop of dc, and READ CROCHET TIP. Work 1 dtr in each of the first 11-11-12-12-13-13 dc AT THE SAME TIME inc 1-3-3-5-7-9 dtr evenly - READ INCREASE TIP-2 – (= half back piece), A.1 over the next 7 dc, 1 dtr in each of the next 2 dc, A.1 over the next 7 dc (= right sleeve), 1 dtr in each of the next 22-22-24-24-26-26 dc AT THE SAME TIME inc 2-6-6-10-14-18 dtr evenly (= front piece), A.1 over the next 7 dc (= left sleeve), 1 dtr in each of the next 2 dc, A.1 over the next 7 dc, (= right sleeve), 1 dtr in each of the next 11-11-12-12-13-13 dc AT THE SAME TIME inc 1-3-3-5-7-9 dtr evenly (= half back piece). Work PATTERN-1 over dtr and A.1 over A.1 as before. On first row in pattern-1 there are 80-88-92-100-112-120 dc (incl A.1). Repeat pattern-1 and A.1 vertically until finished measurements. REMEMBER THE CROCHET TENSION! On next row (= dtr row) inc for raglan on every row from RS (i.e. every row with dtr) on each side of A.1 – READ INCREASE TIP-1 – as follows: Inc 3 dtr on each side of A.1 1 time in total, then inc 2 dtr on each side of A.1 3-4-4-5-5-5 times in total, then 1 dtr on each side of A.1 1-0-1-0-1-2 times in total (= 160-176-188-204-224-240 sts in total). On next row (= from WS with dc) work as follows: Work all dc in front loop of every dtr. Work 1 dc in each of the first 22-25-27-30-34-37 dtr, work 8 ch, insert 1 marker in 4th ch, skip: A.1 + 22-24-26-28-30-32 dtr + A.1 (= sleeve), work 1 dc in each of the next 44-50-54-60-68-74 dtr, work 8 ch, insert 1 marker in 4th ch, skip: A.1 + 22-24-26-28-30-32 dtr + A.1 (= sleeve), 1 dc in each of the next 22-25-27-30-34-37 dtr = 88-100-108-120-136-148 dc (incl A.1) and 16 ch. Move the markers upwards when working. Insert 1 marker in piece, NOW MEASURE PIECE FROM HERE. BODY: Remember CROCHET INFO! Work next row (= from RS) as follows: Pattern-1 over all sts (i.e. 1 dtr in every ch under sleeve) = 104-116-124-136-152-164 dc on row. Work pattern-1 over body as before. When piece measures 6 cm, adjust so that next row is with dtr, inc 1 dtr on each side of each marker in the side (= 4 sts inc), repeat inc every 8 cm 3 more times. On next row with dc there are 120-132-140-152-168-180 dc on row. When piece measures 38-40-39-41-41-40 cm from marker, adjust so that last row is with dc, fasten off. SLEEVE: = A.1 + 22-24-26-28-30-32 dtr + A.1. Insert 1 marker in piece, NOW MEASURE PIECE FROM HERE. Sleeve is worked in the round, top down. Beg by working mid under sleeve as follows: Work 1 dc in the 5th ch of the 8 ch worked in armhole on body, work 1 dc in each of the next 3 ch, work last round of A.1 (= dc) over A.1, 1 dc in back loop of the next 22-24-26-28-30-32 dtr, last round of A.1 over A.1, before working 1 dc in each of the remaining 4 ch under sleeve = 44-46-48-50-52-54 dc. Insert 1 marker mid under sleeve, move the marker when working. Then work piece with PATTERN-2 - see explanation above. When sleeve measures 4 cm, dec 1 dc/tr on each side of marker - READ DECREASE TIP. Repeat dec every 5-4-4-4-4-3 cm 7-8-8-9-9-10 more times = 28-28-30-30-32-32 dc/dtr. Work until piece measures 46-47-45-46-44-42 cm – adjust so that last round is with dc. Work 2 round with 1 dc in back loop of every dc (= 3 round in total with dc at the bottom of sleeve). Fasten off. Work the other sleeve the same way. NECK EDGE: Beg mid back and work as follows from RS: 1 dc in back loop of every dc while AT THE SAME TIME dec 4-4-5-5-6-6 dc evenly = 72-72-75-75-78-78 dc. Turn piece and work from WS. 1 dc in front loop of every dc while AT THE SAME TIME dec 4-4-5-5-6-6 dc evenly = 68-68-70-70-72-72 dc. Fasten off. |
|||||||||||||
Diagram explanations |
|||||||||||||
|
|||||||||||||
 |
|||||||||||||
 |
|||||||||||||
Have you finished this pattern?Tag your pictures with #dropspattern or submit them to the #dropsfan gallery. Do you need help with this pattern?You'll find 14 tutorial videos, a Comments/Questions area and more by visiting the pattern on garnstudio.com. © 1982-2026 DROPS Design A/S. We reserve all rights. This document, including all its sub-sections, has copyrights. Read more about what you can do with our patterns at the bottom of each pattern on our site. |
|||||||||||||


With over 40 years in knitting and crochet design, DROPS Design offers one of the most extensive collections of free patterns on the internet - translated to 17 languages. As of today we count 324 catalogues and 12290 patterns translated into English (UK/cm). 12290
We work hard to bring you the best knitting and crochet have to offer, inspiration and advice as well as great quality yarns at incredible prices! Would you like to use our patterns for other than personal use? You can read what you are allowed to do in the Copyright text at the bottom of all our patterns. Happy crafting!
Post a comment to pattern DROPS Extra 0-1183
We would love to hear what you have to say about this pattern!
If you want to leave a question, please make sure you select the correct category in the form below, to speed up the answering process. Required fields are marked *.