
Popular categories
Looking for a yarn?


Comments / Questions (25)
![]() Kim wrote:
Kim wrote:
Hallo, Wat een leuk kleed! Ik loop helaas vast bij het begin van de zigzag; de laatste rij in de geschreven uitleg geeft aan *2 stk in eerste stk, 1 stk in elk van de volgende 3 stk*. In het diagram zie ik echter *2 stk in eerste stk, 1 stk in elk van de volgende 7 stk* (elke tweede dubbele stk lijkt er maar 1 te zijn in het diagram; de dieper getekende stk). Kunt u mij uitleggen wat ik verkeerd doe? Met vriendelijke groet, Kim
07.06.2018 - 06:56DROPS Design answered:
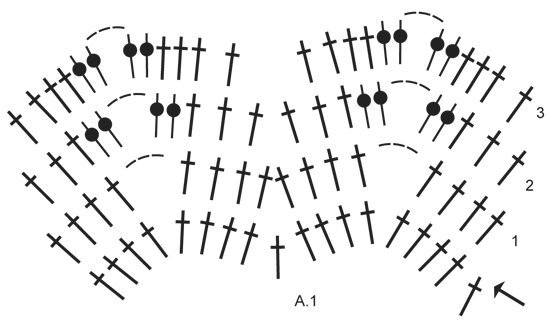
Dag Kim, In het telpatroon staat bij de eerste toer van stokjes een pijl. Dit is toer 6 van het geschreven patroon. Deze is er in getekent zodat je kunt zien hoe je start met het telpatroon, Je begint gewoon bij toer 1 van het telpatroon.
08.06.2018 - 11:04
![]() Trude Grimstad wrote:
Trude Grimstad wrote:
Leser oppskrift og ser både diagram og ser video. Det virker som om hun hekler 2 staver i 1 i stjernemønstret, men det kommer ikke frem i diagram. Og oppskrifta "stopper liksom" etter 6 rad. Dette er forvirrende. Tar jeg feil?
06.04.2017 - 08:29DROPS Design answered:
Hei Trude. Du tar ikke feil. Denne video skal ikke ligge under denne oppskriften. Videoen er laget til et veldig likt teppe, - DROPS Extra 0-1050, og der skal man hekle 2 staver i 1 stjernemønster. Men om du følger oppskriften og diagrammet til 163-12 skal det være riktig, så skal vi få laget en ny video til dette teppet. I den aktuelle videoen viser vi bare begynnelsen, man må også lese oppskriften. Etter 6. omgang skal det hekles striper (les forklaringen i oppskriften) og 3. omgang i A.1 til teppet er ferdig. God fornøyelse.
07.04.2017 - 08:59
![]() Antonella wrote:
Antonella wrote:
E' possibile utilizzare il filato loveyou5 in alternativa? dovrebbe essere più resistente rispetto alla lana, o no?
18.11.2015 - 12:20DROPS Design answered:
Buongiorno Antonella. Può sostituire il filato Eskimo con il filato loveyou5, usandolo doppio. Otterrà ugualmente un buon risultato, resistente. Buon lavoro!
18.11.2015 - 13:45
![]() Anne wrote:
Anne wrote:
Hallo. Hoe block je dit kleed. Het is van wol. Kan ik het nat maken en spannen? Bedankt.
18.10.2015 - 12:03DROPS Design answered:
Hoi Anne. Je kan het ook vochtig maken (sprayen met water) en dan opspannen, dan hoef je niet de kleed helemaal nat te maken.
19.10.2015 - 16:03
![]() Gena wrote:
Gena wrote:
I need help with this pattern. Cannot find the related videos mentioned. Is there a complete written version? Finding it hard to follow the diagram.
14.09.2015 - 22:27
![]() Sandy wrote:
Sandy wrote:
Ich find eure Anleitungen super,aber mit dieser hier hab ich leichte Schwierigkeiten.Wenn ich dann die 3.Reihe vom Zickzackmuster immer wieder wiederhole,wie verhindere ich,dass sich der Teppich zu kräuseln anfängt?
07.09.2015 - 22:29DROPS Design answered:
An sich sollte sich da nichts kräuseln, die Abnahmen in den Zacken"tälern" (d.h. das Überspringen von 2 Stb) sollten sich mit den Zunahmen an den Zackenspitzen so ausgleichen, dass sich nichts stärker wellt. Haben Sie die Maschenprobe eingehalten?
08.09.2015 - 10:25
![]() Alexandra Kratzer wrote:
Alexandra Kratzer wrote:
Ich freu mich schon darauf, diesen tollen Häkelteppich zu machen! Die Sternenform und Farbkombi ist klasse!
02.06.2015 - 13:55
![]() Jelena wrote:
Jelena wrote:
Denne var vakker... flotte farger... kan godt tenk med dette mønstret ;)
31.05.2015 - 17:46Maju wrote:
Beautiful pattern
28.05.2015 - 18:23
![]() Jacques wrote:
Jacques wrote:
Très beau travail,on peu aussi utiliser des restes de laine,super pratique
28.05.2015 - 11:20
|
|||||||||||||
Pole Star#polestarrug |
|||||||||||||
 |
 |
||||||||||||
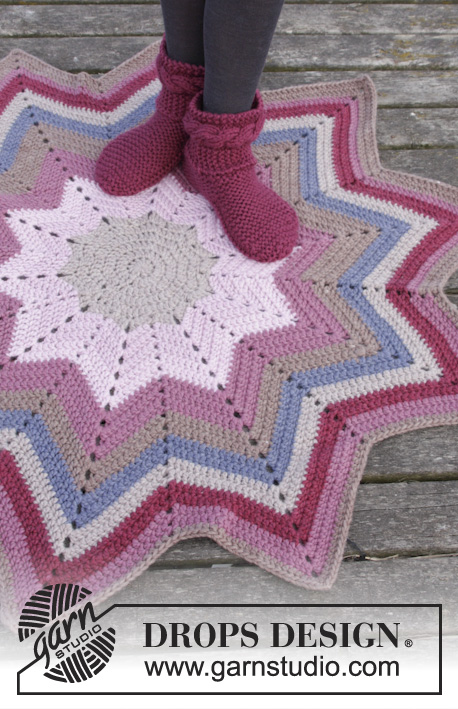
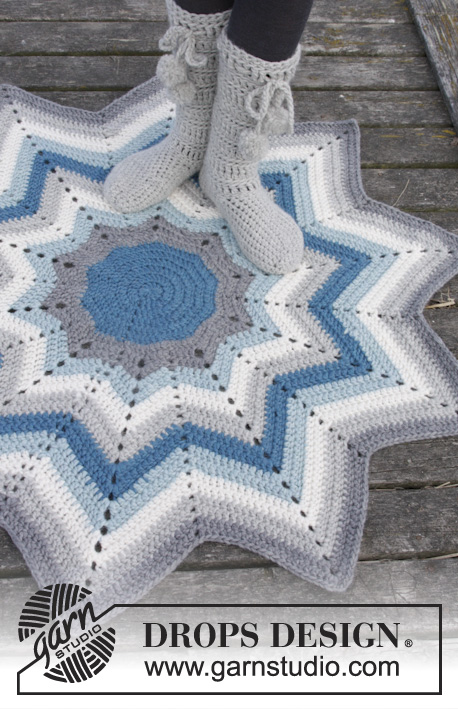
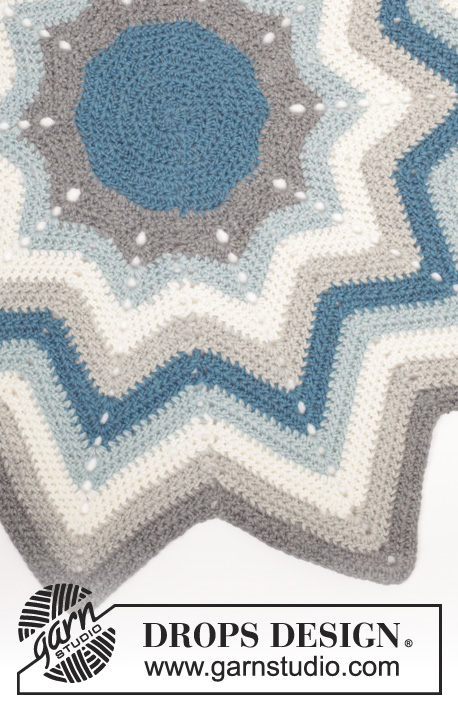
Crochet DROPS carpet with stripes and zig-zag pattern in "Snow".
DROPS 163-12 |
|||||||||||||
|
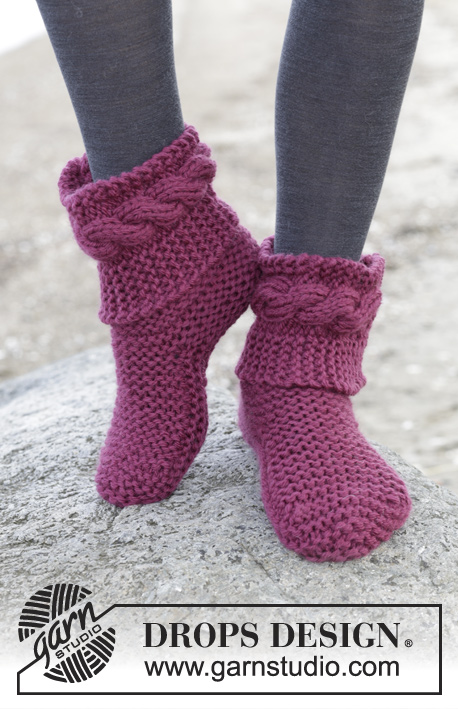
MAGIC CIRCLE: When piece is worked in the round, start with this technique to avoid hole in the middle (instead of ch-ring): Hold the yarn end and wind the yarn one time around the index finger to make a loop. Hold the loop with left thumb and middle finger, place the yarn over left index finger. Insert hook through the loop, make a YO and pull yarn through loop, work 3 ch, then work 11 tr around the loop. Pull the yarn end to tighten loop. Fasten the yarn end on the back side. CROCHET INFO: Replace first tr at beg of every tr round with 3 ch. Finish round with 1 sl st in 3rd ch at beg of round. PATTERN: See diagram A.1. STRIPES: Piece is worked in stripes - READ COLOUR CHANGE. 2 ROUNDS medium grey 2 ROUNDS sapphire 2 ROUNDS off white 2 ROUNDS light grey 2 ROUNDS turquoise 2 ROUNDS sapphire 2 ROUNDS off white 2 ROUNDS light grey 2 ROUNDS medium grey COLOUR CHANGE: To get a nice colour change when working, work last tr on round as follows: Make a YO, insert hook in last st, get the yarn and pull it through st, make a YO and pull it through the first 2 sts on hook, then make a YO with the new colour and pull it through the 2 sts on hook. ---------------------------------------------------------- CARPET: Worked in the round in turquoise before working stripes and zig-zag. CIRCLE: Work a MAGIC CIRCLE - see explanation above, with 12 tr - READ CROCHET INFO, on hook size 7 mm with turquoise. Continue to work as follows: ROUND 1: Work 2 tr in every tr = 24 tr. ROUND 2: Work * 2 tr in first tr, 1 tr in next tr *, repeat from *-* the entire round = 36 tr. REMEMBER THE CROCHET TENSION! ROUND 3: Work * 2 tr in first tr, 1 tr in each of the next 2 tr *, repeat from *-* the entire round = 48 tr. ROUND 4: Work * 2 tr in first tr, 1 tr in each of the next 3 tr *, repeat from *-* the entire round = 60 tr. ROUND 5: Work * 2 tr in first tr, 1 tr in each of the next 4 tr *, repeat from *-* the entire round = 72 tr. Switch to medium grey - READ COLOUR CHANGE! ROUND 6: Work * 2 tr in first tr, 1 tr in each of the next 3 tr *, repeat from *-* the entire round = 90 tr. ZIG-ZAG: Then work STRIPES - see explanation above - while AT THE SAME TIME working zig-zag as follows: Work A.1 5 times in total on round (= 10 tips). When A.1 has been worked 1 time vertically, repeat 3rd round in A.1. Continue until stripes are done. Piece measures approx. 112 cm in diameter (from edge of tips). Fasten off. ---------------------------------------------------------- Slippers: See DROPS 163-13 or "Related patterns" in pattern on website. ---------------------------------------------------------- |
|||||||||||||
Diagram explanations |
|||||||||||||
|
|||||||||||||
 |
|||||||||||||
Have you finished this pattern?Tag your pictures with #dropspattern #polestarrug or submit them to the #dropsfan gallery. Do you need help with this pattern?You'll find 9 tutorial videos, a Comments/Questions area and more by visiting the pattern on garnstudio.com. © 1982-2026 DROPS Design A/S. We reserve all rights. This document, including all its sub-sections, has copyrights. Read more about what you can do with our patterns at the bottom of each pattern on our site. |
|||||||||||||


With over 40 years in knitting and crochet design, DROPS Design offers one of the most extensive collections of free patterns on the internet - translated to 17 languages. As of today we count 324 catalogues and 12290 patterns translated into English (UK/cm). 12290
We work hard to bring you the best knitting and crochet have to offer, inspiration and advice as well as great quality yarns at incredible prices! Would you like to use our patterns for other than personal use? You can read what you are allowed to do in the Copyright text at the bottom of all our patterns. Happy crafting!
Post a comment to pattern DROPS 163-12
We would love to hear what you have to say about this pattern!
If you want to leave a question, please make sure you select the correct category in the form below, to speed up the answering process. Required fields are marked *.