
Popular categories
Looking for a yarn?


Comments / Questions (141)
![]() Kerstin wrote:
Kerstin wrote:
Ich stricke dieses hübsche Kleid gerade in Gr 134 und würde es auch gern in Gr 80 zum Verschenken stricken. Könntet ihr das Strickmuster auch für Gr 80 zur Verfügung stellen? Lieben Gruß
12.01.2016 - 11:32DROPS Design answered:
Leider können wir das Modell erst ab Größe 92 anbieten.
29.01.2016 - 10:56
![]() A.M. Nijsten wrote:
A.M. Nijsten wrote:
Zelf ben ik bijna klaar met het patroon A2, maar nu weet ik niet hoe ik de banen moet inbreien voor A3, omdat ik geen twee steken kan samenbreien en daarna een overhaling kan doen. Ik kom namelijk een steek tekort, voor het patroontje te sluiten.
11.01.2016 - 11:49DROPS Design answered:
Hoi. Zou je kunnen aangeven welke maat je breit? Dan kan ik sneller meekijken en uitrekenen. Bvd.
13.01.2016 - 15:32
![]() Judith wrote:
Judith wrote:
Hallo, ein wirkliches wunderschönes Kleid. Ich habe eine Frage zu der Stelle, an der Vorder- und Rückteil getrennt werden. Es heißt in der Anleitung "an beiden Seiten des Kleides je 6 M abnehmen (= je 3 M beidseitig jedes Markierers). " - wie soll die Abnahme erfolgen? Abketten oder je 2 M re zusammen (in derselben Reihe?)? Danke für Unterstützung.
19.12.2015 - 19:13DROPS Design answered:
Sie müssen die je 6 M abketten, dadurch entstehen die Ausschnitte für die Arme.
20.12.2015 - 18:30
![]() Els Ter Haar-Janssen wrote:
Els Ter Haar-Janssen wrote:
Ik begrijp niet hoe ik de hals moet breien bij patroon 26-6 Kan er niets overvinden. Het is wel een heel leuk patroon! Bij voorbaat dank.
16.11.2015 - 12:06DROPS Design answered:
Hoi Els. Onder het VOORPAND lees je hoe je moet afkanten/minderen voor de hals. Het afwerken lees je onder HALSRAND aan het eind van het jurkpatroon.
16.11.2015 - 14:30
![]() Osten wrote:
Osten wrote:
Ich stricken gerade dies niedliche Kleidchen, habe den Rock fertig. Dann steht man solle über alle Maschen weiter mit Muster A1 stricken. Muss es da nicht A4!!!! heißen? Laut Bild ist doch eine Bordüre am Oberteilrand?
07.11.2015 - 04:02DROPS Design answered:
A.1 ist richtig, das ergibt ja genau die Bordüre - A.1 sind 4 Rd kraus re, 1 Loch-Rd und wieder 4 Rd kraus re, genau das ist als oberer "Rockabschluss" auf dem Bild zu sehen.
07.11.2015 - 12:03
![]() Margaret Kettlewell wrote:
Margaret Kettlewell wrote:
Hi, thank you for this lovely pattern. I am a bit stuck on the sleeve cap instructions. This seemed to come much too short to fit the armhole and I wonder if a sentence is missing. If it is correct, is the cast off 2 sts at the beginning of each row or both ends of each row? Many thanks Margaret
31.10.2015 - 16:19DROPS Design answered:
Dear Mrs Kettlewell, for sleeve cap, you first cast off the 6 sts mid under arm then cast of 2 sts at the beg of every row on each side (=2 sts in each side) until sleeve measures 24-36 cm (see size), then cast off 3 sts at the beg of next 2 row (= 3 sts in each side) and cast off the remaining sts. Happy knitting!
31.10.2015 - 18:18
![]() Jette wrote:
Jette wrote:
Hej. Jeg bliver lidt usikker mht aflukning til ærmekuppel. Luk 2 m på hver p til arbejdet måler 33 cm ( 7/8) luk 3 m i hver side. Luk derefter de resterende m af. Arb måler 34 cm. Hvor mange masker bør de "resterende" være? Mvh Jette
21.10.2015 - 19:36DROPS Design answered:
Hej Jette, det kommer an på hvor mange pinde du har tilbage før arbejdet måler 34 cm. Men det betyder ikke så meget om du har lukket 2 m mere eller mindre af, du vil få den afrundede ærmekuppel og det er det som er vigtigt. God fornøjelse!
02.11.2015 - 12:26
![]() Anne Ruokonen wrote:
Anne Ruokonen wrote:
Hei! Ohjeessa on ilmeisesti pieni virhe kohdassa; oikea olka. Siinä lisätään 1 s mutta mielestäni pitäisi olla 4 silmukkaa, jotta olkapää täsmää vasempaan eikä napitus vedä?
04.10.2015 - 19:53DROPS Design answered:
Ohje on nyt korjattu!
27.10.2015 - 16:36
![]() Hanne Gram wrote:
Hanne Gram wrote:
Er der en fejl i opskriften? Der står, at man skal lukke til ærmegab, når arbejdet måler 37 cm (str2år), derefter skal arbejdet måle 38 cm, når der skal lukkes til skulder??
06.09.2015 - 07:39Monika wrote:
Hello! Would you be so kind to explain, how to decrease sts of dress? You say decrease before and after A3 every 1,5 cm for 12 times. Should I decrease sts in this way in one row? Or do you mean decreasing in every 1,5 cm high row? Thank you in advance!
02.09.2015 - 11:44DROPS Design answered:
Hello Monika! You are right, you have to repeat decreasing after every 1,5 cm vertically and so on 12 times. Happy knitting!
02.09.2015 - 13:34
|
|||||||||||||||||||
Wendy Darling#wendydarlingdress |
|||||||||||||||||||
 |
 |
||||||||||||||||||
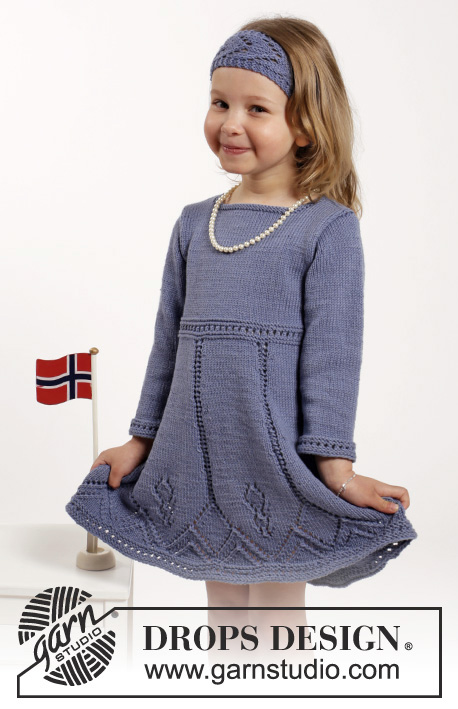
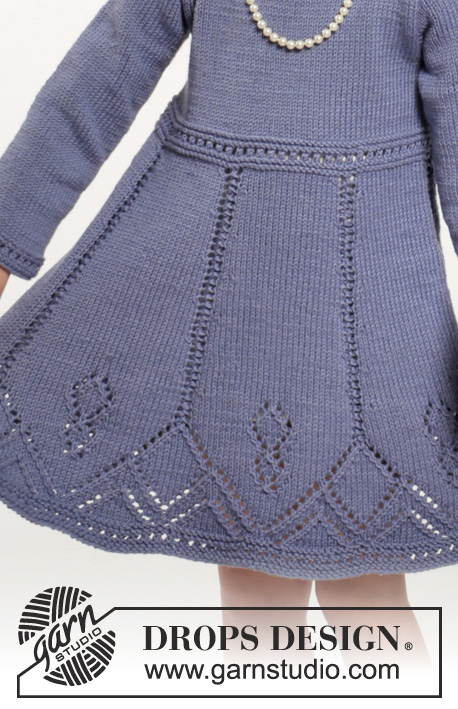
Knitted dress and hair band with lace pattern in DROPS Cotton Merino. Size children 2 - 10 years
DROPS Children 26-6 |
|||||||||||||||||||
|
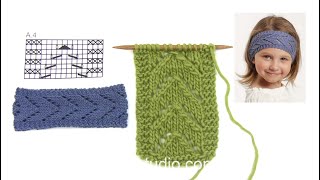
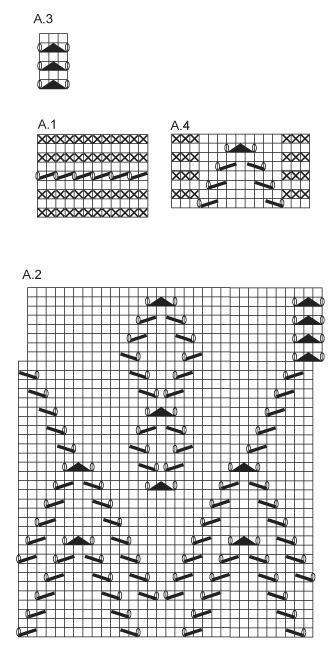
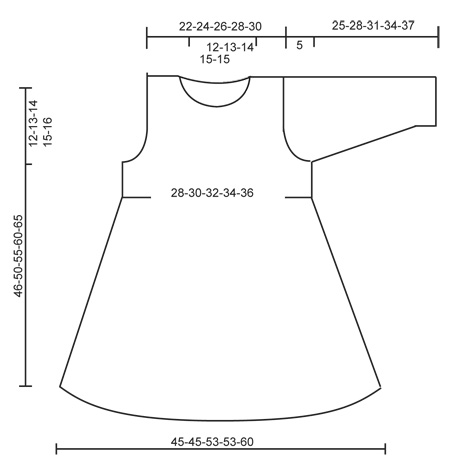
PATTERN: See diagrams A.1 to A.4. DECREASE TIP: Dec as follows before A.3: K 2 tog. Dec as follows after A.3: Slip 1 st as if to K, K 1, psso BUTTONHOLES: Dec for buttonholes on left back piece. Dec by working second and third st tog from mid back, then make a YO. Dec for buttonholes when band measures 2 and 4 cm GARTER ST (back and forth): K all rows. 1 ridge = 2 rows K. ---------------------------------------------------------- DRESS: Worked in the round on circular needle from bottom up. Cast on 192-192-224-224-256 sts on circular needle size 3.5 mm with Cotton Merino. Work A.1. Then work A.2 (= 6-6-7-7-8 repetitions in width). When A.2 has been worked 1 time vertically, work as follows - beg 1 st before first st on round: * A.3 (= 3 sts), 29 sts in stocking st *, repeat from *-* 6-6-7-7-8 times. AT THE SAME TIME when piece measures 15 cm, dec 1 st before every A.3 – READ DECREASE TIP (= 6-6-7-7-8 sts dec). Repeat dec alternately before and after A.3 every every 1-1½-1½-2-2 cm a total of 12-10-12-10-12 times = 120-132-140-154-160 sts. Continue in stocking st and A.3 until piece measures 27-29-32-35-37 cm. Now work A.1 over all sts, on first row in A.1 adjust no of sts to 124-132-140-148-160. Insert 2 markers in the piece; one at the beg of round and 1 after 62-66-70-74-80 sts = sides. Continue in stocking st over all sts. When piece measures 34-37-41-45-49 cm, cast off 6 sts in each side for armholes (i.e. 3 sts on both sides of every marker) and finish each piece separately. BACK PIECE: = 56-60-64-68-74 sts. Continue cast off for armholes in each side at beg of every row as follows: 2 sts 1 time and 1 st 2-2-1-1-2 times = 48-52-58-62-66 sts. When piece measures 38-42-47-52-57 cm, slip the first 22-24-27-29-31 sts (from RS) on 1 stitch holder for right shoulder (work them first) and finish each shoulder separately. LEFT SHOULDER: = 26-28-31-33-35 sts. Continue in stocking st but work the first 4 sts on needle (towards middle) in garter st (= button band). Dec for BUTTONHOLES - see explanation above. When piece measures 44-48-53-58-63 cm, slip the first 4 sts on a stitch holder (work them first), then cast off the next 10-11-12-13-13 sts for neck. Then cast off 1 st on next row towards the neck = 11-12-14-15-17 sts remain on the shoulder. Cast off when piece measures 46-50-55-60-65 cm. RIGHT SHOULDER: Slip the 22-24-27-29-31 sts from stitch holder back on needle and cast on 4 new sts at the end of first row from RS (= button band) = 26-28-31-33-35 sts. Work as left shoulder but reversed, do not dec for buttonholes. FRONT PIECE: = 56-60-64-68-74 sts. Cast off for armhole in the sides as on back piece = 48-52-58-62-66 sts. When piece measures 41-45-50-55-60 cm, slip the middle 18-20-22-24-24 sts on a stitch holder for neck and finish each shoulder separately. Then cast off on every row towards neck: 2 sts 1 time and 1 st 2 times = 11-12-14-15-17 sts remain on shoulder. Cast off when piece measures 46-50-55-60-65 cm. SLEEVE: Worked in the round on double pointed needles. Cast on 40-42-44-46-48 sts on double pointed needles size 3.5 mm with Cotton Merino. Work A.1 over all sts, then work in stocking st. Insert 1 marker at beg of round = mid under sleeve. When piece measures 6 cm, inc 1 st on each side of marker. Inc every 6-3½-3-3-3 cm 2-4-6-7-8 more times = 46-52-58-62-66 sts. When piece measures 20-23-26-29-32 cm, cast off 6 sts mid under sleeve for sleeve cap. Then work sleeve back and forth while AT THE SAME TIME dec for sleeve cap in each side as follows: Cast off 2 sts in each side until piece measures 24-27-30-33-36 cm. Cast off 3 sts in each side, then cast off the remaining sts. Piece measures approx. 25-28-31-34-37 cm. ASSEMBLY: Sew the shoulder seams. Sew in sleeves. Sew the buttons on to right band. Then place the 4 sts from right back piece behind the 4 sts on the left back piece and fasten with small sts. NECK EDGE: Pick up approx. 72 to 88 sts (incl sts on stitch holders) around the neck on circular needle size 3.5 mm. Work 2 ridges. Cast off. ---------------------------------------------------------- HAIR BAND: Cast on 15 sts on needle size 3.5 mm with Cotton Merino. Work 1 ridge in GARTER ST - see explanation above, then work A.4 over all sts. Continue with A.4 until piece measures 41-42-43-44 cm (lightly pull piece when measuring), work a ridge, cast off. Sew cast-on and cast-off edge tog with grafting/kitchener stitches. |
|||||||||||||||||||
Diagram explanations |
|||||||||||||||||||
|
|||||||||||||||||||
 |
|||||||||||||||||||
 |
|||||||||||||||||||
Have you finished this pattern?Tag your pictures with #dropspattern #wendydarlingdress or submit them to the #dropsfan gallery. Do you need help with this pattern?You'll find 31 tutorial videos, a Comments/Questions area and more by visiting the pattern on garnstudio.com. © 1982-2026 DROPS Design A/S. We reserve all rights. This document, including all its sub-sections, has copyrights. Read more about what you can do with our patterns at the bottom of each pattern on our site. |
|||||||||||||||||||


With over 40 years in knitting and crochet design, DROPS Design offers one of the most extensive collections of free patterns on the internet - translated to 17 languages. As of today we count 324 catalogues and 12290 patterns translated into English (UK/cm). 12290
We work hard to bring you the best knitting and crochet have to offer, inspiration and advice as well as great quality yarns at incredible prices! Would you like to use our patterns for other than personal use? You can read what you are allowed to do in the Copyright text at the bottom of all our patterns. Happy crafting!
Post a comment to pattern DROPS Children 26-6
We would love to hear what you have to say about this pattern!
If you want to leave a question, please make sure you select the correct category in the form below, to speed up the answering process. Required fields are marked *.