
Popular categories
Looking for a yarn?


Comments / Questions (4)
![]() Katharine wrote:
Katharine wrote:
I'm confused about decreases for sleeve cap. It would help a lot to have the stitch counts after main decreases. I don't understand "bind off for sleeve cap at each side every other row." Does every other row mean that there's a row (each direction, so actually 2 rows) with NO decrease, then the next decrease (going in both directions)..?
12.06.2022 - 04:24DROPS Design answered:
Dear Katharine, you have to cast off at the beginning of every row on each side, ie both from RS and from WS, for example cast off 4 sts at the beginning of next 4 rows (= 2 times on each side), then cast off 3 sts at the beginning of next 4 rows (= 2 times on each side), etc. Happy knitting!
13.06.2022 - 09:19
![]() Thank You wrote:
Thank You wrote:
Thank you.
07.04.2020 - 06:03
![]() Melissa wrote:
Melissa wrote:
I don't understand the reason for the increases after the piece reaches 8 cm. The reason I'm asking is that I'm lengthening the bodice by four inches. Will that make a difference where the increases begin or should I start the increases when the piece measures 17 cm?
05.04.2020 - 20:47DROPS Design answered:
Dear Melissa, the increases are there to shape the sides, of the sweater, making it folowing the waistline vloser. If you want to lengthten teh cardigan, start the increaes to where the waits would be. Happy knitting!
07.04.2020 - 05:38
![]() Melissa wrote:
Melissa wrote:
I think the explanation for the cable could be clarified by explaining the cable with the cable needle and then add "OR knit as follows without . . . . . " The way it reads now could be interpreted as knit the NEXT two st without a cable needle . . . .
23.03.2020 - 23:20
|
|||||||||||||
DROPS 72-5 |
|||||||||||||
 |
 |
||||||||||||
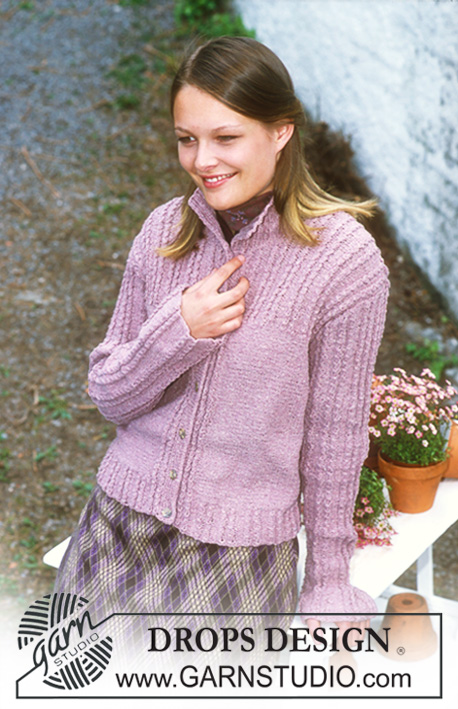
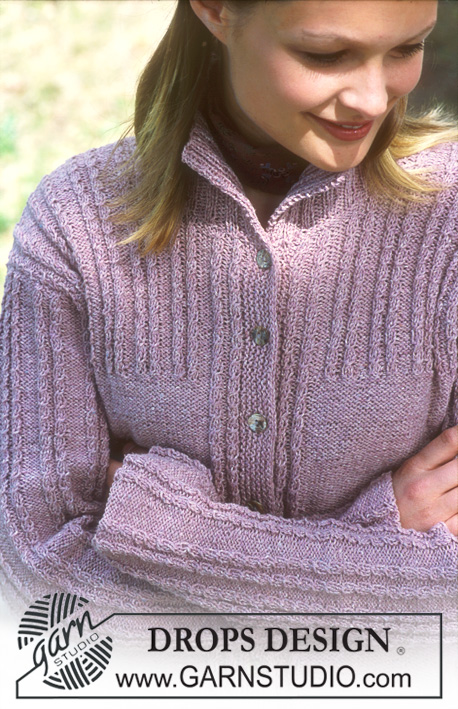
DROPS Cardigan in Silke-Tweed.
DROPS 72-5 |
|||||||||||||
|
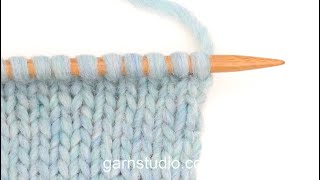
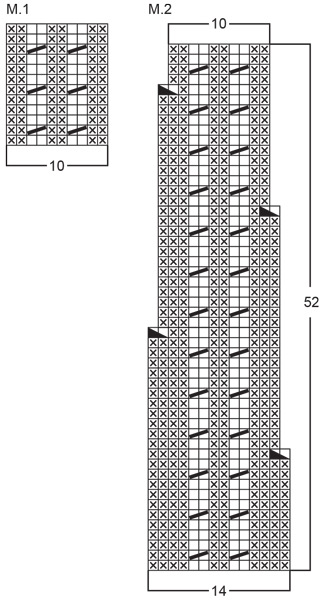
Gauge: 24 sts x 32 rows on larger needles in stockinette st = 10 x 10 cm Pattern: See charts. The pattern is seen from the right side. Rib: * K 2, P 2 *, repeat from * - *. Garter st, when knitting flat: Knit all sts, all rows. Body: Cast on 250-270-290-310 sts on larger circular needles and knit Pattern 1 across all sts. When the piece measures 6 cm change to reverse stockinette st - but keep 10 sts at each edge (center front edges) in Pattern 1, and dec 46-50-54-58 sts evenly distributed on the first row - do not dec over the 10 sts in Pattern 1 at each side = 204-220-236-252 sts remain on needles. Put a marker at each side, 51-55-59-63 sts in from center front edge at each side. When the piece measures 8 cm inc 1 st each side of markers every 5 cm a total of 4 times = 220-236-252-268 sts - knit the increased sts in reverse stockinette st as you go along. When the piece measures 30-32-33-35 cm bind off 6 sts at each side for armhole (3 sts each side of markers). Knit each piece separately. Right front: = 52-56-60-64 sts. Bind off for armhole every other row: 3 sts 0-0-1-2 time, 2 sts 1-2-3-4 times and 1 st 2-4-3-2 times = 48 sts remain on needles. At the same time when the piece measures approx. 34-36-38-40 cm - adjust to end after 4 rows of Pattern 1 - knit Pattern 1 over all sts to finished dimensions, increasing 12 sts evenly distributed on the first row = 60 sts. When the piece measures 44-46-48-50 cm bind off 12 sts at center front edge for neck. Then bind off for the neck every other row: 2 sts 3 times and 1 st 3 times = 39 sts remain on shoulder. When the piece measures 52-54-56-58 cm dec 8 sts K 2 tog over all the small cables = 31 sts remain on shoulder. On the next row bind off all sts. Left front: Knit the same as the right, reversing all shaping. Back: = 104-112-120-128 sts. Bind off for armhole at both sides as on front = 96 sts remain on needles. At the same time when the piece measures approx. 34-36-38-40 cm - adjust to end after 4 rows of Pattern 1 - knit Pattern 1 over all sts to finished measurements, increasing 24 sts evenly distributed on the first row = 120 sts. When the piece measures approx. 50-52-54-56 cm bind off the center 38 sts for the neck. Then dec 1 st at each neck edge every other row 2 times = 39 sts remain on shoulder. When the piece measures 52-54-56-58 cm dec 8 sts by K 2 tog over all the small cables = 31 sts remain on shoulder. On the next row bind off all sts. Sleeve: Cast on 86-86-100-100 sts on larger needles. Knit Pattern 2, but do not knit 1 edge st at each side in the pattern – keep in reverse stockinette st throughout. After Pattern 2 the piece measures approx. 16 cm and there are 62-62-72-72 sts. Change to Pattern 1 over all sts (line up cables over those in Pattern 2). At the same time when the piece measures 17 cm inc 1 st at each side every 4 rows 25 times = 112-112-122-122 sts - knit the increased sts in Pattern 1 as you go along. When the piece measures 50-50-48-48 cm bind off for sleeve cap at each side every other row: 4 sts 2-2-2-2 times, 3 sts 2-2-2-2 times, 2 sts 2-2-3-2 times, 1 st 1-2-2-6 times, 2 sts 2-2-3-2 times, then 3 sts at each side until the piece measures 58-59-58-59 cm. Bind off remaining sts. Assembly: Sew shoulder seams - be sure to line up ribs from back and fronts. Left button band: Pick up approx. 110 to 124 sts (divisible by 4) along left button band inside 1 edge st on smaller needles. Knit 12 rows garter st, bind off. Right button band: Pick up and knit the same as the left, but after 4 rows garter st make 7 buttonholes evenly distributed on button band - the top and bottom buttonholes should be approx. 1 cm from edge. 1 buttonhole = bind off 2 sts and cast on 2 new sts on the next row. Collar: Pick up approx. 100 to 112 sts (divisible by 4) around the neck on smaller needles - including over button bands. Knit rib keeping 1 st at each edge in garter st and begin rib with K 2 (seen from the right side when the collar lays flat). When the collar measures 9 cm bind off all sts in rib. Sew the sleeve using edge sts as seam allowance. Sew in sleeves and sew on buttons. |
|||||||||||||
Diagram explanations |
|||||||||||||
|
|||||||||||||
 |
|||||||||||||
 |
|||||||||||||
Have you finished this pattern?Tag your pictures with #dropspattern or submit them to the #dropsfan gallery. Do you need help with this pattern?You'll find 22 tutorial videos, a Comments/Questions area and more by visiting the pattern on garnstudio.com. © 1982-2026 DROPS Design A/S. We reserve all rights. This document, including all its sub-sections, has copyrights. Read more about what you can do with our patterns at the bottom of each pattern on our site. |
|||||||||||||


With over 40 years in knitting and crochet design, DROPS Design offers one of the most extensive collections of free patterns on the internet - translated to 17 languages. As of today we count 324 catalogues and 12290 patterns translated into English (UK/cm). 12290
We work hard to bring you the best knitting and crochet have to offer, inspiration and advice as well as great quality yarns at incredible prices! Would you like to use our patterns for other than personal use? You can read what you are allowed to do in the Copyright text at the bottom of all our patterns. Happy crafting!
Post a comment to pattern DROPS 72-5
We would love to hear what you have to say about this pattern!
If you want to leave a question, please make sure you select the correct category in the form below, to speed up the answering process. Required fields are marked *.