
Popular categories
Looking for a yarn?


Comments / Questions (19)
![]() Dominique wrote:
Dominique wrote:
Bonjour Je suis arrivee au 7eme rang qui est envers et ne comprends pas comment tricoter en rond le suivant a l'endroit. Si je ferme le cercle c'est sur l'envers faut il couper le fil? Merci de votre reponse.
24.04.2014 - 14:21DROPS Design answered:
Bonjour Dominique, après le 7ème rang (sur l'envers), tournez pour continuer sur l'endroit, et continuez en rond (sur l'endroit) comme indiqué. Vous allez fermer l'ouvrage en rond à la fin du 8ème rang (=1er tour). Bon tricot!
24.04.2014 - 14:49
![]() Dominique wrote:
Dominique wrote:
Bonjour Je suis arrivee au 7eme rang qui est envers et ne comprends pas comment tricoter en rond le suivant a l'endroit. Si je ferme le cercle c'est sur l'envers faut il couper le fil? Merci de votre reponse.
24.04.2014 - 14:08
![]() G. Nyström wrote:
G. Nyström wrote:
Jag erkänner att det här är min första tröja, så därför en, troligen dum, fråga - jag förstår inte varför jag ska öka (raglan) genom omslag, istället för att öka 'osynligt i maskan under', som ni visar i en video. Hur jag än gör, vriden maska eller inte - det blir ett hål. Med vriden maska blir det mindre, men inte så litet som om jag gör enl metoden osynlig i maskan under. Jag vet i och för sig att det normalt är hål vid raglan, men borde det inte vara bättre att minimera dem?
13.02.2014 - 02:43DROPS Design answered:
Du kan välja helt själv :) Om du vill ha ökningen mer osynlig så använd gärna metoden "osynlig i m under".
13.02.2014 - 21:10
![]() Birgit wrote:
Birgit wrote:
Hallo, müssen nach der letzten Zunahme für die Raglanblende (bei Größe M) noch einmal 3 Runden glatt rechts gestrickt werden, bevor die Ärmel stillgelegt werden und der Rumpf weiter gestrickt wird oder wird mit den Umschlägen für die Zunahme aufgeteilt. In der Anleitung schließt sich die Aufteilung direkt an die letzte Zunahme an. Vielen Dank für eine Antwort.
31.01.2014 - 17:30DROPS Design answered:
Liebe Birgit, es wird direkt nach der letzten Aufnahme geteilt.
03.02.2014 - 08:47
![]() Tiiu wrote:
Tiiu wrote:
Eestikeelses mustris on tõlkeviga. Raglaani tuleb kasvatada igal teisel real, mitte igal real nagu mustris kirjas on.
02.01.2014 - 23:42
![]() BOILLOT wrote:
BOILLOT wrote:
Puis-je tricoter la laine NEPAL UNI COLOUR ou NEPAL MIX à la machine à tricoter.
07.11.2013 - 18:47DROPS Design answered:
Bonjour Mme Boillot, Chaque machine à tricoter est différente, référez-vous à la notice de la vôtre et n'hésitez pas à demander conseil à votre magasin DROPS ou sur un forum de tricoteuses machine. Bon tricot!
08.11.2013 - 09:29
![]() Nicole wrote:
Nicole wrote:
Bonjour, j'ai fais les augmentations au niveau du raglan et emmanchures, comme indiqué dans le modèle mais cela fait des trous (pas très jolis) avez vous une solution? Merci pour vos conseils.
06.11.2013 - 13:07
![]() Rita wrote:
Rita wrote:
Waar in Belgie kan men de drops love you 4 kopen? Al de internetwinkels die ik ken stoppen met de verkoop van drops.Drops is nogthans een zeer prijs-kwaliteitsgaren
06.09.2013 - 15:10
![]() Gaby Müller wrote:
Gaby Müller wrote:
In der Anleitung steht das man (bei mir in größe L) 10 Maschen abketten soll, ich denke es sollen aber 10 Maschen aufgenommen werden sonst komme ich nicht auf 168 Maschen :)
06.09.2013 - 09:27DROPS Design answered:
Liebe Gaby, vielen Dank für den Hinweis und Entschuldigung für die Umstände, die Stelle wird sofort korrigiert.
07.09.2013 - 12:33
|
||||
Autumn Love |
||||
 |
 |
|||
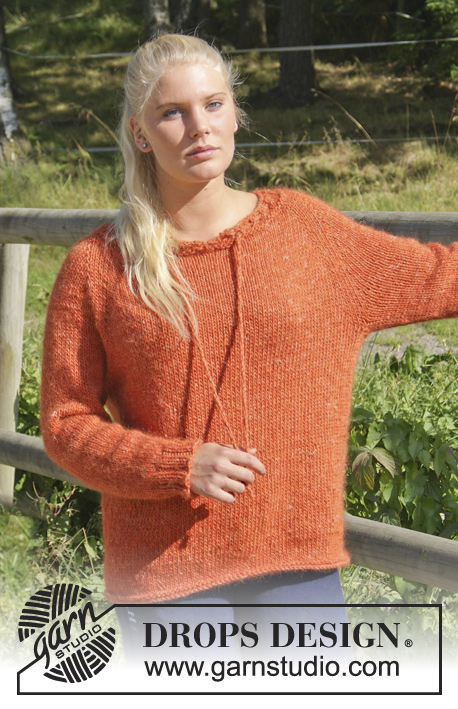
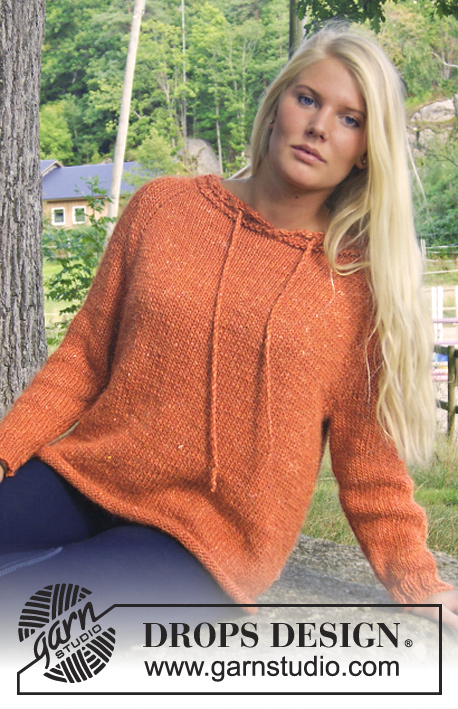
Knitted DROPS jumper with raglan, eyelet holes and string, worked top down in ”DROPS ♥ YOU #4” or ”Nepal”. Size: S - XXXL.
DROPS Extra 0-937 |
||||
|
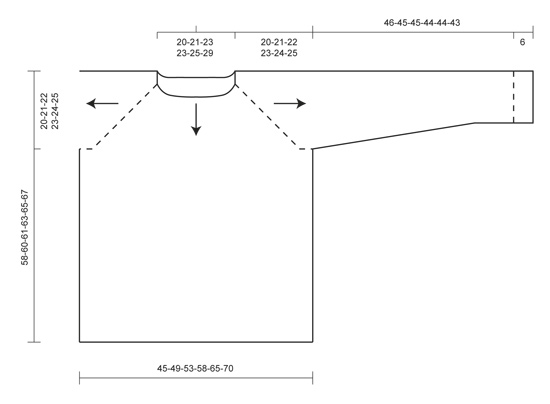
INCREASE TIP: Back and forth on needle: Inc 1 st from RS by making 1 YO, on next row P YO twisted. In the round on needle: Inc 1 st by making 1 YO, on next round K YO twisted. DECREASE TIP: Dec 1 st on each side of marker as follows: Work until 3 sts remain before marker, slip 1 st as if to K, K 1, psso, K 2 (marker is in the middle of these), K tog the next 2 sts. ---------------------------------------------------------- RAGLAN: The piece is worked from the neck down. First work back and forth until sts have been cast on for front piece, then work in the round. Cast on 48-50-52-52-52-58 sts on circular needle size 5.5 mm with orange. Row 1 (= WS): P all sts. Insert 1 marker 8-8-8-8-6-6 sts in from each side (= 8-8-8-8-6-6 sts on sleeve in each side, 32-34-36-36-40-46 sts on back piece between markers). Move the markers upwards when working. Row 2 (= RS): K 2, * inc 1 st - READ INCREASE TIP, K until 2 sts remain before next marker, inc 1 st, K 4 (marker is in the middle of these sts), inc 1 st, K until 2 sts remain before next marker, inc 1 st, K 4 (marker is in the middle of these sts), inc 1 st *, K until 2 sts remain on needle, inc 1 st, K 2 = 6 inc sts. Now cast on 4 sts on needle for front piece = 58-60-62-62-62-68 sts on needle. Row 3: P all sts, at the end of row cast on 4 sts = 62-64-66-66-66-72 sts. Insert 1 new marker 4 sts in from each side (= 4 sts on front piece in each side, 4 markers in total in piece). Row 4: K 6, (1st marker is after the first 4 sts), repeat from *-* from 2nd row, K until 2 sts remain before last marker, inc 1 st, K 6 (last marker is before the last 4 sts) = 6 inc sts. Cast on 4 sts = 72-74-76-76-76-82 sts on needle. Row 5: P all sts, at the end of row cast on 4 sts = 76-78-80-80-80-86 sts (= 8 sts on front piece in each side). Row 6: K 10, (1st marker is after the first 8 sts), repeat from *-* from 2nd row, K until 2 sts remain before last marker, inc 1 st, K 10 = 6 inc sts (last marker is before the last 8 sts). Cast on 11-12-13-13-15-18 sts = 93-96-99-99-101-110 sts on needle. Row 7: P all sts, at the end of row cast on 11-12-13-13-15-18 sts = 104-108-112-112-116-128 sts on needle (= 19-20-21-21-23-26 sts on front piece in each side, 38-40-42-42-46-52 sts on back piece and 14-14-14-14-12-12 sts on each sleeve). REMEMBER THE KNITTING TENSION! Then work piece in the round on needle as follows: ROUND 1: * K until 2 sts remain before next marker, inc 1 st, K 4 (marker is between these sts), inc 1 st *, repeat from *-* 3 more times (= 4 times in total), K the rest of round = 8 inc sts. ROUND 2: K all sts. Then inc 8 sts on round the same way - i.e. inc 1 st on each side of every marker - every other round 10-11-12-17-20-21 more times (11-12-13-18-21-22 inc in total on front piece), then every 4th round 3-3-3-1-0-0 times. When all inc are done, there are 216-228-240-264-284-304 sts on needle (= 66-70-74-80-88-96 sts on front and back piece, 42-44-46-52-54-56 sts on each sleeve). NOTE! Insert 1 marker in the mid on front piece (marks front piece which has shorter raglan). BODY: Worked in the round. Work next round as follows: Work 66-70-74-80-88-96 sts on front piece, * slip the next 42-44-46-52-54-56 sts (= sleeve) on 1 stitch holder, cast on 6-8-10-12-14-16 sts for armhole *, work the next 66-70-74-80-88-96 sts on back piece, repeat from *-* 1 more time = 144-156-168-184-204-224 sts on needle. Then work in stocking st over all sts. When piece measures 57-59-60-62-64-66 cm in total vertically (measured on the back), switch to circular needle size 5 mm. P 1 round, K 1 round, P 1 round and cast off with K on next round. SLEEVE: Worked in the round on double pointed needles size 5.5 mm. Cast on 3-4-5-6-7-8 sts on double pointed needles with orange, pick up 42-44-46-52-54-56 sts on stitch holder from one sleeve, cast on 3-4-5-6-7-8 sts on double pointed needles = 48-52-56-64-68-72 sts in total (= 6-8-10-12-14-16 sts for armhole). Insert 1 marker at beg of round (= mid under sleeve). NOTE: Now measure the piece from here. Continue to work in stocking st in the round for 3 cm. On next round dec 1 st - READ DECREASE TIP - on each side of marker. Repeat dec every 5½-5-4-2½-2½-2 cm 6-7-8-12-13-14 more times (7-8-9-13-14-15 times in total) = 34-36-38-38-40-42 sts. Continue in stocking st until piece measures 41-40-40-39-39-38 cm. On next round switch to double pointed needles size 5 mm, K while AT THE SAME TIME inc 10-8-10-10-12-10 sts evenly on round = 44-44-48-48-52-52 sts. Continue to work rib as follows: * K 2, P 2 *, repeat from *-* the entire round. When rib measures 5 cm, loosely cast off all sts with K over K and P over P, sleeve measures approx. 46-45-45-44-44-43 cm (shorter measurements in the larger sizes because of wider shoulders). ASSEMBLY: Sew tog opening under sleeves. NECK EDGE: Worked back and forth on circular needle from mid front. Beg mid front and pick up from RS approx. 90 to 110 sts on circular needle size 5.5 mm around the neck. Pick in addition up 1 more st in each of the first 2 sts picked up. This way the neck edge will overlap somewhat and give a nice opening mid front. Turn piece and K row from WS. Turn piece, K tog the first 2 sts from RS, K the rest of row. Turn piece, P tog the first 2 sts, P the rest of row. Turn piece and K tog the first 2 sts, K 1, * K 2 tog, 1 YO *, repeat from *-* the entire round and finish with K 3. Turn and work all sts and K YOs from WS. Cast off with K from RS. Neck edge measures approx. 3 cm. TWINED STRING: Cut 2 lengths of 3 metres each. Twine the strands tog until they resist, fold the string double so that it twines again. Make a knot at each end. Thread the string through row with eyelet holes. |
||||
Diagram explanations |
||||
|
||||
 |
||||
Have you finished this pattern?Tag your pictures with #dropspattern or submit them to the #dropsfan gallery. Do you need help with this pattern?You'll find 16 tutorial videos, a Comments/Questions area and more by visiting the pattern on garnstudio.com. © 1982-2026 DROPS Design A/S. We reserve all rights. This document, including all its sub-sections, has copyrights. Read more about what you can do with our patterns at the bottom of each pattern on our site. |
||||


With over 40 years in knitting and crochet design, DROPS Design offers one of the most extensive collections of free patterns on the internet - translated to 17 languages. As of today we count 324 catalogues and 12291 patterns translated into English (UK/cm). 12291
We work hard to bring you the best knitting and crochet have to offer, inspiration and advice as well as great quality yarns at incredible prices! Would you like to use our patterns for other than personal use? You can read what you are allowed to do in the Copyright text at the bottom of all our patterns. Happy crafting!
Post a comment to pattern DROPS Extra 0-937
We would love to hear what you have to say about this pattern!
If you want to leave a question, please make sure you select the correct category in the form below, to speed up the answering process. Required fields are marked *.