DROPS Nepal
DROPS Nepal
65% Wool, 35% Alpaca
from 2.40 £ /50g
Get the yarn to make this pattern from 21.60£.

The yarn cost is calculated from the pattern’s smallest size and the yarn’s cheapest product type. Looking for an even better price? You might find it on the DROPS Deals!

DROPS SS24

Autumn Love

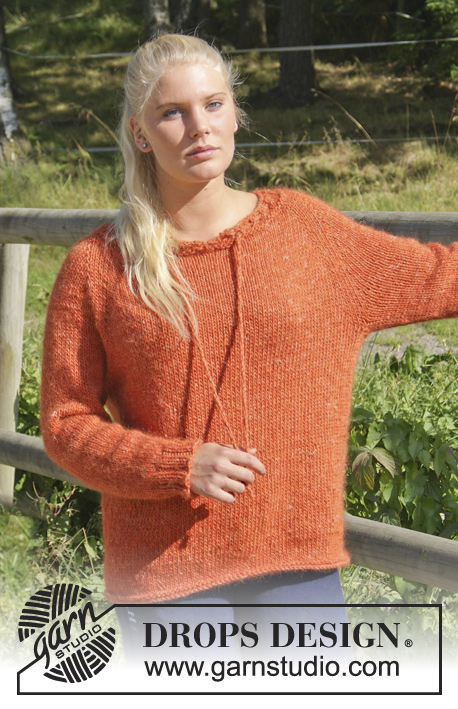
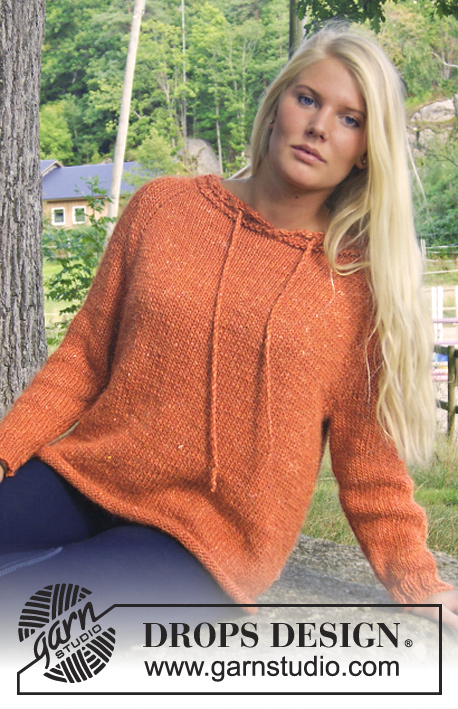
Knitted DROPS jumper with raglan, eyelet holes and string, worked top down in ”DROPS ♥ YOU #4” or ”Nepal”. Size: S - XXXL.

DROPS Extra 0-937
DROPS design: Pattern no ne-135
Yarn group C
-----------------------------------------------------------
Size: S - M - L - XL - XXL - XXXL
Materials:
DROPS ♥ YOU #4 from Garnstudio
450-500-550-600-650-700 g colour no 2920, orange

Or use:
DROPS NEPAL from Garnstudio
450-500-550-600-650-700 g colour no 2920, orange

DROPS DOUBLE POINTED NEEDLES AND CIRCULAR NEEDLE SIZE 5.5 mm (80 cm) - or size needed to get 16 sts x 20 rows in stocking st = 10 x 10 cm.
DROPS DOUBLE POINTED NEEDLES AND CIRCULAR NEEDLE SIZE 5 mm (80 cm) - for rib.

-------------------------------------------------------

Alternative Yarn – See how to change yarns here
Yarn Groups A to F – Use the same pattern and change the yarn here
Yarn usage using an alternative yarn – Use our yarn converter here

-------------------------------------------------------

DROPS Nepal
DROPS Nepal
65% Wool, 35% Alpaca
from 2.40 £ /50g
Get the yarn to make this pattern from 21.60£.

The yarn cost is calculated from the pattern’s smallest size and the yarn’s cheapest product type. Looking for an even better price? You might find it on the DROPS Deals!

Pattern instructions

NOTE: This pattern is written in British English. All measurements in charts are in cm. For conversion from cm to inches - click here. There are different terms for crocheting in British and American English. If this pattern includes crochet, click for "crochet terms" here. For this pattern in American English, please click here.
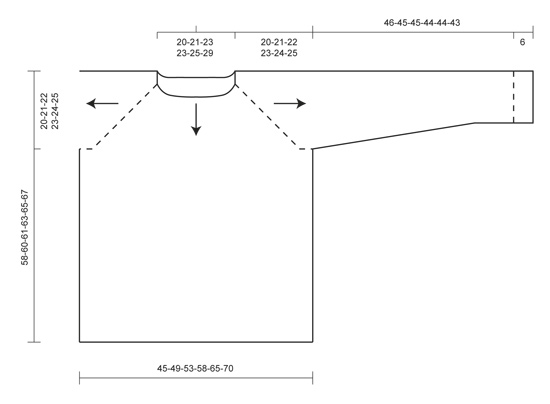
INCREASE TIP:
Back and forth on needle: Inc 1 st from RS by making 1 YO, on next row P YO twisted.
In the round on needle: Inc 1 st by making 1 YO, on next round K YO twisted.

DECREASE TIP:
Dec 1 st on each side of marker as follows: Work until 3 sts remain before marker, slip 1 st as if to K, K 1, psso, K 2 (marker is in the middle of these), K tog the next 2 sts.
----------------------------------------------------------

RAGLAN:
The piece is worked from the neck down. First work back and forth until sts have been cast on for front piece, then work in the round. Cast on 48-50-52-52-52-58 sts on circular needle size 5.5 mm with orange.
Row 1 (= WS): P all sts. Insert 1 marker 8-8-8-8-6-6 sts in from each side (= 8-8-8-8-6-6 sts on sleeve in each side, 32-34-36-36-40-46 sts on back piece between markers). Move the markers upwards when working.
Row 2 (= RS): K 2, * inc 1 st - READ INCREASE TIP, K until 2 sts remain before next marker, inc 1 st, K 4 (marker is in the middle of these sts), inc 1 st, K until 2 sts remain before next marker, inc 1 st, K 4 (marker is in the middle of these sts), inc 1 st *, K until 2 sts remain on needle, inc 1 st, K 2 = 6 inc sts. Now cast on 4 sts on needle for front piece = 58-60-62-62-62-68 sts on needle.
Row 3: P all sts, at the end of row cast on 4 sts = 62-64-66-66-66-72 sts. Insert 1 new marker 4 sts in from each side (= 4 sts on front piece in each side, 4 markers in total in piece).
Row 4: K 6, (1st marker is after the first 4 sts), repeat from *-* from 2nd row, K until 2 sts remain before last marker, inc 1 st, K 6 (last marker is before the last 4 sts) = 6 inc sts. Cast on 4 sts = 72-74-76-76-76-82 sts on needle.
Row 5: P all sts, at the end of row cast on 4 sts = 76-78-80-80-80-86 sts (= 8 sts on front piece in each side).
Row 6: K 10, (1st marker is after the first 8 sts), repeat from *-* from 2nd row, K until 2 sts remain before last marker, inc 1 st, K 10 = 6 inc sts (last marker is before the last 8 sts). Cast on 11-12-13-13-15-18 sts = 93-96-99-99-101-110 sts on needle.
Row 7: P all sts, at the end of row cast on 11-12-13-13-15-18 sts = 104-108-112-112-116-128 sts on needle (= 19-20-21-21-23-26 sts on front piece in each side, 38-40-42-42-46-52 sts on back piece and 14-14-14-14-12-12 sts on each sleeve). REMEMBER THE KNITTING TENSION!
Then work piece in the round on needle as follows:
ROUND 1: * K until 2 sts remain before next marker, inc 1 st, K 4 (marker is between these sts), inc 1 st *, repeat from *-* 3 more times (= 4 times in total), K the rest of round = 8 inc sts.
ROUND 2: K all sts.
Then inc 8 sts on round the same way - i.e. inc 1 st on each side of every marker - every other round 10-11-12-17-20-21 more times (11-12-13-18-21-22 inc in total on front piece), then every 4th round 3-3-3-1-0-0 times. When all inc are done, there are 216-228-240-264-284-304 sts on needle (= 66-70-74-80-88-96 sts on front and back piece, 42-44-46-52-54-56 sts on each sleeve). NOTE! Insert 1 marker in the mid on front piece (marks front piece which has shorter raglan).

BODY:
Worked in the round. Work next round as follows: Work 66-70-74-80-88-96 sts on front piece, * slip the next 42-44-46-52-54-56 sts (= sleeve) on 1 stitch holder, cast on 6-8-10-12-14-16 sts for armhole *, work the next 66-70-74-80-88-96 sts on back piece, repeat from *-* 1 more time = 144-156-168-184-204-224 sts on needle. Then work in stocking st over all sts. When piece measures 57-59-60-62-64-66 cm in total vertically (measured on the back), switch to circular needle size 5 mm. P 1 round, K 1 round, P 1 round and cast off with K on next round.

SLEEVE:
Worked in the round on double pointed needles size 5.5 mm. Cast on 3-4-5-6-7-8 sts on double pointed needles with orange, pick up 42-44-46-52-54-56 sts on stitch holder from one sleeve, cast on 3-4-5-6-7-8 sts on double pointed needles = 48-52-56-64-68-72 sts in total (= 6-8-10-12-14-16 sts for armhole). Insert 1 marker at beg of round (= mid under sleeve). NOTE: Now measure the piece from here.
Continue to work in stocking st in the round for 3 cm. On next round dec 1 st - READ DECREASE TIP - on each side of marker. Repeat dec every 5½-5-4-2½-2½-2 cm 6-7-8-12-13-14 more times (7-8-9-13-14-15 times in total) = 34-36-38-38-40-42 sts. Continue in stocking st until piece measures 41-40-40-39-39-38 cm. On next round switch to double pointed needles size 5 mm, K while AT THE SAME TIME inc 10-8-10-10-12-10 sts evenly on round = 44-44-48-48-52-52 sts. Continue to work rib as follows: * K 2, P 2 *, repeat from *-* the entire round. When rib measures 5 cm, loosely cast off all sts with K over K and P over P, sleeve measures approx. 46-45-45-44-44-43 cm (shorter measurements in the larger sizes because of wider shoulders).

ASSEMBLY:
Sew tog opening under sleeves.

NECK EDGE:
Worked back and forth on circular needle from mid front. Beg mid front and pick up from RS approx. 90 to 110 sts on circular needle size 5.5 mm around the neck. Pick in addition up 1 more st in each of the first 2 sts picked up. This way the neck edge will overlap somewhat and give a nice opening mid front. Turn piece and K row from WS. Turn piece, K tog the first 2 sts from RS, K the rest of row. Turn piece, P tog the first 2 sts, P the rest of row. Turn piece and K tog the first 2 sts, K 1, * K 2 tog, 1 YO *, repeat from *-* the entire round and finish with K 3. Turn and work all sts and K YOs from WS. Cast off with K from RS. Neck edge measures approx. 3 cm.

TWINED STRING:
Cut 2 lengths of 3 metres each. Twine the strands tog until they resist, fold the string double so that it twines again. Make a knot at each end. Thread the string through row with eyelet holes.

Diagram

symbols = knitting direction
diagram
Do you have a question? See a list of frequently asked questions (FAQ)

Knitting tension is what determines the final measurements of your work, and is usually measured per 10 x 10 cm. It is provided like so: number of stitches in width x number of rows in height - eg: 19 stitches x 26 rows = 10 x 10 cm.

The knitting tension is very individual; some people knit/crochet loosely while others work tightly. You adjust the knitting tension with the needle size, which is why the suggested needle size is only meant as a guide! You need to adjust this (up or down) to ensure that YOUR knitting tension matches the knitting tension provided in the pattern. If you work with a different knitting tension than provided you will have a different yarn consumption, and your work will have different measurements than what the pattern suggests.

The knitting tension also determines which yarns can replace each other. As long as you achieve the same knitting tension you can replace one yarn with another.

See DROPS lesson: How to measure your tension/gauge

See DROPS video: How to make a gauge tension swatch

The required amount of yarn is provided in grams, eg: 450 g. To calculate how many balls you’ll need you first need to know how many grams are in 1 ball (25g, 50g or 100g). This information is available if you click on the individual yarn quality on our pages. Divide the amount required with the amount of each ball. For example, if each ball is 50g (the most common amount), the calculation will be as follows: 450 / 50 = 9 balls.

The important thing when changing from one yarn to another is that the knitting/crochet tension remains the same. This is so that the measurements of the finished piece will be the same as on the sketch provided. It is easier to achieve the same knitting tension using yarns from the same yarn group. It is also possible to work with multiple strands of a thinner yarn to achieve the knitting tension of a thicker one. Please try our yarn converter. We recommend you to always work a test swatch.

Please NOTE: when changing yarn the garment might have a different look and feel to the garment in the photo, due to individual properties and qualities of each yarn.

See DROPS lesson: Can I use a different yarn than the one mentioned in the pattern?

All our yarns are categorised into yarn groups (from A to F) according to thickness and knitting tension – group A contains the thinnest yarns and group F the thickest. This makes it easier for you to find alternative yarns to our patterns, should you wish to switch yarn. All yarns within the same group have a similar knitting tension and can easily replace each other. However, different yarn qualities have different structures and properties which will give the finished work a unique look and feel.

Click here for an overview of the yarns in each yarn group

At the top of all our patterns you’ll find a link to our yarn calculator, which is a helpful tool should you wish to use a different yarn than suggested. By filling in the yarn quality you wish to replace, the amount (in your size) and number of strands, the calculator will present good alternative yarns with the same knitting tension. Additionally it will tell you how much you’ll require in the new qualities and whether you’ll need to work with multiple strands. Most skeins are 50g (some are 25g or 100g).

If the pattern is worked with multiple colours, every colour will have to be calculated separately. Similarly, if the pattern is worked with several strands of different yarns (for example 1 strand Alpaca and 1 strand Kid-Silk) you will have to find alternatives for each, individually.

Click here to see our yarn calculator

Since different yarns have different qualities and textures we have chosen to keep the original yarn in our patterns. However, you can easily find options among our available qualities by using our yarn calculator, or simply pick a yarn from the same yarn group.

It is possible that some retailers still have discontinued yarns in stock, or that someone has a few skeins at home that they would like to find patterns for.

The yarn calculator will provide both alternative yarn as well as required amount in the new quality.

If you think it's hard to decide what size to make, it can be a good idea to measure a garment you own already and like the size of. Then you can pick the size by comparing those measures with the ones available in the pattern's size chart.

You'll find the size chart at the bottom of the pattern.

See DROPS lesson: How to read size chart

The needle size provided in the pattern serves only as a guide, the important thing is to follow the knitting tension. And since knitting tension is very individual, you will have to adjust the needle size to ensure that YOUR tension is the same as in the pattern – maybe you’ll have to adjust 1, or even 2 needle sizes, up or down to achieve the correct tension. For this, we recommend that you work test swatches.

Should you work with a different knitting tension than the one provided, the measurements of the finished garment might deviate from the measurement sketch.

See DROPS lesson: How to measure your tension/gauge

See DROPS video: How to make a tension/gauge swatch

Working a garment top-down provides more flexibility and room for personal adjustment. For example it is easier to try the garment on while working, as well as making adjustments to length of yoke and shoulder caps.

The instructions are carefully explaining every step, in the correct order. Diagrams are adjusted to the knitting direction and are worked as usual.

The diagram depicts all rows/rounds, and every stitch seen from the right side. It is read from bottom to top, from right to left. 1 square = 1 stitch.

When working back and forth, every other row is worked from the right side and every other row is worked from the wrong side. When working from the wrong side, the diagram will have to be worked reversed: from left to right, knit stitches are purled, purl stitches are knit etc.

When working in the round every round is worked from the right side and the diagram are worked from right to left on all rounds.

See DROPS lesson: How to read knitting diagrams

The diagram depicts all rows/rounds, and every stitch seen from the right side. It is worked from bottom to top, from right to left.

When working back and forth every other row is worked from the right side: from right to left and every other row is worked from the wrong side: from left to right.

When working in the round, every row in the diagram are worked from the right side, from right to left.

When working a circular diagram you start in the middle and work your way outwards, counter clockwise, row by row.

The rows usually start with a given number of chain stitches (equivalent to the height of the following stitch), this will either be depicted in the diagram or explained in the pattern.

See DROPS lesson: How to read crochet diagrams

Instructions for working several diagrams after each other on the same row/round, will often be written like so: “work A.1, A.2, A.3 a total of 0-0-2-3-4 times". This means you work A.1 once, then A.2 is worked once, and A.3 is repeated (in width) the number of times provided for your size – in this case like so: S = 0 times, M = 0 times, L=2 times, XL= 3 times and XXL = 4 times.

The diagrams are worked as usual: begin with the first row in A.1, then work the first row in A.2 etc.

See DROPS lesson: How to read knitting diagrams

See DROPS lesson: How to read crochet diagrams

The total width of the garment (from wrist-to-wrist) will be larger in the larger sizes, despite the actual sleeves being shorter. The larger sizes have longer sleeve caps and wider shoulders, so there will be a good fit in all sizes.

The measurement sketch/schematic drawing provides information regarding the full length of the garment. If it’s a jumper or a jacket the length is measured from the highest point on the shoulder closest to the neckline, and straight down to the bottom of the garment. It is NOT measured from the tip of shoulder. Similarly, the length of yoke is measured from the highest point on the shoulder and down to where yoke is split into body and sleeves.

On a jacket measures are never taken along bands, unless specifically stated. Always measure inside band stitches when measuring the length.

See DROPS lesson: How to read a schematic drawing

Diagrams are often repeated on the round or in height. 1 repeat is the diagram the way it appears in the pattern. If it says to work 5 repeats of A.1 in the round, then you work A.1 a total of 5 times after/next to each other in the round. If it says to work 2 repeats of A.1 vertically/in height you work the entire diagram once, then begin again at the start and work the entire diagram one more time.

Chain stitches are slightly narrower than other stitches and to avoid working the cast-on edge too tight, we simply chain more stitches to begin with. The stitch count will be adjusted on the following row to fit the pattern and measurement sketch.

The rib edge is more elastic and will contract slightly compared to, for example, stocking stitch. By increasing before the rib edge, you avoid a visible difference in width between the rib edge and the rest of the body.

It’s very easy to cast off too tightly, and by making yarn overs while casting off (and simultaneously casting these off) you avoid a too tight cast off edge.

See DROPS video: How to bind off with yarn overs (yo)

To achieve an even increase (or decrease) you can increase on, for example: every 3rd and 4th row alternately, like so: work 2 rows and increase on the 3rd row, work 3 rows and increase on the 4th. Repeat this until the increase is complete.

See DROPS lesson: Increase or decrease 1 st on every 3rd and 4th row alternately

Should you prefer to work in the round instead of back and forth, you may of course adjust the pattern. You’ll need to add steeks mid-front (usually 5 stitches), and follow the instructions. When you would normally turn and work from the wrong side, simply work across the steek and continue in the round. At the end you’ll cut the piece open, pick up stitches to work bands, and cover the cut edges.

See DROPS video: How to knit steeks and cut open

Should you prefer to work back and forth instead of in the round, you may of course adjust the pattern so you work the pieces separately and then assemble them at the end. Divide the stitches for the body in 2, add 1 edge stitch in each side (for sewing) and work the front and back pieces separately.

See DROPS lesson: Can I adapt a pattern for circular needles into straight needles?

Pattern repeats can vary slightly in the different sizes, in order to get the correct proportions. If you’re not working the exact same size as the garment in the photo, yours might deviate slightly. This has been carefully developed and adjusted so that the complete impression of the garment is the same in all sizes.

Make sure to follow instructions and diagrams for your size!

If you have found a pattern you like which is available in women’s size it’s not very difficult to convert it to men’s size. The biggest difference will be the length of sleeves and body. Start working on the women size that you think would fit across the chest. The additional length will be worked right before you cast off for the armhole/sleeve cap. If the pattern is worked top-down you can add the length right after the armhole or before the first decrease on sleeve.

Regarding additional yarn amount, this will depend on how much length you add, but it is better with a skein too many than too few.

All yarns will have excess fibres (from production) that might come off as lint or shedding. Brushed yarns (ie hairier yarns) have more of these loose, excess fibres, causing more shedding.

Shedding also depends on what is worn under or over the garment, and whether this pulls at the yarn fibres. It’s therefore not possible to guarantee that there will be no shedding

Below are some tips on how to get the best result when working with hairier yarns:

1. When the garment is finished (before you wash it) shake it vigorously so the looser hairs come off. NOTE: do NOT use a lint roller, brush or any method that pulls at the yarn.

2. Place the garment in a plastic bag and put it in your freezer - the temperature will cause the fibres to become less attached to each other, and excess fibres will come off easier.

3. Leave in the freezer for a few hours before taking it out and shaking it again.

4. Wash the garment according to the instructions on the yarn label.

Pilling is a natural process that happens to even the most exclusive of fibers. It's a natural sign of wear and tear that is hard to avoid, and that is most visible in high friction areas of your garment like a sweater's arms and cuffs.

You can make your garment look as new by removing the pilling, using a fabric comb or a pill/lint remover.

Still can't find the answer you need? Then scroll down and leave your question so one of our experts can try to help you. This will be done normally within 5 to 10 working days.
In the meantime, you can read the questions and answers that others have left to this pattern or join the DROPS Workshop on Facebook to get help from fellow knitters/crocheters!

Post a comment to pattern DROPS Extra 0-937

We would love to hear what you have to say about this pattern!

If you want to leave a question, please make sure you select the correct category in the form below, to speed up the answering process. Required fields are marked *.

Comments / Questions (22)

country flag Corina Avram wrote:

Hi! Please help me understand this part "Row 1 (= WS): P all sts. Insert 1 marker 8-8-8-8-6-6 sts in from each side (= 8-8-8-8-6-6 sts on sleeve in each side, 32-34-36-36-40-46 sts on back piece between markers)". What exactly happends after casting on and Purling one time? Thanks a lot!

30.01.2024 - 13:40

DROPS Design answered:

Dear Mrs Avram, after you have cast on all stitches, just purl all stitches, this will be the first row from wrong side, at the same time, insert markers to mark each part of the jumper. Happy knitting!

31.01.2024 - 08:12

country flag Stefania wrote:

Buongiorno, non riesco a capire la spiegazione per eseguire il raglan. ci sono 6 maglie aumentate ma non riesco a capire come vanno aumentate e i segni dove vanno inseriti. grazie per la vostra risposta. Non è il primo modello che eseguo, ma con questo proprio non riesco a capire.

08.02.2023 - 16:04

DROPS Design answered:

Buonasera Stefania, nelle spiegazioni del ferro 2 viene indicato il punto in cui eseguire gli aumenti; per lavorare gli aumenti deve seguire le indicazioni riportate nel paragrafo apposito. Buon lavoro!

11.02.2023 - 00:05

country flag Patricia wrote:

Bonjour, j'ai relevé les mailles pour faire le col et je ne comprends pas comment relever la maille supplémentaire dans chaque première maille relevée. Est ce que je dois faire ressortir une maille de la maille relevée ? Merci pour votre réponse.

23.11.2022 - 12:05

DROPS Design answered:

Bonjour Patricia, relevez ces 2 mailles derrière chacune des 2 premières mailles du tour, comme on le montre au time code 01:00 dans cette vidéo pour un col châle. Ainsi, les 2 premières mailles et les 2 dernières mailles du tour se chevauchent un tout petit peu. Bon tricot!

23.11.2022 - 15:59

country flag LUCQUIN Corinne wrote:

Où trouver le fil conseillé, à savoir drops you"4? Est-ce du coton ou de la laine, et par quoi le remplacer s'il vous plaît? merci...

14.03.2021 - 13:17

DROPS Design answered:

Bonjour Corinne, vous pouvez utiliser la laine DROPSLovesYou 8, DROPS Nepal ou chaque laine du group C. Bon tricot!

14.03.2021 - 18:49

country flag Louise wrote:

Bonjour, je tricote ce modèle en taille M. Je ne comprends pas comment réaliser le col. Comment fait-on pour relever 90 à 110 mailles (et combien exactement ?) alors qu'il n'y a que 50 mailles de montées au départ ? J'ai regardé la vidéo mais il y a le même nombre de mailles. Également, si l'on tricote en aller-retour, il y aura une couture pour finir ou bien c'est l'ouverture à l'avant indiquée dans les explications qui fait office ? Merci d'avance.

22.05.2019 - 07:43

DROPS Design answered:

Bonjour Louise, au début de ce pull, on tricote en allers et retours et on va augmenter pour le raglan mais également pour l'encolure devant = 4 m à la fin des rangs 2 à 5 puis 12 m à la fin des rangs 6 et 7. L'ouvrage se tricote en rond seulement après le 7ème rang. On aura donc suffisamment de mailles pour relever celles du col tout autour des mailles montées au début + celles montées de chaque côté pour l'encolure devant. Bon tricot!

22.05.2019 - 09:29

country flag Patricia Mendler wrote:

Liebes Drops Team, Ich habe noch nie eine solche gebogene Nähnadel gesehen. Und finde sie aber genial. Könnt Ihr mir sagen, wo ich eine solche Nadel bekommen kann. Hat sie einen spezielle Bezeichnung. Vielen Dank schon einmal Herzliche Grüße Patricia

12.02.2019 - 19:08

DROPS Design answered:

Liebe Frau Mendler, sicher kann Ihnen Ihr DROPS Laden weiterhelfen, nehmen Sie bitte Kontakt mit ihm - auch telefonisch oder per Email auf. Viel Spaß beim stricken!

13.02.2019 - 09:03

country flag Meike wrote:

Ich verstehe die 2. Reihe nicht. Auch weiß ich nicht was das * bedeutet. Wäre schön wenn sie mir das erklären könnten. Dankeschön

16.09.2018 - 04:26

DROPS Design answered:

Liebe Meike, die 2. Reihe wird einfach so gestrickt, wie beschrieben. Die * werden bei den nächsten Hinreihen gestrickt - siehe z.B. Reihe 4: man muss dann von *bis* der 2. Reihe stricken. Viel Spaß beim stricken!

17.09.2018 - 09:02

country flag Caroline wrote:

I would like to download/print this pattern 0-937 but the pdf is missing details on the righthand side of each page - it is not sizing correctly. Hope you can help ... Regards, Caroline

17.12.2016 - 18:32

DROPS Design answered:

Dear Caroline, we tested printing successfully to this pattern, make sure to check your printer's settings, try to refresh and empty your browser's cache - your DROPS store will be also able to help you. Happy knitting!

19.12.2016 - 09:13

country flag Cecilia Fernandez Perez wrote:

Me pueden aclarar la parte en la que dice "despues aum 8 pts en la vuelta de la misna manera a cada 2 vtas (en mi caso) 17 veces mas y que despues a cada 4° vta 1 veces. Y que deveria tener 264 pts en la aguja. Me e perdido en esta parte. Muchas gracias

22.03.2015 - 19:44

DROPS Design answered:

Hola Cecilia. Comenzamos con los aum cuando hay 112 pts para tu talla , ahora aum 144 pts (8 pts en la vta x un total de 18 vcs, cada 2ª vta) + 8 pts (8pts en la vta x 1 vez cada 4ª vta) = 112 + 144 + 8 = 264 pts.

26.03.2015 - 09:52

country flag Claudia wrote:

Wo genau befindet sich der Rundenbeginn nachdem ich zur Runde geschlossen habe? Eigentlich müsste die Runde in der Mitte des Vorderteils anfangen, jedoch heißt es bei der Einteilung für den Rumpf, dass bei Rundenbeginn ALLE Maschen des Vorderteils gestrickt werden.

29.01.2015 - 21:17

DROPS Design answered:

Liebe Claudia, wo genau Sie die Rd beginnen, ist bei diesem Modell nicht so wichtig, Hauptsache, Sie kommen bei den Raglanzunahmen nicht durcheinander und beenden jede Runde. Da noch eine Halsblende angestrickt wird und nur glatt re gestrickt wird, ist der Rd-Beginn am Vorderteil hinterher nicht mehr sichtbar. Wenn Ihnen das lieber ist, können Sie den Faden aber auch neu ansetzen, am besten am Beginn des Vorderteils.

30.01.2015 - 10:04