
Popular categories
Looking for a yarn?


Comments / Questions (55)
![]() Ann Granlöf wrote:
Ann Granlöf wrote:
Vad är det för storlek/mått på knapparna? Finns inte att köpa
14.02.2026 - 12:07DROPS Design answered:
Hei Ann. Disse knappene er dessverre utgått fra vårt sortiment, men str. på Skjellknapp nr. 525 var 15mm. mvh DROPS Design
16.02.2026 - 12:54
![]() Toril wrote:
Toril wrote:
Går det an å strikke denne som en genser på rundpinne? kanksje det hadde vårt bedre enn å sy den sammen som jakke. Likte designet, men kommer aldri til å bruke den som jakke.
25.08.2025 - 14:33DROPS Design answered:
Hei Toril. Jo, med noen justeringer burde det være mulig. Les godt igjennom oppskriften og gjør de forandringene som trengs (tenker da speielt foran / knappestolpene /maskeantallet). mvh DROPS Design
22.09.2025 - 09:23
![]() Anita wrote:
Anita wrote:
Beste medewerker, Het is mij niet duidelijk waar de minderingen en meerderingen moeten komen in het achterpand, Is dat meteen na de kantsteek en worden dan de 7 tricotsteken minder of meer? Dus voor of na welke steek komen die minderingen? groet, anita
27.12.2024 - 09:03DROPS Design answered:
Dag Anita,
Deze komen in de zijnaad, dus je maakt de minderingen en meerderingen aan het begin/einde van de naald, direct naast de kantsteek.
01.01.2025 - 17:17
![]() Marylene Lourenço wrote:
Marylene Lourenço wrote:
Bonjour j'aime beaucoup vos modèles je ne suis pas une pro je ne comprends pas tout dommage ce serait formidable d'avoir des tutos si c'est possible un jour... merci quand même pour tout
14.05.2024 - 19:04
![]() Doris Lietz wrote:
Doris Lietz wrote:
Hallo. Bei mir sieht das Muster im re Vordeteil anders aus. Auf eurem Foto erscheint es, als wenn eine Querrippe zwischen den Zöpfen nach oben läuft. Laut Muster wird doch nur in jeder 4 Reihe 2 Maschen re und 6 li gestrickt. Liegt hier im Muster ein Fehler vor? LG Doris
13.05.2023 - 11:08DROPS Design answered:
Liebe Frau Lietz, die Zunahmen beim rechten Vorderteil entstehen vor (bei Hinreihen) oder nach (bei Rückreihen) den ersten 9 Maschen (= 5 Blenden-Maschen kraus rechts + 2 Maschen glatt rechts + 2 Maschen kraus rechts). Kann das Ihnen helfen oder missverstehe ich Ihre Frage?
15.05.2023 - 08:14
![]() Kelly C wrote:
Kelly C wrote:
I am at the position of the pattern of 126 Cherry with the Twist where I am doing the armhole decreases on the back. The way it is written is kind of confusing. I am at the point where it says a string of numbers and then times to do it. I am not sure if I am supposed to decrease 3 sts 0-0-0-1-2-3 so does that mean for 6 rows I decrease 3 stitches?
02.01.2020 - 16:34DROPS Design answered:
Dear Kelly C, if you are working the last size, you will then cast off 3 stitches at the beginning of the next 6 rows (= 3 times on each side). Happy knitting!
03.01.2020 - 09:48
![]() Alicia wrote:
Alicia wrote:
Agradezco me confirmen si entendí correctamente la indicación de los aumentos de la espalda . Tejeré el talle M. ¿ Debo aumentar a los 6 cm un aumento de cada lado, repito a los 3 cm , otra vez a los 3 cm otra vez a los 3 cm , luego a los 5 cm , y el último a los 3 cm?
08.07.2019 - 01:09DROPS Design answered:
Hola Alicia. Para la talla M los aumentos son los siguientes: Cuando la labor mida 24 cm, aumentar 1 punto a cada lado, repetir los aumentos cada 3 cm un total de 6 veces. Después de completar todos los aumentos hay 96 puntos.
10.07.2019 - 23:14
![]() April B wrote:
April B wrote:
I’m not understanding right front instructions. Is the first inc. row saying to M1 five times across the row? If so it alters the set up for the cable pattern. Or is it M1 just in that place on RSrow for five different rows? Also, does the first cable cross take place on the fifth row from the cast on row?
10.04.2019 - 01:02DROPS Design answered:
Dear April, the row before first row in M.1 is worked from WS, and the first row in M.1 will be worked from RS, so that when you finished WS row with K2, P2, K5, you work these stitches from RS: K5, K2, K2 (= 5 sts in garter st, 2 sts in stocking st and 2 sts in garter st), then the *K2,P6* from WS will be worked in M.1 with K6 (cable), K2 (= 2 sts in garter st). The cable in M.1 is worked on the 5th row worked in M.1. Happy knitting!
10.04.2019 - 10:18
![]() Anthonia Boer wrote:
Anthonia Boer wrote:
Hallo Birgit, Ik wil heel graag dit vestje breien, maar ik kan nergens een winkel vinden, die de donker roze kleur nr. 39 verkoopt. En ook kan ik niet vinden hoeveel bollen ik nodig heb voor maat M. Ik hoop van harte dat U mij kan helpen. Bij voorbaat hartelijk dank. Vriendelijke groet.....Anthonia Boer.
19.08.2018 - 11:42DROPS Design answered:
Dag Anthonia, Bovenaan bij materialen staat hoeveel gram je nodig hebt per maat: 500-550-600-700-750-800 gr. kleur nr. 39, donkerroze. Voor maat m het tweede getal, dus 550 gram. (Een bol weegt 50 gram). Je kunt het betreffende verkooppunt vragen of ze je op de hoogte willen houden wanneer deze kleur weer op voorraad is.
20.08.2018 - 08:13
![]() Helenor Dale wrote:
Helenor Dale wrote:
For the sleeve .. after M1, and then the RS row, the instruction is to continue in stocking stitch. Will this look like purl from the right side of the work?
15.04.2018 - 22:51DROPS Design answered:
Dear Mrs Dale, sleeves are worked in stocking stitch after M.1 showing the K from the outside of work (= "standard" stocking st, not reversed stocking st showing the purl from the RS). Happy knitting!
16.04.2018 - 09:59
|
||||||||||
Cherry with a Twist#cherrywithatwistcardigan |
||||||||||
 |
 |
|||||||||
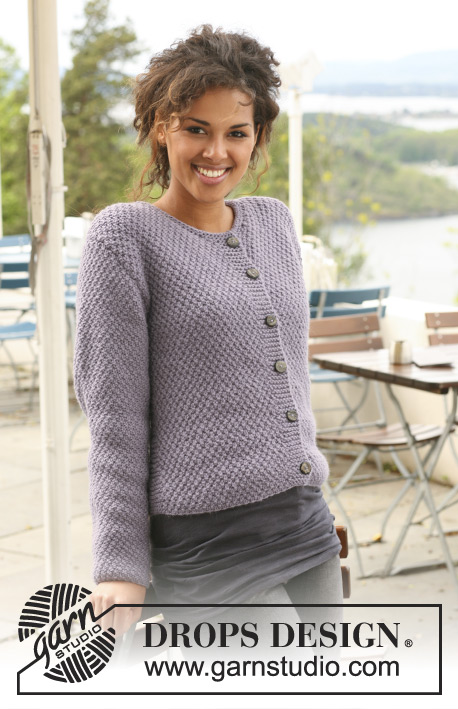
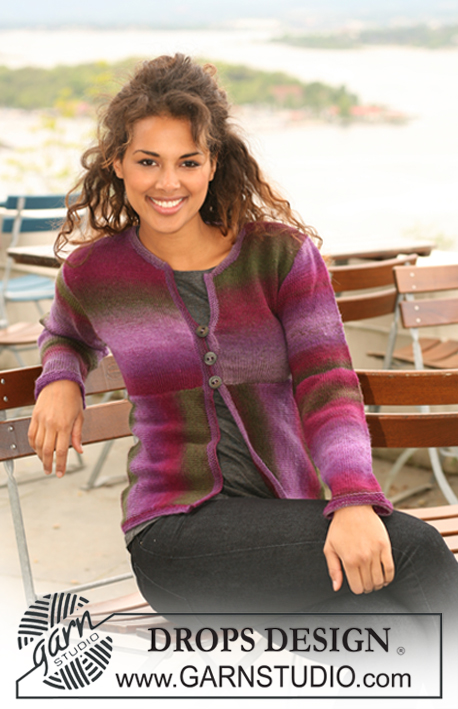
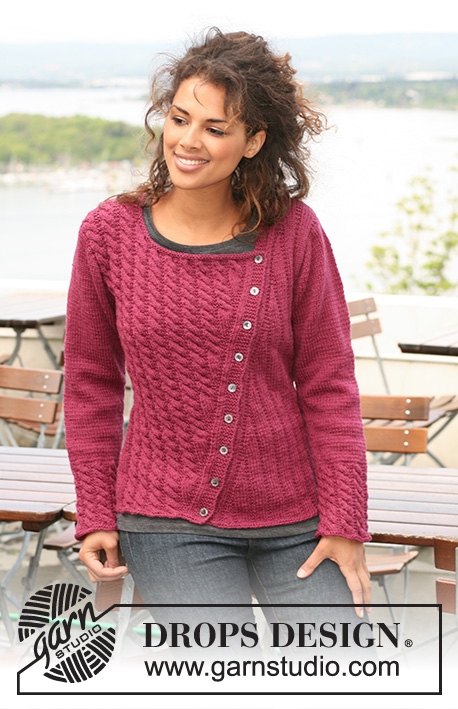
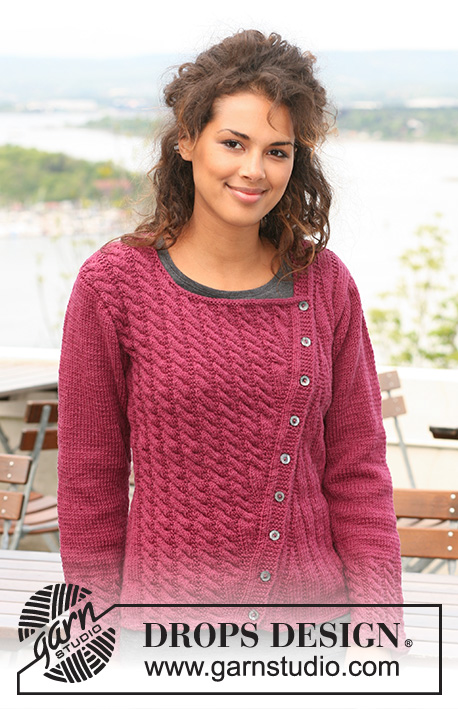
Asymmetric DROPS Jacket in ”Karisma” with cables on one front piece. Size S to XXXL.
DROPS 126-6 |
||||||||||
|
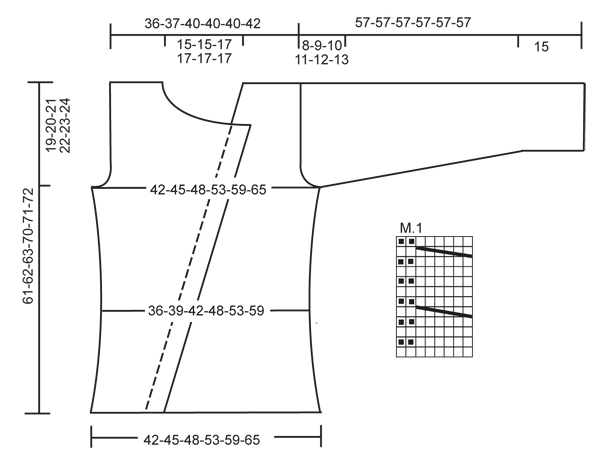
PATTERN: See diagram M.1- Diagram shows the pattern from RS (Row 1 = RS). GARTER ST (back and forth on needle): K all rows. BUTTONHOLES: Make buttonholes on front band on right front piece. 1 BUTTONHOLE = K tog third and fourth st from mid front and make 1 YO. Make buttonholes when piece measures: SIZE S, M and L: 2, 8, 15, 21, 27, 33, 40, 46 and 52 cm. SIZE XL, XXL and XXXL: 2, 9, 15, 22, 28, 34, 41, 47, 54 and 60 cm. INCREASING TIP (applies to right front piece): Inc 1 st inside 9 sts towards front edge (= 5 garter sts, 2 stocking sts and 2 garter sts) by making 1 YO. On next row K YO into back of loop to avoid a hole - K or P acc to pattern. Work the first 2 inc sts in garter st, the next 6 in stocking st, after the 8th inc continue these 8 sts in M.1. Repeat the 8 inc a total of 6-6-6-7-7-7 times. DECREASING TIP (applies to left front piece): Make all dec from RS. Dec 1 st inside 9 sts (= 5 garter sts, 2 stocking sts and 2 garter sts) by K2 tog. -------------------------------------------------------- BACK PIECE: Cast on 90-96-102-114-126-138 sts (includes 1 edge st each side) on needle size 4 mm with Karisma. K 1 row from WS and K 1 row from RS. Work next row as follows (from WS): 1 edge st in garter st, P7, * K2, P4 *, repeat from *-* until 10 sts remain, K2, P7 and 1 edge st in garter st. Continue as follows: 1 edge st in garter st, 7 stocking sts, * 2 garter sts, 4 stocking sts *, repeat from *-* until 10 sts remain, 2 garter sts, 7 stocking sts and 1 edge st in garter st. SIDE INC AND DEC: At the same time when piece measures 6 cm dec 1 st each side and repeat the dec on every 3-3-3-3.5-3.5-3.5 cm a total of 6 times = 78-84-90-102-114-126 sts. When piece measures 24-24-24-28-28-28 cm inc 1 st each side, repeat the inc on every 3-3-3-3.5-3.5-3.5 cm a total of 6 times (work inc sts in stocking st) = 90-96-102-114-126-138 sts. ARMHOLE: When piece measures 42-42-42-48-48-48 cm cast of for armhole at the beg of every row each side: 4 sts 1 time, 3 sts 0-0-0-1-2-3 times, 2 sts 0-1-1-3-4-4 times and 1 st 3-3-3-2-3-4 times = 76-78-84-84-84-88 sts. Continue pattern as before with 1 edge st each side. When piece measures 59-60-61-68-69-70 cm cast off the middle 30-24-30-30-30-30 sts for neck and complete each shoulder separately. Cast off 2 sts on neckline on next row = 21-25-25-25-25-27 sts left on shoulder. Cast off when piece measures 61-62-63-70-71-72 cm. RIGHT FRONT PIECE: Worked back and forth on needle. Cast on 41-49-57-57-65-73 sts (includes 5 front band sts towards front edge and 1 edge st at the side) on needle size 4 mm with Karisma. K 1 row from WS and K 1 row from RS. Work next row as follows (from WS): 1 edge st in garter st, P7, * K2, P6 *, repeat from *-* a total of 3-4-5-5-6-7 times, K2, P2, K5. READ ALL OF THE FOLLOWING SECTION BEFORE CONTINUING! PATTERN: Continue as follows (= from RS): 5 front band sts in garter st, 2 stocking sts, 2 garter sts, M.1 (= 8 sts) 3-4-5-5-6-7 times, 7 stocking sts and 1 edge st in garter st. INC FOR SLOPED FRONT: At the same time on 6th row (from cast on row) inc 1 st towards front edge inside 9 sts – SEE INCREASING TIP. Repeat the inc on every 3rd row (i.e. from RS and WS alternately) a total of 48-48-48-56-56-56 times. BUTTONHOLES: At the same time when piece measures approx 2-3 cm (measured in knitting direction) make buttonholes – see above. SIDE DEC AND INC: At the same time when piece measures 6 cm dec at the side as described for back piece. When piece measures 24-24-24-28-28-28 cm inc at the side as described for back piece. ARMHOLE: At the same time when piece measures 42-42-42-48-48-48 cm cast off for armhole at the beg of every row from the side: 4 sts 1 time, 3 sts 0-0-0-1-3-4 times, 2 sts 0-1-1-4-4-5 times and 1 st 3-3-3-2-4-5 times (you dec more sts for armhole on right front piece due to no of sts in cables). After all inc towards front edge and dec for armhole are complete there are 82-88-96-96-96-98 sts on needle. After the last inc piece measures approx 53-53-53-61-61-61 cm. Work next row from mid front as follows: 5 garter sts, K2, * 2 garter sts, K2 tog 3 times *, repeat from *-* a total of 5-5-6-6-6-6 times, then work remaining sts on row as before = 67-73-78-78-78-80 sts. Turn and work the first 35-41-41-41-41-43 sts as before, slip the last 32-32-37-37-37-37 sts on a stitch holder for neck. Cast off to shape the neckline at beg of every row from mid front: 2 sts 2 times and 1 st 4 times = 27-33-33-33-33-35 sts left on shoulder. Continue in pattern as before with 1 edge st each side until piece measures approx 60-61-62-69-70-71 cm. On next row dec 2 sts on each cable = 21-25-25-25-25-27 sts, now cast off all sts. LEFT FRONT PIECE: Worked back and forth on needle. Cast on 71-77-77-89-95-101 sts (includes 5 front band sts towards front edge and 1 edge st at the side) on needle size 4 mm with Karisma. K 1 row from WS and K 1 row from RS. Work next row as follows from WS (from mid front): 5 garter sts, P2, 2 garter sts, * P4, 2 garter sts *, repeat from *-* until 8 sts remain, P7 and 1 edge st in garter st. READ ALL OF THE FOLLOWING SECTION BEFORE CONTINUING! Continue like this with garter st over garter st and stocking st over stocking st. DEC FOR SLOPED FRONT EDGE: At the same time on row 4 dec 1 st towards front edge – SEE DECREASING TIP, repeat the dec on every 4th row a total of 42-42-42-48-48-48 times. SIDE DEC AND INC: At the same time when piece measures 6 cm dec at the side as described for back piece. When piece measures 24-24-24-28-28-28 cm inc at the side as described for back piece. ARMHOLE: At the same time when piece measures 42-42-42-48-48-48 cm cast off for armhole at the side as described for back piece (you have cast off more sts on right front piece). After all dec and inc are complete there are 22-26-26-26-26-28 sts left on needle (i.e. 1 st more than on the other shoulder). Continue until piece measures 61-62-63-70-71-72 cm, cast off with K over K and P over P. SLEEVE: Worked back and forth on needle. Cast on 66-66-66-74-74-82 sts (includes 1 edge st each side) on needle size 4 mm with Karisma. K 1 row from WS and continue as follows: 2 garter sts (first st = edge st), then M.1 to end (last st = edge st). Continue like this until piece measures 14 cm. Work next row from RS as follows: K2, * K1, K2 tog, K2 tog, K1, K2 *, repeat from *-* to end = 50-50-50-56-56-62 sts. Continue in stocking st. AT THE SAME TIME when piece measures 15 cm inc 1 st each side, repeat the inc on every 3-2.5-2-2-1.5-1.5 cm a total of 11-13-16-15-18-17 times = 72-76-82-86-92-96 sts. When piece measures 49-48-47-46-45-44 cm (less for the larger sizes because of longer sleeve cap and wider shoulder) cast off for sleeve cap at the beg of every row each side: 4 sts 1 time, 2 sts 3 times, 1 st 3-5-6-7-9-10 times, then 2 sts each side until piece measures 56 cm. Now cast off 4 sts 1 time each side, and cast off remaining sts. Sleeve measures approx 57 cm for all sizes. ASSEMBLY: Sew right shoulder seam. NECKLINE: Slip the 32-32-37-37-37-37 sts from stitch holder on right front piece back on needle size 4 mm, then pick up approx 20 to 30 sts up to the shoulder and approx 30 to 36 sts on back piece = approx 82 to 103 sts. K 1 row on all sts, cast off with K sts from RS. FURTHER ASSEMBLY: Sew left shoulder seam – sew the extra st towards the garter st along neck on back piece. Set in sleeves, sew sleeve and side seams inside 1 edge st. Sew on buttons. |
||||||||||
Diagram explanations |
||||||||||
|
||||||||||
 |
||||||||||
Have you finished this pattern?Tag your pictures with #dropspattern #cherrywithatwistcardigan or submit them to the #dropsfan gallery. Do you need help with this pattern?You'll find 20 tutorial videos, a Comments/Questions area and more by visiting the pattern on garnstudio.com. © 1982-2026 DROPS Design A/S. We reserve all rights. This document, including all its sub-sections, has copyrights. Read more about what you can do with our patterns at the bottom of each pattern on our site. |
||||||||||


With over 40 years in knitting and crochet design, DROPS Design offers one of the most extensive collections of free patterns on the internet - translated to 17 languages. As of today we count 324 catalogues and 12290 patterns translated into English (UK/cm). 12290
We work hard to bring you the best knitting and crochet have to offer, inspiration and advice as well as great quality yarns at incredible prices! Would you like to use our patterns for other than personal use? You can read what you are allowed to do in the Copyright text at the bottom of all our patterns. Happy crafting!
Post a comment to pattern DROPS 126-6
We would love to hear what you have to say about this pattern!
If you want to leave a question, please make sure you select the correct category in the form below, to speed up the answering process. Required fields are marked *.