
Popular categories
Looking for a yarn?


Comments / Questions (137)
Danielle wrote:
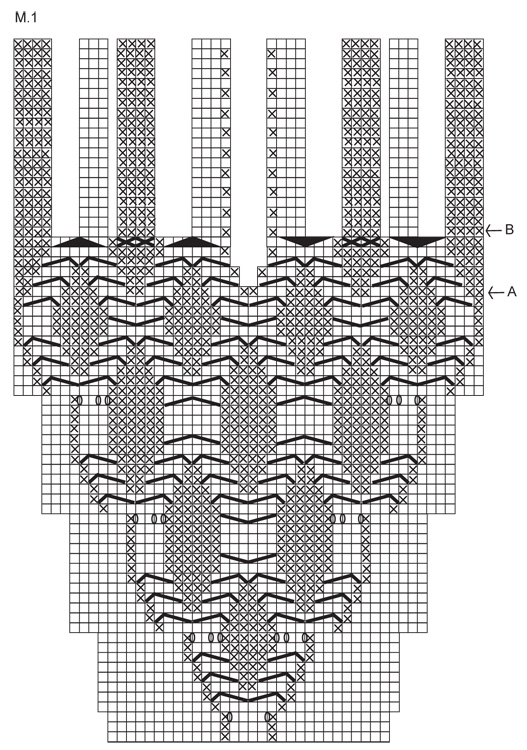
Bonjour, je suis à tricoter la section B du M1 (devant gauche). Sur le graphique on montre qu'il y a au total 8 mailles de disparues. Comment sont-elles disparues puisque je ne comprends pas ce qu'il faut faire. Est-ce que l'on peut m'aider, s.v.p. Merci Danielle
09.02.2012 - 03:36Drops Design wrote:
Hi Nikki It's 2 sts 5 times each side.
18.10.2011 - 23:38
![]() Nikki Cruden wrote:
Nikki Cruden wrote:
Hei! I am a bit confused regarding the sleeve cap shaping on this pattern. After you cast off 4 stitches each side, it then says to cast off 2 stitches each side at the beginning of every row, 5 times. Do you mean that I should cast off 2 stitches at the BEGINNING of each row for 10 rows, or 2 stitches EACH END of the next five rows. If you could clarify this for me please (with stitch counts if possible for size L) I would appreciate it. Love the pattern so far! Thanks, Mvh, Nikki
18.10.2011 - 22:43
![]() Clarice39 wrote:
Clarice39 wrote:
Gerade fertig geworden, im Originalgarn in hellpetrol. Einfach zu stricken, der Ausschnitt könnte größer sein.
25.09.2011 - 06:35
![]() DROPS Design NL wrote:
DROPS Design NL wrote:
Hoi. De teltekening geeft het patroon weer zoals het wordt op de goede kant, maar zowel de heengaande als de teruggaande nld is weergegeven. Dus eerste rij is goede kant, tweede verkeerde kant enz. Rita: Denkt u een fout te hebben gevonden, dan graag doorgeven waar u dat precies denkt dat hij staat. Alvast bedankt en veel breiplezier. Gr. Tine
07.03.2011 - 10:30
![]() Rita wrote:
Rita wrote:
Opgelet ik heb dit patroonookgemaakt er zit een fout in het telpatroon
06.03.2011 - 11:32
![]() Conny wrote:
Conny wrote:
Er staat dat de telpatronen de goede kant van het werk weergeven. Betekent dat dat alleen de heengaande (rechte) naalden zijn weergegeven? oftewel: wordt de eerste meerdering gebreid in de 3e naald totaal of in de derde HEENGAANDe naald, en dus in totaal de 5e naald?
05.03.2011 - 15:39Françoise wrote:
Je l'ai réalisé en Baby Mérino colour 25 en suivant les explications il est splendide, c'était ma 1ère torsade complexe... MERCI DROPS
18.09.2010 - 16:04
![]() DROPS Design NL wrote:
DROPS Design NL wrote:
Er staat dat u bij beide mouwen M.2 moet breien? En bij beide 1 verticale herhaling van M.2. Ik zie hier geen fout in dit patroon? Gr. Tine
16.03.2010 - 12:13
![]() Magda wrote:
Magda wrote:
Patroon 114- Bij de 3/4 mouw een keer M1 en bij de lange mouw twee keer M2 breien? Zie onduidelijkheid in patroon!
14.03.2010 - 16:36
|
||||||||||||||||||||||||||||||||||
Viking Knots#vikingknotssweater |
||||||||||||||||||||||||||||||||||
 |
 |
|||||||||||||||||||||||||||||||||
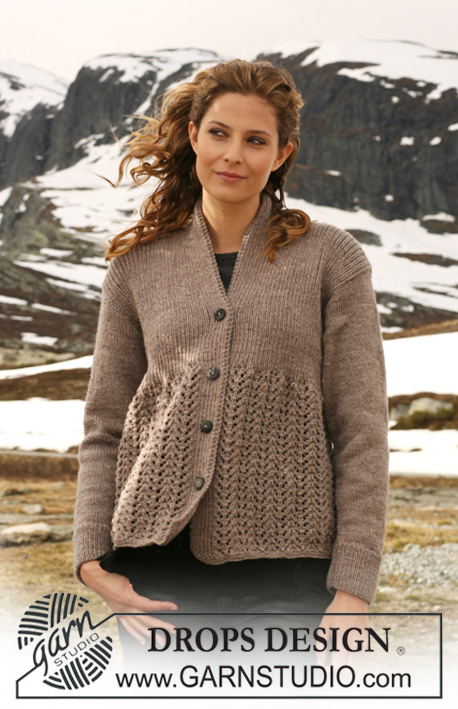
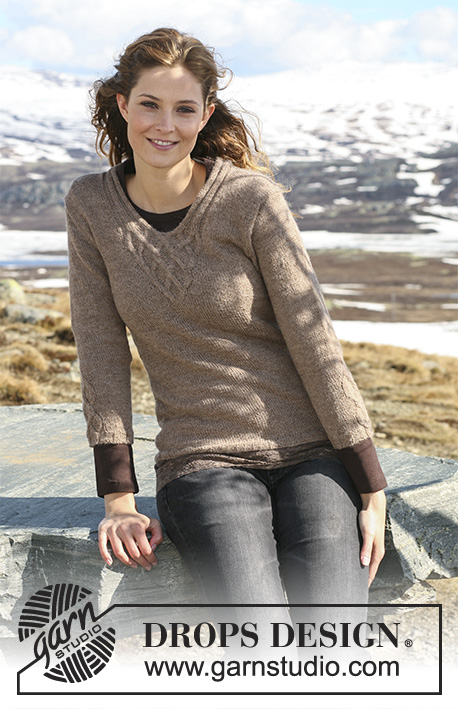
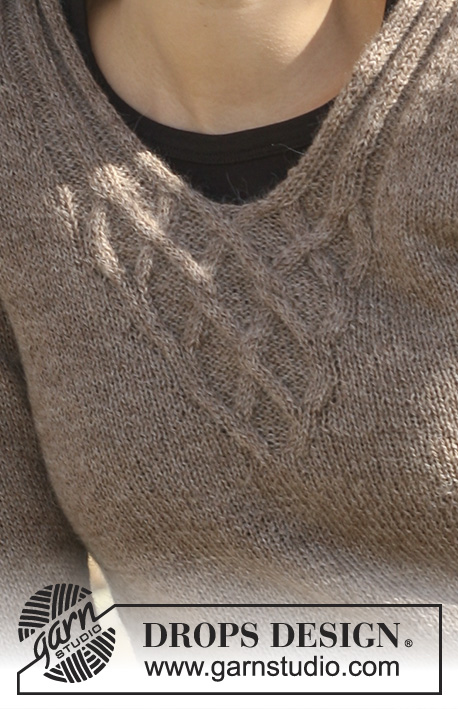
DROPS jumper with cables in ”Alpaca” with 3/4 sleeves or long sleeves. Size S - XXXL.
DROPS 114-8 |
||||||||||||||||||||||||||||||||||
|
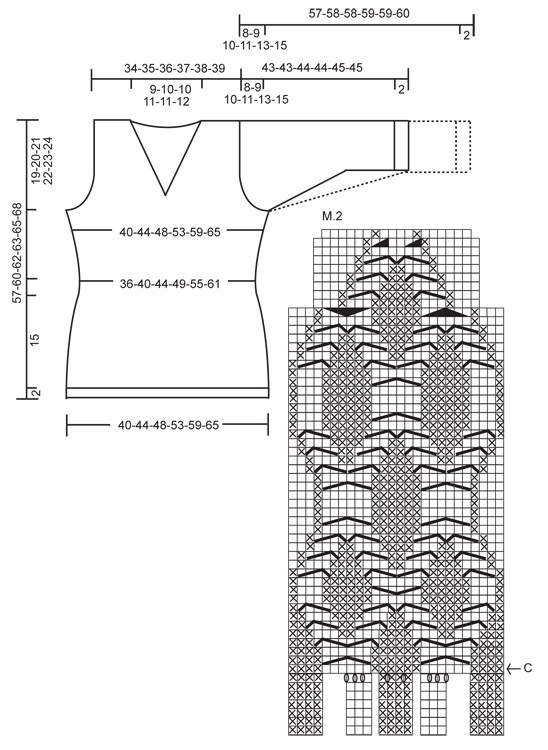
PATTERN: See diagram M.1 and M.2. Diagram shows the pattern from RS. -------------------------------------------------------- BACK PIECE: Worked back and forth on needle. Cast on 107-121-135-142-163-177 sts (includes 1 edge st each side) on needle size 2.5 mm with Alpaca. Work rib as follows (first row = RS): 1 edge st, * K3, P4 *, repeat from *-* and finish with 1 edge st. When rib measures 2 cm K 1 row from RS, AT THE SAME TIME dec 9-13-17-12-19-19 sts evenly = 98-108-118-130-144-158 sts. Change to needle size 3 mm. P 1 row from WS and continue in stocking st with 1 edge st each side. When piece measures 9 cm dec 1 st each side, repeat the dec on every 2 cm a total of 5 times = 88-98-108-120-134-148 sts. When piece measures 20-21-21-20-20-21 cm inc 1 st each side, repeat the inc on every 3-3-3.5-4-4.5-4.5 cm a total of 5 times = 98-108-118-130-144-158 sts. When piece measures 38-40-41-41-42-44 cm cast off 4 sts each side for armhole and cast off for armhole each side on every other row: 4 sts 0-0-0-1-1-2 times, 2 sts 2-3-5-6-8-9 times and 1 st 0-2-2-1-2-2 times = 82-84-86-88-92-94 sts. Continue in stocking st on all sts. When piece measures 54-57-59-60-62-65 cm cast off the middle 32-34-34-36-38-40 sts for neck and complete each shoulder separately. Cast off 1 st on neckline on every other row 2 times = 23-23-24-24-25-25 sts left on shoulder. Cast off loosely when piece measures 57-60-62-63-65-68 cm. FRONT PIECE: Cast on and work like back piece until piece measures 20-21-21-20-20-21 cm. On next row inc 1 st each side, repeat the inc on every 3-3-3.5-4-4.5-4.5 cm a total of 5 times = 98-108-118-130-144-158 sts. Continue in stocking st with 1 edge st each until piece measures 33-34-35-36-39-40 cm. Now continue as follows (from RS): 1 edge st, 33-38-43-49-56-63 stocking sts, M.1 (= 30 sts), 33-38-43-49-56-63 stocking sts and 1 edge st. AT THE SAME TIME when piece measures 38-40-41-41-42-44 cm cast off for armhole each side as described for back piece. Continue up to arrow-A in M.1. On next row from RS cast off for neck as follows: work the first 24 sts of M.1, cast off 2 sts (= mid front) and work the remaining 24 sts of M.1 (work remaining sts in stocking st as before). Insert a marker in piece, and now complete each side separately. LEFT FRONT PIECE: Continue back and forth on needle in stocking st and M.1 as before – remember to cast off for armhole at the side! AT THE SAME TIME on next row from mid front dec 1 st for neck. Continue to arrow-B in diagram for M.1. Now continue with 15 sts rib as shown in M.1, work remaining sts in stocking st as before. AT THE SAME TIME dec 1 st for neck inside the 15 sts in rib, and repeat the dec on every 4th row 3-4-4-5-6-7 times = 38-38-39-39-40-40 sts. Continue until piece measures 11-12-12-13-13-14 cm from marker (adjust to length of armhole on back piece). Now cast off 23-23-24-24-25-25 sts from shoulder towards neckline = 15 sts left on needle. Continue back and forth on needle in rib as before on these 15 sts. Cast off loosely with K over K and P over P after approx 7-7-7-8-8-8 cm (measured from shoulder). RIGHT FRONT PIECE: Like left front piece but mirrored. ASSEMBLY: Sew shoulder seams. 3/4 SLEEVES: Worked back and forth on needle. LEFT SLEEVE: Cast on 65-65-72-72-72-79 sts on needle size 2.5 mm with Alpaca. Work rib as follows (first row = RS): 1 edge st, * P4, K3 *, repeat from *-* on 21-21-28-28-28-28 sts, M.2 (= 18 sts), K3, *P4, K3 *, repeat from *-* on the next 21-21-21-21-21-28 sts and 1 edge st. Continue like this up to Arrow-C in M.2. There are now 73-73-80-80-80-87 sts on needle. Change to needle size 3 mm. Continue as follows (from RS): 1 edge st, 21-21-28-28-28-28 stocking sts, M.2 (= 26 sts), 24-24-24-24-24-31 stocking sts and 1 edge st. Work 1 vertical repeat of M.2 like this = 65-65-72-72-72-79 sts on needle. Insert a marker, and now measure piece from here. Continue in stocking st with 1 edge st each side. AT THE SAME TIME when piece measures approx 2 cm from marker inc 1 st each side, repeat the inc on every 1.5-1-1-0.5-0.5-0.5 cm a total of 8-11-11-14-17-17 times = 81-87-94-100-106-113 sts. When piece measures 17-16-16-15-14-12 cm from marker (less for the larger sizes because of longer sleeve cap and wider shoulder) cast off 4 sts each side. Cast off for sleeve cap at the beg of every row: 2 sts 4-5-5-5-4-4 times each side and 1 st 3-3-5-5-11-14 times each side, then 2 sts each side until piece measures 24-24-25-25-26-26 cm, now cast off 4 sts each side 1 time, and cast off remaining sts. Piece measures a total of approx 43-43-44-44-45-45 cm. RIGHT SLEEVE: Cast on 65-65-72-72-72-79 sts on needle size 2.5 mm with Alpaca. Work rib as follows (first row = from RS): 1 edge st, * K3, P4 *, repeat from *-* on 21-21-21-21-21-28 sts, K3, M.2 (= 18 sts), * K3, P4 *, repeat from *-* on the next 21-21-28-28-28-28 sts and 1 edge st. Continue like this up to Arrow-C in M.2. There are now 73-73-80-80-80-87 sts on needle. Change to needle size 3 mm and continue as follows (from RS): 1 edge st, 24-24-24-24-24-31 stocking sts, M.2 (= 26 sts), 21-21-28-28-28-28 stocking sts and 1 edge st. Work 1 vertical repeat of M.2 like this = 65-65-72-72-72-79 sts on needle. Insert a marker, and now measure piece from here. Continue as described for Left Sleeve. LONG SLEEVES: Worked back and forth on needle. LEFT SLEEVE: Cast on 58-58-65-65-65-72 sts on needle size 2.5 mm with Alpaca. Work rib as follows (first row = RS): 1 edge st, * P4, K3 *, repeat from *-* on 21-21-21-21-21-28 sts, M.2 (= 18 sts), K3, * P4, K3 *, repeat from *-* on the next 14-14-21-21-21-21 sts and 1 edge st. Continue like this up to Arrow-C in M.2. There are now 66-66-73-73-73-80 sts on needle. Change to needle size 3 mm and continue as follows (from RS): 1 edge st, 21-21-21-21-21-28 stocking sts, M.2 (= 26 sts), 17-17-24-24-24-24 stocking sts and 1 edge st. Work 1 vertical repeat of M.2 like this = 58-58-65-65-65-72 sts on needle. Insert a marker, and now measure piece from here. Continue in stocking st with 1 edge st each side. AT THE SAME TIME when piece measures approx 1-2-2-1-1-1 cm from marker inc 1 st each side, repeat the inc on every 2.5-1.5-1.5-1.5-1-1 cm a total of 12-15-15-18-21-21 times = 82-88-95-101-107-114 sts. When piece measures 31-31-30-30-28-27 cm from marker (less for the larger sizes because of longer sleeve cap and wider shoulder) cast off for 4 sts each side for sleeve cap and cast off for sleeve cap at the beg of every row: 2 sts 4-5-5-5-4-4 times each side and 1 st 3-3-5-5-11-14 times each side, then cast off 2 sts each side until piece measures 38-39-39-40-40-41 cm, now cast off 4 sts each side 1 time, and cast off remaining sts. Piece measures a total of approx 57-58-58-59-59-60 cm. RIGHT SLEEVE: Cast on 58-58-65-65-65-72 sts on needle size 2.5 mm with Alpaca. Work rib as follows (first row = RS): 1 edge st, * K3, P4 *, repeat from *-* on 14-14-21-21-21-21 sts, K3, M.2 (= 18 sts), * K3, P4 *, repeat from *-* on the next 21-21-21-21-21-28 sts and 1 edge st. Continue like this up to Arrow-C in M.2. There are now 66-66-73-73-73-80 sts on needle. Change to needle size 3 mm and continue as follows (from RS): 1 edge st, 17-17-24-24-24-24 stocking sts, M.2 (= 26 sts), 21-21-21-21-21-28 stocking sts and 1 edge st. Work 1 vertical repeat of M.2 like this = 58-58-65-65-65-72 sts on needle. Insert a marker, and now measure piece from here. Continue as described for Left Sleeve. ASSEMBLY: Sew shoulder seams. Set in sleeves. Sew sleeve and side seams inside 1 edge st. Sew rib on neck tog mid back and sew to back piece. |
||||||||||||||||||||||||||||||||||
Diagram explanations |
||||||||||||||||||||||||||||||||||
|
||||||||||||||||||||||||||||||||||
 |
||||||||||||||||||||||||||||||||||
 |
||||||||||||||||||||||||||||||||||
Have you finished this pattern?Tag your pictures with #dropspattern #vikingknotssweater or submit them to the #dropsfan gallery. Do you need help with this pattern?You'll find 18 tutorial videos, a Comments/Questions area and more by visiting the pattern on garnstudio.com. © 1982-2026 DROPS Design A/S. We reserve all rights. This document, including all its sub-sections, has copyrights. Read more about what you can do with our patterns at the bottom of each pattern on our site. |
||||||||||||||||||||||||||||||||||


With over 40 years in knitting and crochet design, DROPS Design offers one of the most extensive collections of free patterns on the internet - translated to 17 languages. As of today we count 324 catalogues and 12290 patterns translated into English (UK/cm). 12290
We work hard to bring you the best knitting and crochet have to offer, inspiration and advice as well as great quality yarns at incredible prices! Would you like to use our patterns for other than personal use? You can read what you are allowed to do in the Copyright text at the bottom of all our patterns. Happy crafting!
Post a comment to pattern DROPS 114-8
We would love to hear what you have to say about this pattern!
If you want to leave a question, please make sure you select the correct category in the form below, to speed up the answering process. Required fields are marked *.